| |
 12-24-2009, 03:49 PM
| #41 |
| Newbie Join Date: Oct 2008 Location: SALT ROCK,WV
Posts: 44
|
Heres a little tip for your short dogbone problem, insteed of adding more o-rings get part # DTXC7475 this is a duratrax part# but they fit perfectly with no slop in the cc01 with a lift and steering mods because their a longer,also to get full travel out of your lift the c-hubs need to be modded aswell because the dog bones acually hit the top of the hole they pass through on the c-hub at full droop.If you remove the front shocks and let the suspenion hang you will understand what im trying to explain.Hope this helps because i have been borrowing ideas for my cc01s since i found this sight. AWSOME BUILD! i love the looks of rear suspenion. super clean. |

|  |
| Sponsored Links | |
| | |
|
12-24-2009, 04:02 PM
| #42 |
| Newbie Join Date: Oct 2008 Location: SALT ROCK,WV
Posts: 44
|
By the way i have a possible connection with a cnc machine and the owner seems to be very interested in these cc01 rigs and after the new year he may help us cc01 owners out with a steel gear cover for strength and weight up front, what do you think?
|
|
| |
|
12-27-2009, 02:06 AM
| #43 |
| Pebble Pounder Join Date: Nov 2009 Location: Monterey Bay, CA
Posts: 149
|
where did you get the GPM alloy steering pieces?
|
|
| |
|
12-27-2009, 03:36 PM
| #44 | |
| Rock Crawler Join Date: Dec 2007 Location: St. Cloud
Posts: 632
| Quote:
See the sticky at the top of the page CC-01/XC owners.... Please read. | |
|
| |
|
12-27-2009, 05:40 PM
| #45 |
| Quarry Creeper Join Date: Aug 2007 Location: Temple
Posts: 326
|
do you by chance have the measurments for the rear shock brackets?
|
|
| |
|
12-29-2009, 12:19 PM
| #46 | ||||
| RCC Addict  Join Date: Mar 2007 Location: Penngrove
Posts: 1,809
| Quote:
Quote:
Quote:
Quote:
anyway, here is a teased of the tube front bumper: 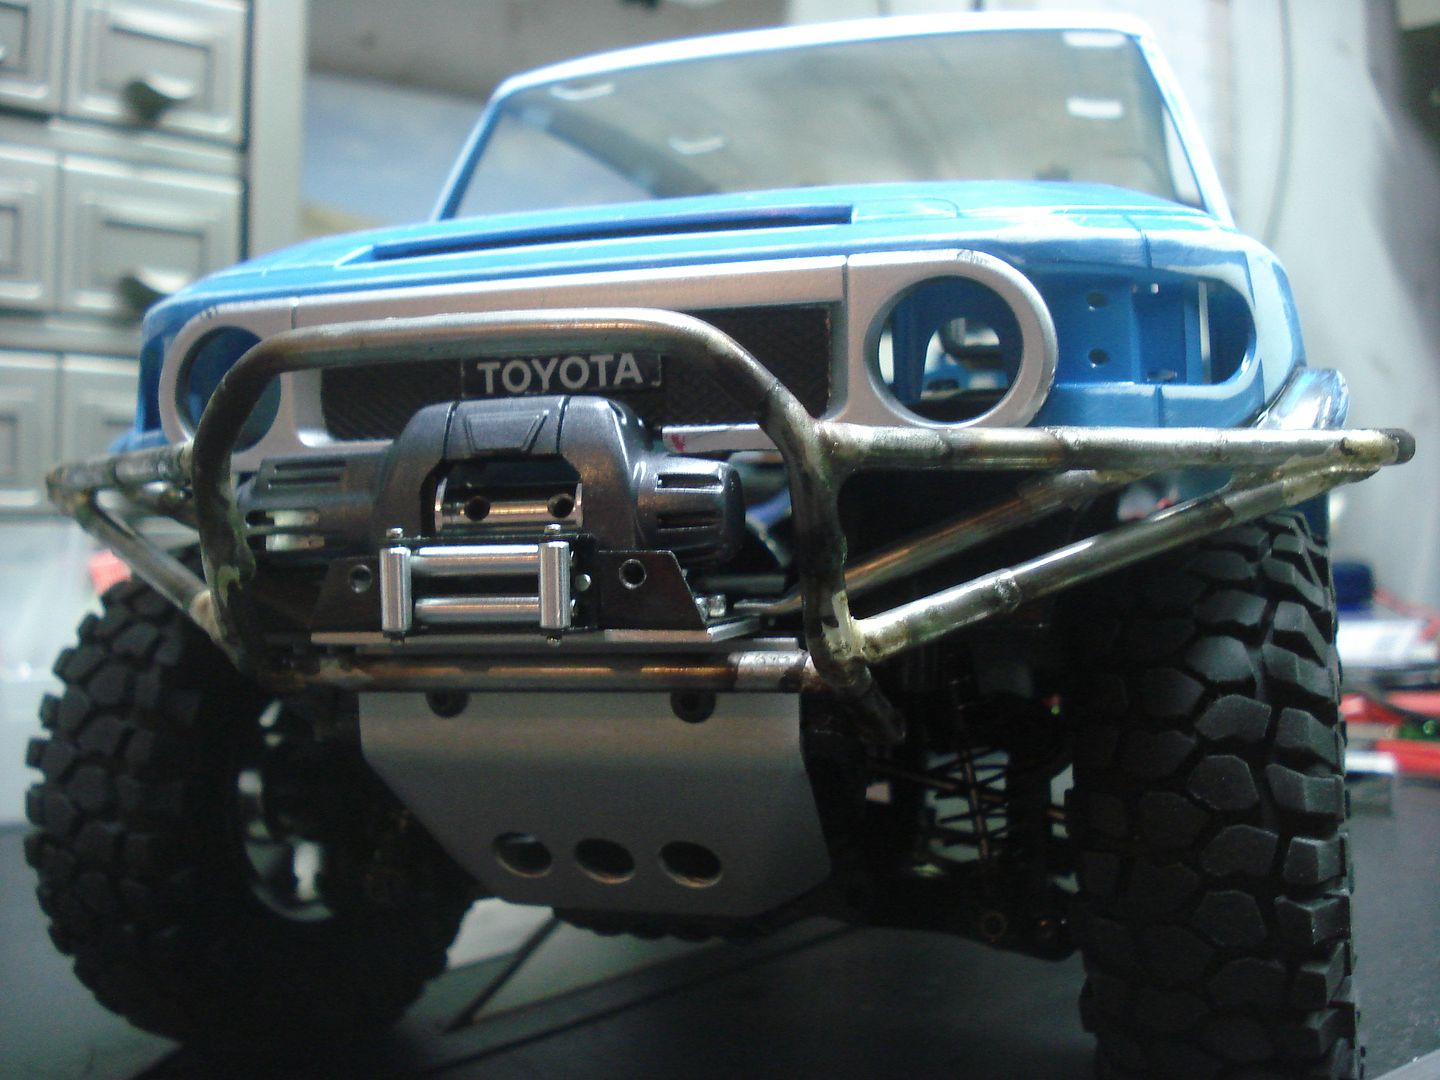 | ||||
|
| |
|
12-29-2009, 12:22 PM
| #47 |
| RCC Addict Join Date: Mar 2007 Location: Penngrove
Posts: 1,809
|
oh yeah, also spent an hour last night sanding the ugly blue paint off the body, I woke up with smurf boogers this morning  |
|
| |
|
12-29-2009, 06:13 PM
| #48 |
| Quarry Creeper Join Date: Aug 2007 Location: Temple
Posts: 326
|
nice! paint colored buggers seem to happen quite a bit in this hobby lol and yes that would help greatly |
|
| |
|
12-30-2009, 09:47 PM
| #49 |
| RCC Addict Join Date: Mar 2007 Location: Penngrove
Posts: 1,809
|
here is a shot from the back side of the bumper, there are four mounting brackets, two go into the side of the chassis down low and the the other two go in the front two holes 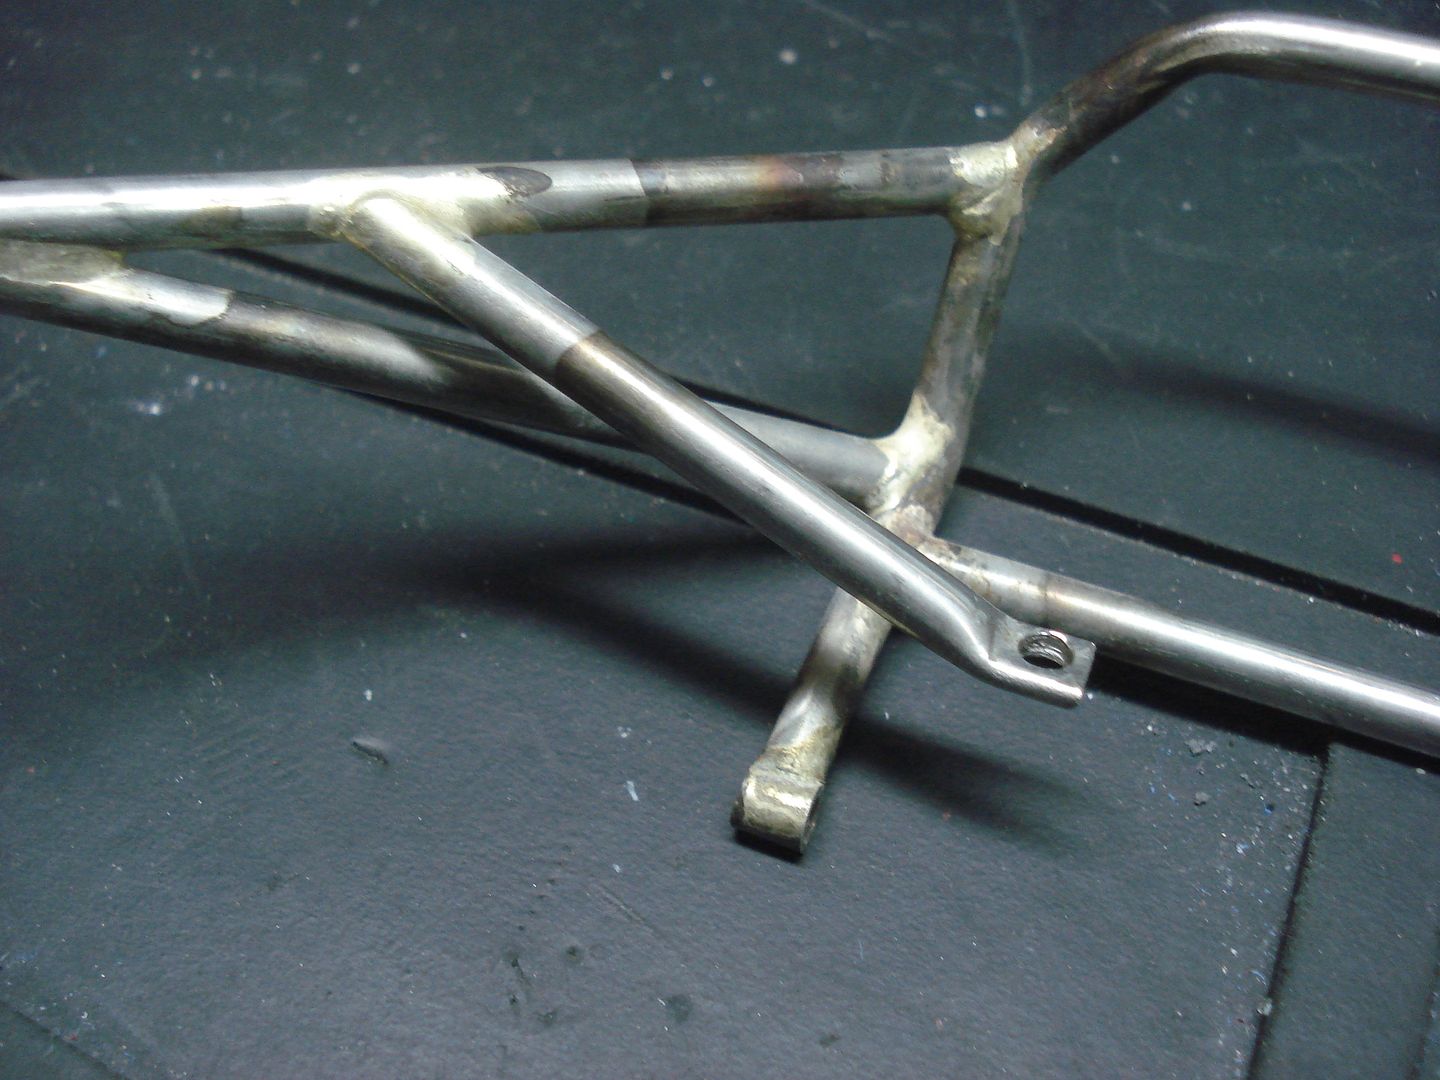 also got some simple sliders fab'd up today, they use stock mounting holes 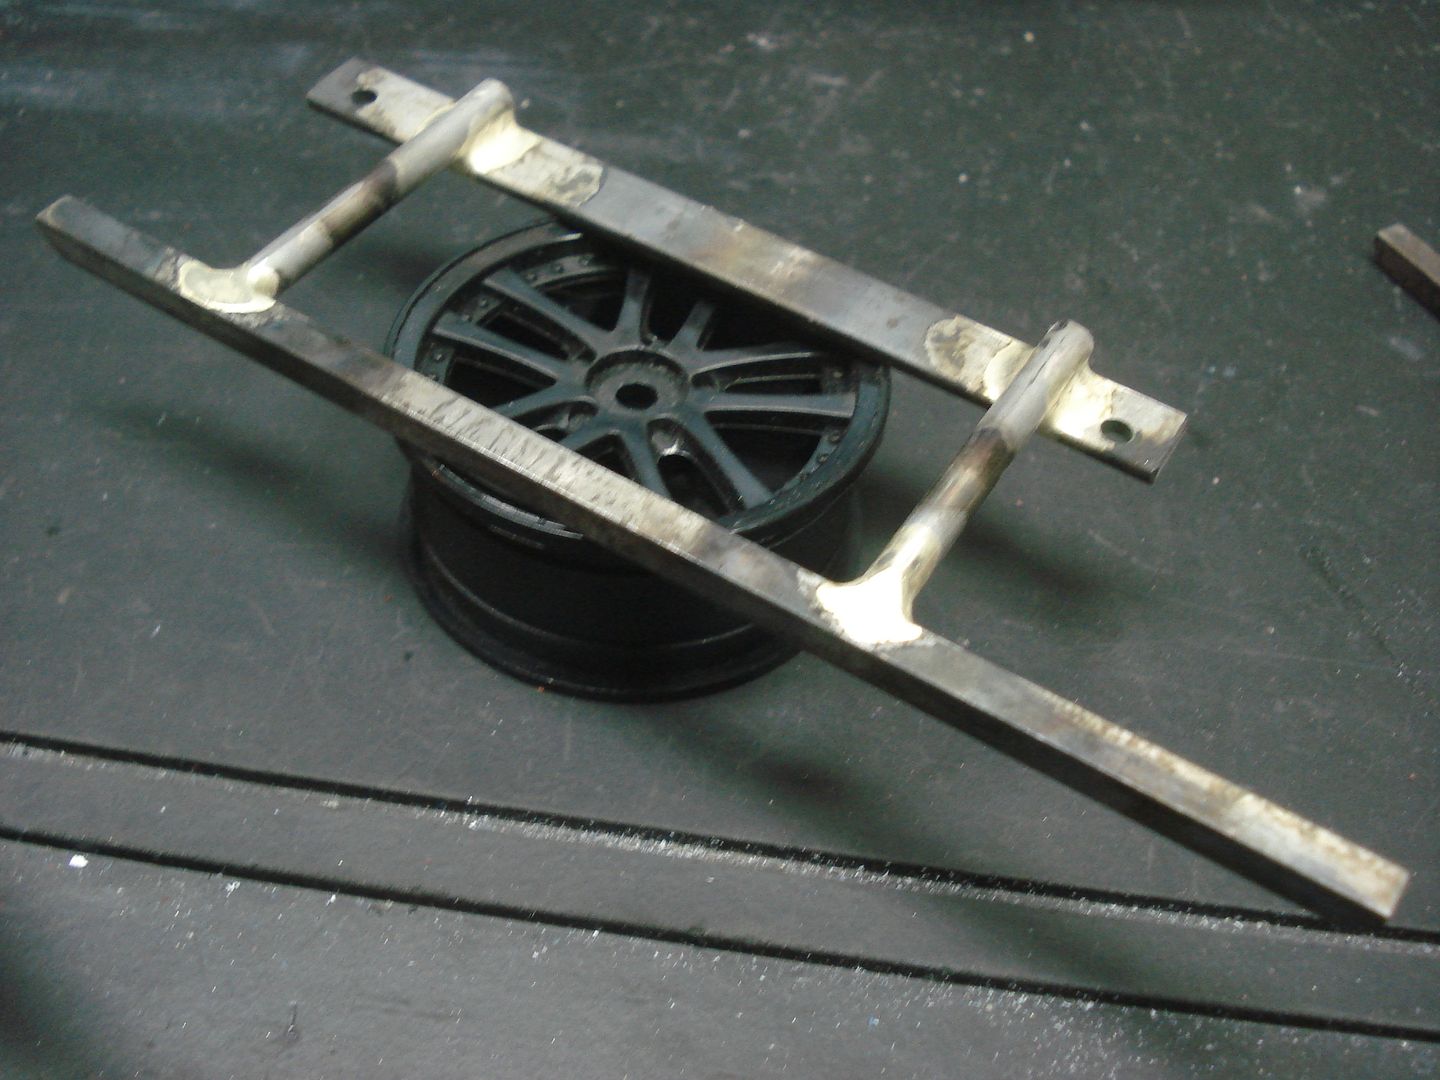 |
|
| |
|
12-30-2009, 09:59 PM
| #50 |
| Rock Crawler  Join Date: Feb 2007 Location: Peoria, Arizona
Posts: 919
|
Nice looking parts!
|
|
| |
|
12-30-2009, 10:30 PM
| #51 |
| Rock Crawler Join Date: Dec 2007 Location: St. Cloud
Posts: 632
|
Nice tube work. Should look good mounted up.
|
|
| |
|
12-31-2009, 07:36 PM
| #52 |
| RCC Addict Join Date: Mar 2007 Location: Penngrove
Posts: 1,809
|
rear bumper  |
|
| |
|
01-03-2010, 11:14 AM
| #53 |
| Quarry Creeper Join Date: Aug 2007 Location: Temple
Posts: 326
|
looks dead sexy! great job
|
|
| |
|
03-28-2010, 11:04 PM
| #54 |
| RCC Addict Join Date: Mar 2007 Location: Penngrove
Posts: 1,809
|
Well I finally got motivated enough to throw some paint on the old FJ body, at first I wasn't sure what color to paint it but ended up using Mica Silver: 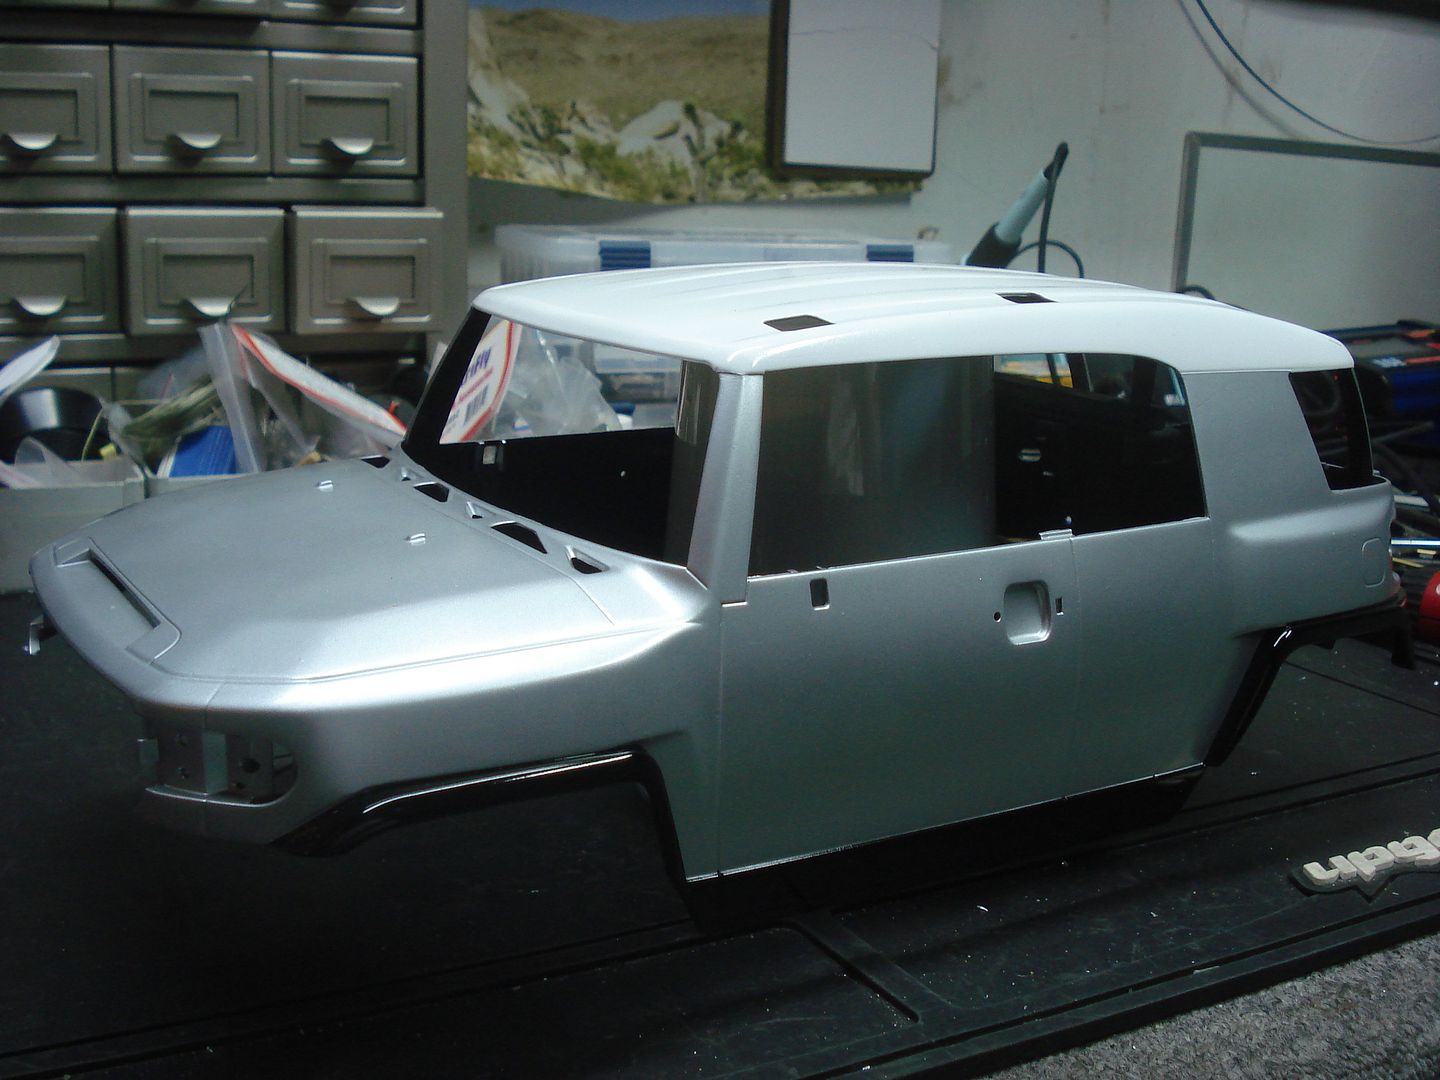 I think it turned out OK, just can't wait to get it all put back together 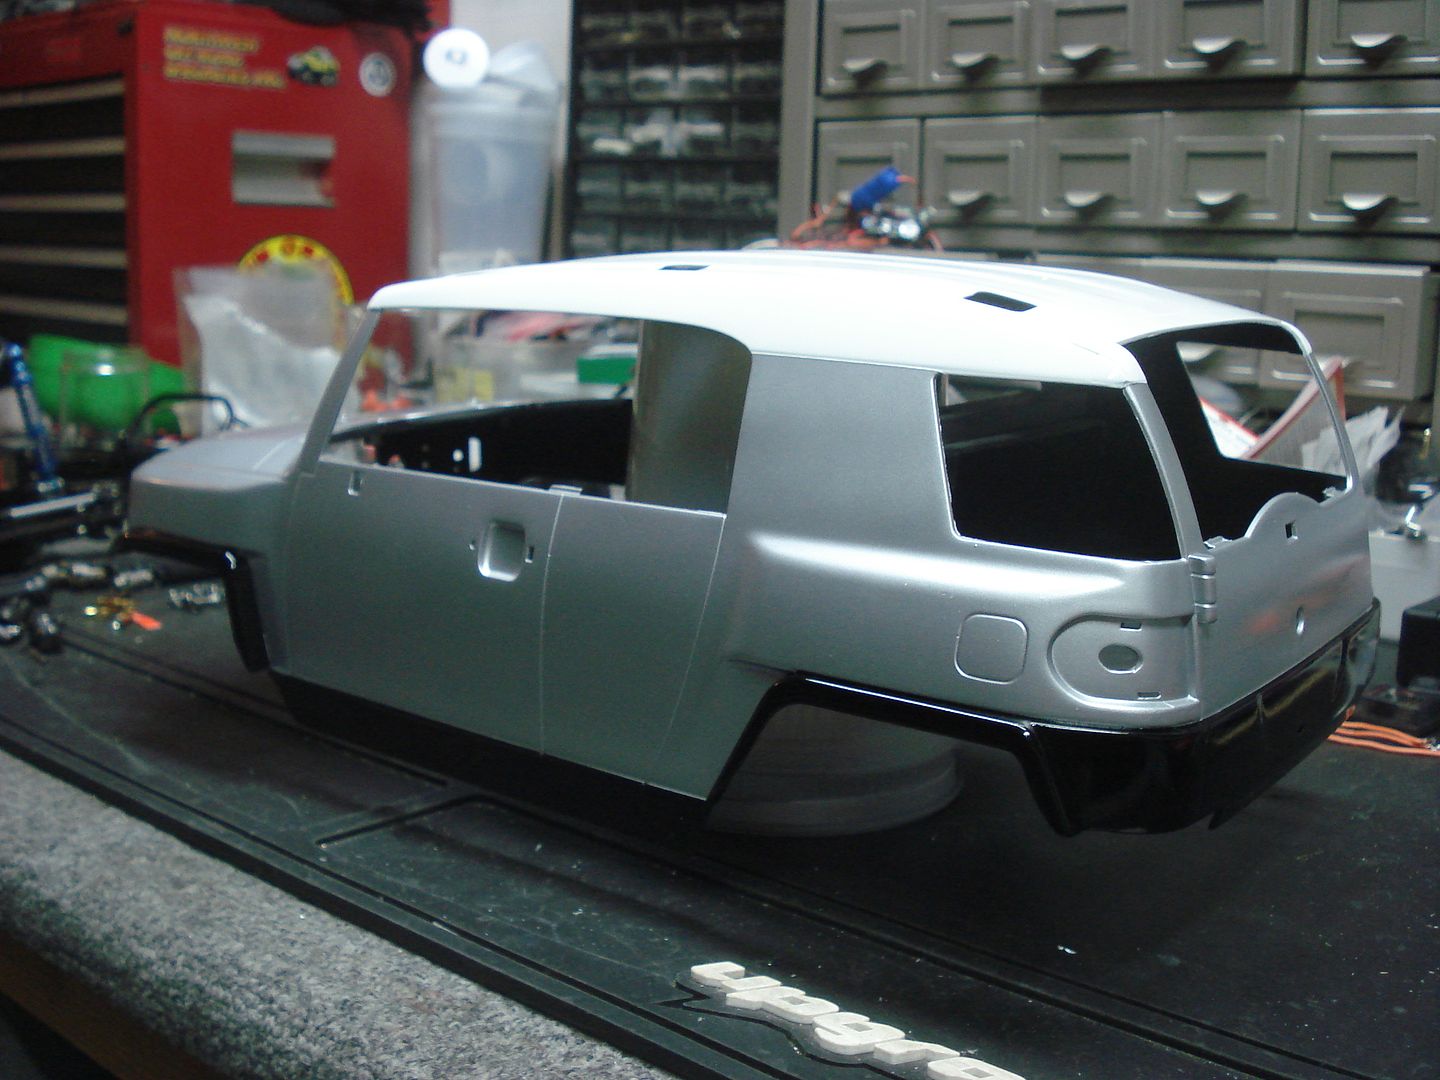 Also some paint on the bumpers and sliders 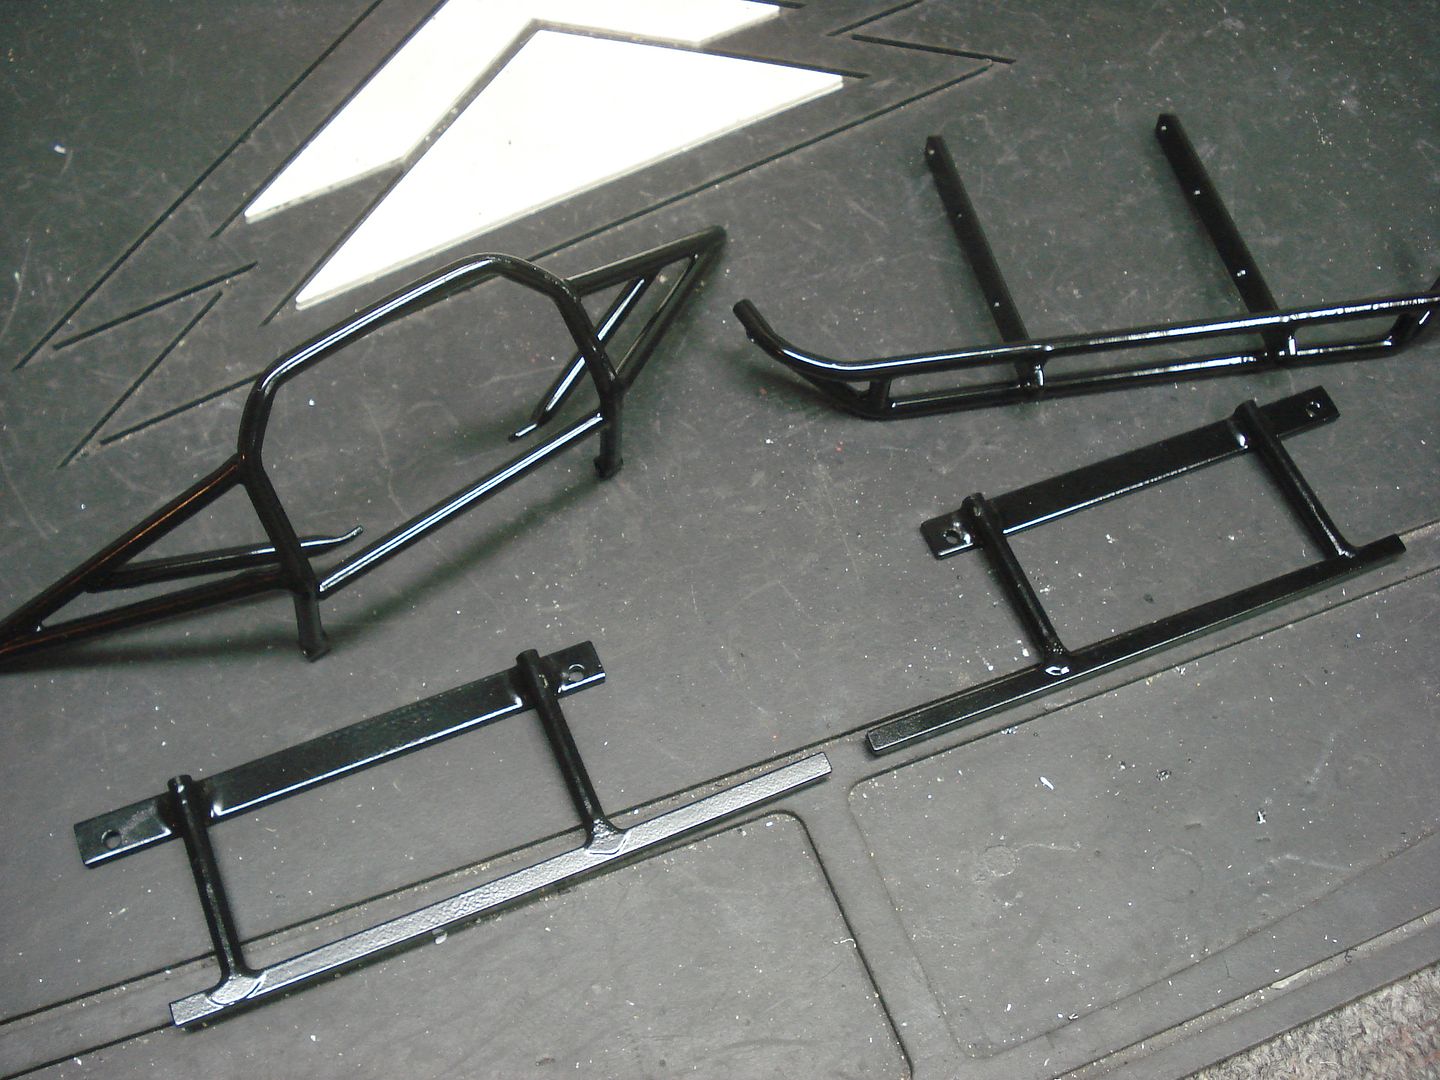 |
|
| |
|
03-31-2010, 05:47 PM
| #55 |
| Quarry Creeper Join Date: Aug 2007 Location: Go Broncos!!!!!!
Posts: 425
|
WOW |
|
| |
|
03-31-2010, 06:46 PM
| #56 |
| Quarry Creeper Join Date: Jan 2008 Location: san jose
Posts: 293
|
damn nice rig. what kinda tubes did u use?
|
|
| |
|
03-31-2010, 07:18 PM
| #57 | ||
| RCC Addict Join Date: Mar 2007 Location: Penngrove
Posts: 1,809
| Quote:
Quote:
http://www.mcmaster.com/itm/find.asp...RCntxt=OrdHist super strong stuff, way better than brake line | ||
|
| |
|
04-04-2010, 01:11 AM
| #58 |
| RCC Addict Join Date: Mar 2007 Location: Penngrove
Posts: 1,809
|
Well it's finally time to put this build to bed. The final stage started today when I installed a 80t Integy hand wound in place of the 55t that was in there. Then I put in a new Spektrum Rx and quickly rearranged the electronics:  I also installed Losi MRC aluminum shocks all around and bolted up the bumpers and sliders, I made the little bumper skid from a Proline western bumper: 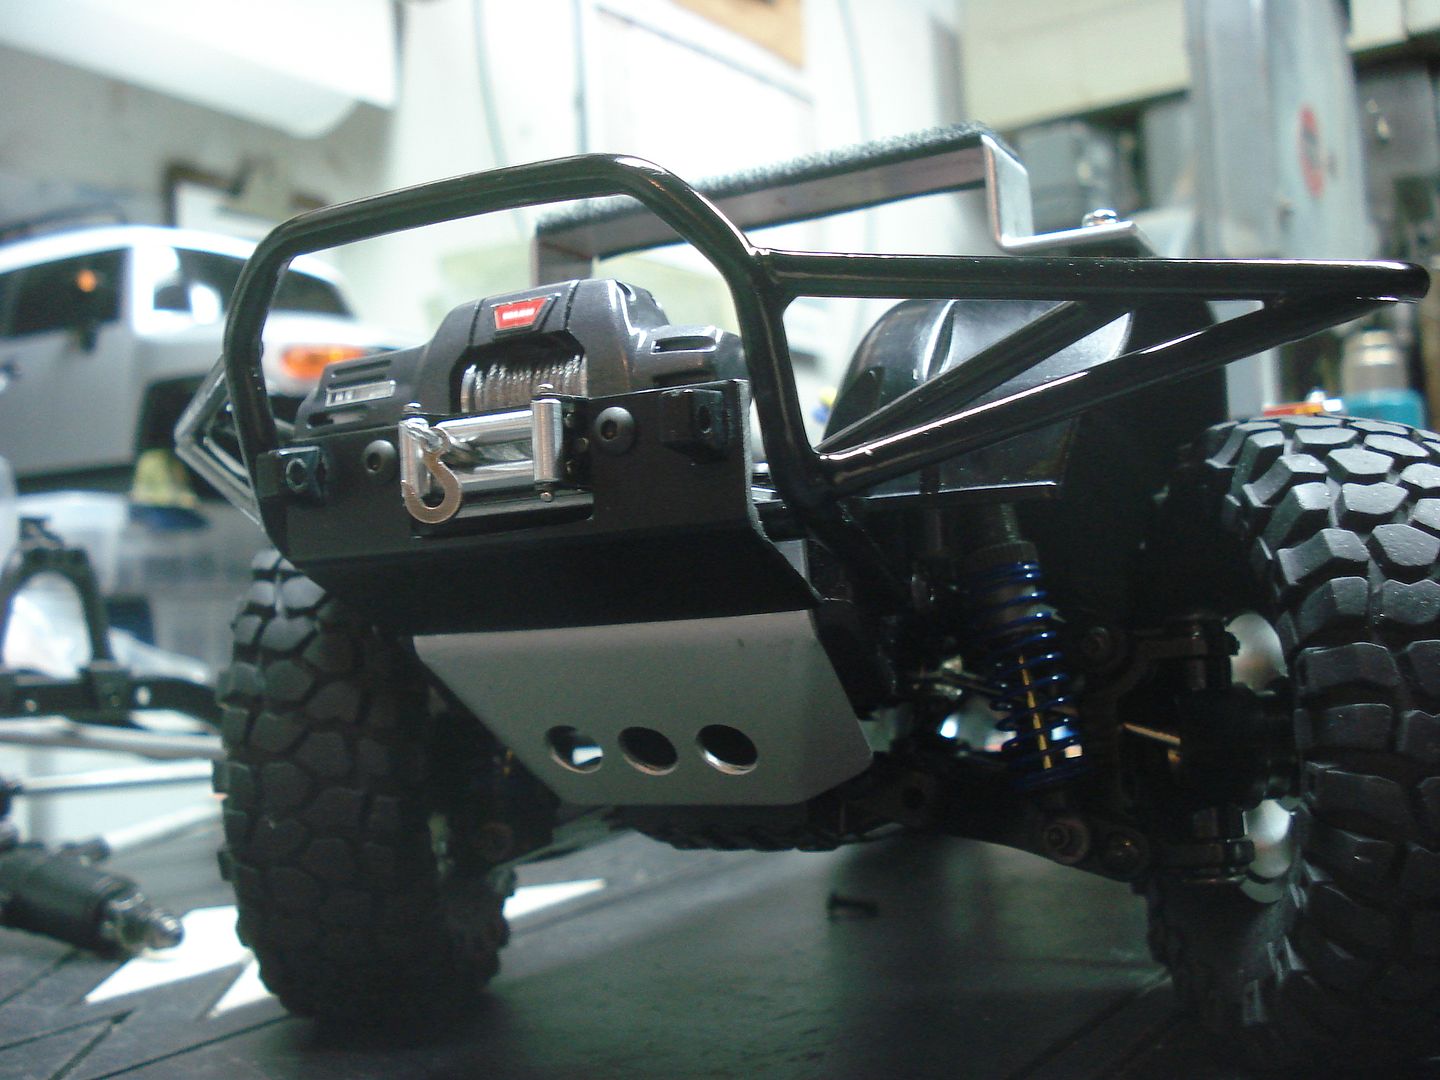 Lastly the grill, mirrors and door handles all got a coat of semi-gloss black paint: 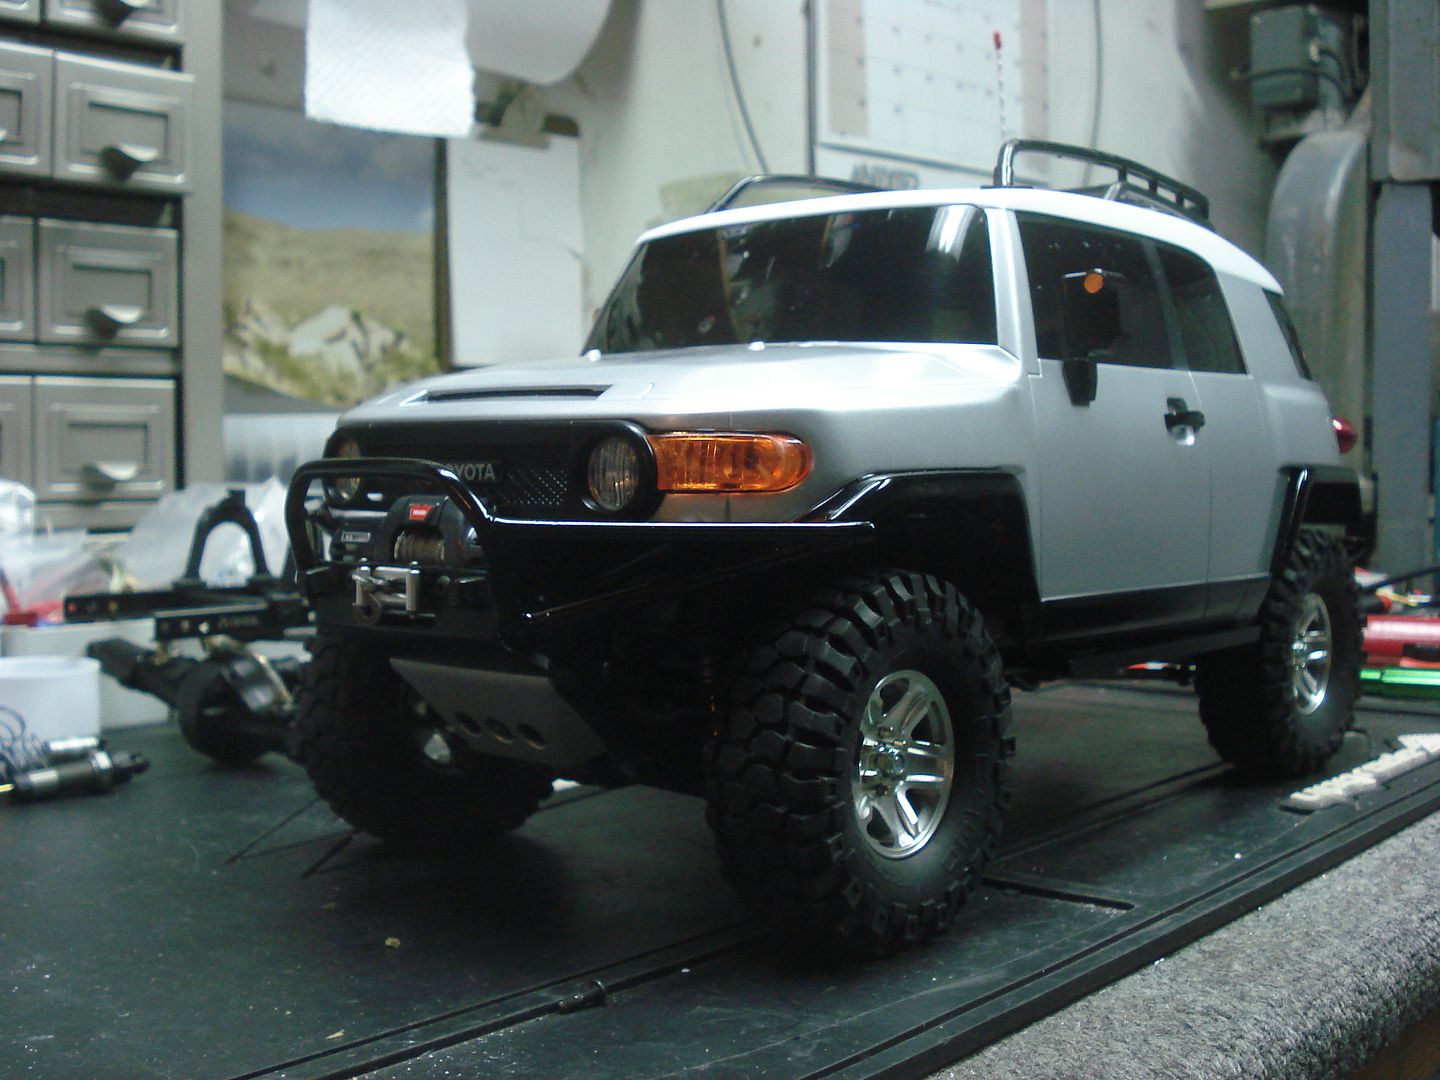 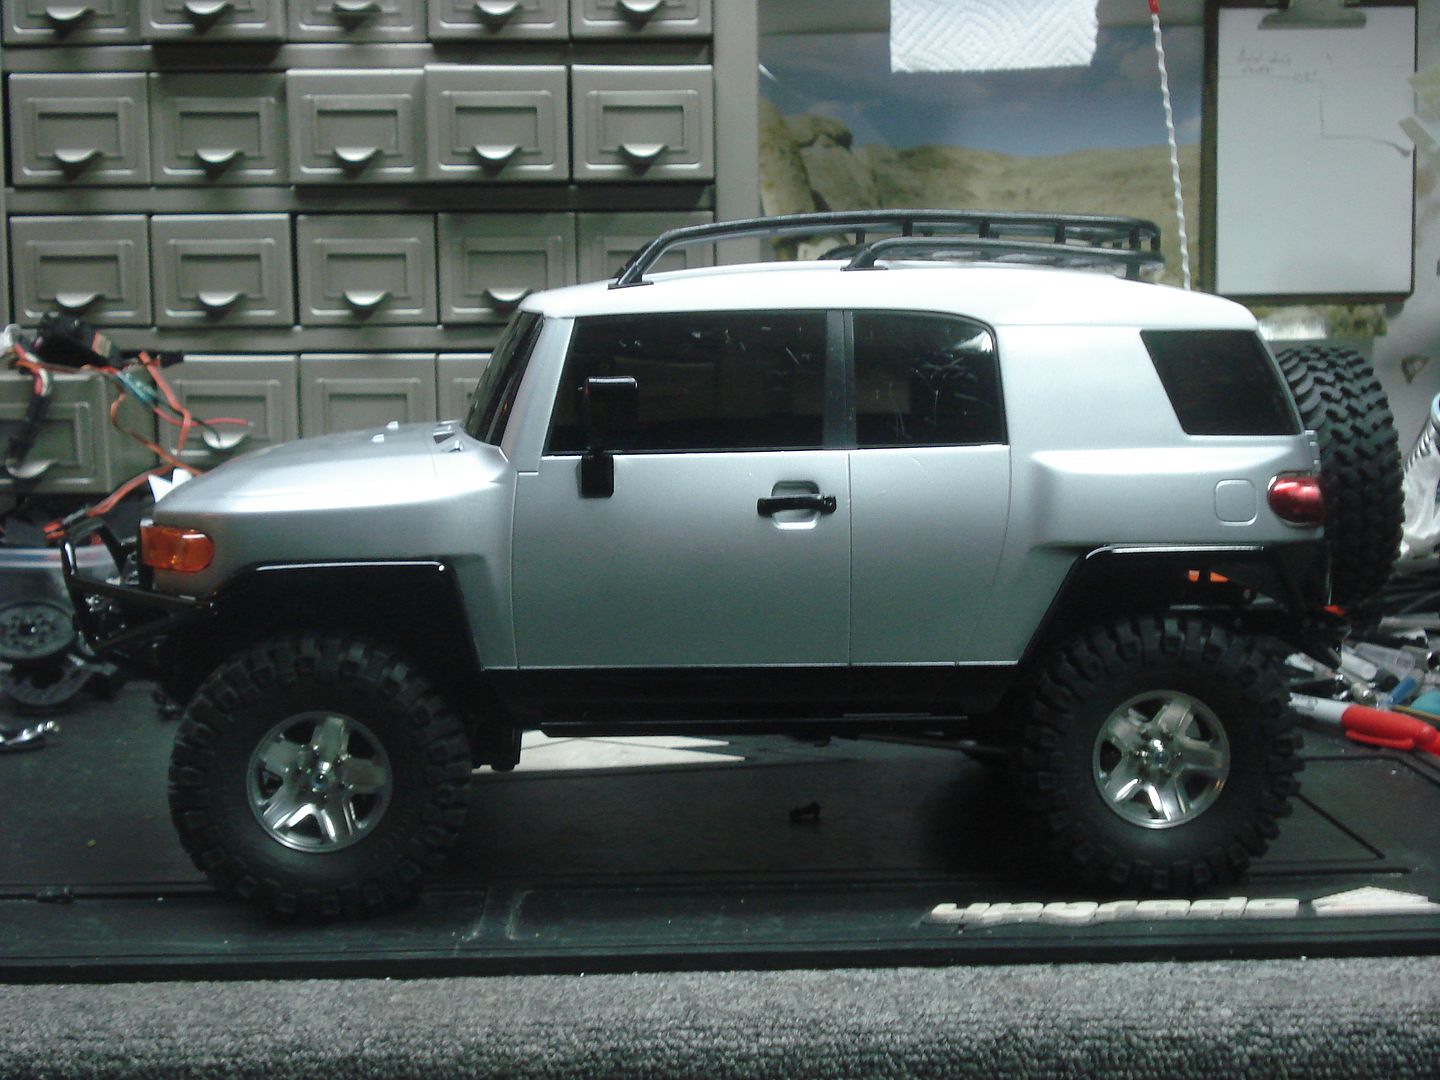 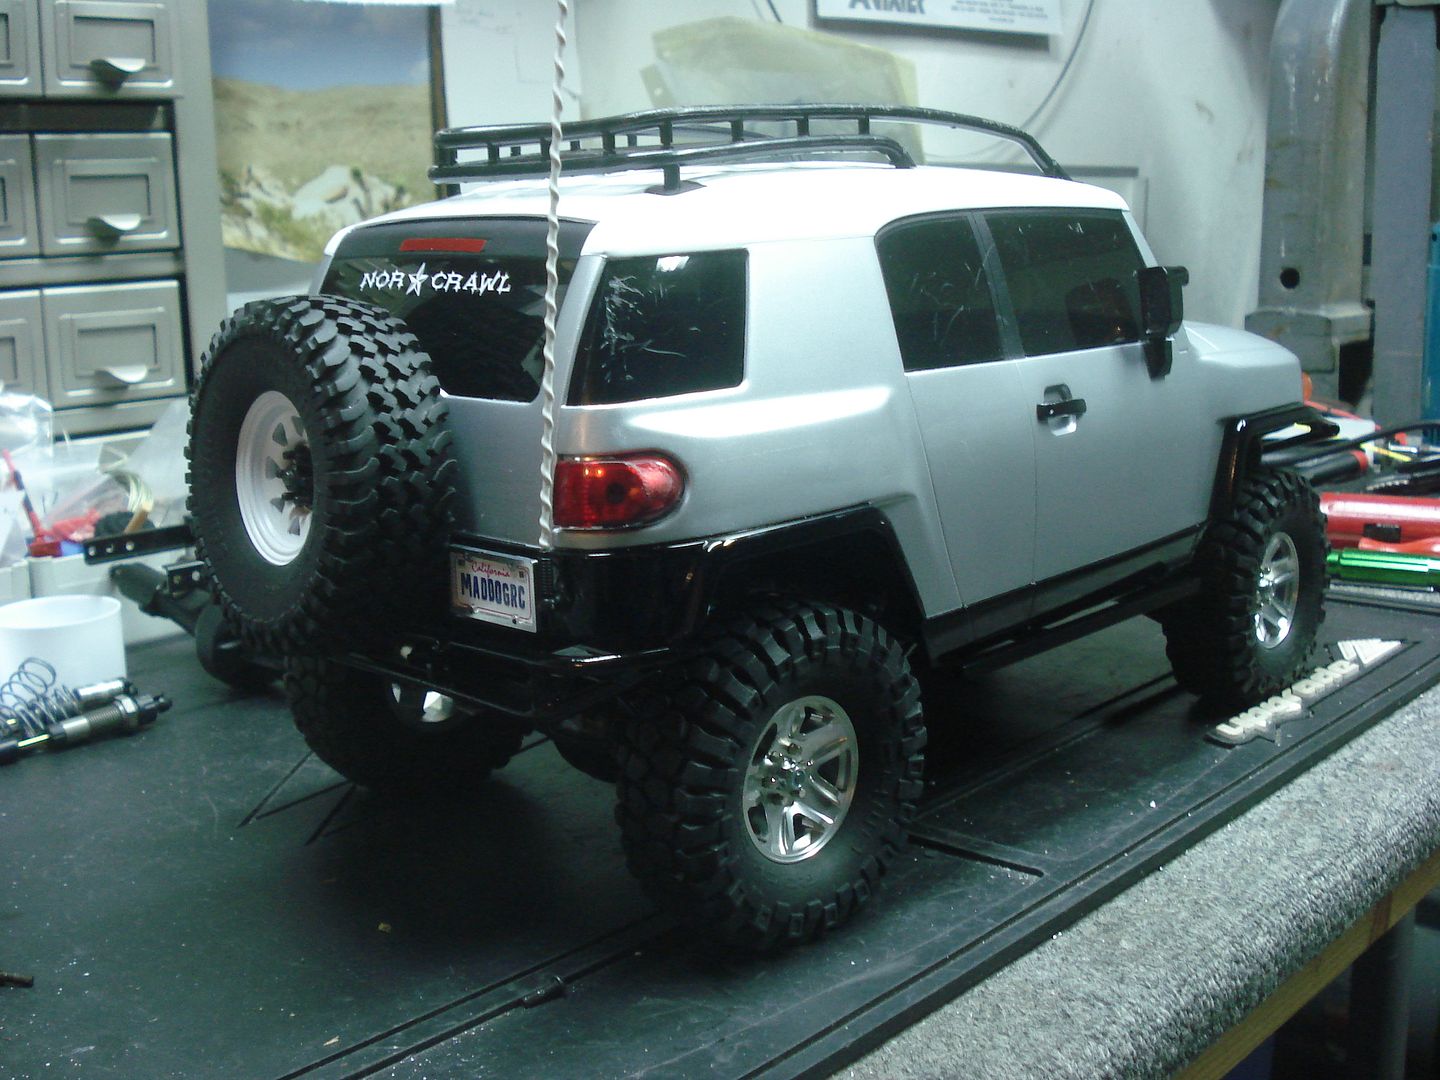 I'll try to install some more scale goodies and get some outdoor pics soon. |
|
| |
|
04-04-2010, 07:53 AM
| #59 |
| WOOPOOW!! Join Date: Nov 2008 Location: Atlanta, GA
Posts: 4,218
|
Thats THE best newer style FJ landcruiser I have seen yet! Awesome job man |
|
| |
|
04-04-2010, 10:41 AM
| #60 | |
| RCC Addict Join Date: Mar 2007 Location: Penngrove
Posts: 1,809
| Quote:
| |
|
| |
 |
 LinkBacks (?)
LinkBack to this Thread: http://www.rccrawler.com/forum/1-5-scale-rigs/200854-loco-fj-01-a.html | ||||
| Posted By | For | Type | Date | |
| ZONACRAWLING • Ver Tema - Tamiya Wrangler XC - por Skorpion_ | This thread | Refback | 10-05-2011 03:22 PM | |
| |


 Linear Mode


