| |
 04-26-2015, 11:52 AM
| #1 |
| Quarry Creeper Join Date: Apr 2012 Location: Lansford
Posts: 432
|
FYI these wheels/tires are 1.7's but no section for that. I plan on swapping the tires for some 1.55 Iroks when the bank allows my next parts order and possibly some silver yota2 cases to replace these not bright and shiny black ones. So it'll half fit in this category. I'm starting a new build for myself. Can't wait. A few months ago I saw the RC4WD V8 and decided I needed it. I have since been stockpiling parts to build a truck for it. I plan to build it with all scale hardware, leave engine uncovered and build with all metal. It's gonna be tricky hiding electronics. So After collecting and admiring parts for a few months, I finally got started. I used 1/4" 6061 T6 to build my chassis. First I bought a small bandsaw and then cut out the parts I scribed. Then I used a dremil with 80 grit drum on the end to sand out the deep grooves from the saw blade. Next was dremil with 120 grit sanding discs. That's where I'm at now. Next step will be to hand sand it down to 360 grit in one direction to make it nice and smooth shiny finish. As this build goes, you will see the theme is bright and shiny, just like the RC4WD v8! So here are some of parts I stockpiled:  And here's the chassis as it is now before the hand sanding. It's just kinda propped up for the time being. Once the finish is done I will begin drilling, tapping, and screwing.  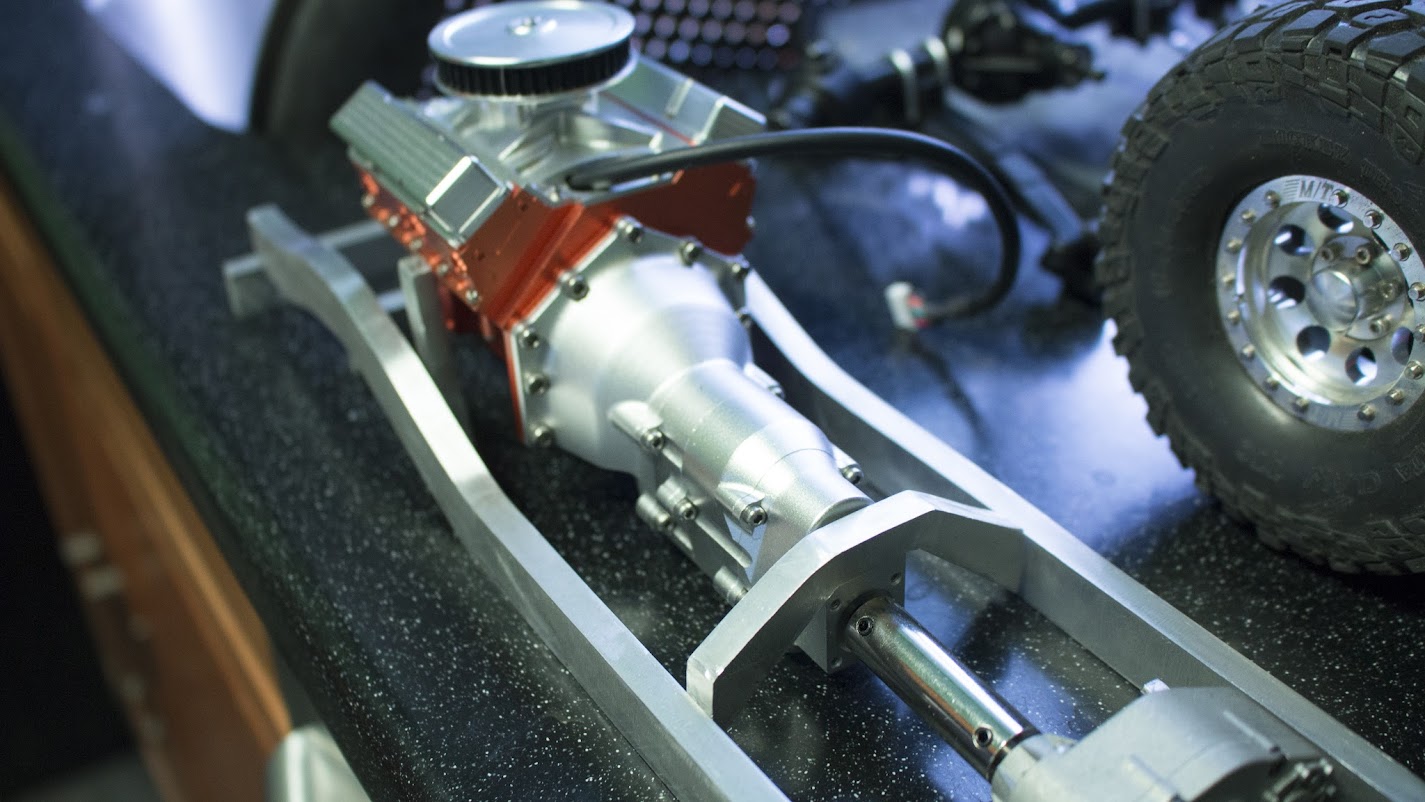 |

|  |
| Sponsored Links | |
| | |
|
04-26-2015, 06:23 PM
| #2 |
| Rock Crawler Join Date: Feb 2011 Location: Williston
Posts: 850
|
You really need the GCM transfercase on the end of that tranny. �� L.R. |
|
| |
|
04-26-2015, 08:07 PM
| #3 |
| Newbie  Join Date: Dec 2014 Location: Stow
Posts: 34
|
interested to see where this goes....Looks great so far!  |
|
| |
|
04-26-2015, 10:12 PM
| #4 |
| Sinking with the ship   Join Date: Mar 2005 Location: El Capitan...sole survivor and sinking fast
Posts: 8,864
|
Like what I am seeing so far! |
|
| |
|
04-26-2015, 10:20 PM
| #5 |
| Quarry Creeper Join Date: Dec 2011 Location: Gold Coast, Australia
Posts: 290
|
After the first post you can tell this is going to be a beauty... Keen to see this progress.
|
|
| |
|
04-27-2015, 10:55 PM
| #6 |
| Pebble Pounder Join Date: Nov 2014 Location: in a tree home atop a redwood tree on the corner of yonder and timbuktoo
Posts: 137
|  |
|
| |
|
04-28-2015, 05:49 PM
| #7 |
| RCC Addict Join Date: Dec 2009 Location: Laceys Spring, Alabama
Posts: 1,067
|
Looks like you're off to a great start! The only problem is those 1.7 Mickey's are supposed to be on my truck. Hint, hint.
|
|
| |
|
04-28-2015, 06:32 PM
| #8 |
| Quarry Creeper Join Date: Apr 2012 Location: Lansford
Posts: 432
|
The wheels or the tires? I want to replace the tires with some 1.55 Iroks if that's what your getting at...
|
|
| |
|
04-28-2015, 07:01 PM
| #9 |
| RCC Addict Join Date: Dec 2009 Location: Laceys Spring, Alabama
Posts: 1,067
|
The wheels are what I want. Pm me if you're interested in selling them.
|
|
| |
|
04-28-2015, 07:12 PM
| #10 |
| Quarry Creeper Join Date: Jul 2008 Location: Minot
Posts: 324
|
Go karl go!!
|
|
| |
|
05-01-2015, 04:22 PM
| #11 |
| Quarry Creeper Join Date: Apr 2012 Location: Lansford
Posts: 432
|
Finished sanding the chassis parts all nice and smooth with 320 grit. Then I put a light coat of polish. Not to make it shiny, but to help protect the surface from corroding for a while. Now it looks like nice shiny brushed aluminum!  |
|
| |
|
05-05-2015, 06:16 PM
| #12 |
| Quarry Creeper Join Date: Apr 2012 Location: Lansford
Posts: 432
|
I'll keep with my previous build thread theme of updating every time I touch the build! Today My bits, taps, and LockedUp RC bolts came in the mail. I got the LockedUp bolts since RC4WD hasn't had their tool in stock. Seeing the 2 bolts side by side... Sorry RC4WD, But I like the LockedUp ones better. Their tool is much nicer and much quicker/easier to use. I don't have a tool handle, but it chucks nicely into my cordless drill and makes installation a breeze! I had ordered a bunch of bolts much longer than I needed. I figured better to long and cut to size, than too short. I guess as a sheet metal guy used to installing rivets this is more my speed than measuring everything ahead of time and ordering the correct length. So today I cut a handful to the length I want for the chassis. I then began drilling and tapping. I figured I would start with the front bumper. Once I got the parts drilled and rails tapped I found some more work. I kind of expected it though making the parts by hand. The ends of my rails are not square to each other. When I tighten the bolts the rails get kind of wonky. Now that I have the bumper drilled though I can use this to sand the ends until everything sits straight and square on the counter top. Then I will know they are square and move on to the rear. I will pick up with that next time. So after today's short progress this is where it's at.   |
|
| |
|
05-06-2015, 11:33 AM
| #13 |
| RCC Addict Join Date: Nov 2009 Location: Tulsa
Posts: 1,667
|
interested to see how that trans set up holds up to that brushless. chassis looks great!
|
|
| |
|
05-08-2015, 06:20 PM
| #14 |
| Quarry Creeper Join Date: Apr 2012 Location: Lansford
Posts: 432
|
Got the frame squared and bolted both front/rear bumpers on. Now I can start measuring and placing the motor so I can bolt on the mounts and add cross members. My new Iroks came in the mail so I decided to get them mounted up. I also painted my beadlock rings Caterpillar yellow while they were apart. I like the dark yellow/orange color. Glad I didn't use a brighter yellow. Might look cheesy with the bright aluminum.    |
|
| |
|
05-10-2015, 08:13 AM
| #15 |
| Quarry Creeper Join Date: Apr 2012 Location: Lansford
Posts: 432
|
Did some more tapping... Got the motor and transmission mounted now. I measured out how much room I need in front of the grill for my winch, then positioned my steering servo behind where the grill will go, then put the motor about 1/8" from that. Now I can make a servo mount, winch mount, my grill, and start the link mounts and shock mounts. 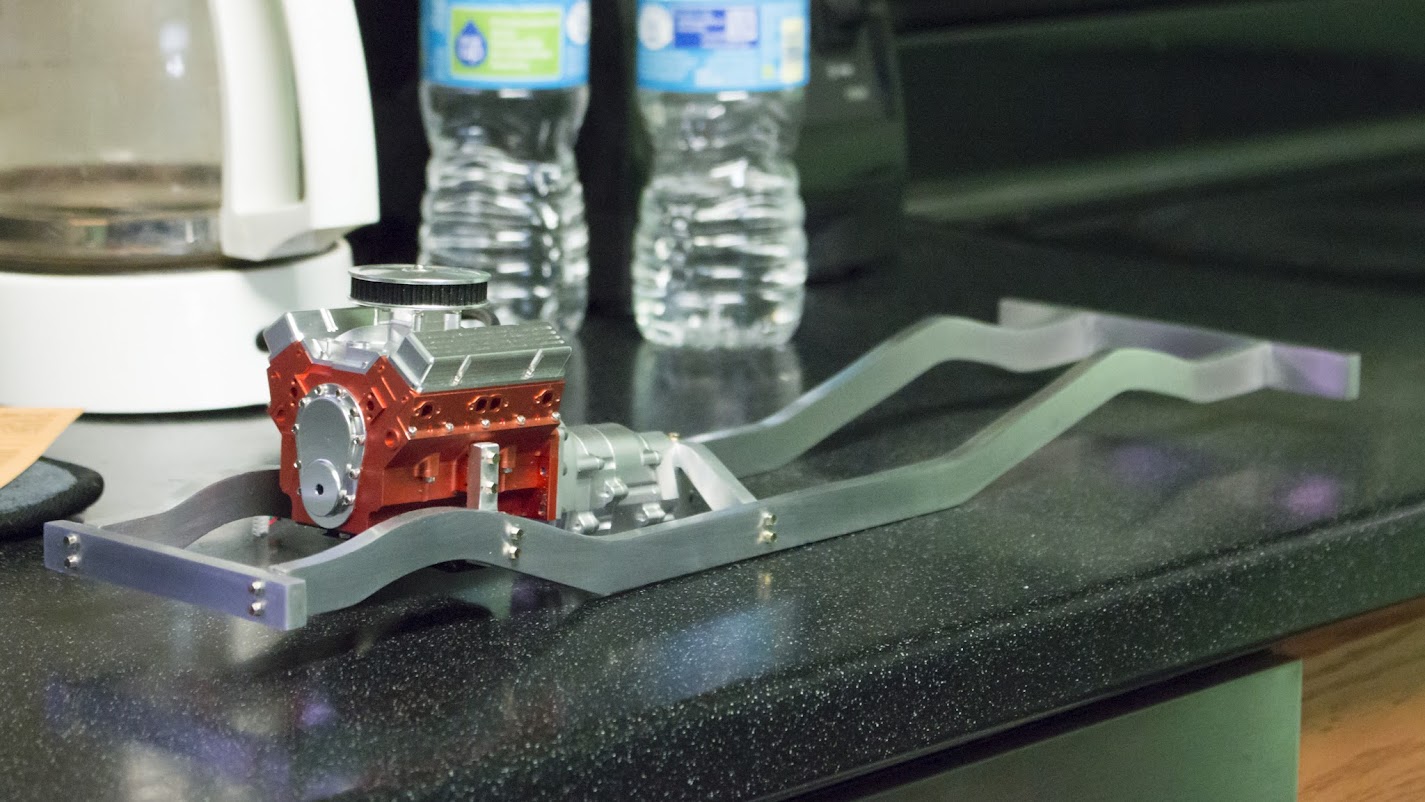  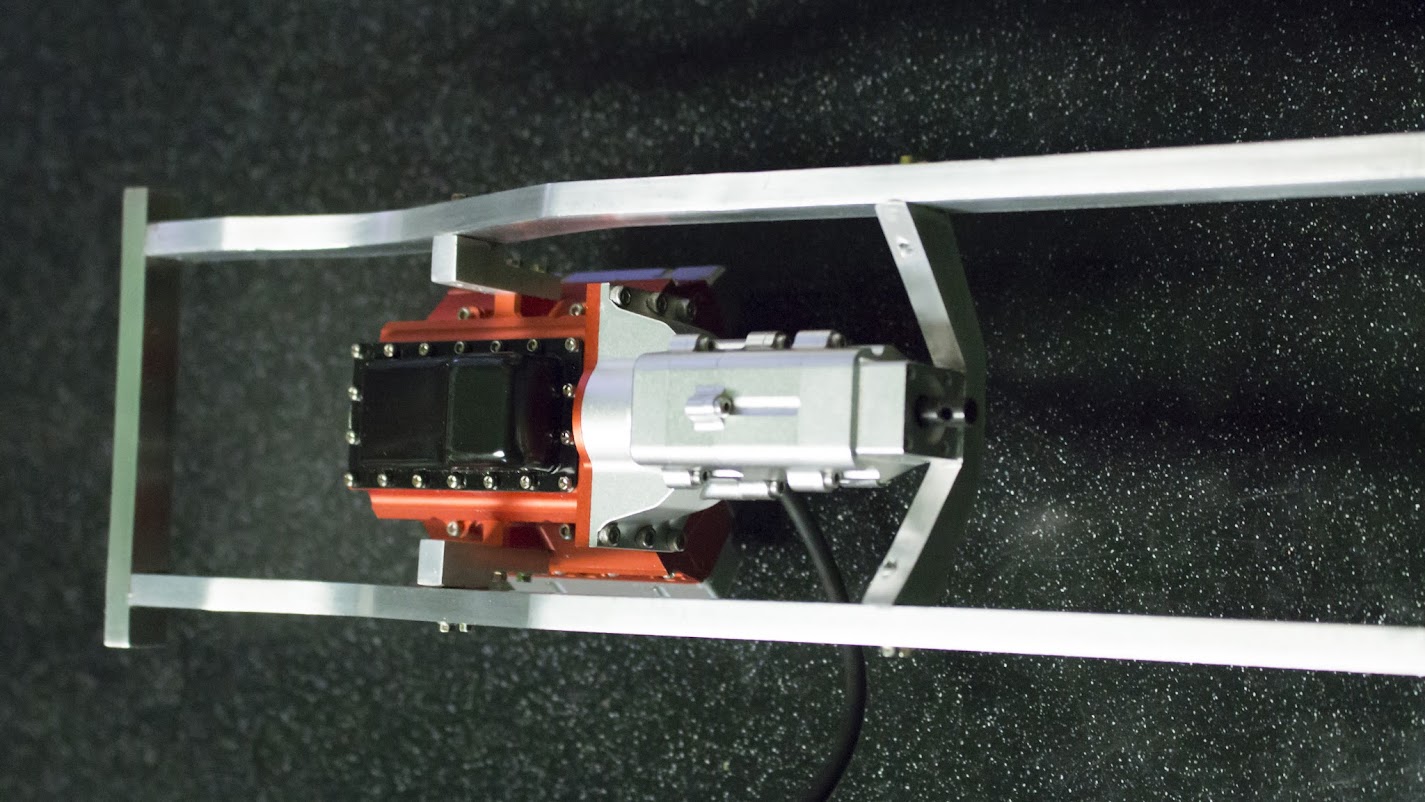 |
|
| |
|
05-10-2015, 06:39 PM
| #16 |
| Quarry Creeper Join Date: Apr 2012 Location: Lansford
Posts: 432
|
Had a little time after doing the yard work so I shortened up my transfer case coupling. I drilled and tapped a new hole to bring the shafts as close as possible. 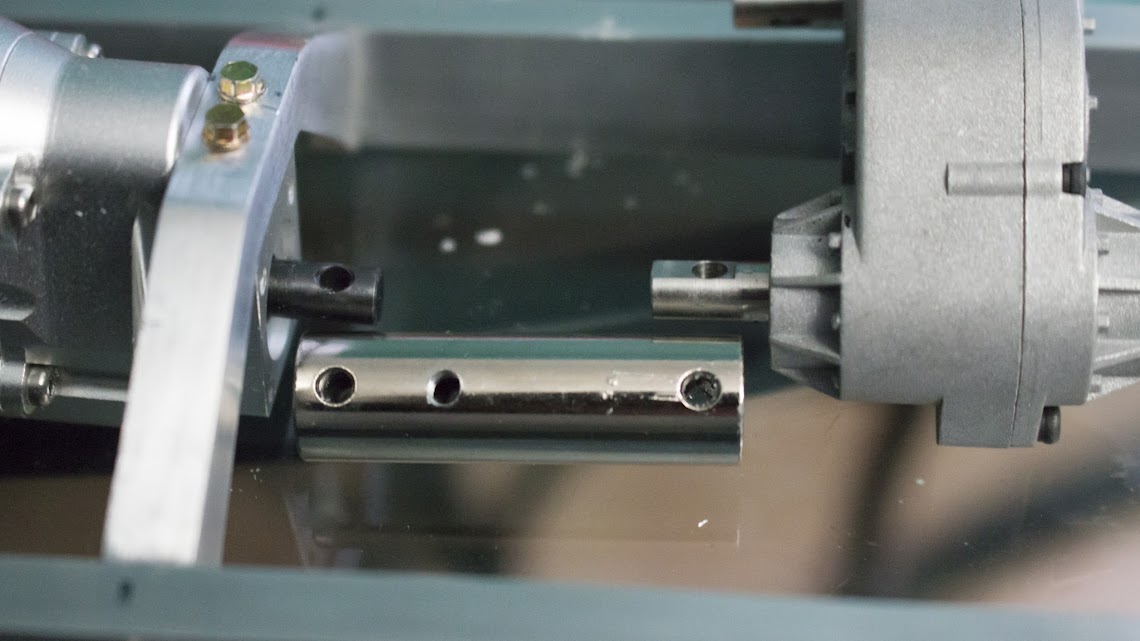 Then I cut the coupling just after the new hole. I had to sand out some of the passenger side frame rail to clear the transfer case. I then used a small piece of .125" 6061 T6 to make a mount for the transfer case, finished it to match, and mounted the transfer case up. 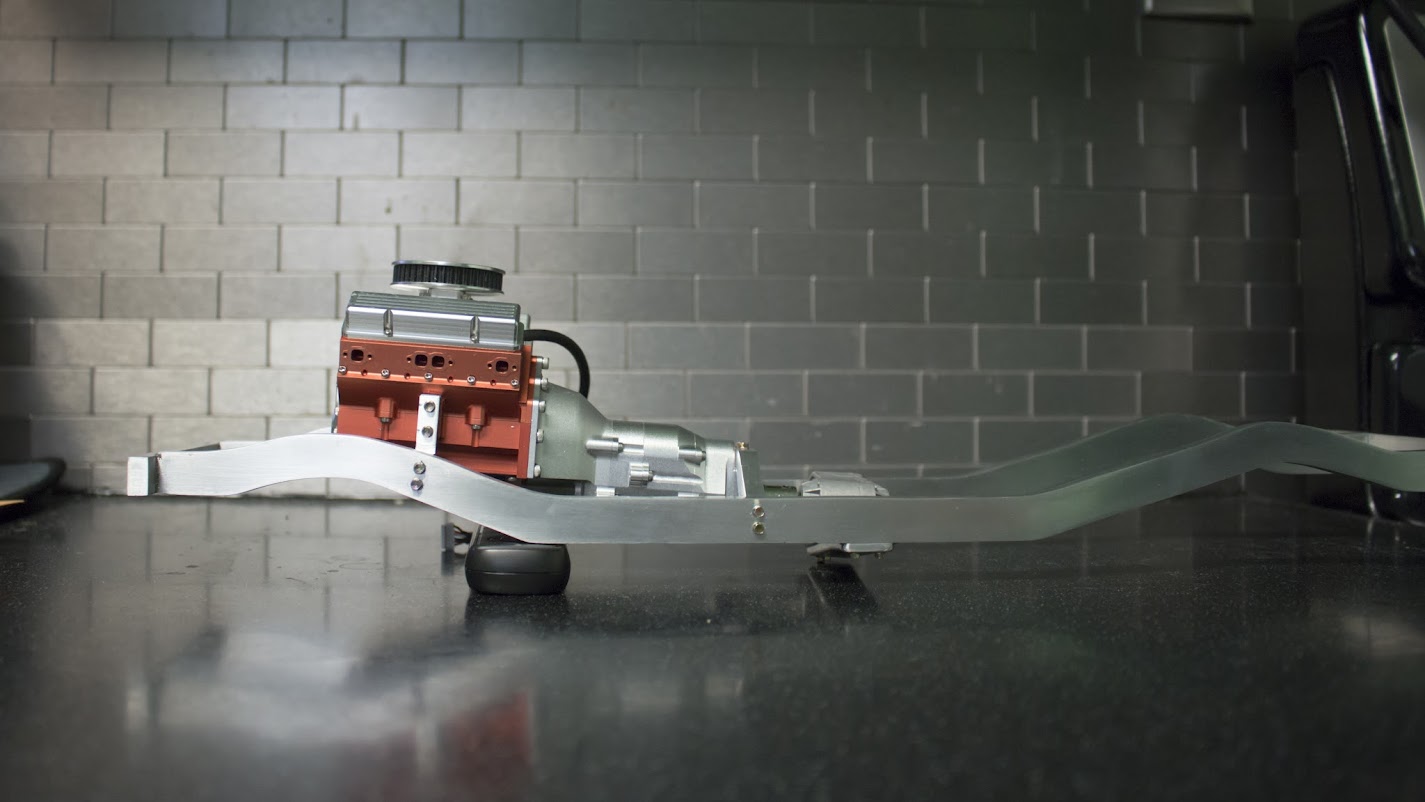 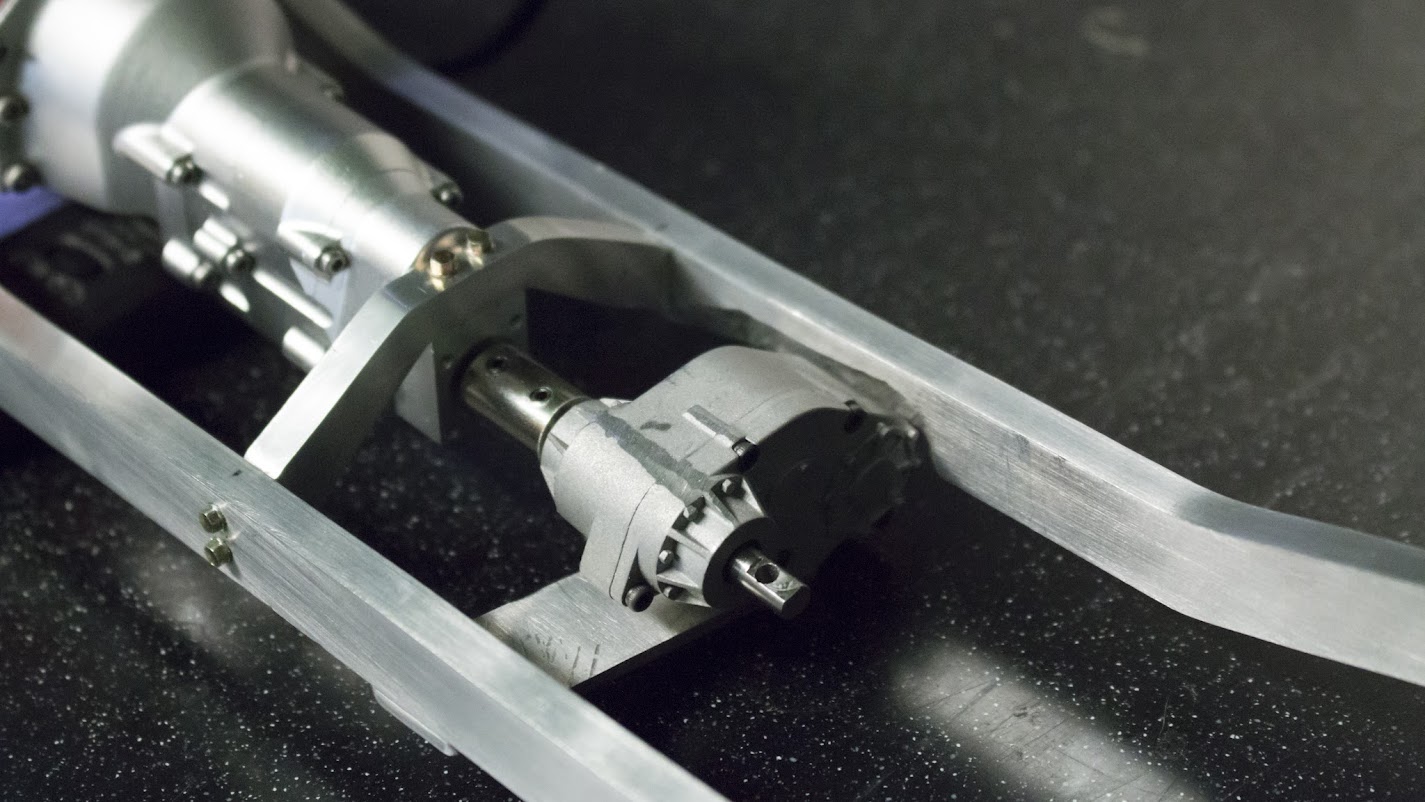  Should give me room for my drive shaft and not hang down too horribly far. I won't know for sure until I mound my axles and order up some driveshafts! 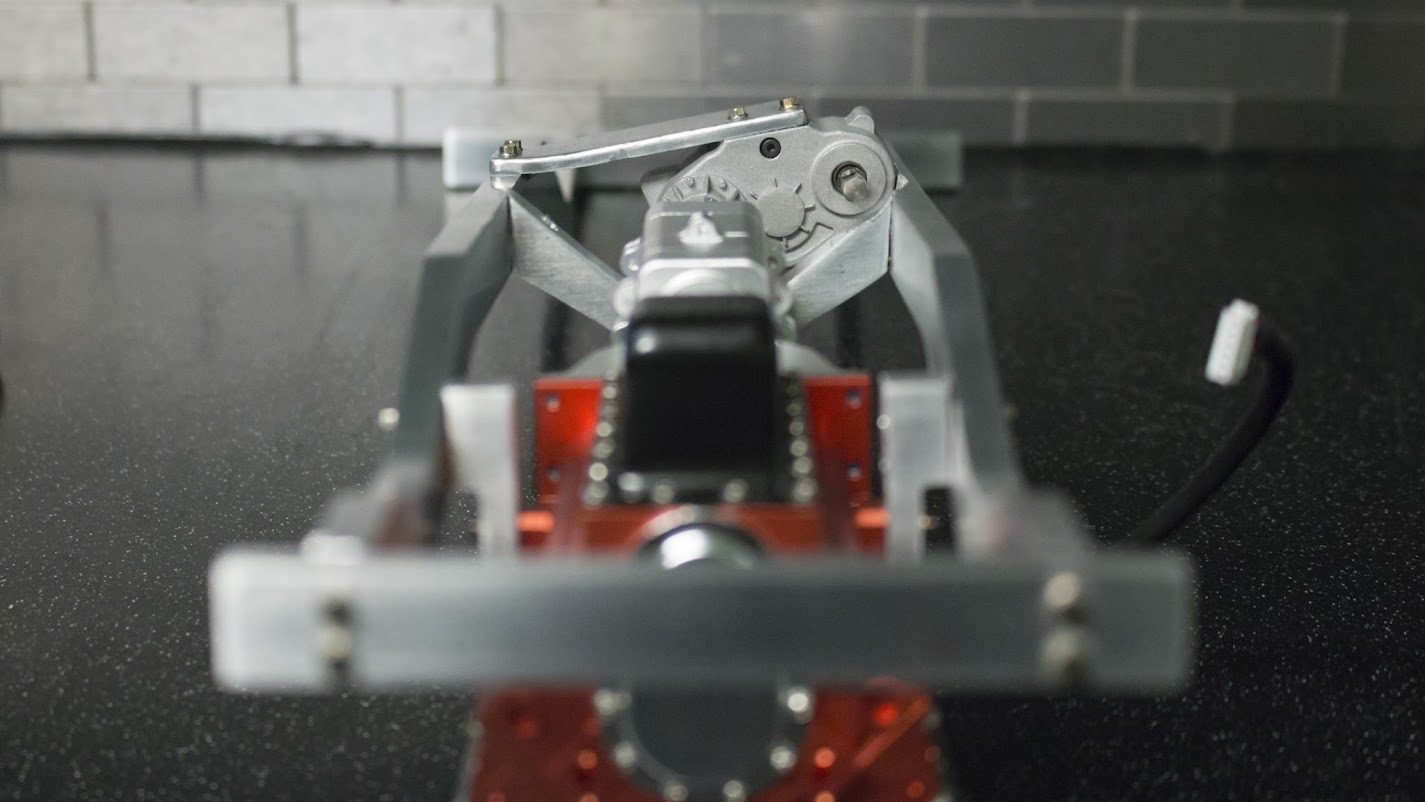 |
|
| |
|
05-12-2015, 06:14 PM
| #17 |
| Quarry Creeper Join Date: Apr 2012 Location: Lansford
Posts: 432
|
Getting my axles ready... Took them apart, sanded them down, and re-painted. Now I hope I have enough scale bolts and remember how to put them back together!  |
|
| |
|
05-13-2015, 06:34 PM
| #18 |
| Quarry Creeper Join Date: Apr 2012 Location: Lansford
Posts: 432
|
Managed to cut 40 some odd number of tiny scale bolts to the correct length and get the axles rebuilt! I love em! Now I can start working on the links/mounts!  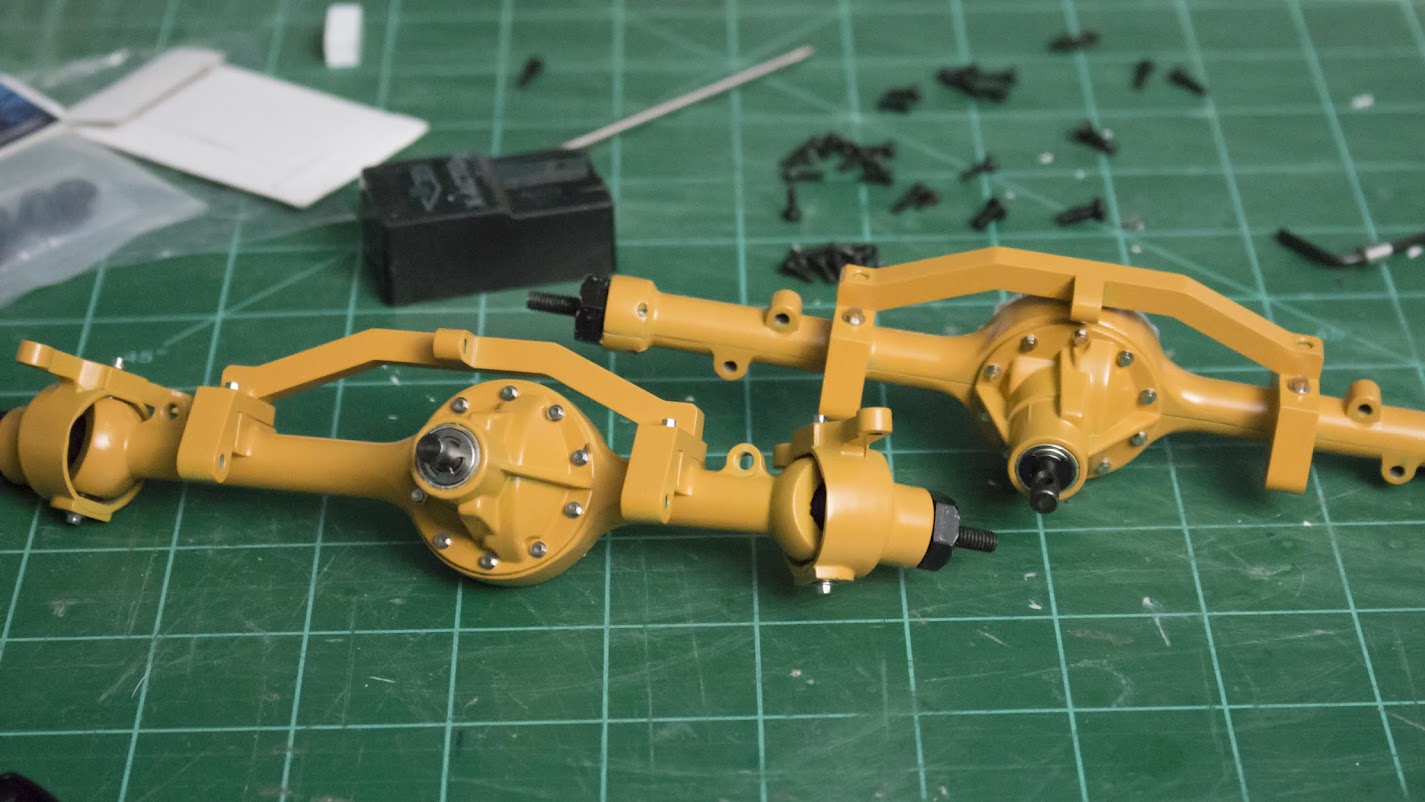 |
|
| |
|
05-15-2015, 09:39 PM
| #19 |
| Quarry Creeper Join Date: Apr 2012 Location: Lansford
Posts: 432
|
I mounted my wheels to my axles to help position them where I wanted, then attached my link ends to the axles to help figure out how long to make my links. Once I settled on a length I cut some 3/16" 6061-T6 rod to size, drilled the ends and tapped them. I then put some screws in them through a paper plate and painted them up. Next I will attach the link ends to them so they are complete so I can position the axles, mark where I need to drill/tap to mount the links and then the axles will be mounted up. Once this is all done, I'll start the shock mounts.  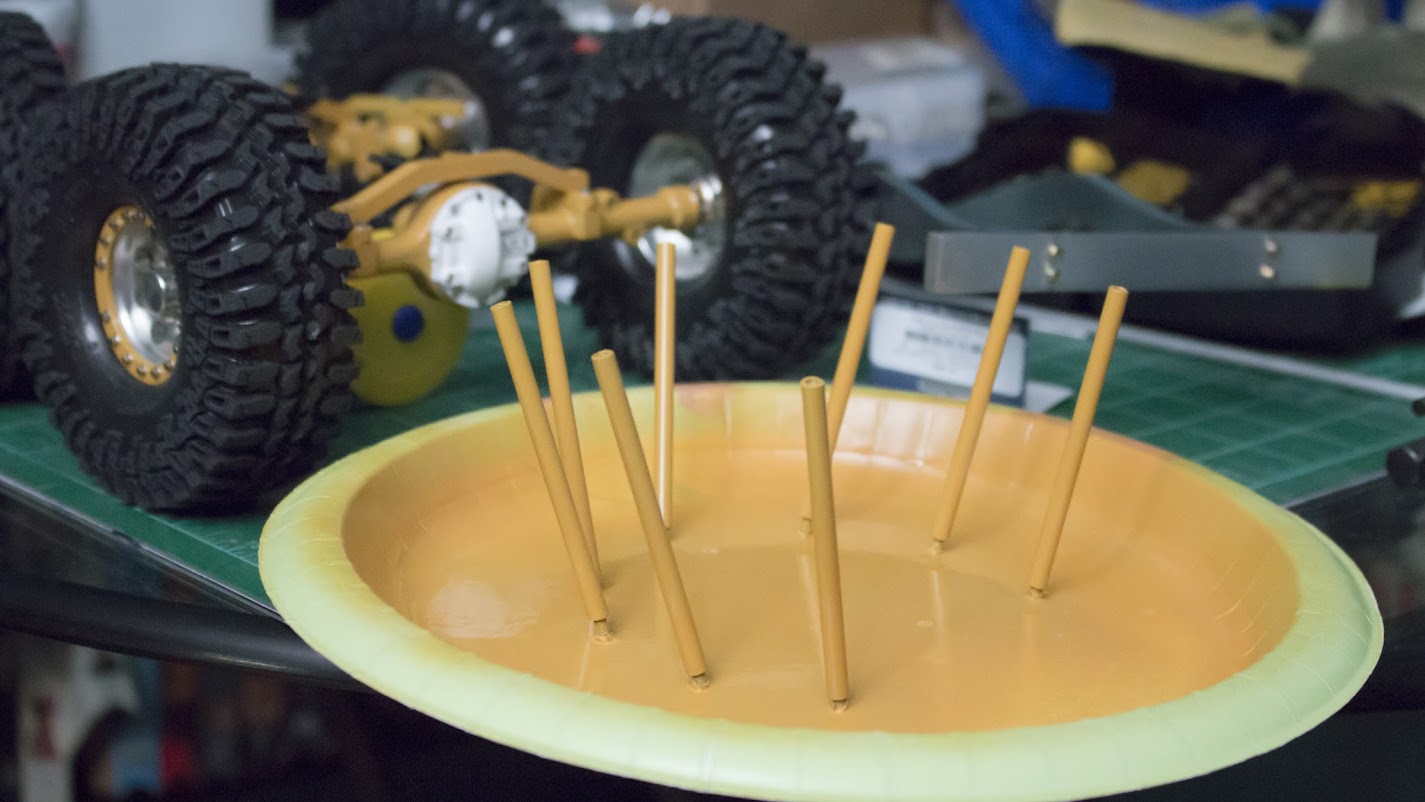  |
|
| |
|
05-16-2015, 02:47 PM
| #20 |
| Quarry Creeper Join Date: Apr 2012 Location: Lansford
Posts: 432
|
Today I put the links together and drilled the frame. They are now installed. I had put long M3 set screws into the ends of the links with JB weld. At some point when it's dry I'll have to adjust the front lower links a little to level off the axle. The front axle input needs to be rotated down a little. I may have issues fitting a front drive shaft. I set up the links so this can go as low as possible. The rear will only be limited by the 4 link truss hitting the frame. The front is limited by the center link ends hitting the v8 oil pan. I managed to get the front upper links to straddle the lowest part of the oil pan when it's fully compressed. The front lower link mount may interfere with the driveshaft, as well as the bottom of the transmission mount. Shafts should be here monday to begin fitting them. Next I need to make my shock mounts and servo mount. 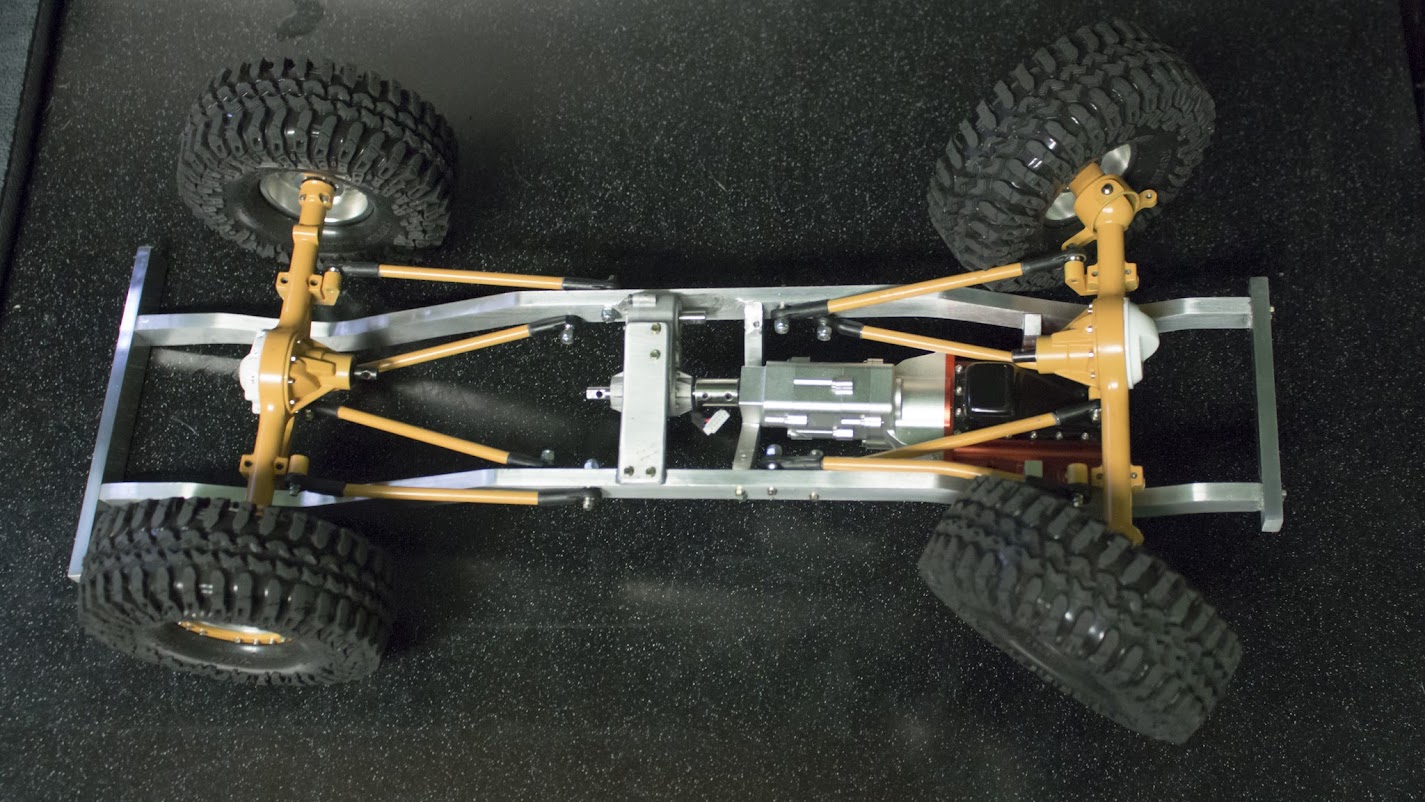   |
|
| |
 |
| |


 Linear Mode


