| |
| |||||||
 |
| | LinkBack | Thread Tools | Display Modes |
 02-06-2009, 05:52 PM
| #81 | |
| I wanna be Dave Join Date: Aug 2007 Location: santa monica
Posts: 3,687
| Quote:
 | |

|  |
| Sponsored Links | |
| | |
|
02-06-2009, 06:44 PM
| #82 |
| Newbie Join Date: Nov 2008 Location: ND
Posts: 29
|
It looks great. Can't wait to see some interior |
|
| |
|
02-06-2009, 09:54 PM
| #83 | |
| Quarry Creeper Join Date: Sep 2008 Location: Petaluma
Posts: 282
| Quote:
Does anyone buying those "Warn" winch decals want to off load their spare set? | |
|
| |
|
02-07-2009, 10:58 PM
| #84 |
| Quarry Creeper Join Date: Sep 2008 Location: Petaluma
Posts: 282
|
After fumbling with different concepts on how to build the dash - I'm lucky enough to have one sitting in the driveway. I HOPE it will be at least be somewhat close to this when it's done. I'm not as insane as some of these guys that make it look like a picture - but a simple dash is all I'm looking for. 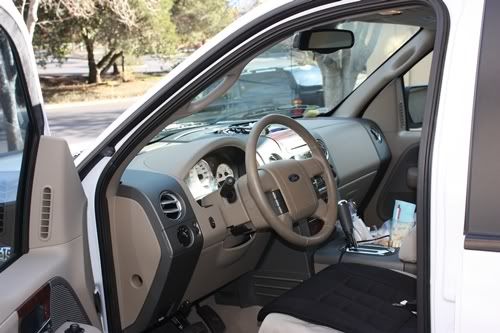 using my old f350 cab as a model, I started with a simple paper cut out. 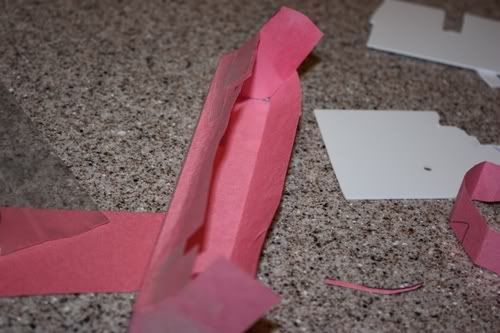 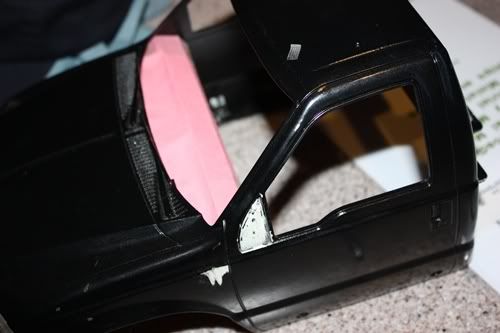 Yea - I know - pink paper - hey - it's all the kids had left... I then started a mock up dash made from styrene. I plan on doubleing this and using inner ribs for support as it developes. The cut outs are for the hood speaker and trannie. 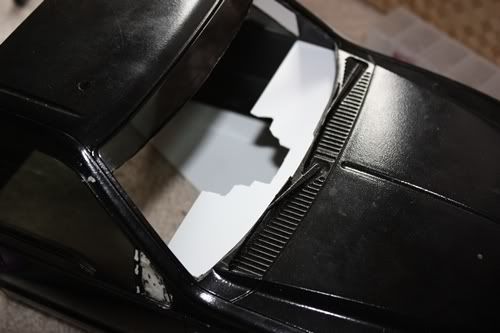 I'll mount it by using the stock window mounts. 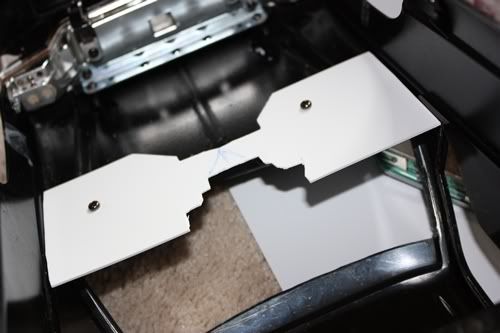 more to come as progress is made. I'm assuming this will take a while to build, Last edited by FodigoDave; 02-07-2009 at 11:02 PM. |
|
| |
|
02-09-2009, 09:29 AM
| #85 |
| Quarry Creeper Join Date: Sep 2008 Location: Petaluma
Posts: 282
|
WOW - Working with styrene is pretty fun! This is my first attempt at styrene too. After making the mock up dash (basic form) using construction paper, I cut it into pieces and started cutting the styrene strips to match. Then a little glue. 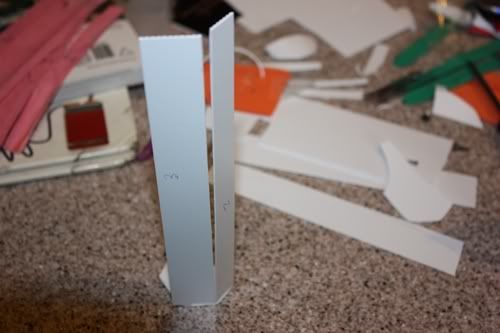 After the basic form was built - it was test fit in the truck. The window kinda screwed up my dimentions so it was good to test fit before going any further. I ended up cutting about a quarter inch off the end so it could accomindate the extra window material. 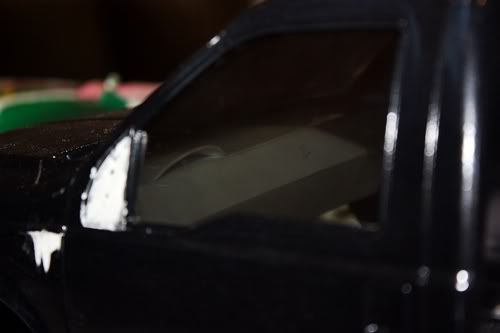 Then I took it out and got busy. Sorry, no other deveoplment pics, I just kept going like an energizer bunny until it got to this point. I found a pic of an f350 dash on the internet, reduced it from the printer, and test fit it in the dash gauge area. Fits nicely. I decided to go with my own design to hold the steering wheel. It looks more super-duty now with a side of beef. Can't really see it here but you will in future updates. More to come. Unfortunately, I still have yet to cut the massive trannie slot out in the dash. That's going to be a mess. 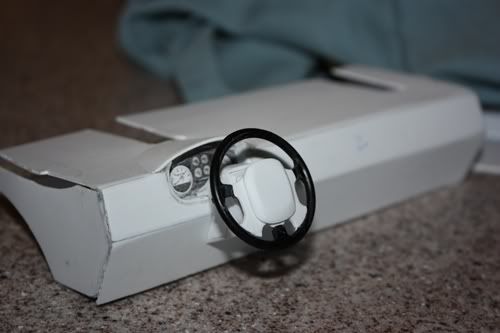 Last edited by FodigoDave; 02-09-2009 at 05:16 PM. |
|
| |
|
02-09-2009, 10:24 AM
| #86 |
| RCC Addict Join Date: Jun 2008 Location: Monroe, NC
Posts: 1,547
|
Nice progress on the interior. Keep it up. Justin |
|
| |
|
02-11-2009, 09:49 AM
| #87 |
| Quarry Creeper Join Date: Sep 2008 Location: Petaluma
Posts: 282
|
More progress on the dash. The hand grooved lines in the air bag and ford decal really set it off. I used the tips from the exhaust pipes for the AC vents. I'll later replace the exhaust with brass tubing. I still have a ways to go but after a slap of paint - it's now starting to come together. Here's a few pics - the rib configuration for support under the dash and the progress. 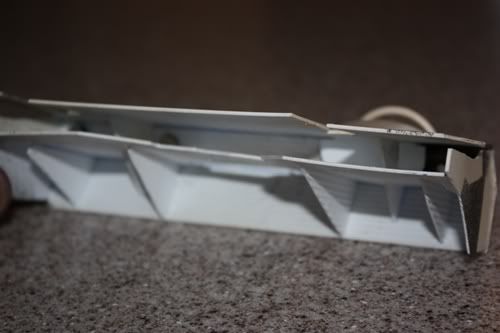 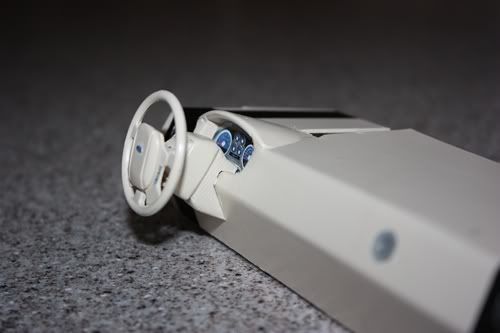 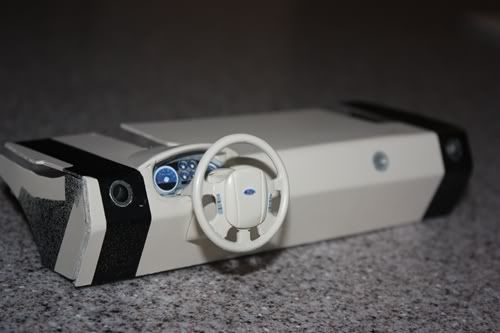 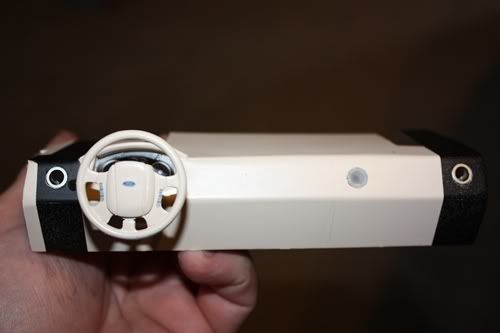 |
|
| |
|
02-12-2009, 08:40 PM
| #88 |
| Quarry Creeper Join Date: Sep 2008 Location: Petaluma
Posts: 282
|
Here's a cool idea to help with the scale look. I used a thin piece of metal (windshield wiper metal insert) and made a leaf spring clamp. It took place of the Zip-Tie that held the two leafs together. 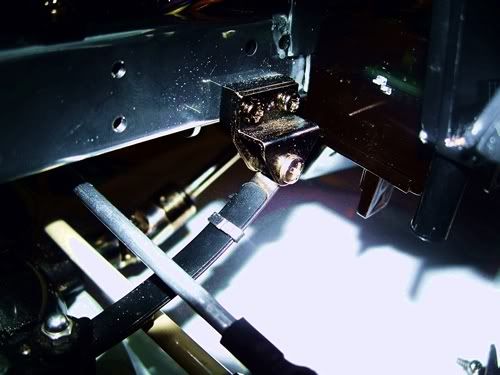 I test fit the dash to the trannie today. Turns out it was easier to rip the truck's frame in half and pull the trannie out - then...test fit it to the dash with the cab removed. I could see under the cab a lot easier and see where it needed to be trimmed. Versus trying to test fit the cab to the frame and look under. You just can't see what's going on with the dash trying to look through the fender well from under the truck. The Dash ultimately got cut in half today but it test-fit nicely. I still have a little bit to go to snug it down and then will start Diamond Plating the interior. Yikes! I'll need to look for a driver! (any ideas...) Hunter Dan seems a bit small. More pics to come.... |
|
| |
|
02-13-2009, 05:08 AM
| #89 |
| Quarry Creeper Join Date: Sep 2008 Location: Petaluma
Posts: 282
|
Truck frame & trannie put back together and test fitting the diamond plate interior. 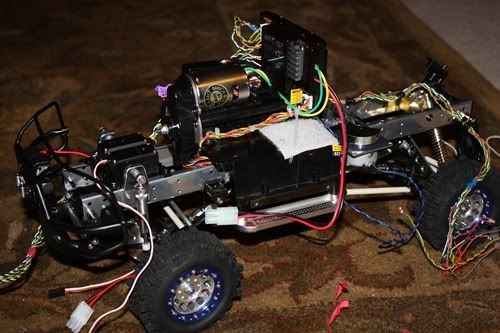 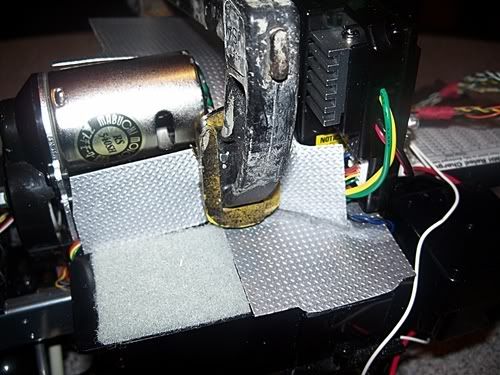 Made an updated Fire extinguisher and working on the extinguisher mount prototypes. I'm finding its extremely difficult to make those intricate bends in piano wire. But - it seems that's the proper type of wire to use. Extinguisher (made of glass with epoxy resin interior and all aluminum piping) features a realistic pull pin. Labels to come. 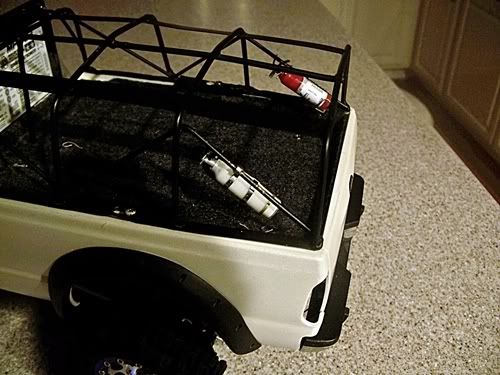 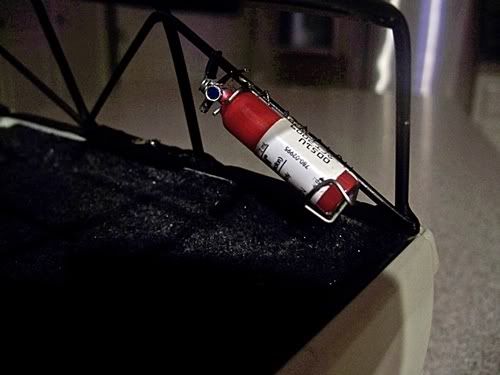 Last edited by FodigoDave; 02-13-2009 at 05:24 AM. |
|
| |
|
02-13-2009, 06:40 AM
| #90 |
| RCC Addict Join Date: Jun 2008 Location: Monroe, NC
Posts: 1,547
| Justin |
|
| |
|
02-14-2009, 02:34 AM
| #91 |
| RCC Addict  Join Date: Mar 2007 Location: Penngrove
Posts: 1,809
|
Wow this thing is evolving nicely. I need to see it in person one of these days.
|
|
| |
|
02-14-2009, 09:05 PM
| #92 | ||
| Quarry Creeper Join Date: Sep 2008 Location: Petaluma
Posts: 282
| Quote:
Quote:
  | ||
|
| |
|
02-16-2009, 04:47 PM
| #93 |
| Quarry Creeper Join Date: Sep 2008 Location: Petaluma
Posts: 282
|
Ok . I'm going for it. I bought a vender permit so I can sell a few of these for those wanting them. Go to the build thread to order - limited supply Scale Fire Extinguisher How To: alatta Pics 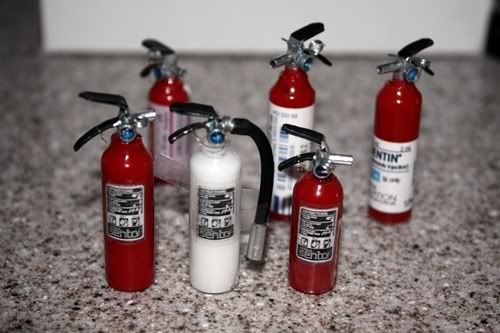 |
|
| |
|
02-16-2009, 04:55 PM
| #94 |
| Quarry Creeper Join Date: Jun 2007 Location: Inthe back of JACK IN THE BOX!!!!
Posts: 200
| Those ARE BAD ASSSSSSSSSSSSSSS
|
|
| |
|
02-16-2009, 06:31 PM
| #95 |
| RCC Addict Join Date: Jun 2008 Location: Monroe, NC
Posts: 1,547
|
Thats awesome Dave. I hope you do well with them. Justin |
|
| |
|
02-16-2009, 11:55 PM
| #96 |
| Rock Crawler Join Date: Jun 2006 Location: Wisconsin
Posts: 570
|
Awesome job so far! I'm subscribing! I might have missed it, but how much did you raise your transmission up? I've got a stock High-Lift that I am wanting to raise the transmission on as well.
|
|
| |
|
02-17-2009, 12:26 PM
| #97 | |
| Quarry Creeper Join Date: Sep 2008 Location: Petaluma
Posts: 282
| Quote:
When you raise the trannie - just know you will likely need to modify the front windshield too. The transmission will buttt right against it, or just a hair over making it stressful to mount the cab to the mounting brackets. However, an effort well worth every hour it takes to perform the operation regardless of how high you decide to go. I ultimately lifted my truck at (or just about) a full inch. A respectable height. This put the transmission mounts sitting on top of the frame. It was easy to fab a piece of sheet metal at that point which acted like a bolt on item. You will encounter a small problem trying to re-mount your cab base plate (that black U shaped housing for the cab). Although I showed in this build a few cuts to get you started, its a tweaking process from there. I wouldn't suggest going any higher than I did if you intend to put that piece back on. Not only will it be difficult to fit it right but the screw blocks will become too short and bind/warp the plastic when you tighten down the plate. You'll also start to mess with the suspension components too. Lastly, the driveshaft angle transition (I feel) will put too much stress on the u-bolts of your driveshaft, decreasing the life of those parts. Hope that helps. | |
|
| |
|
02-17-2009, 11:06 PM
| #98 |
| Rock Crawler Join Date: Jun 2006 Location: Wisconsin
Posts: 570
|
Dave, thanks for the info. I went ahead and started the transmission lifting stage, today, so I guess I am pretty well commited at this point! I went with a 7/8" lift (I think that's about 23mm for you metric guys). I didn't really feel like going much higher then that. The driveshaft angles get pretty steep. Before I read your reply, I just finished bolting the trans in for a test fit. Just like you said, I see I will need to change the cab floor to fit. That will probably be the easiest part. The next thing I want to do is relocate the motor. That's going to take some thought and fabrication, but I've been looking at it and I have some good ideas. I'll mount the motor underneath the supur gear and flip it so it faces the opposite way it did before. It's going to end up sitting between the frame rails, right where the shifting servo is currently located. I will build a remote motor mount plate and bolt it to the transmission with some stand offs. Perhaps I'll start a thread for my build so I can share some ideas with you. I really didn't want to raise the body more then stock, and relocating the motor should give me all the room I need to keep the cab at the same height. Thanks for taking the time to share your knowledge and build with us. |
|
| |
|
02-18-2009, 12:05 AM
| #99 | |
| Quarry Creeper Join Date: Sep 2008 Location: Petaluma
Posts: 282
| Quote:
Good luck with that build. E-mail me your build thread local when you start (speedproteam@yahoo.com). Relocating the engine; forward...(? under the hood). You would likely have the room as long as your not putting the steering servo up there too. I've got both shifting and steering under the hood and only have enough room to squeeze that little speaker under there. I'm trying to keep the cab height stock as well. On a different note - props out to PANTABLO !!! I built my first syrene "coleman" cooler the other day. Weee... It's sooo cool. I'll get some pics up shortly. Last edited by FodigoDave; 02-18-2009 at 12:09 AM. | |
|
| |
|
02-18-2009, 09:59 AM
| #100 |
| Quarry Creeper Join Date: Sep 2008 Location: Petaluma
Posts: 282
|
THANKS Pantablo! My first attempt at your vintage Coleman cooler. It'll look nice in the bed of this truck. I'm working on giving the case about 10 years of use at the moment before it gets its official paint job.  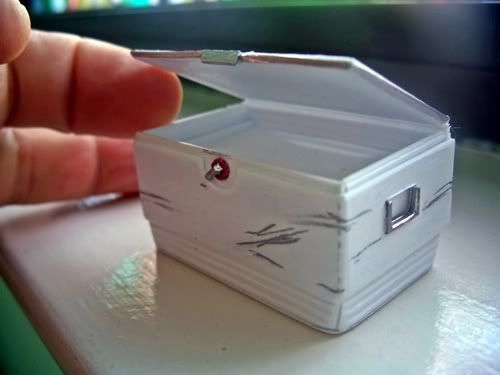  |
|
| |
|
| Thread Tools | |
| Display Modes | |
| |


 Linear Mode


