| |
 02-18-2009, 10:03 AM
| #101 |
| RCC Addict Join Date: Jun 2008 Location: Monroe, NC
Posts: 1,547
|
Great job Dave. I am about to work with styrene for the first time. Do you have any pointers on how you do the rounded edges? Thanks, Justin |

|  |
| Sponsored Links | |
| | |
|
02-18-2009, 10:39 AM
| #102 | |
| Quarry Creeper Join Date: Sep 2008 Location: Petaluma
Posts: 282
| Quote:
Take your time too - do a little on each side and then re evaluate your efforts so your ends are equal and you dont take too much off. I tapered the bottom more than the rest of the box to give it dimention and add to its personality. Good Luck - cant wait to see it. | |
|
| |
|
02-18-2009, 10:42 AM
| #103 |
| RCC Addict Join Date: Jun 2008 Location: Monroe, NC
Posts: 1,547
|
Thanks for the tips Dave. I really appreciate it. I'll try not to dissapoint.:-P Justin |
|
| |
|
02-20-2009, 03:06 AM
| #104 |
| Pebble Pounder Join Date: Nov 2008 Location: in a cardboard box, maybe a castle
Posts: 148
|
THAT RIG IS HOT AND THE ICE CHEST IS SICK NICE WORK  |
|
| |
|
02-20-2009, 04:33 AM
| #105 |
| Rock Crawler Join Date: Nov 2008 Location: Lake Texoma, texas
Posts: 519
|
cooler looks fin bitchin!!!!!
|
|
| |
|
02-22-2009, 11:11 AM
| #106 | |||
| Quarry Creeper Join Date: Sep 2008 Location: Petaluma
Posts: 282
| Quote:
Quote:
.......in the oven. At least it was the lowest setting and I opened the door - but - the heat was still too much and it started to melt anyway. In my defense, I was thinking "spray booth" but kinda forgot that baking the paint on a car has steel under it and baking the paint on plastic, ...well it melts. No worries - I can fix it. It's styrene, you can fix anything with that stuff. I should post some pics but I'll probably feel even more like an idiot if you see it too. Quote:
Details Details Details.... 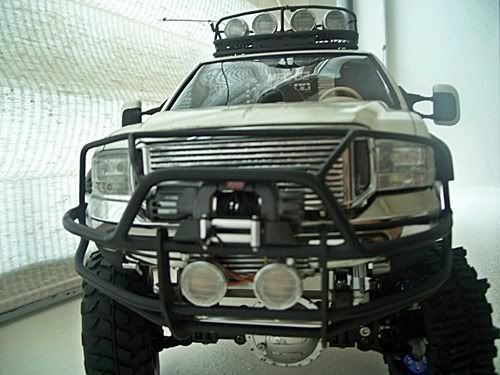 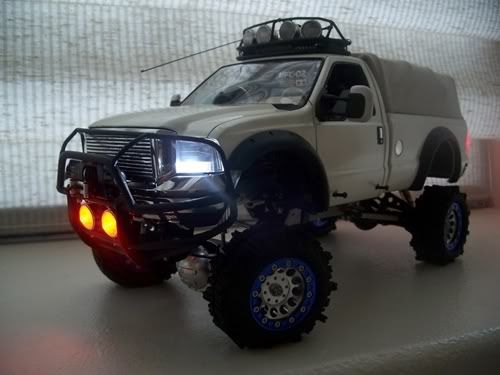 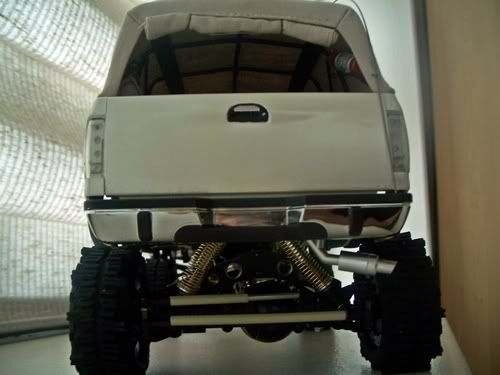  Here's my laundry list: (might be a good idea to write these things down so I don't forget) Decoy CB Antenna detail fix radio transmitter antenna fix lights and MFC-02 adjustments switch turn indicator lights (x4) (got them backwards) window detail, license decals finish interior and FIND A DRIVER fender badges. grill and tailgate emblems wheel locks Possibly new front shocks (and detail) front brush guard antenna mount brush guard "fire" fog lights manual switch or servo switch license plate tow hook and ball (?) rear bumper guard (?) rear tail light cage covers wiper blades finish truck bed soft top differential front and rear skid pans [would like to 4 link front] but probably wont nerf bars to replace running boards (?) rear steering decal shocks fender flare detail fender wells mud flaps redo exhaust with more realistic brass tube gas cap detail on and on and on....... and about 12 more things I can't remember but will do. If anyone knows where I can get 1 of those metal differential covers cheap, let me know. The same goes for a pair of shocks with oil reservoir (but I'll pay $$ for a good pair of clean looking shocks.) Last edited by FodigoDave; 02-23-2009 at 11:32 AM. | |||
|
| |
|
02-22-2009, 11:27 AM
| #107 |
| Rock Crawler Join Date: Nov 2008 Location: Lake Texoma, texas
Posts: 519
|
looks alot like my to do list. but, i think my list mybe a foot longer.
|
|
| |
|
02-22-2009, 12:16 PM
| #108 |
| RCC Addict Join Date: Jun 2008 Location: Monroe, NC
Posts: 1,547
|
Sorry t hear it got baked Dave. Looks good tho. You have a ways to go(by your standards. Justin |
|
| |
|
02-22-2009, 02:00 PM
| #109 |
| Rock Crawler Join Date: Jun 2006 Location: Wisconsin
Posts: 570
|
Looks great Dave. Soon as you get those turn signals back in the right places, those low light pictures are going to look as cool as your earlier photo, when you just had the corner markers lit. I read your entire thread last night and I like where your truck has gone. It looks like a really tough machine now, especially with the fender flares and the brush guard. Since your rear axle is 4 linked, I think it would really cool to do the same to the front, even though getting rid of the leaf springs kind of takes some of the High-Lift's originality away. No matter. You'll still have the three speed. |
|
| |
|
03-19-2009, 10:52 PM
| #110 |
| Quarry Creeper Join Date: Sep 2008 Location: Petaluma
Posts: 282
|
It's been a while since an update. I started a lot of assembly. Most of the delay was working out problems that kept coming up - the turn lights were fixed. I wasn't able to get the 3 speed shifting right (fixed), interior dash was interferring with the engine (fixed), Shaker box hitting cab (moved), mirrors reattached, windshield and windshield wipers installed, Interior dome light installed, Wiring nightmare figured out (it will eventually tuck under the truck in a gas tank), and a few other little minor things fixed. My new 6 channel radio doesn't want to work the lights remotely so I have to manually turn them on at the moment. The orange fog lamps were replaced with white ones. 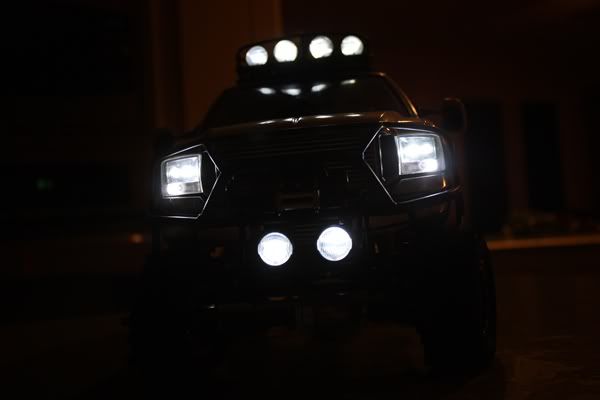 Winch was also installed and worked off the 6 channel radio. Currently - I'm making a hook out of brass. 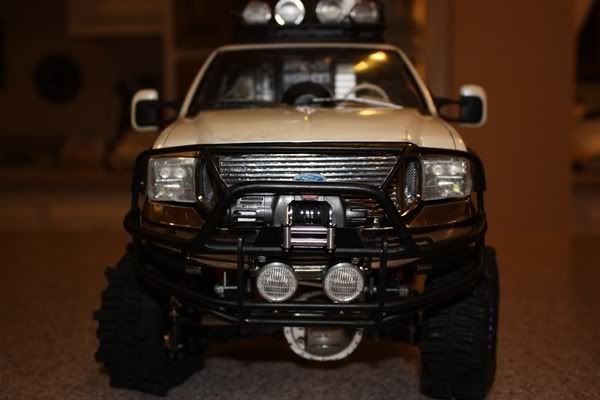 I wanted a bit more steering so I moved the steering shaft forward the front axle, it gives me a tighter turing radius. However, after getting the front brush guard installed, I ran into a little problem. The steering servo shaft hits the brush guard bracket - I'll be fixing that too next week. 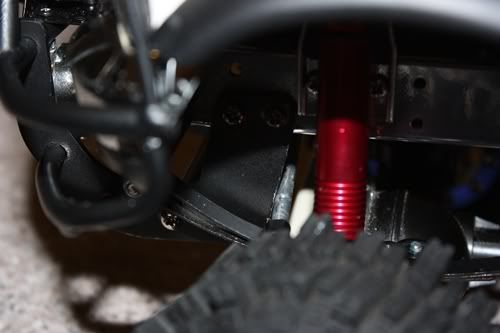 Last edited by FodigoDave; 03-19-2009 at 10:55 PM. |
|
| |
|
03-19-2009, 11:09 PM
| #111 |
| Rock Crawler Join Date: Jun 2006 Location: Wisconsin
Posts: 570
|
I like the dark photo, with the lights all burning. Did you do away with the orange marker/signal lights? I thought maybe you got the bulbs mixed up with the front off road lights, since they were orange and now your corner markers are white. The brush guard sure looks cool. The angles of the tube reflecting the light. |
|
| |
|
03-20-2009, 05:28 AM
| #112 | |
| Quarry Creeper Join Date: Sep 2008 Location: Petaluma
Posts: 282
| Quote:
WOW - Your pretty observant! I still have the turn/hazard yellow lights and I did change their positions to the inside while I was rotating the turn signals from one side to the other, but this was planned. I moved the turn signals inside simply to give it a different look. Afterwords, I thought it gave the truck a better looking "stance". To me - it looked stronger and more wide when all the main lights were as far outside mounted as possible. Its soooo bright now, you don't even want to look at it when all the lights are on - unless you want to see spots for about 20 minutes later. The yellow turn/hazard lights are in a wider place and look like they should be there when in operation. I also thought leaving the lenses clear gave it a more Europon look too (as do those white marker lights now). I know, this is a Desert/Artic/High Sierra vehicle so what gives? Its not like it's going to be seeing France anytime soon.... but it looks cool Believe me, I was tossing and turning over the decision for a long time before I made it official. I think it just adds to making it look more unique. Now - all you see is a plithra of white intimidating blinding beams of light screaming from the front. Like "move or be burned" if you dare get in my way. But - I guess I can always decrease the Suns lumens and change it back if it doesn't look right or qualify under "scaler" rules. I can't beleive you noticed that - GREAT EYE! | |
|
| |
|
03-20-2009, 05:36 AM
| #113 |
| Quarry Creeper Join Date: Sep 2008 Location: Petaluma
Posts: 282
|
Now - I just need some killer front shocks! Any ideas?
|
|
| |
|
03-20-2009, 06:31 AM
| #114 |
| RCC Addict Join Date: Jun 2008 Location: Monroe, NC
Posts: 1,547
|
Nice job on this thing Dave. You sure do know how to finish out a rig. What kind of shock are you looking for? RC4WD makes a lot of different type of shocks.Justin |
|
| |
|
03-20-2009, 07:05 AM
| #115 |
| Rock Crawler Join Date: Nov 2008 Location: Lake Texoma, texas
Posts: 519
|
really looking good. |
|
| |
|
03-20-2009, 09:13 AM
| #116 | ||
| Quarry Creeper Join Date: Sep 2008 Location: Petaluma
Posts: 282
| Quote:
 Quote:
| ||
|
| |
|
03-20-2009, 09:25 AM
| #117 |
| RCC Addict Join Date: Jun 2008 Location: Monroe, NC
Posts: 1,547
|
You could do turned down TLT shocks and tabe some tubing and mount to the side. I've seen it done before, I'll have to try find them and send you the link. Or you could use these: http://rc4wdstore.com/product_info.p...roducts_id=710 Not exactly right but kind of close. Justin |
|
| |
|
03-20-2009, 09:40 AM
| #118 |
| Rock Crawler Join Date: Jun 2006 Location: Wisconsin
Posts: 570
|
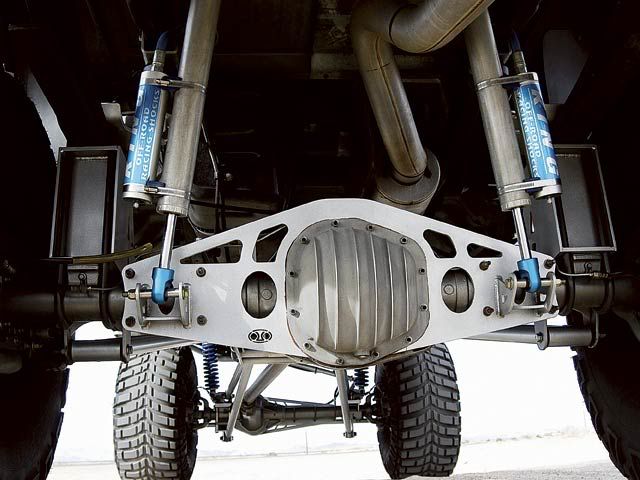
Dave, I usually have an eye for the details. What can I say? I too like the clear lenses. I will not be adding the transparent orange decals to my F-350's corner markers either, but I will run orange LEDs. I noticed a lot of the later model 1:1 F-350s have clear lenses too, so it's totally realistic. It's a much cleaner, modern look that way. That is a really cool 1:1 axle truss photo you posted. I recognize that exhaust bend anywhere. Must be a Dodge Ram with a Cummins Turbo Diesel under the hood. |
|
| |
|
03-20-2009, 05:56 PM
| #119 | |
| Quarry Creeper Join Date: Sep 2008 Location: Petaluma
Posts: 282
|
Thanks Justin - I saw those but wanted without an outer spring. I might have to make those too. Ugg. I'm sure I saw the shocks somethere tho - maybe I could get those from rc4wd and customize them a bit. Quote:
The shock photo was taken from this truck: 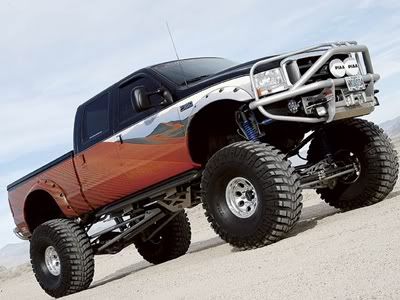 Here's todays update: Finished resolving the problem of the front turning rod (and front tire-to-tire rod link). I found both were hitting the brush guard mounting bracket. A little grinding action made quick work of the bracket's extra hendering material. 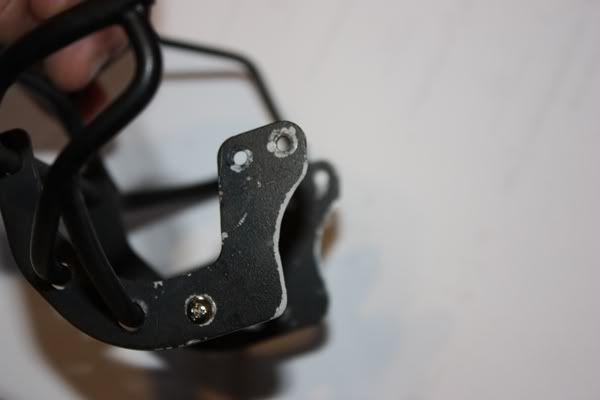 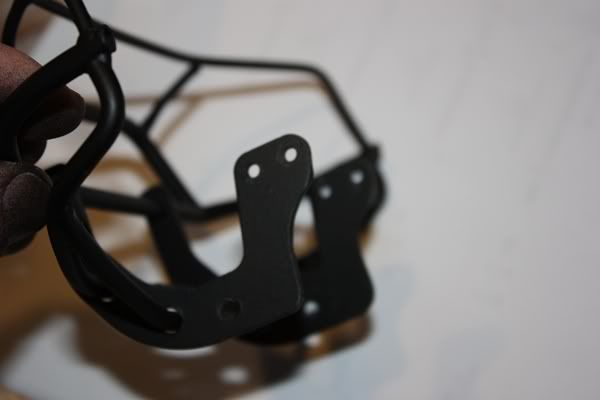 And I decided to start working on the front wheel wells. Only the front's will get them and the rear will remain open. My real 1:1 Pickup doesn't have rear wells either. 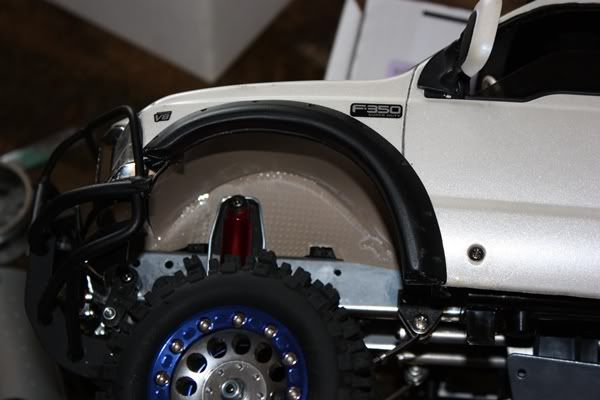 Last edited by FodigoDave; 03-21-2009 at 08:50 AM. | |
|
| |
|
03-21-2009, 09:23 AM
| #120 |
| Quarry Creeper Join Date: Sep 2008 Location: Petaluma
Posts: 282
|
UPdated! Things are looking up for the Fodster and its suprising how fast I'm moving now. It's been months and although it looks pretty done, it's time to do the fun detail work now. Today I finished the fender wells using a little left over styrene diamond plate from the interior and added a little flat black paint. It really made the area under the hood looked clean and finished. Since this is a big custom build job, I think (Justin) I'll be making the shock reservoir additions myself.  For those who already picked up my fire extinguishers - I'll be sending out the free updated labels shorlty. HERE IS THE PROTOTYPE (below). Complete with inspection tag (new), charge meter (new), and updated 09 label. There is a scale pull pin too on the otherside but you can't really see it here. Features all aluminum hardware & glass exterior that's hand crafted. After a month of designing just the labels (I like perfection), It's now a matter of fine tuning at this point (getting the colors right - hence the prototype below). The new label will now feature the K-Guard logo (in color), extinguisher instructions, & all the certification seals. At just an inch and a half tall, this little guy packs a lot of detail. 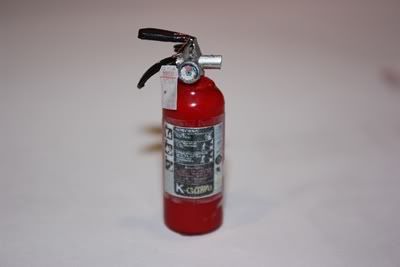 Last edited by FodigoDave; 03-21-2009 at 10:30 AM. Reason: spelling typo |
|
| |
 |
| |


 Linear Mode


