| |
 11-19-2010, 11:46 PM
| #21 |
| Pebble Pounder Join Date: Oct 2010 Location: Dunedin FL
Posts: 146
|
The level of detail you've got goin on is pretty amazing. Can't wait to see the end result after seeming your roof rack and accessories.
|

|  |
| Sponsored Links | |
| | |
|
11-20-2010, 01:26 AM
| #22 |
| Pebble Pounder Join Date: Feb 2010 Location: Arvada
Posts: 96
|
looks awesome always loved the disco body style
|
|
| |
|
11-20-2010, 02:08 AM
| #23 | |
| Rock Crawler Join Date: Feb 2009 Location: New England
Posts: 529
| Quote:
| |
|
| |
|
11-20-2010, 06:12 AM
| #24 |
| Rock Crawler Join Date: Dec 2008 Location: Fortuna Calif.
Posts: 997
|
Wow, your build is coming along very nicely. Your attention to detail is awesome, the rack and ladder are spot on  |
|
| |
|
11-20-2010, 10:11 AM
| #25 |
| Pebble Pounder Join Date: Aug 2010 Location: Chattanooga
Posts: 112
|
Thanks for the compliments fellas. I should have some more of the build posted up later tonight.
|
|
| |
|
11-20-2010, 10:13 AM
| #26 | |
| Pebble Pounder Join Date: Aug 2010 Location: Chattanooga
Posts: 112
| Quote:
Thanks again, -Steven | |
|
| |
|
11-20-2010, 11:33 AM
| #27 |
| RCC Addict Join Date: Feb 2008 Location: tauranga north island new zealand
Posts: 1,786
|
Very nice build,and nice its a bit different,as in being a disco. And the detail you;re putting into it,top notch, |
|
| |
|
11-20-2010, 11:49 AM
| #28 |
| I wanna be Dave Join Date: Jul 2006 Location: The beautiful Pacific Northwest
Posts: 6,923
|
Wow, just found this build, and I must say....very impressive. Your details and fabricating skills are amazing. Can't wait to see some more progress! BTW, I love Disco's. One of my all time favorite rigs: 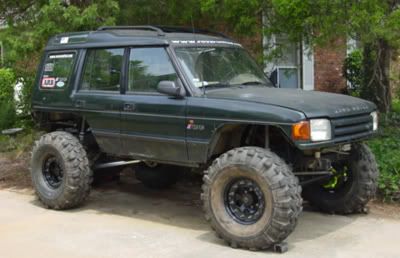 |
|
| |
|
11-20-2010, 11:49 AM
| #29 |
| Rock Crawler Join Date: Oct 2009 Location: San Diego
Posts: 599
|
Looking nice. Metal work is excellent. Especially like the roof rack How about using thin gauge wire to hold the mesh on instead of zip ties? |
|
| |
|
11-20-2010, 09:36 PM
| #30 |
| Pebble Pounder Join Date: Aug 2010 Location: Chattanooga
Posts: 112
|
Thanks again fellas for the compliments. Much appreciated. War Pig, That's a mean disco. Looks like he has 2 front Dana 60's for axles. Got any more info on it? I've seen guys put 60's on these, but I've never seen them with rear steer. I say rear steer because the rear looks to have locking hubs on it... Interesting. Cheers, -Steven |
|
| |
|
11-20-2010, 09:38 PM
| #31 | |
| Pebble Pounder Join Date: Aug 2010 Location: Chattanooga
Posts: 112
| Quote:
| |
|
| |
|
11-20-2010, 09:49 PM
| #32 |
| Pebble Pounder Join Date: Aug 2010 Location: Chattanooga
Posts: 112
|
Below are my progress photos for the rear tire carrier completion with the Hi-Lift jack holder. I'll go through step by step how it works. This is where I left off last time. Only now I've added the lug bolts to the carrier. I had to wait for the wheel so that I could get the bolt pattern correct. Also, on my 1:1 I have my carrier flipped upside down, so what you see is correct for me   On the bumper is the HiLift carrier. It is a sleeve design. You'll see as we progress through these pics.  Slid over the lug bolts is the base of the HiLift carrier  Then the tire goes on and gets secured with lug nuts... or .80 nuts in this case.  Now the sleeve fits over and they are secured together by a clip (kinda hidden in this shot)  Finally, the jack gets secured with a flat plate. Below are just a couple more shots of the set up.  Here are just a couple more angles of the set up.    |
|
| |
|
11-20-2010, 09:53 PM
| #33 |
| Pebble Pounder Join Date: Aug 2010 Location: Chattanooga
Posts: 112
|
***Front Bumper 2.0*** I'm very glad that I messed up the first version, because this came out far better than I hoped. As you look tat the following photos, take note that I still have a lot of clean up to do. I got some pretty bad boogers that need filing down. Straight on you can really see some of the bad boogers. They will get taken care of though.  This rear shot you can see the winch tray and frame mounts.    Here it is mocked up on the chassis with the body. I also started getting the posts made for the 3 Hella 4000 lights on the front. They are still kinda wonky and will be finessed, but you get the idea of how this bumper will look on the truck with all the lights.   Oh, in case you're wondering, the tabs on the top sides are for limb risers. I am quite happy with this bumper. At this point, there is still a lot of work to do on it with regards to clean up. Thanks for looking! Cheers, -Steven |
|
| |
|
11-20-2010, 10:01 PM
| #34 |
| Pebble Pounder Join Date: Aug 2010 Location: Chattanooga
Posts: 112
|
The rear bumper on my truck is all plate. Not much in the way of tube. This rear bumper is 10X more difficult than the front, but it came together nicely. Here is the CAD of the rear bumper.  At this point I have Printed the CAD onto adhesive paper and stuck to the sheet metal and cut and folded. As I mentioned before, this is the hardest thing I've done with this project. Cutting this out and bending alone took hours.  All welded together. Notice that I was able to include the class III hitch receiver as well.  The gap that you see between the mounting plate and the top of the bumper is where the body slides into. It is a press fit and is absolutely perfect.  The brass tubes you see coming from the wings are just a little added overkill. The wings are structurally sound, but I added the supports anyway. Not pretty welds, but they are not visible once everything is installed.  Here is the receiver shackle. It turned out fine. Currently, I only have a body mount pin to secure it. I will figure something else out permanently.  This photo shows the butchering I had to do to the body. The lower lip of the body (used to be the top of the molded bumper) is what slides into the bumper that I mentioned above.  Rear view of the installed bumper and body. Below it is a photo of my 1:1. Again, real happy with how it turned out.   Side views.   Last photos.   |
|
| |
|
11-20-2010, 10:06 PM
| #35 |
| Quarry Creeper Join Date: Jul 2007 Location: Dallas, TX
Posts: 441
|
This is one sweet build.
|
|
| |
|
11-20-2010, 10:07 PM
| #36 |
| Pebble Pounder Join Date: Aug 2010 Location: Chattanooga
Posts: 112
|
Finally the paint job! I have 3 coats of primer - sanded between each coat, 5 coats of top color - sanded between each coat, 2 coats of stripe white, 3 coats of clear, 2 coats of flat, 2 coats of flat clear top coat. All-in-all, a heck of a lot of paint. The following photos are after 5 coats of black. Each coat is sanded with 1200 grit sanding pads. The photos show the haze of final sanding. That disappears when clear coat is applied.    The next photos are the masking job for the zebra stripes. I was not sure if I was going to tape or liquid mask. The stripes are about 95% accurate to my 1:1.    These photos are after the second coat of white was applied.   The following photos are the result of 3 heavy clear coats. I did not spray too much onto the hood as I knew it would be getting flat paint. Pictures bring out the imperfections, but in person it feels like glass. Now it is time to spray the hood, grill, trim and window gaskets flat black.   This is 2 coats of flat and 2 coats of matte clear.  Lastly... Here is the result of several weeks and hours of paint. It is kinda dirty with fingerprints. After a couple more days, I will be comfortable cleaning without risk of damaging the paint:     The masking was way more tedious than I anticipated. The stripes took me about 4 hours. They could have taken less if I didn't try to replicate the stripes on my actual truck. The flat black masking took about 1.5 hours. |
|
| |
|
11-20-2010, 10:09 PM
| #37 |
| Pebble Pounder Join Date: Aug 2010 Location: Chattanooga
Posts: 112
|
Here's a shot comparing the scale with the real.  |
|
| |
|
11-20-2010, 10:18 PM
| #38 |
| Pebble Pounder Join Date: Aug 2010 Location: Chattanooga
Posts: 112
|
During the time that I was painting body, I had dropped off the rock sliders and bumpers to the powder coaters. I had them done in satin black. If I agreed to wait until they were doing satin black again, then they would only charge me $20 for everything. Well, I picked them up about a week afer I dropped them off and they look great! Best $20 I've spent on this project Got my bumpers and sliders reinstalled. They look AWESOME! I couldn't be happier. There are some areas that the coating was a little thick and pooled up when they baked it, but It still looks good. Here they are before I installed them back on the truck:  And following are WAAAAY too many photos of the bumpers and sliders installed. You will also notice my other updates like the windows, windshield wipers, Land Rover badges and snorkel. I ended up buying the snorkel made for the Hilux. I brought out the heat gun and tweaked it and now it looks like it was made for this body. Anyway, here are some photos:        So I decided for my mock-up to throw in the yank strap loosely stowed around the Hi-Lift... like I do after usage on the trail in real life.     My 1:1 has factory tint on the rear cargo doors, cargo glass, rear passenger doors, sunroofs and alpine windows. The front door glass and windshield are not tinted. So, I thought I'd do the same on my Scale truck. Also, when I off road, I usually have my driver's window all the way down and the passenger up, but to make it a little more interesting for my Scaler, I decided to have the passenger front window slightly open.  These last 2 photos are of the Hilux snorkel. I added a band of aluminum and a nut and bolt to represent the hose style clamp that is on my 1:1 version.   Here's the Safari Snorkel for my real truck.  |
|
| |
|
11-20-2010, 10:20 PM
| #39 |
| Pebble Pounder Join Date: Aug 2010 Location: Chattanooga
Posts: 112
|
I found a good photo of my 1:1 that is nearly the same angle as one of the shots I took of the Scaler.  |
|
| |
|
11-20-2010, 10:22 PM
| #40 |
| Pebble Pounder Join Date: Aug 2010 Location: Chattanooga
Posts: 112
|
I got the 3 lights installed on the front bumper. I still do not have LEDs for these yet, but that's ok. I also got the winch mounted with new winch cable from Stefan as well as his winch hook. Lastly, I installed the swiveling D-Rings onto the bumper. I am happy with how everything looks so far  I took some outside shots to get out of the studio:    Here's a couple of my truck with Mini Me on top:   |
|
| |
 |
| |


 Linear Mode


