| |
 12-08-2016, 09:24 PM
| #1 |
| Quarry Creeper Join Date: Nov 2010 Location: Athol
Posts: 296
|
Hey guys. Picked up an axial scx10 II a few weeks back. Been really enjoying it, but have decided to make it my own. First thing I did was buy a set of Pitbull rock beast XL's in the alien compound, and a set of RC4WD Raceline beadlocks. I star cut the foams before assembling everything because I thought the stock foams were a little too stiff. Then came the point of choosing a body. I wanted something relatively unique so I decided I'd throw my own twist on a JK China hardbody. And it went from there. Stay tuned!
|

|  |
| Sponsored Links | |
| | |
|
12-08-2016, 09:52 PM
| #2 |
| Quarry Creeper Join Date: Nov 2010 Location: Athol
Posts: 296
|
So everyone knows what a China JK body looks like. So when mine came in the mail, I totally disassembled it and got it ready to cut.   Then out came the cutoff wheel. Wheelbase turned out to be perfect to the 12.3 wheelbase of the SCX after stretching it for the JK8 conversion. 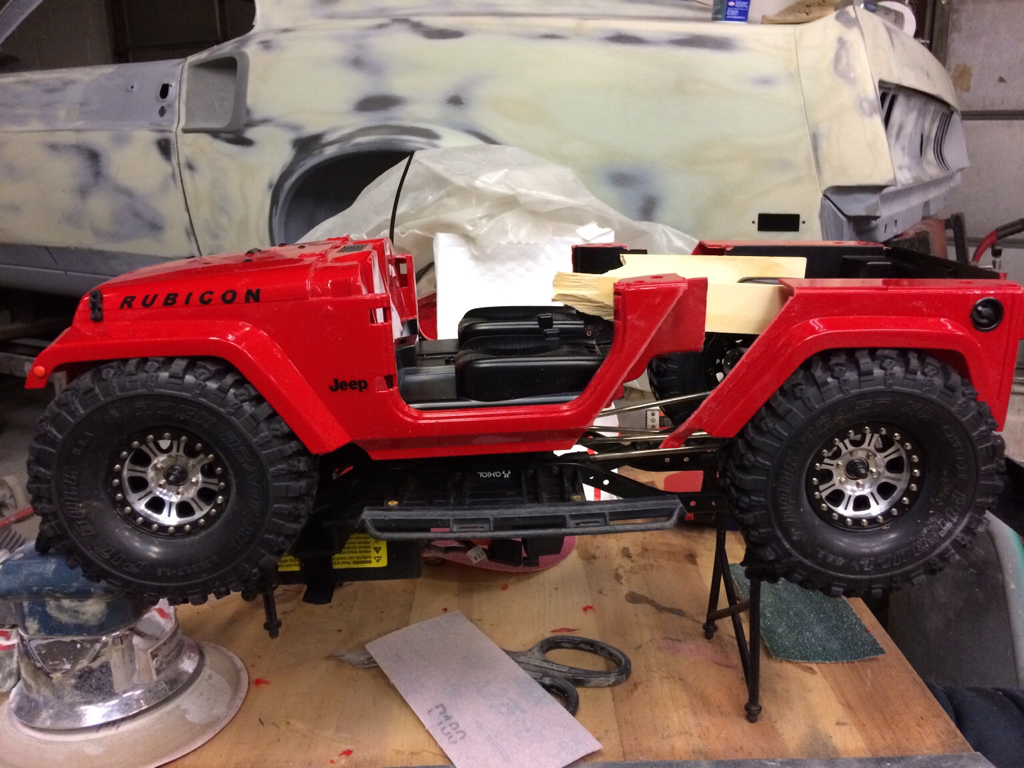 Then I cut out the back half of the floor, where the bed floor will soon be.   Next I made templates of the pieces of styrene that would be going behind quarter panel to be reattaching the two halves of the body.    Then before I glued those pieces on, i thought it would be a good idea to cut the rocker panel off the jeep, since I wasn't planning on using it anyways. It would also make gluing the piece in place easier. Before:  After:  So next I glued the panels in place.  Since they we glued behind the exterior plastic, there obviously was a need for a filler piece, so I made that, and glued them in place.  Then cut them to length.    Next I decided to remove the rear flares. One because it would made the bodywork process easier, and two, because I never planned on using a stock flare. Hearing and exacto blade with a torch made a very nice, crisp cut to remove the flares.  Next I quickly block sanded the stretched area with 80 Grit to knock down any high spots in order to get it ready for bodywork. I used a small sanding block used for removed dirt nibs from clear coat. Worked well.  Then came the first coat of putty.   And sanded. Far from perfect.   So I added another coat, and block sanded again.     Then another coat of filler applied and sanded.  Then I had to get the stepped bodyline in the stretched portion of the quarter. I just clamped sheet metal on the body as a guide for the cutoff wheel, and so I didnt gouge any of the bodywork, and lightly recreated the step, then finished with 80 grit. Still have to finish with the other side, then 180 grit the bodywork, and then it can be sprayed with some high build primer.     The left side is finished. Just have to button up the right side. Thoughts, comments, questions? Stay tuned! |
|
| |
|
12-09-2016, 12:37 AM
| #3 |
| Rock Stacker Join Date: Jul 2016 Location: Amherstburg, Ontario, Canada
Posts: 95
|
You've got my undivided attention!! Can't wait to see where you take this. Quick question though...what does "suitable for infra red" mean on the glazing putty container?? |
|
| |
|
12-09-2016, 01:39 AM
| #4 | |
| Quarry Creeper Join Date: Nov 2010 Location: Athol
Posts: 296
| Quote:
You know..... I've never noticed that before. I'm wondering myself. | |
|
| |
|
12-09-2016, 10:21 AM
| #5 |
| Quarry Creeper Join Date: Nov 2010 Location: Athol
Posts: 296
|
Got some more progress done today. Finished up the bodywork between waiting for some coats of paint to dry on a customers car in the shop here, and was able to mask it and give it a few coats of primer.     I didn't want to get primer in the jambs because it's a very high build primer and would possibly affect the way the doors fit, so I masked off the doors and then installed them on the jeep.  Spray gun hauler?...  All unmasked and guide coated. Ready for some block sanding this weekend. Need to get some more glue and start on the drop bed and cut the top.   Can't wait to get some paint on this thing! |
|
| |
|
12-10-2016, 07:22 AM
| #6 |
| I wanna be Dave Join Date: Dec 2006 Location: Where the sheep run scared.
Posts: 3,008
|
Looks like we have a true body guy in the house! I bet it's nice to do sanding on 1/10 scale as opposed to the 1.1's. Lol. Nice equipment and picture tutorial. Keep up the picture documentation/tips/and stellar build sir  |
|
| |
|
12-10-2016, 08:05 AM
| #7 | |
| Quarry Creeper Join Date: Nov 2010 Location: Athol
Posts: 296
| Quote:
Lol... yes. If you look close there is a 69 Mach 1 Mustang in the background of the pictures. Have countless hours in that car, so it's nice to cut something apart, stretch it, and have some nice bodywork done and in primer in about 2 hours. Thanks for the kind words bud! | |
|
| |
|
12-10-2016, 10:40 AM
| #8 |
| I wanna be Dave Join Date: Dec 2006 Location: Where the sheep run scared.
Posts: 3,008
|
Just props when it's due my brother. I build 1.1 off road trucks and vintage motorcycles along with the tiny trucks. I can look in the background and appreciate the long hard hours spent in the 1.1 world. I'm not a 1.1 Jeep bolt on guy. I cut the entire hanger system out, measure, and weld new in. I have dabbled in body work with my vintage Triumph scoots and more recently with my 13 inch bed bob on the 84 Yota. Please keep us up to date with your sharp build. If you need anything shoot me a pm |
|
| |
|
12-10-2016, 11:20 AM
| #9 | |
| Quarry Creeper Join Date: Nov 2010 Location: Athol
Posts: 296
| Quote:
I can definitely respect metal work as it's actually by far my favorite part of the job. Believe it or not, EVERYTHING except the roof, floor, and firewall was replaced on the 69 Mach 1. And I loved doing it. But heading out to the garage now, to start on shortening the roof, and starting on the bed. I'll keep you guys updated. | |
|
| |
|
12-10-2016, 02:26 PM
| #10 |
| Quarry Creeper Join Date: Dec 2016 Location: Womelsdorf
Posts: 195
|
Sir would you mind telling me why you made a angle cut instead of cutting vertical? I am new to this and like your work very much!
|
|
| |
|
12-10-2016, 02:38 PM
| #11 |
| RCC Addict  Join Date: Apr 2015 Location: New Brunswick,Canada
Posts: 1,425
|
I'm assuming more stable when glued together rather then up and down cut... Just like building a bridge.. great job man..... |
|
| |
|
12-10-2016, 03:34 PM
| #12 | |
| Rock Stacker Join Date: Aug 2016 Location: Northern AZ
Posts: 69
| Quote:
| |
|
| |
|
12-10-2016, 11:38 PM
| #13 |
| I wanna be Dave Join Date: Aug 2005 Location: NE Ohio
Posts: 8,817
|
Really great work, it didn't take long to figure out you knew what you were doing by the technique and materials you were using. Great start, can't wait to see more
|
|
| |
|
12-11-2016, 06:10 AM
| #14 | |
| Quarry Creeper Join Date: Nov 2010 Location: Athol
Posts: 296
| Quote:
I made the angled cut where I did because it was the easiest place to make the cut. If I had cut it vertically I would have either had to cut into the wheel opening, or into the door jamb. And I didn't really want to mess with any of that. | |
|
| |
|
12-11-2016, 06:12 AM
| #15 | |
| Quarry Creeper Join Date: Nov 2010 Location: Athol
Posts: 296
| Quote:
Oh right. Makes total sense now. Only lamp I have to accelerate the drying process is the big Nashua wood stove in the corner. Lol. | |
|
| |
|
12-11-2016, 06:13 AM
| #16 | |
| Quarry Creeper Join Date: Nov 2010 Location: Athol
Posts: 296
| Quote:
Thanks for the kind words. | |
|
| |
|
12-11-2016, 06:30 AM
| #17 |
| Quarry Creeper Join Date: Nov 2010 Location: Athol
Posts: 296
|
Small update. Got the top chopped up and glued together. Basically looked at it for a few minutes to figure out where to cut it to make it the easiest to make look factory, and still strong. So I decided to cut it on the factory lines. If that makes sense.     Then I decided to shorten up the side window panels to the correct size. Found a good picture for reference.    Then quickly taped it together to continue the mock up process.   Then decided to cut the remaining rear part of the roof, to match up with the front.   Turns on the jeep must slightly taper in as you go down the quarter panel, so the rear portion of the top was just a hair too narrow, so I made two relief cuts so I could open it up to the correct size. That's the reason you see a broken paint stick taped to the back of the top, it's helping to keep the cab spread out to where it needs to be.  Starting to take shape.  As you can see, the top must gradually taper down as you get closer to the back as well. Once the portion of the roof is glued down above the small side window, it will require a piece of styrene to fill that "step" that is now on the top of the cab.  Glued the whole top together, and was left with this.  As you can tell, the top is going to need a decent amount of bodywork to get it looking correct. But that's not a big deal. Just takes time. I might start on that today. Also you might be able to see in the last picture but I bent up the start of a quick drop bed. Not sure if I'm liking the one in the picture so I might redo it, we will see what the day brings. Thanks for all the kind words guys. Stay tuned! |
|
| |
|
12-11-2016, 01:17 PM
| #18 |
| Rock Stacker Join Date: Aug 2016 Location: Northern AZ
Posts: 69
|
Wow, this is coming together really nicely. Great work =)
|
|
| |
|
12-11-2016, 02:32 PM
| #19 |
| Quarry Creeper Join Date: Dec 2015 Location: Centerton
Posts: 234
|
This is awesome dude keep up the great work!!! So far mine and yours a pretty simmilar Sent from my iPhone using Tapatalk |
|
| |
|
12-11-2016, 03:05 PM
| #20 |
| Pebble Pounder Join Date: Dec 2006 Location: Irvine, CA
Posts: 143
|
Wow great work so far!
|
|
| |
 |
 Jeep JK8 Build - Similar Threads
 | ||||
| Thread | Thread Starter | Forum | Replies | Last Post |
| Jeep JK8 - Carnage Creek Trail | BENDER | Videos! | 0 | 04-08-2016 10:40 AM |
| Jeep JK8 Off Road | BENDER | Scale Videos! | 2 | 09-04-2015 12:40 PM |
| Jeep Brute/JK8 thread. | tozrovr | General Scale Talk | 32 | 06-16-2014 01:46 AM |
| Vwerks jeep jk8 recon build | lappdogg | 1.9 Scale Rigs | 14 | 12-01-2012 08:21 PM |
| |


 Linear Mode


