| |
| |||||||
 |
| | LinkBack | Thread Tools | Display Modes |
 09-20-2019, 01:19 PM
| #41 |
| Pebble Pounder Join Date: Sep 2018
Posts: 109
|
Your build looks awesome dude! An I can't believe how much your links cost!! They do look very nice though!! Sent from my ONEPLUS A6003 using Tapatalk |

|  |
| Sponsored Links | |
| | |
|
09-20-2019, 04:07 PM
| #42 | |
| Quarry Creeper Join Date: Nov 2018 Location: Mexico, Guadalajara
Posts: 281
| Quote:
 ), maybe I have to look for local lathe and milling machine workshops for this kind of parts ), maybe I have to look for local lathe and milling machine workshops for this kind of parts
| |
|
| |
|
09-20-2019, 04:27 PM
| #43 | |
| Quarry Creeper Join Date: Nov 2018 Location: Mexico, Guadalajara
Posts: 281
| Quote:
almost 3000 USD invested in this project, I I hope my wife never find these costs. I don't want to spend more | |
|
| |
|
10-15-2019, 05:15 PM
| #44 |
| Quarry Creeper Join Date: Nov 2018 Location: Mexico, Guadalajara
Posts: 281
|
another steep on this building the custom servo winch/body mount build on my first attempt building this part I notice that it doesn't fit well when I drill the holes and mount the servo winch  so I decided to star over and braze the parts together instead bending the stainless steel plate the result was much better 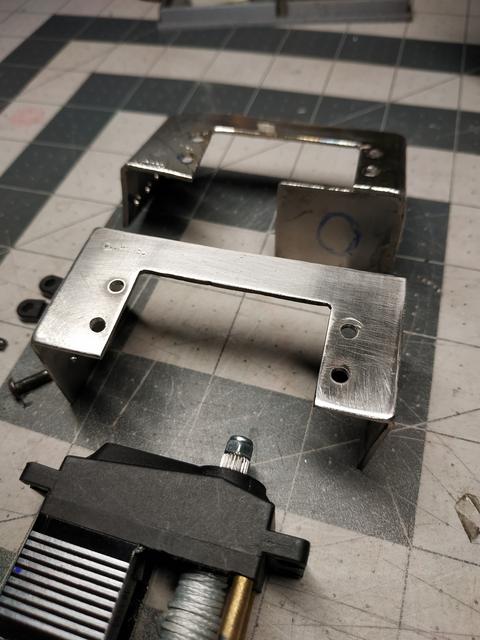 after some hours trying to figure out how to mount the Unimog cab, I realize that some mods the recently made servo winch mount may help to mount the body too so I braze additional tabs (pig hears) to the servo mount so I can embed the body to the chassis using a couple of screws in the front   My intention is to attach the cab to the roll cage using some custom tabs brazed to the roll cage and a couple of screws to secure the body in place so the front body mount plus the back screws may be enough to securely hold the body, I hope that will work! 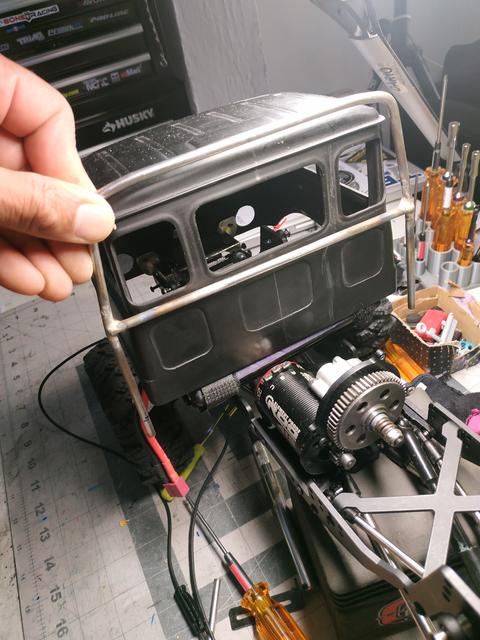 I am a slow builder |
|
| |
|
10-15-2019, 10:30 PM
| #45 |
| I wanna be Dave Join Date: Jul 2014 Location: Deep South
Posts: 3,444
|
Looking good.
|
|
| |
|
10-16-2019, 01:06 AM
| #46 |
| Pebble Pounder Join Date: Sep 2018
Posts: 109
|
Looks awesome dude!! Did you make winch yourself? Sent from my ONEPLUS A6003 using Tapatalk |
|
| |
|
10-16-2019, 08:32 AM
| #47 | |
| Quarry Creeper Join Date: Nov 2018 Location: Mexico, Guadalajara
Posts: 281
| Quote:
this is what I'm using powershift RC technologies PST 300 Servo winch found it at teamknkhardware | |
|
| |
|
12-26-2019, 05:34 PM
| #48 |
| Quarry Creeper Join Date: Nov 2018 Location: Mexico, Guadalajara
Posts: 281
|
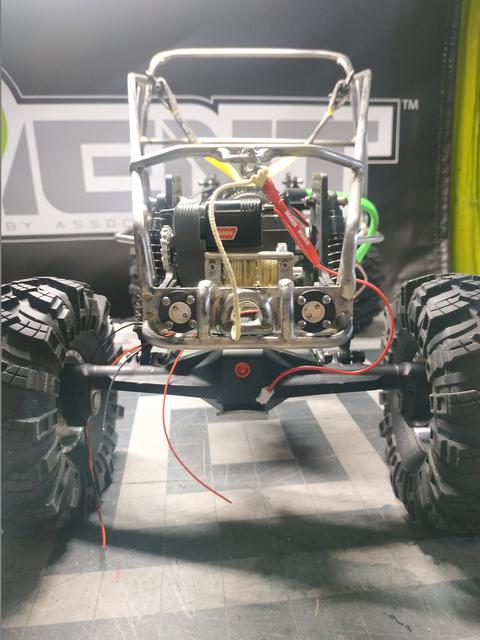
I finally had some time to continue with this project this is going to be about how I build the rear roll cage for this rig My initial intention was to replicate the "Team Jccmog" Unimog but the wheelbase on my chassis is longer, so the original design of two straight rear bars look awkward on my model  So I thought about adding a rear winch to fill the space so now I have to design and build a custom real roll cage first I built the structure that fits in the back of the cab 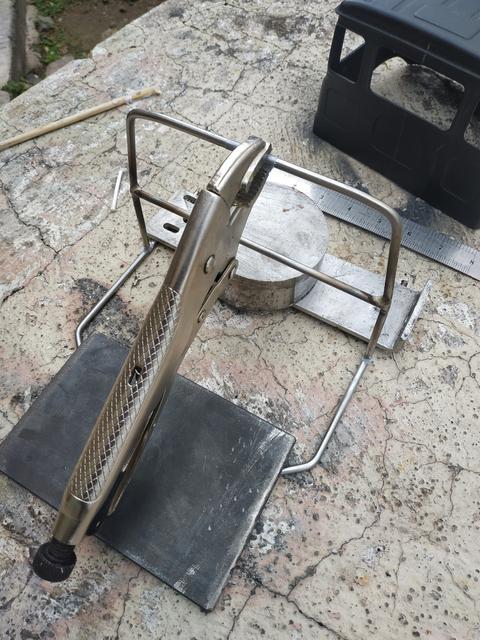 then I build the back cage support, this part includes the winch line fairlead and the mounts for the Powershift RC Technologies PST Flush Mount Tailights 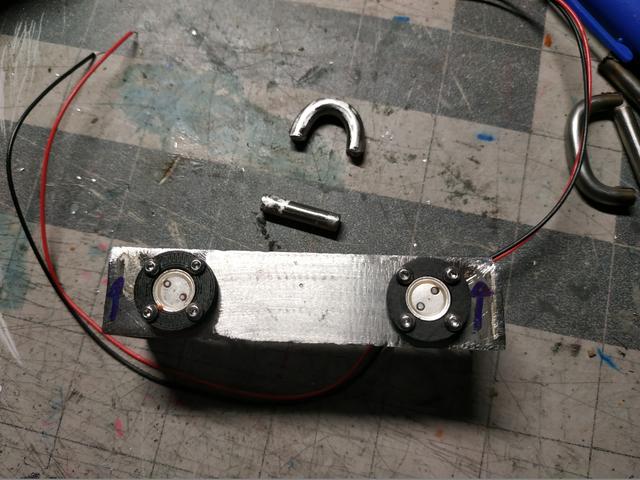 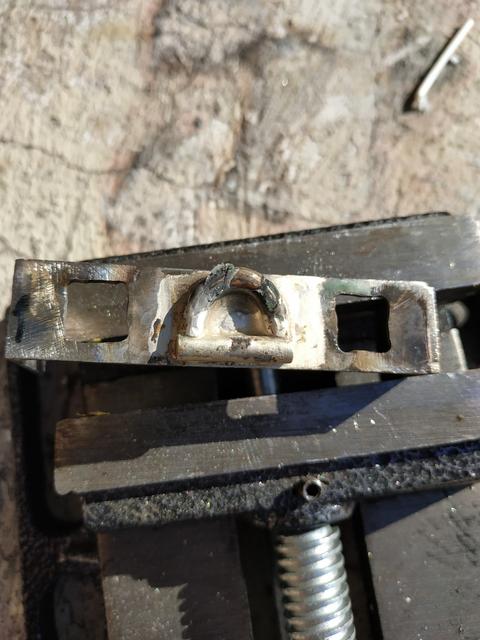 then rear roll cage is going to have 6 support plates, 2 in the front 2 in the middle and 2 in the back the BPC GenX Steel Rail Chassis has several mount holes, so I can fix the roll cage on them 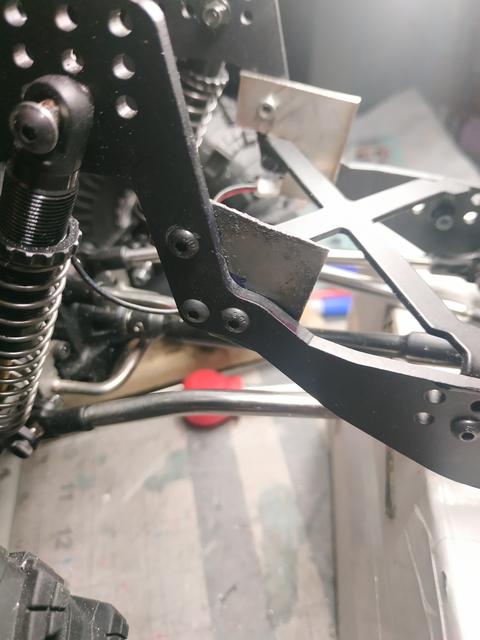 Now that I know where the supports are going to be located, I can continue with the brazing  to avoid offsets in mounts I decided to fix the lateral plates to the chassis and the braze the roll cage. I noticed later that the powder coating applied to the chassis was a little bit burned, also a couple of plastic rod ends were burned but I can replace it later 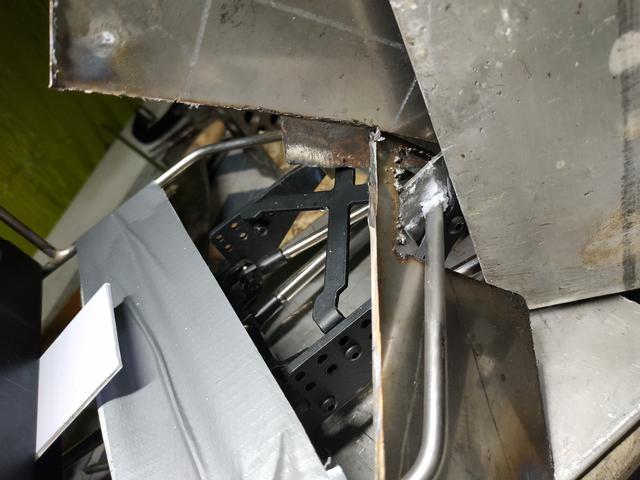 fortunately, after the brazing the fit was perfect.  now let's braze the front support for this roll cage.  In my opinion, the most difficult part is to build the parts prior to brazing. you have to make the parts fit properly before brazing 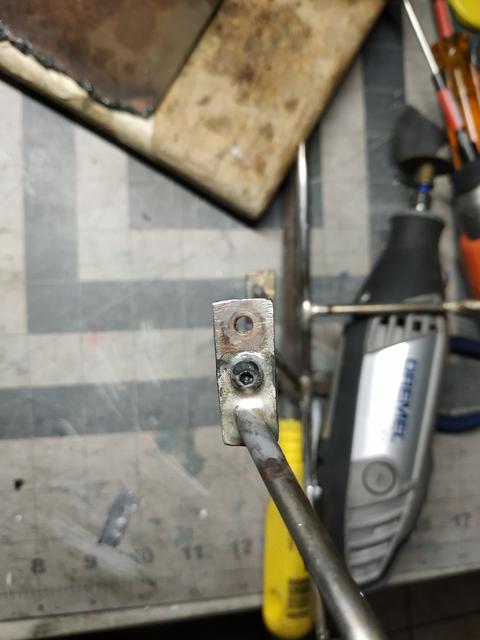 notching the steel rod is difficult if you don't have the right tools, I am working with the following tools 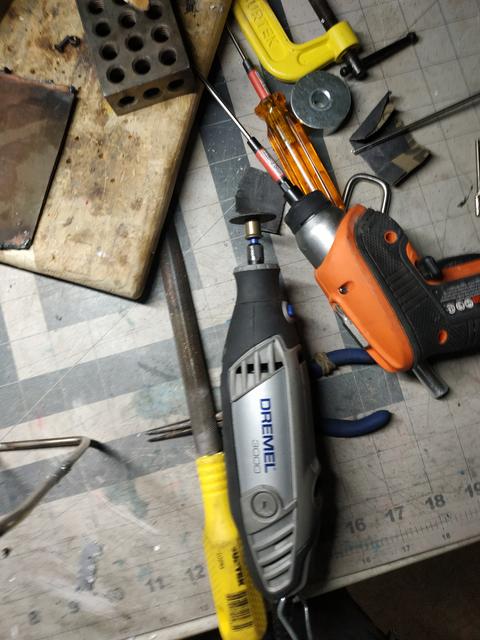  I have to find a wat to reinforce the structure so let's build a couple of lateral supports 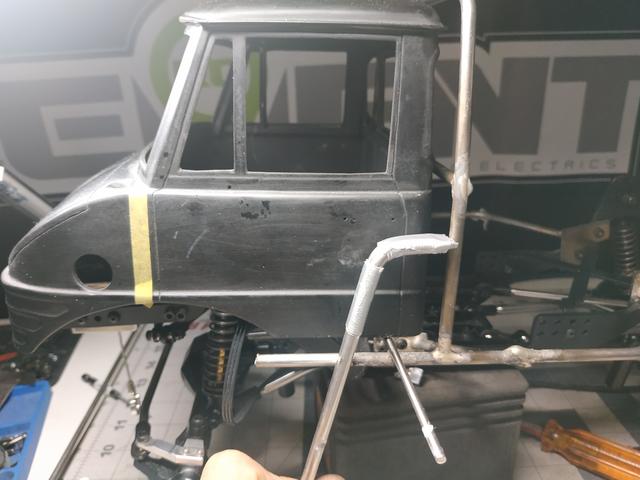 after this, I can finally braze the long rear bars 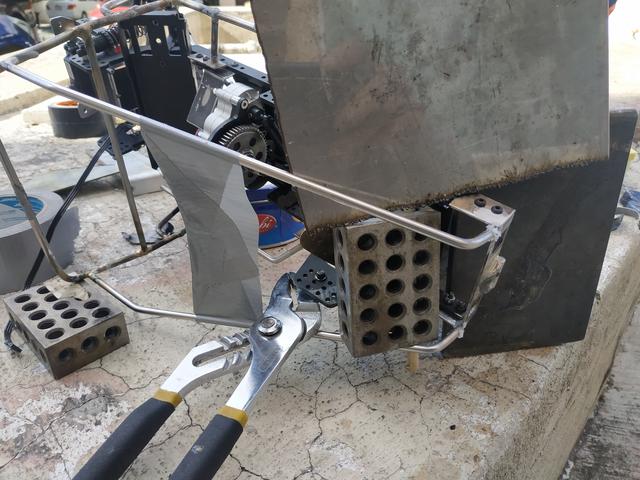 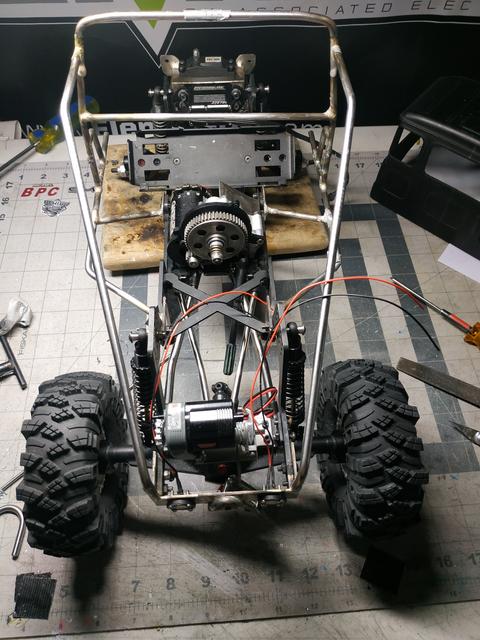 Now I can add some extra supports and details including the fairlead for the rear winch  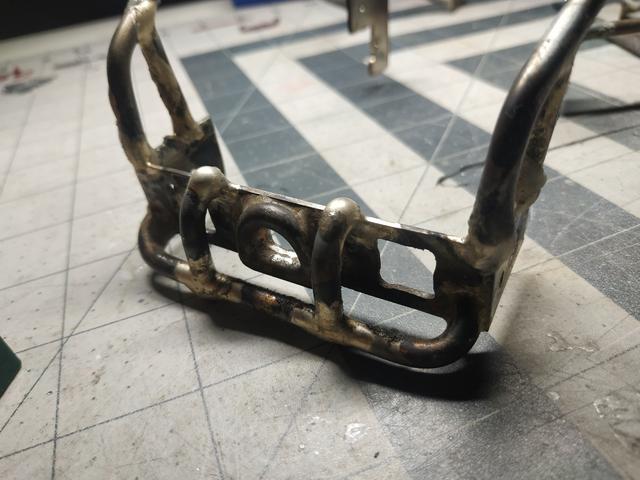 I am going to use a different steel rod diameter for the winch hook holder and for the upper lift plates where I going to install a pulling strap   finally, let's build a different fairlead for the rc42w winch 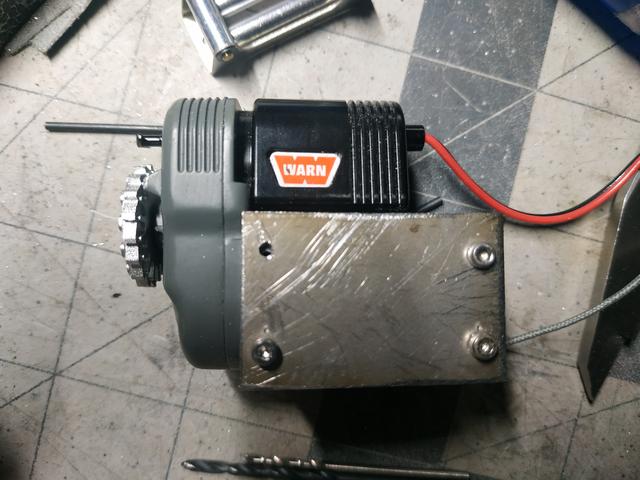 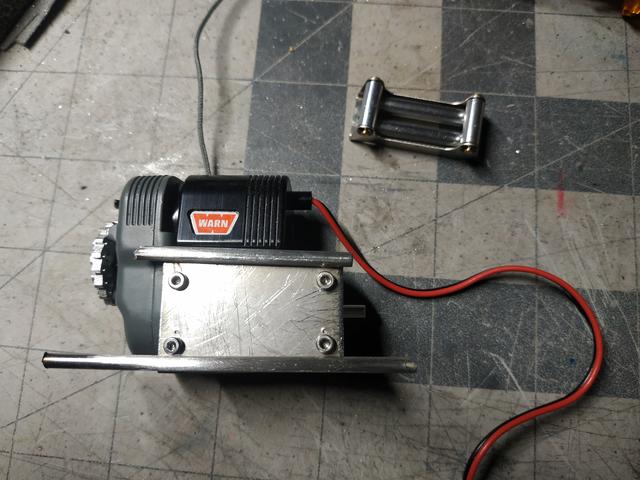  this is the final result 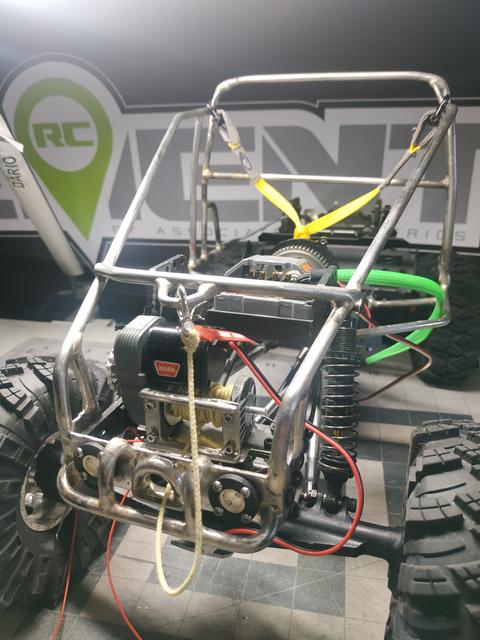 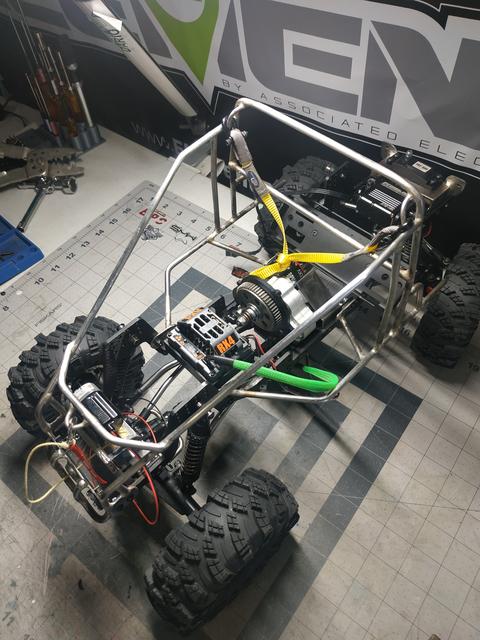 Last edited by antigacho; 01-07-2020 at 10:14 AM. |
|
| |
|
01-07-2020, 10:17 AM
| #49 |
| Quarry Creeper Join Date: Nov 2018 Location: Mexico, Guadalajara
Posts: 281
|  |
|
| |
|
01-12-2020, 08:32 AM
| #50 |
| I wanna be Dave  Join Date: Oct 2012 Location: Medina
Posts: 2,263
|
Awesome build! Awesome fabrication skills and problem solving. Excellent documentation of what you’re doing and how you’re doing it as well. Great thread! This is going to be one sick rig!
|
|
| |
|
01-14-2020, 11:06 AM
| #51 | |
| Quarry Creeper Join Date: Nov 2018 Location: Mexico, Guadalajara
Posts: 281
| Quote:
I am a slow builder, been an office worker I don't have time to work on this during the week and the weekends I am usually busy practicing rock climbing or playing with my other rigs Actually, this the building is stuck, I am debating the best way to build a bumper and install the body I have a problem with the battery position because is mandatory to remove the cab to have access to the battery, I think that some kind of hinge would work but I have to build the bumper first I am planning a bumper (screwed) bolted the chassis rails this are my options  since I have to remove the cab to have access to the battery sadly the cab roll cage is not an option | |
|
| |
|
01-14-2020, 02:04 PM
| #52 |
| I wanna be Dave Join Date: Oct 2012 Location: Medina
Posts: 2,263
|
My first thought was the same as yours. Incorporate some type of hinge mechanism in the front bumper so the body can just pivot forward on it when you need battery access. Id use rare earth magnets on the back of the cab. They hold extremely strong, but easy enough to wiggle and pull up so you can rotate the can forward on the hinge.  |
|
| |
|
01-22-2020, 11:23 AM
| #53 |
| Quarry Creeper Join Date: Nov 2018 Location: Mexico, Guadalajara
Posts: 281
|
I began the building of the front bumper it is inspired on the Sülysáp 4x4 Team Unimog 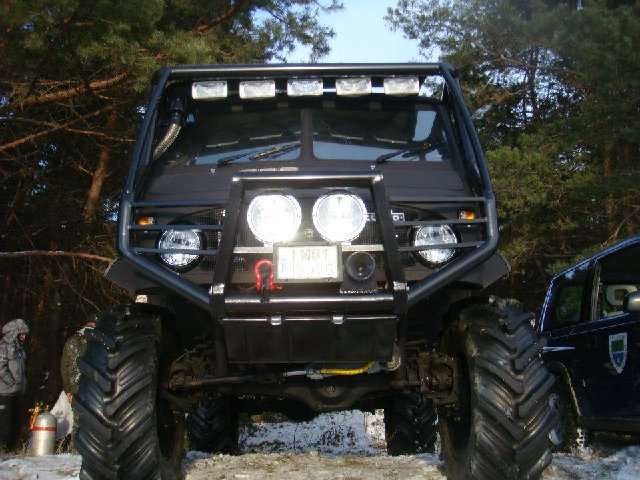 materials used stainless steel 3/16 rod (I got it at a local store) Steel Key Stock, 1/8" Thickness, 1/4" Width, 12" Steel Key Stock, 1/8" Thickness, 3/8" Width, 12" First I made the lateral mounts using the 1/4 width steel, I drilled a hole to the lateral bars to mount the main lower bar, centering the hole was difficult because I don't have a bench drill so I used a small drill and then I Use my Dremel to correct the misplaced holes 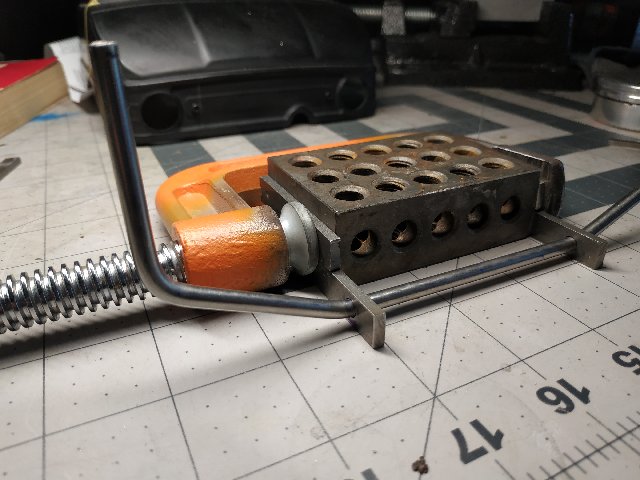 I use the 3/8 thickness steel to fabricate the front part of the bumper, it takes me a couple of hours to make it fir together before Silber brazing  I made a lot of mistakes during silver brazing because it was difficult to keep the parts in place during the process, to be honest, I am not totally satisfied with this work but I don't want to repeat it and I don't have more plain steel bars for another try, so I am going to keep this and continue the building  I didn't finish this, next step is to brace/solder the light covers or reinforcements for the bumper, I going to use 3mm stainless steel rod for that |
|
| |
|
01-22-2020, 06:50 PM
| #54 |
| I wanna be Dave Join Date: Aug 2004 Location: central VT
Posts: 2,300
|
It may be built with a slow pace, but quality takes time. Most excellent work you've done. As a Unimog fan, and a trial's fan, I'll keep following your updates. Not sure if its feasible with what you've already made, but it would be sweet to make the cage go over the cab with a couple bolts to hold the rear section, then have the entire cab and bumper pivot forward to access battery? |
|
| |
|
01-23-2020, 10:00 AM
| #55 | |
| Quarry Creeper Join Date: Nov 2018 Location: Mexico, Guadalajara
Posts: 281
| Quote:
thanks for your comments meatmonkey, I have been racking my brain about the cab mounting and battery access. at this point, I am not sure if the mounts on the winch base will works just as you mentioned Initially, my idea was to replicate the TeamJccmog Unimog building an integrated bumper + Exo cage for the cab, but I thought that a moving bumper doesn't provide enough protection or will to fail, My mistake but I will keep that idea in my mind for the future, rebuild is always possible Now I have to finish the bumper and instead of building a cage for the cab I have to build some kind of support for the upper spotlights that I pretend to mount, Maybe I can extend that support to secure the cage to the shock towers  | |
|
| |
|
01-24-2020, 04:51 PM
| #56 |
| Quarry Creeper Join Date: Nov 2018 Location: Mexico, Guadalajara
Posts: 281
|
I will continue the bumper fabrication this weekend, meanwhile. I notice a small 3d print business near to my apartment, so using Tinkercad I design a basic ESC mount for this project I will try to go there and order the 3d print next week 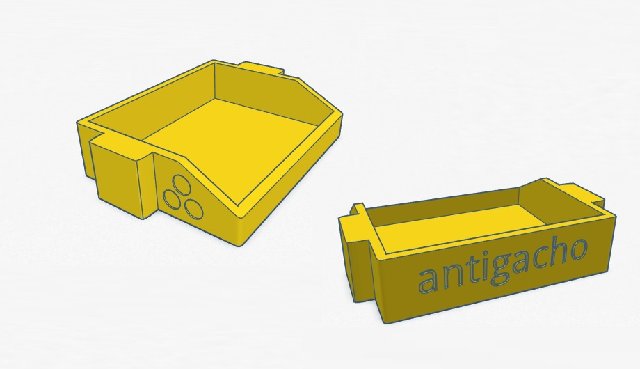 I am using the Tekin RX4 ESC STL file available at thingiverse.com |
|
| |
|
01-24-2020, 05:17 PM
| #57 |
| I wanna be Dave  Join Date: Dec 2005 Location: Happiness is a warm AK.
Posts: 12,563
|
Love it!😍 Reminds me a little of my Mog Helmet!  |
|
| |
|
01-27-2020, 10:19 AM
| #58 |
| Quarry Creeper Join Date: Nov 2018 Location: Mexico, Guadalajara
Posts: 281
|
Finally some progress with the bumper. this is where I left the work the last week 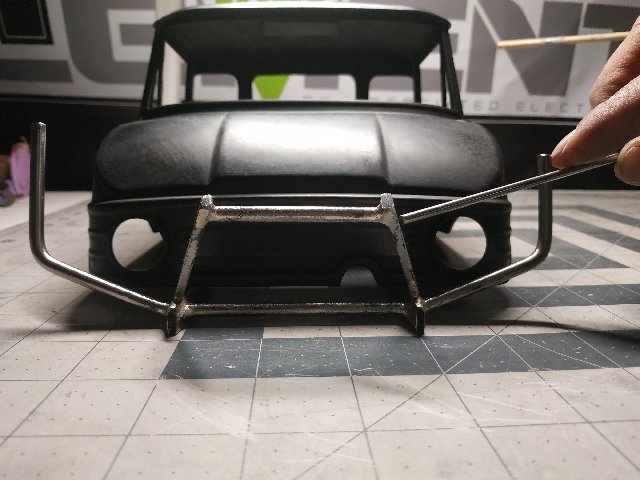 to complete the bumper I have to braze 6 little rods to protect the front lights, Also I have to install the fairlead for the winch first lest brace the upper section 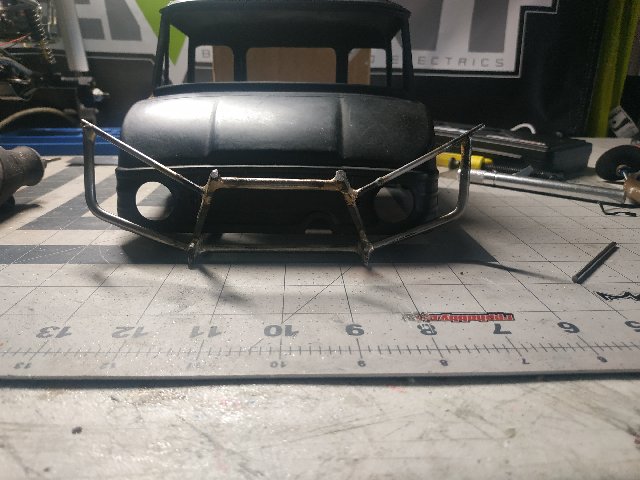 FAIL, I don't like how it looks, very tall in my opinion I have to shorten the length of the sides and braze again now it looks better 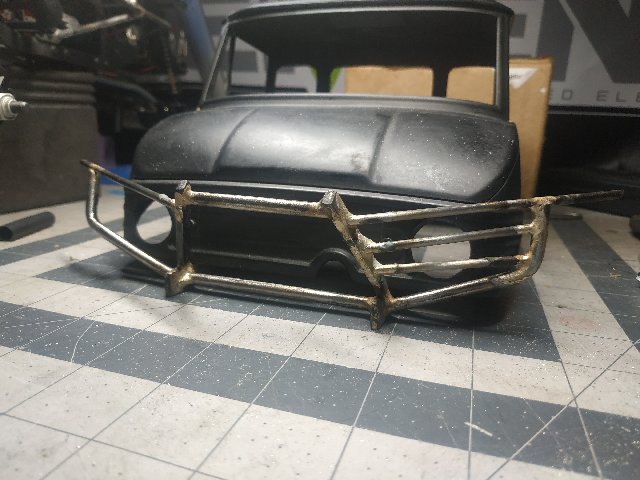 the right side is done, let's work with the left. the most difficult part is to notch the steel parts to make it fit together prior to brazing, a lot of correction and Dremel work is necessary. 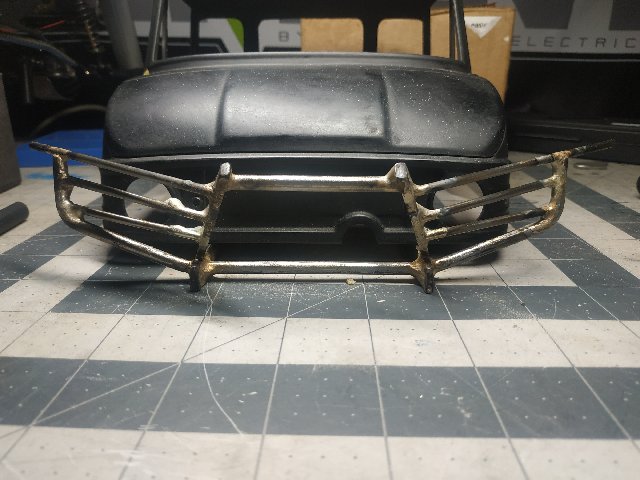 After the brazing, I noticed that the parallel bars are not perfectly symmetrical but correcting that little offset implies a lot of extra work so let's leave it like that Next step, build and brace the winch fairlead 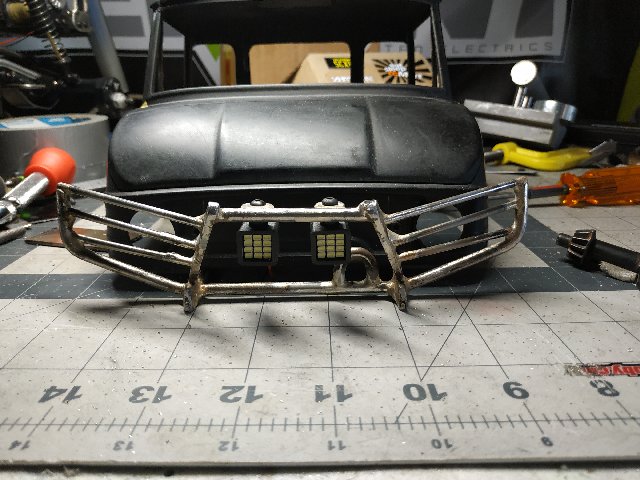 I also have to install some little fairlead to the servo winch mount this is to avoid the contact of the winch line with the body, I am worried about brazing this little part because I don't want to overheat and break the previous brazing  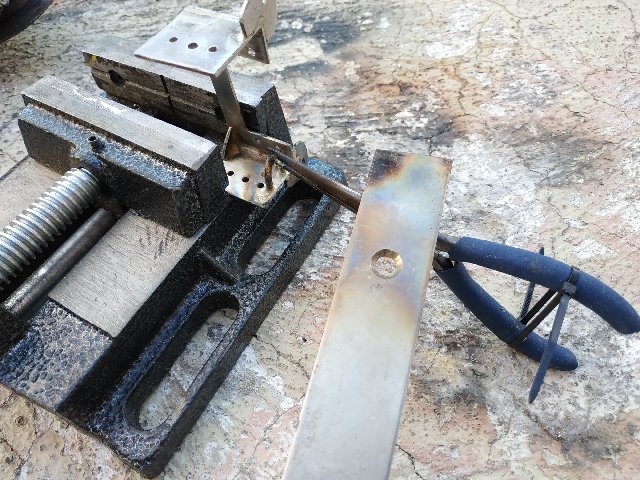 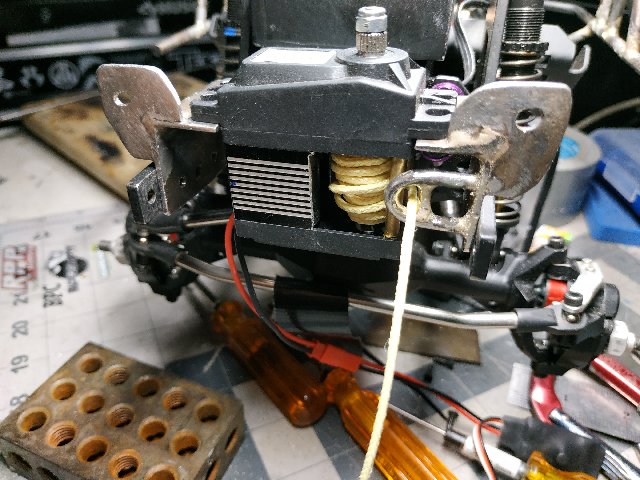 After drilling the holes to mount the bumper I notice a little offset in the position of the fairlead, it must be placed a couple of millimeters to the left, lest braze it again, do you notice the difference? I also fabricate and brazed a couple of stainless steel tabs to mount the spotlights 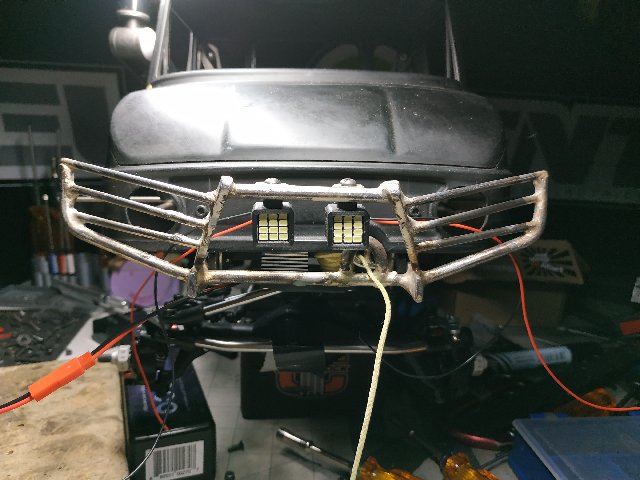 I like the final work, but it is not complete, I have to fabricate some kind of skid plate to protect the lower part of the servo wich After that, I have to find a way to mount the cab. |
|
| |
|
01-31-2020, 10:11 AM
| #59 |
| Quarry Creeper Join Date: Nov 2018 Location: Mexico, Guadalajara
Posts: 281
|
It takes me at least 3 weeks but I finally finished the bumper I braze a skid plate to protect the servo winch, fortunately, after the brazing the angle was perfect and I had enough clearance under the servo winch   I also include a couple of lateral supports, this is the ugliest part of this bumper. The brazing just doesn't look good, but I don't want to redo this because I have the risk to melt the silver solder around the lateral supports, As you can notice my brazing skills aren't good enough so the overheating during the brazing broke the winch fairlead, I also have to correct the brazing of this little front rod 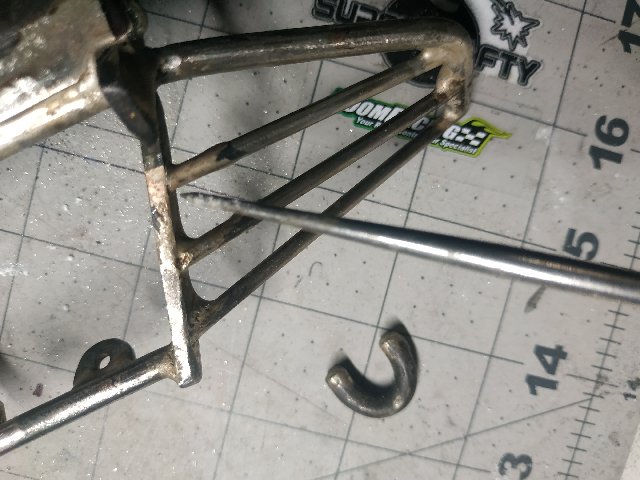 After some sanding, this is the final result 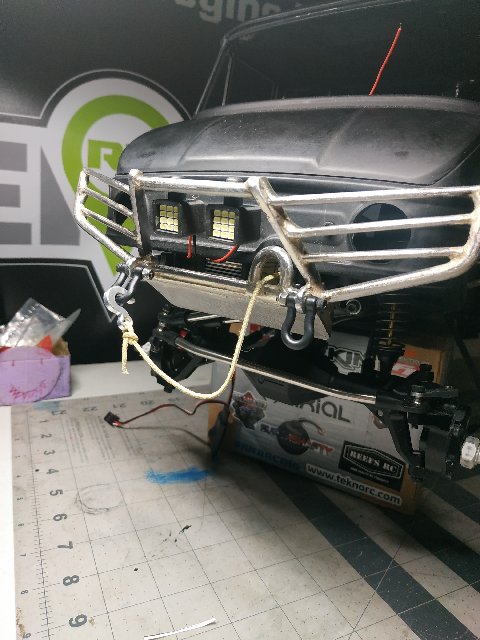 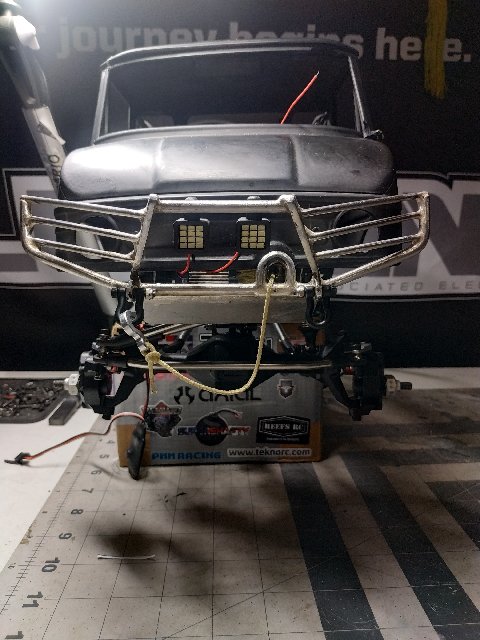 finally something really stupid I was cleaning the workbench so I place the body cab in my seat to make some room during cleaning stupidly I totally forgot that the cab was in my seat so when I take a seat again I crashed my body cab 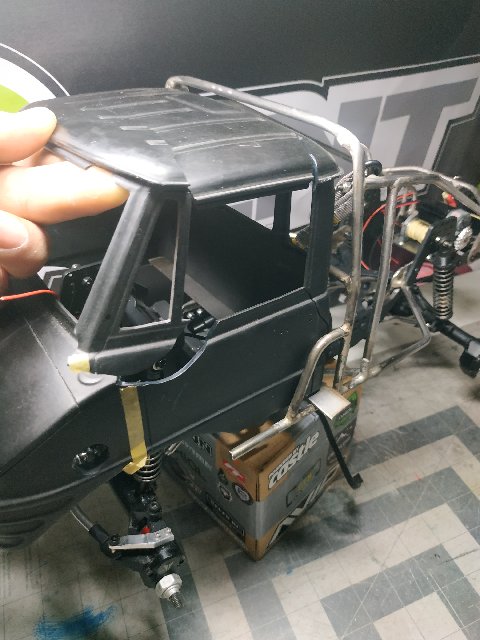 I want to cry, I feel so stupid, I will try to glue it but I´m afraid I have to order a new body $119 usd + international shipping NNOOOOOOOOOOOOOOOOOOOOOOOOOOOOO!  |
|
| |
|
01-31-2020, 12:39 PM
| #60 |
| I wanna be Dave Join Date: Jul 2014 Location: Deep South
Posts: 3,444
|
It can be glued, but very carefully. Hopefully others will correct me. But use contact adhesive (super glue) with something like baking soda lightly mixed in as an aggregate. Mix enough to do each crack at a time and lit it sit before moving on. Last edited by Brake Weight; 01-31-2020 at 12:41 PM. |
|
| |
|
 ANTIGACHO BP Custom GenX/SCX10 UNIMOG - Similar Threads
 | ||||
| Thread | Thread Starter | Forum | Replies | Last Post |
| Antigacho SCX10II Truggy MX | antigacho | Axial SCX10 II | 75 | 05-11-2022 07:40 PM |
| SCX10 Unimog Fire Truck with custom light controller and lots of details | prymus | Axial SCX-10 | 5 | 12-05-2016 05:08 PM |
| SCX10, Custom Unimog | OGXXXOG | Scale Videos! | 2 | 05-01-2014 06:25 PM |
| 9 Trucks Offroading Unimog u300 M35 Custom Axial Wraith Tamiya CC01 scx10 Honcho | boolean21 | Scale Videos! | 2 | 06-05-2012 07:15 PM |
| |


 Linear Mode


