| |
| |||||||
 |
| | LinkBack | Thread Tools | Display Modes |
 01-31-2020, 03:15 PM
| #61 | |
| Quarry Creeper Join Date: Nov 2018 Location: Mexico, Guadalajara
Posts: 281
| Quote:
fingers crossed | |

|  |
| Sponsored Links | |
| | |
|
01-31-2020, 06:10 PM
| #62 |
| I wanna be Dave  Join Date: Oct 2012 Location: Medina
Posts: 2,263
|
Damn - that sucks. I would definitely attempt to glue before ordering a new one. You can then go back with body filler to smooth / hide the cracks before painting. Front bumper looks great! |
|
| |
|
02-05-2020, 05:29 PM
| #63 |
| Quarry Creeper Join Date: Nov 2018 Location: Mexico, Guadalajara
Posts: 281
|
another step forward on this building let's braze some tabs to mount the cab and the rear platform. 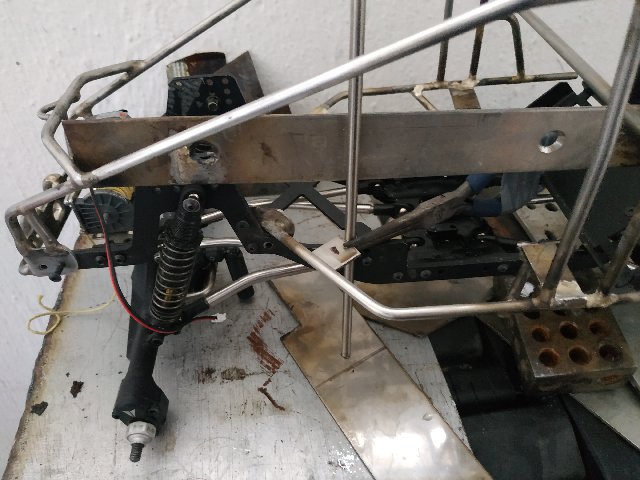 is always difficult to find the correct fit before brazing, this holder was helpful during brazing, it was made by a friend in the factory where I work, it will be helpful for future projects 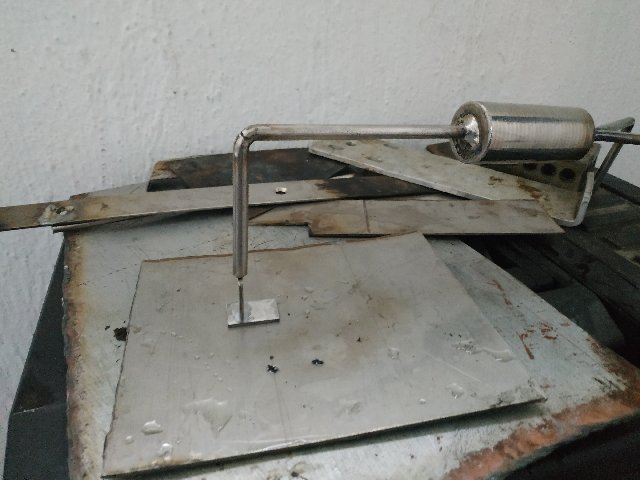 plates installed 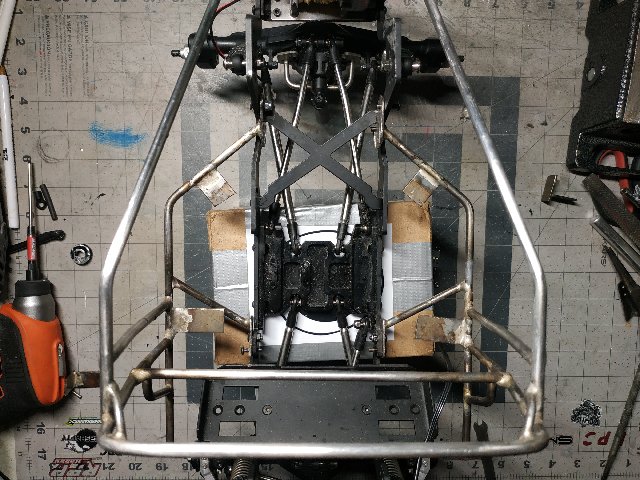 I am also including the support for the Powershift RC NR TANK D.M.S UNIT  This is how the cab looks mounted I have to drill some holes to secure the cab using screws. I am not sure if that will be enough to secure it, Or maybe I have to build some kind of additional supports 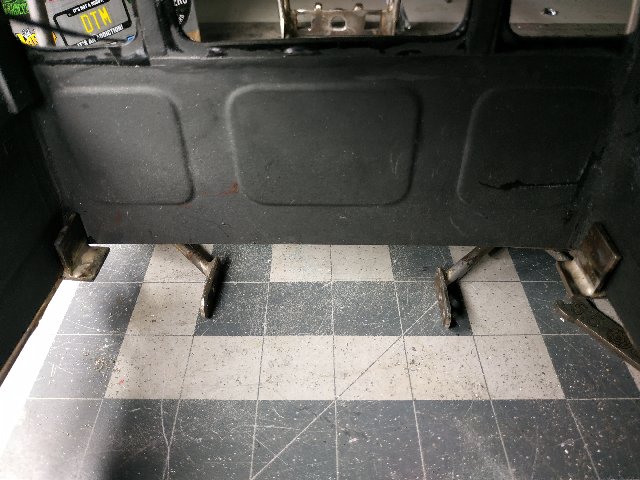 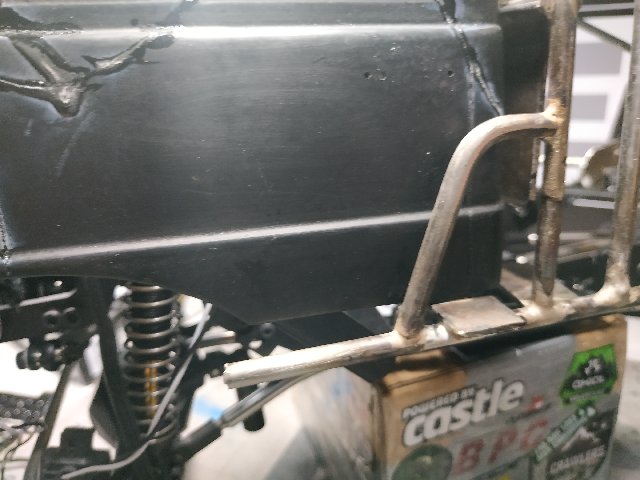 I also receive the 3d printed parts where the electronics are going to be mounted; I am not happy with the green color but I can paint it later, I have to drill some holes to secure the 3d printed parts to the chassis rails 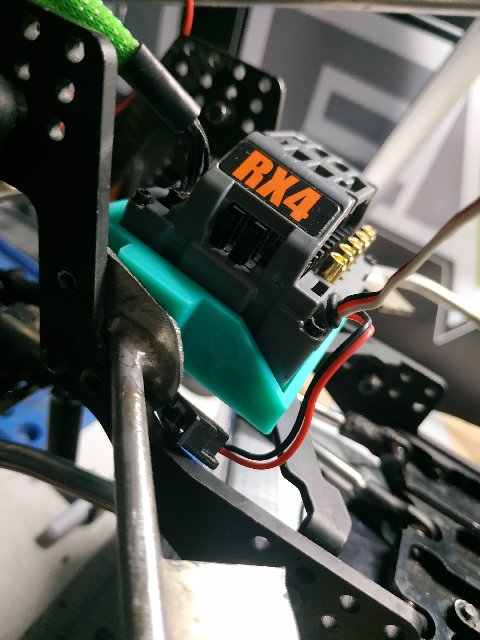 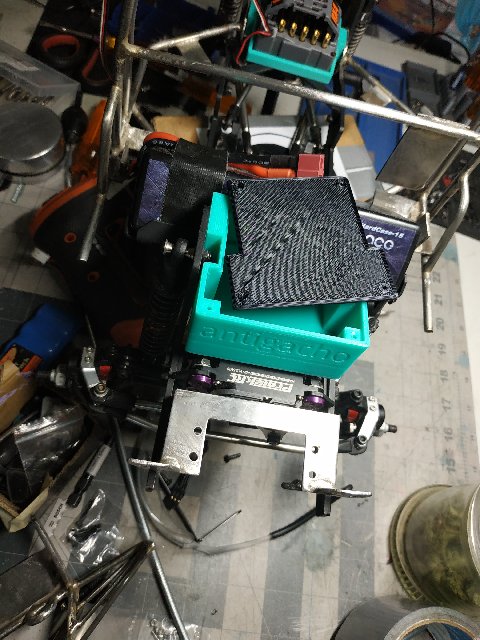 next step is applying black powder coating the recently made steel parts Last edited by antigacho; 02-06-2020 at 10:07 AM. |
|
| |
|
02-06-2020, 07:33 AM
| #64 |
| Pebble Pounder Join Date: Sep 2018
Posts: 109
|
Dude that looks awesome!! Cage work is sweet! Are you using steel? An what are you using to braze? Sent from my ONEPLUS A6003 using Tapatalk |
|
| |
|
02-06-2020, 09:49 AM
| #65 | |
| Quarry Creeper Join Date: Nov 2018 Location: Mexico, Guadalajara
Posts: 281
| Quote:
some tools and material used small portable vice BAC industries Shop Tuff MR-01 Mighty Rod Bender 3/16 stainless steel rod Steel Key Stock, Standard Tolerance, 1/8" Thickness, 3/8" Width, Steel Key Stock, Standard Tolerance, 1/8" Thickness, 1/4" Width, scrap metal Angle Grinder Dremel Harris SSWF 1/2 Stay Silv Brazing Flux Harris Safety-Silv 56% 1/16 Silver Solder Brazing Alloy Bernzomatic TS8000 - High-Intensity Trigger Start Torch Mapp gas | |
|
| |
|
02-06-2020, 10:21 AM
| #66 |
| Pebble Pounder Join Date: Sep 2018
Posts: 109
|
Cheers dude need to hit Google an try an do this!! What type of gas do you use? Sent from my ONEPLUS A6003 using Tapatalk |
|
| |
|
02-06-2020, 11:12 AM
| #67 | |
| Quarry Creeper Join Date: Nov 2018 Location: Mexico, Guadalajara
Posts: 281
| Quote:
locally I found this tank but you can find some other options available turner map gas tank CB-1000  | |
|
| |
|
02-06-2020, 12:53 PM
| #68 |
| Pebble Pounder Join Date: Sep 2018
Posts: 109
|
Cheers dude your a star Sent from my ONEPLUS A6003 using Tapatalk |
|
| |
|
02-14-2020, 12:31 PM
| #69 |
| Quarry Creeper Join Date: Nov 2018 Location: Mexico, Guadalajara
Posts: 281
|
During the built of the rear cage, I burned some rod ends let's change it 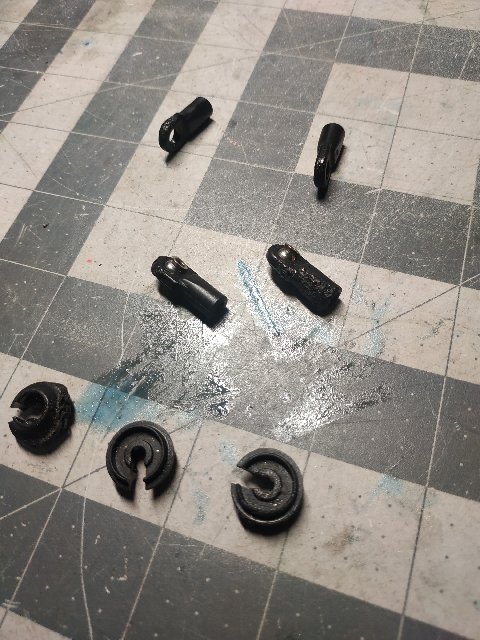 I also will take this opportunity to install the Samix TRX-4 Brass Shock Spring Cups and Boom Racing BADASS Pivot Balls  I also want to show off the fresh powder coating applied to the bumper and rear cage recently made  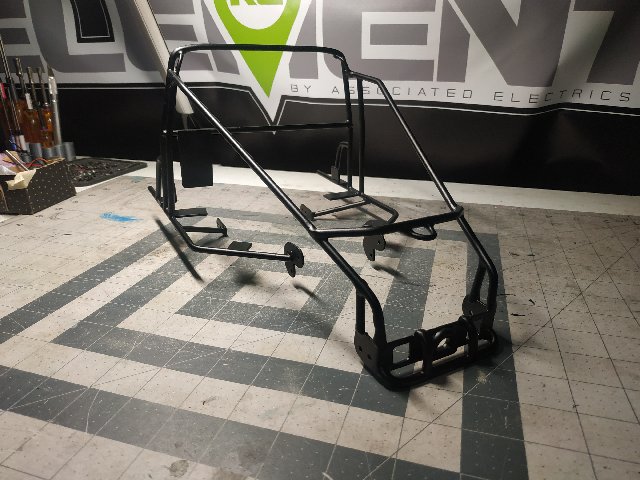 paintwork just cost me $40 pesos ( $2 USD) at local paint workshop |
|
| |
|
02-18-2020, 08:25 AM
| #70 |
| Rock Crawler Join Date: Dec 2008 Location: Fortuna Calif.
Posts: 997
|
What an awesome build, this is how we built trucks before all of the 3D printing took hold. I have seen quite a few Mercedes Benz Sprinter vans with a front bumper that looks the same as yours, beautiful workmanship.  |
|
| |
|
02-24-2020, 11:13 AM
| #71 |
| Quarry Creeper Join Date: Nov 2018 Location: Mexico, Guadalajara
Posts: 281
|
I have some progress to report on this post I finally finished the wiring It takes al least one-week figuring out how to manage the wiring mess this is the list of electronics installed on this rig Tekin RX4 Hardbox Waterproof Sensored / Sensorless D2 Crawler ESC TT2000 $159.90 Tekin ROC412EP BL Crawler Motor 2300kv TEKTT2623 $139.99 Futaba R304SB T-FHSS 4-Channel Receiver FUTL7680 69.99 Gens ace 5000mAh 11.1V 50C 3S1P HardCase Lipo Battery $55.42 Castle Creations BEC 2.0 Waterproof BEC Voltage Regulator (15 Amp) CSE010-0153-00 $45.99 ProTek RC Braided Brushless Motor Sensor Cable (150mm) PTK-2108 $5.49 ProTek RC 370TBL "Black Label" Waterproof High Torque Brushless Crawler Servo PTK-370TBL $159.99 Powershift RC Technologies Night Killer Series Big Square Light Pods PWR-01 $16.99 MyTrickRC High Power Spotlights w/Mounting Hardware HeyOK Performance The Lighting Controller HEYTLC $55.99 Powershift RC PST-300 servo winch series Powershift RC Technologies Nitrogen Tank DMS Dead Man PWR-0108 $39.99 Powershift RC Technologies PST Flush Mount Tailights MT3608 DC-DC Step Up Power Apply Module Booster Power Eagle Eye COB LED Amber Car Daytime Running some pictures of the final wiring I tried to waterproof my electronics aplying silicon conformal coating prior intallation I desing this custom receiver box Inside this box I placed the receptor, the servo winch controller, the lighting controller and the power booster module  I mounted the BEC on a custom plate that I made, rc4wd rear winch controlled was mounted using doule sided tape 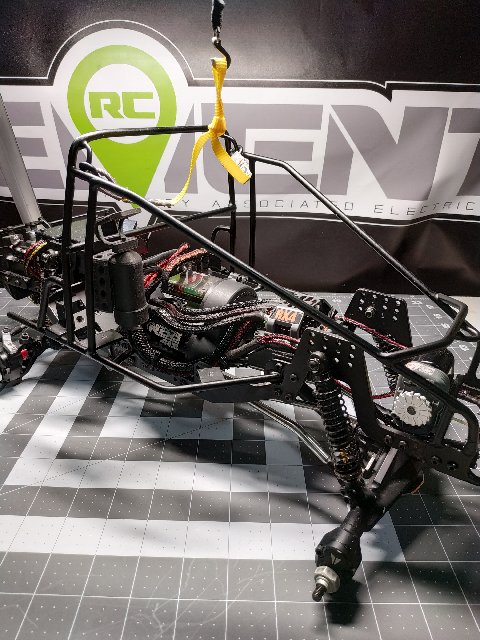 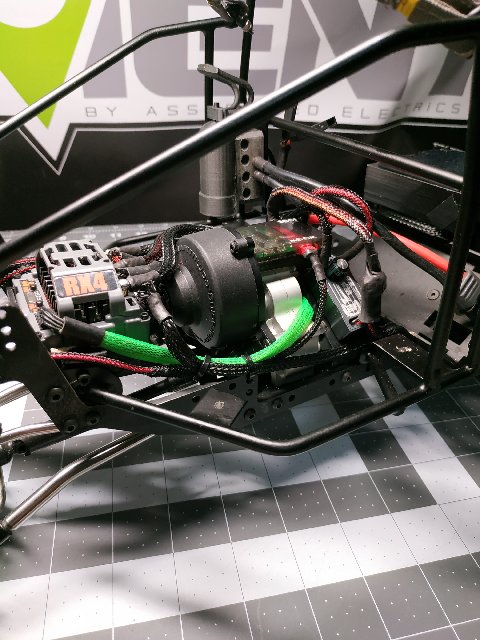 Notice the ESC plate that I designed usig Tinkercad I like the look of the tail lights and rear winch after ,mounting 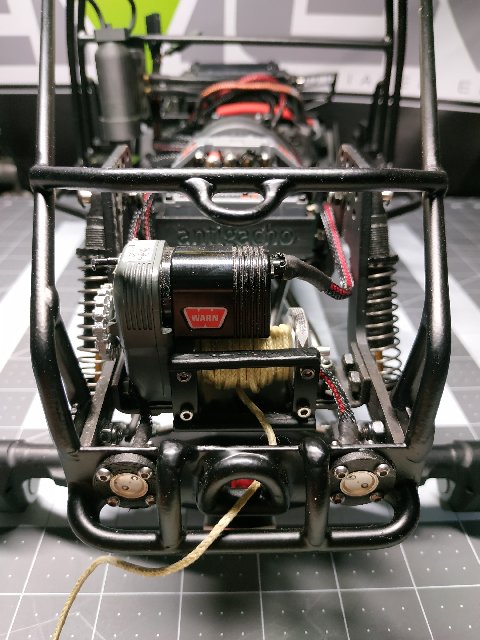 I lost the 3d printed valves on the dead man switch (power tank) so using some plastic form axial parts trees I carved new scales valves, not the same desight that originals but it look good enought 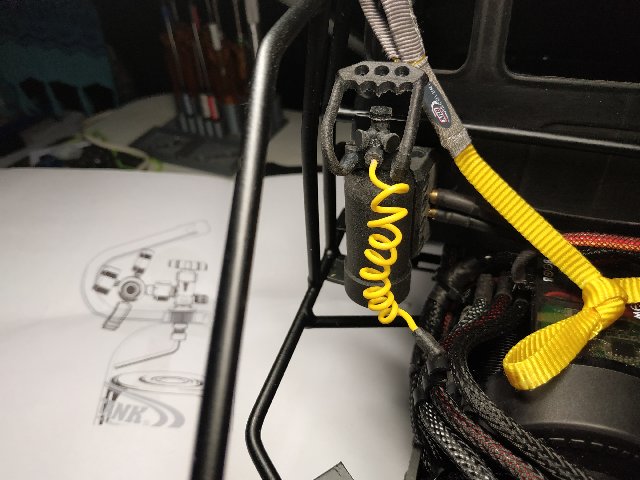 I also modidied the dead man swith, origuinaly it includess magnets, but In my experience that tends to fails so I installed an xt60 plug insted  after some testing I confirmed that electronics work propertly, my unimog is alive |
|
| |
|
02-27-2020, 04:54 AM
| #72 |
| I wanna be Dave Join Date: Oct 2012 Location: Medina
Posts: 2,263
|
It's really coming along and looking good. The cage is looking great finished in black. |
|
| |
|
02-28-2020, 12:11 PM
| #73 |
| Quarry Creeper Join Date: Nov 2018 Location: Mexico, Guadalajara
Posts: 281
|
I finished the modifications to the powershift RC NR TANK D.M.S UNIT I lost the 3d printed tank regulator so I carved a new one using plastic residues from axial parts tree I also installed an xt60 plug instead of magnets after painting I printed the "powertank" logo and "gauge face" in a regular paper sheet, then I cover it using transparent Scotch tape and paste it to the tank, then I apply a layer of silicone conformal coating to protect the stickers  actually I am dealing with the build of the transmission/motor cover, I'm using styrene, of course, my building skills are very poor but I will try to do my best, I am planning to include a couple of decorative radiator fans  |
|
| |
|
03-05-2020, 12:31 PM
| #74 |
| Quarry Creeper Join Date: Nov 2018 Location: Mexico, Guadalajara
Posts: 281
|
goddamned another problem to face on this build after the fail trying to install this wheels ( TEAM DC ARMORY VERSION BEADLOCK DC-50973  I finally receive what it looks like the perfect wheel for this project D1RC 1.9 Beadlock Wheel Rim  Unfortunately, I have fitting problems again 1st. the hole where the axle shaft is inserted in the hub is too narrow, that had an easy solution just make a wider hole, Dremel tool, and round lime solve the problem 2nd, once again I noticed that the Beadlock back ring hasn't enough clearance on the inside so the ring is rubbing with the portal axles and the wheel don't spin free I have two options: Order new wheels, probably the Gmade SR03 who had a similar design to my last selection or, Try to sand the inner ring and the portal axle to make the necessary clearance. I think I should try to modify the current beadlocks first, besides i don't know if the back half of the gmade wheel will fit on the vanquish portal hexes  I also have to decide which tires look better  |
|
| |
|
03-05-2020, 04:01 PM
| #75 |
| I wanna be Dave Join Date: Jul 2014 Location: Deep South
Posts: 3,444
|
The agriculture tread looks more proper but the one on the left will be more performing.
|
|
| |
|
03-09-2020, 12:30 PM
| #76 |
| Quarry Creeper Join Date: Nov 2018 Location: Mexico, Guadalajara
Posts: 281
|
Metal building and styrene building are the most difficult task in this building. Before this, all was just putting parts together My skills working with styrene are as bad as my English language skills, sorry It takes me the whole week to build the transmission/motor cover and still need a lot of sanding I forgot to take photos to follow this but I have some        mounting and painting in progress, more updates soon |
|
| |
|
03-17-2020, 12:47 PM
| #77 |
| Quarry Creeper Join Date: Nov 2018 Location: Mexico, Guadalajara
Posts: 281
|
I finally finished the build of the transmission cover I included an exhaust to complete the cover, I found a little plastic bottle that would be helpful for this  after some modifications I got this:  and this is how it looks after painting and weathering I am also using the Yeah Racing 1/10 Crawler Steel Diamond Plate for lateral plates    Not perfect but not so bad, I definitely need to watch more painting tutorials on youtube and of course more practice I just need to fix the cover to the lateral plates using some screws I also build some kind of internal cage for the cab. this will help to mount the MyTrickRC High Power Spotlights, This also will help to reinforce the cab structure who was broken due to a stupid accident that I mentioned previously.  After building the metal internal cage I glue it using pegatanke, I really like this product, this is an epoxy glue that I found it at a local hardware store, very useful for this hobby   Last edited by antigacho; 03-17-2020 at 01:21 PM. |
|
| |
|
03-17-2020, 04:50 PM
| #78 |
| Quarry Creeper Join Date: Nov 2018 Location: Mexico, Guadalajara
Posts: 281
|
I am building the torso interior for my project inspired on the "Ugamug" Mercedes Unimog crawler build by Jonnie Fraz picture credit to Jonnie Fraz  I am also considering dome real Unimog interior pictures as reference this is the basics dashboard, it takes me a lot of time to build it because it needs to fit inside the modified cab that included an internal cage  I am using pegatanke epoxy glue to reinforce the dashboard build it also will be helpful to reinforce the central cover, this is the styrene interior curing under the sun  the central cover was difficult to build it was made of 7 different small parts. of course, it needs a lot of sanding, hour and hours of sanding   more pictures soon |
|
| |
|
03-18-2020, 09:21 AM
| #79 |
| Quarry Creeper Join Date: Nov 2018 Location: Mexico, Guadalajara
Posts: 281
|
Small update Some decals strategically placed for styling and attitude including the "Europa truck trial" logo that I printed for this project 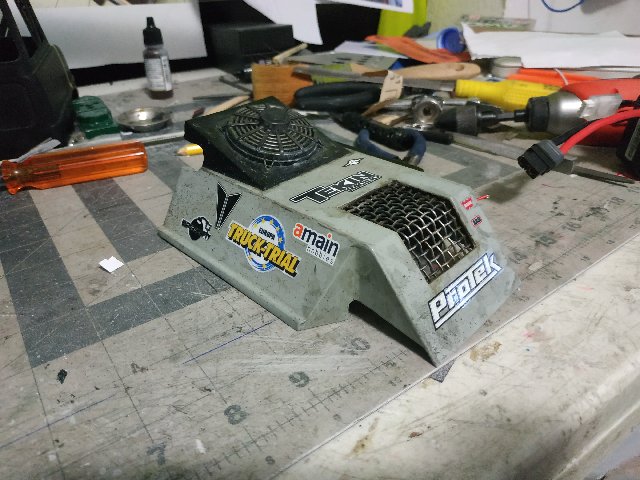 Taking advantage of my Microsoft "paint" design skills  I also create this race number for the cab I also create this race number for the cab As a final touch for this styrene transmission cover, I decided to include an additional feature. I had on my spare parts box a small voltage meter that was intended to be installed as part of the cab interior, but I change my mind and decide to mount it inside the transmission cover, I can read the screen through the ventilation fins  Last edited by antigacho; 03-18-2020 at 09:25 AM. |
|
| |
|
03-20-2020, 05:17 PM
| #80 |
| Quarry Creeper Join Date: Nov 2018 Location: Mexico, Guadalajara
Posts: 281
|
The cab interior is taking form as reference, this is the real Unimog cab that I am trying to replicate  using styrene, pegatanke epoxy glue and CA glue I build this:  As you can notice this is not good replica, very basis styrene work but takes me almost 2 weeks to build it This is the driver McFarlane Toys Call of Duty Soap Action Figure and I am using these seats Axial Corbeau LG1 Seat Set and this Metal Steering Wheel this is how it looks after paint an basic weathering  Now I just have to find a way to hold the cab parts together , and this will be ready to be installed  but first I have to paint the hardbody, that will be the next update on this theard Last edited by antigacho; 03-21-2020 at 01:03 AM. |
|
| |
|
 ANTIGACHO BP Custom GenX/SCX10 UNIMOG - Similar Threads
 | ||||
| Thread | Thread Starter | Forum | Replies | Last Post |
| Antigacho SCX10II Truggy MX | antigacho | Axial SCX10 II | 75 | 05-11-2022 07:40 PM |
| SCX10 Unimog Fire Truck with custom light controller and lots of details | prymus | Axial SCX-10 | 5 | 12-05-2016 05:08 PM |
| SCX10, Custom Unimog | OGXXXOG | Scale Videos! | 2 | 05-01-2014 06:25 PM |
| 9 Trucks Offroading Unimog u300 M35 Custom Axial Wraith Tamiya CC01 scx10 Honcho | boolean21 | Scale Videos! | 2 | 06-05-2012 07:15 PM |
| |


 Linear Mode


