| |
 10-05-2007, 09:18 AM
| #21 |
| I wanna be Dave  Join Date: May 2006 Location: HONDURAS...ROCK HEAVEN
Posts: 5,076
|  , and i am sure you will have another great build for us , and i am sure you will have another great build for us |

|  |
| Sponsored Links | |
| | |
|
10-05-2007, 09:21 AM
| #22 |
| Rock Crawler Join Date: Jul 2004 Location: OC, Oregon
Posts: 803
|
Damn, Looking better already Can't wait to see what you do with it.I always had a thing for the hilux bed aswell, its ugly as hell but different. |
|
| |
|
10-05-2007, 09:41 AM
| #23 | |||
| Sinking with the ship   Join Date: Mar 2005 Location: El Capitan...sole survivor and sinking fast
Posts: 8,864
| Quote:
I am hoping this one wont take to long.Quote:
Quote:
| |||
|
| |
|
10-05-2007, 04:40 PM
| #24 |
| Rock Crawler Join Date: Apr 2005 Location: Upland
Posts: 546
|
Nice build. Looks great!
|
|
| |
|
10-06-2007, 02:31 PM
| #25 |
| Rock Crawler Join Date: Oct 2006 Location: England, Where the birds fly backwards.
Posts: 626
|
I beleive this did come with shocks! This is a 1.9 vintage bruiser on flebay with shocks!  Just extra proof they do exist (I'm no expert but these look original!) |
|
| |
|
10-06-2007, 09:57 PM
| #26 |
| Newbie Join Date: Nov 2005 Location: San Jose
Posts: 21
|
The Dampers were an optional hop up for the Hilux. They were the same dampers that were sold with the Sand Scorcher and rough rider. They are a horrible damper and will leak oil constantly. It looks like you have a good truck to start with, these are a classic and deserve to be built up properly. |
|
| |
|
10-06-2007, 09:58 PM
| #27 | |
| Newbie Join Date: Nov 2005 Location: San Jose
Posts: 21
| Quote:
| |
|
| |
|
10-06-2007, 10:07 PM
| #28 | |
| Sinking with the ship Join Date: Mar 2005 Location: El Capitan...sole survivor and sinking fast
Posts: 8,864
| Quote:
Thanks shodog, I assure you itll be built right I even ordered some of the cool new "warn" hubs for it. I need to make the rear shocks next and go from there.
| |
|
| |
|
10-06-2007, 10:25 PM
| #29 |
| Newbie Join Date: Nov 2005 Location: San Jose
Posts: 21
|
The ones you made look pretty good. it might be just as easy to pick of a set of used SRB dampers. Another little scale trick is to use the rubber bellows from the bruiser dampers.  |
|
| |
|
10-07-2007, 01:14 AM
| #30 | |
| Rock Crawler Join Date: Oct 2006 Location: England, Where the birds fly backwards.
Posts: 626
| Quote:
| |
|
| |
|
10-07-2007, 06:09 AM
| #31 |
| I wanna be Dave Join Date: May 2006 Location: Arlington, VA
Posts: 3,377
|
Did you paint the hubs black? Looks good. If you want some beater plastic hubs, a guy sent me some so-so resin copies and I since got some identical repro's off Ebay. |
|
| |
|
10-08-2007, 03:23 AM
| #32 |
| Sinking with the ship Join Date: Mar 2005 Location: El Capitan...sole survivor and sinking fast
Posts: 8,864
|
Thanks for the pictures shodog, I have some extra Bruiser shocks somewhere, Ill probably end up stealing the boots from...did the same thing on my clone and when there painted white with a red rancho sticker look perfect I think I want black hubs, that looks great |
|
| |
|
10-15-2007, 08:43 PM
| #33 |
| Sinking with the ship Join Date: Mar 2005 Location: El Capitan...sole survivor and sinking fast
Posts: 8,864
|
Made some rear shocks and got them mounted 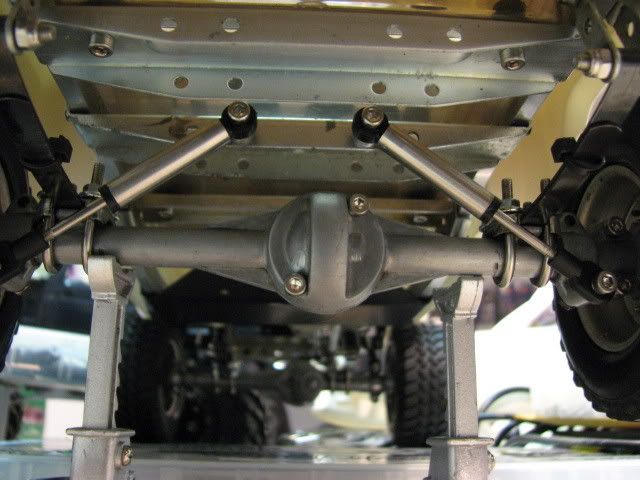 Then found my rear hubs to look like this 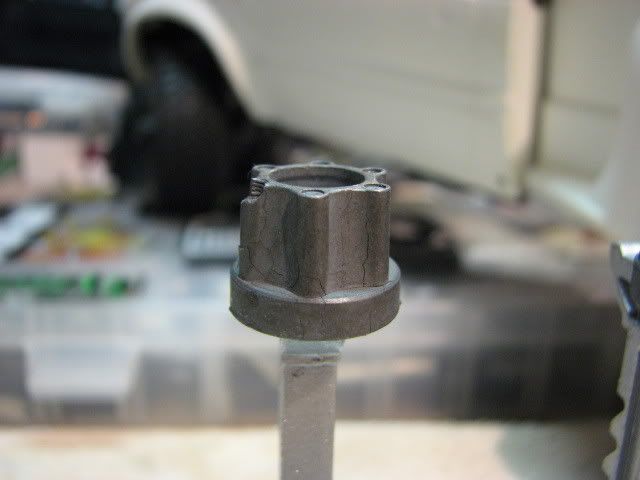  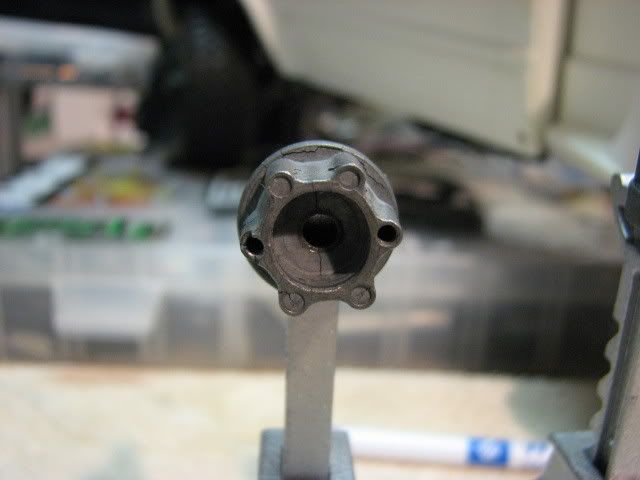 Gotta love old tamiya pot metal O and I attacked the dash too 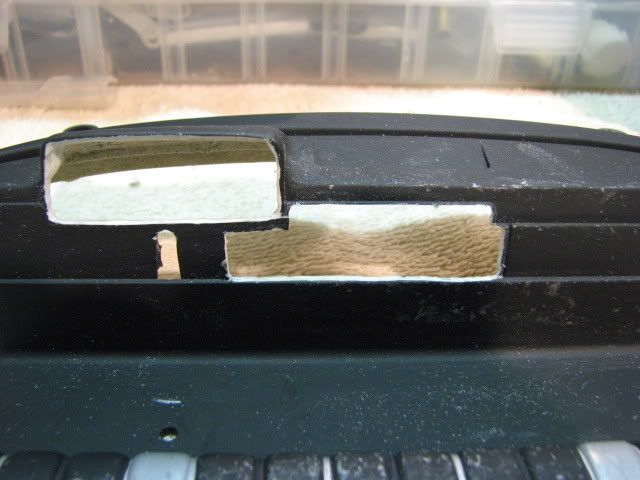 its currently in 3 pc and I am starting to work on the gage cluster. Thanks for looking -Mike |
|
| |
|
10-15-2007, 09:43 PM
| #34 |
| Gettin back on the horse Join Date: Feb 2006 Location: Hoonsville
Posts: 6,671
|
Wow buddy thanks for showing us how it is done. What is next teacher? |
|
| |
|
10-15-2007, 10:37 PM
| #35 |
| I wanna be Dave Join Date: Apr 2007 Location: clarksburg
Posts: 2,009
|
You Sir Are A Scale Master Keep The Pics Commin Thanks For Sharing.
|
|
| |
|
10-16-2007, 01:00 AM
| #36 |
| I joined the Band! Join Date: Aug 2007 Location: mission b.c canada
Posts: 233
|
nice build cant wait to see it finished
|
|
| |
|
10-16-2007, 01:55 AM
| #37 |
| Rock Crawler Join Date: Jul 2004 Location: OC, Oregon
Posts: 803
|
Wow, were the hubs really all cracked up like that? I never even noticed them.
|
|
| |
|
10-16-2007, 08:02 AM
| #38 | |||
| Sinking with the ship Join Date: Mar 2005 Location: El Capitan...sole survivor and sinking fast
Posts: 8,864
| Quote:
Quote:
Quote:
| |||
|
| |
|
11-04-2007, 06:13 PM
| #39 |
| Sinking with the ship Join Date: Mar 2005 Location: El Capitan...sole survivor and sinking fast
Posts: 8,864
|
Hevent updated this in some time, mostly because I hadnt had time to work on it. I got my new hub parts, and some cool "Warn" style covers for the front from some dude on ebay. I then came home from the GFs last night at like 12 and headed down into the basement till 3 which really was only 2 and got some more dashboard work accomplished 1st I finished the heater ducts, then I started on the glove box latch opener. On my last interior I glue a small circular piece of styrene to the dash with a "latch" glued to that piece however that wasnt the way it really is. The knob/latch is actually recessed and the opening to it is beveled. So after using a combination of 4 different drill bits by hand to get the contour correct, I then had to flip the dash and grind it down so the latch would be so far in and closer to flush. I then glued a piece in from the back side and cut a small piece of styrene rod to use as the knob/latch part 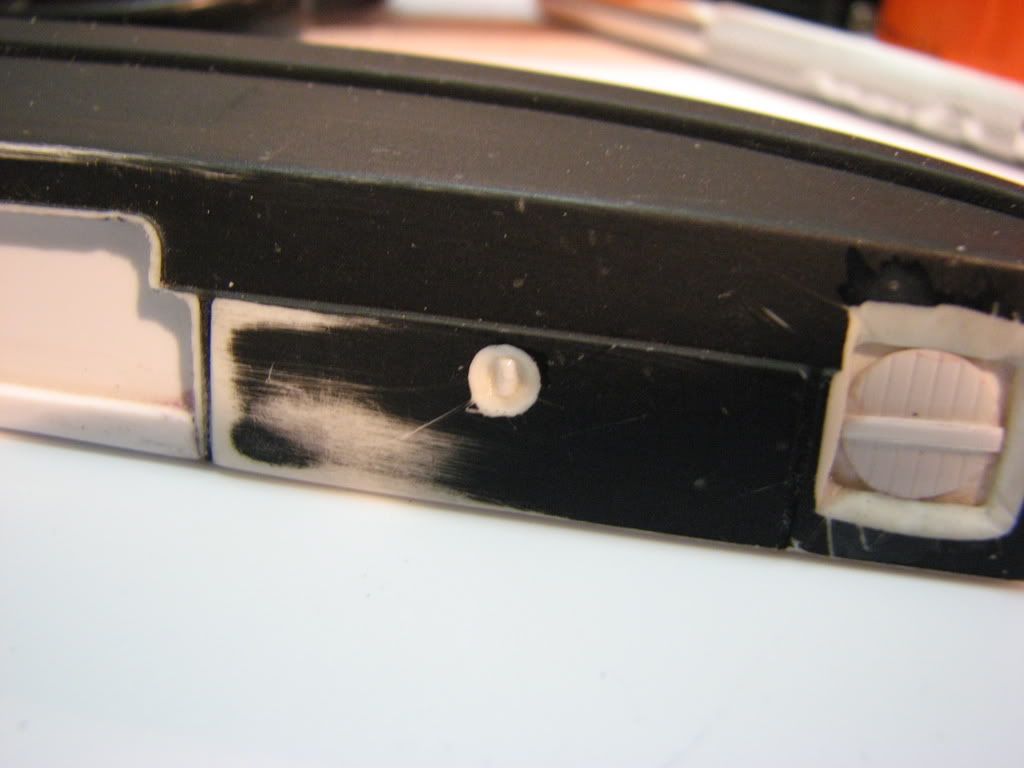 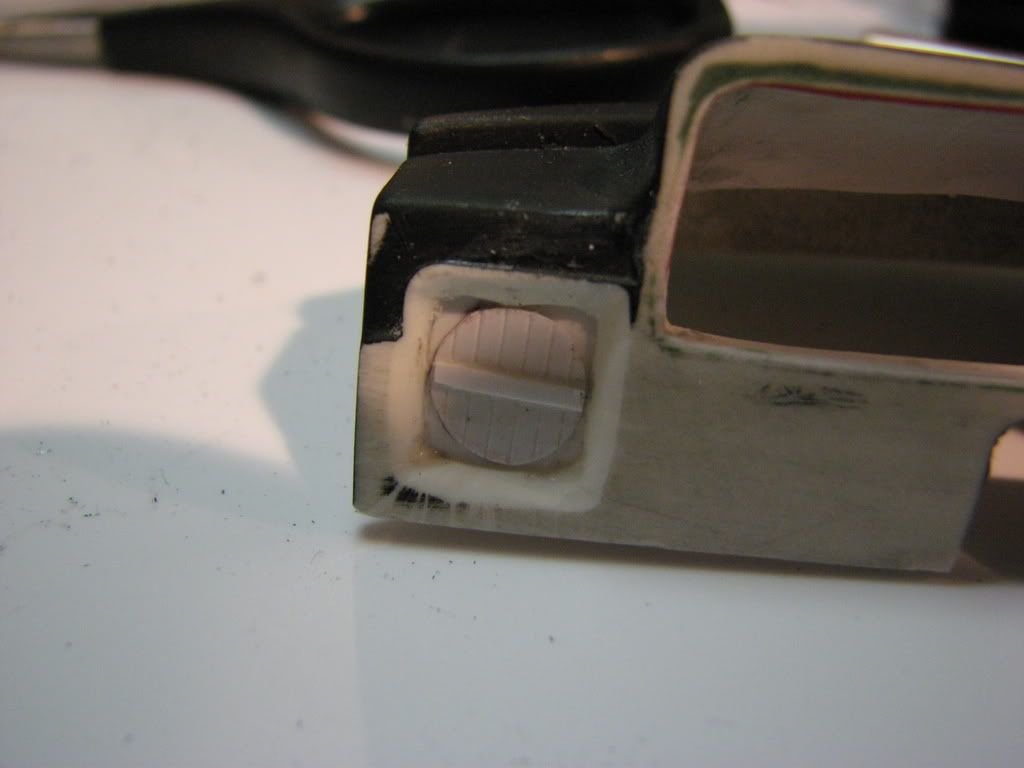 I think next time I am also going to try to make the heater duct look more realistic...we will see...I always try improve each time I do one a new one. I knew I had kept that camaro interior for a reason, got my self my heater controls (not exact but beats making them) and a full blown REAL heat duct 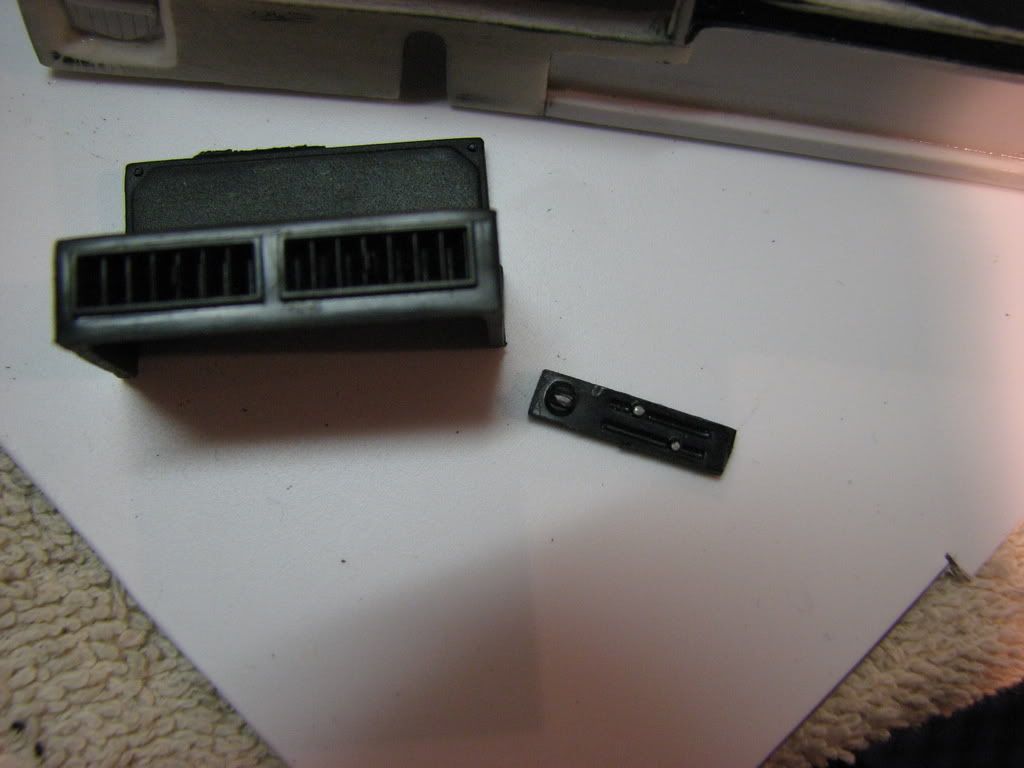 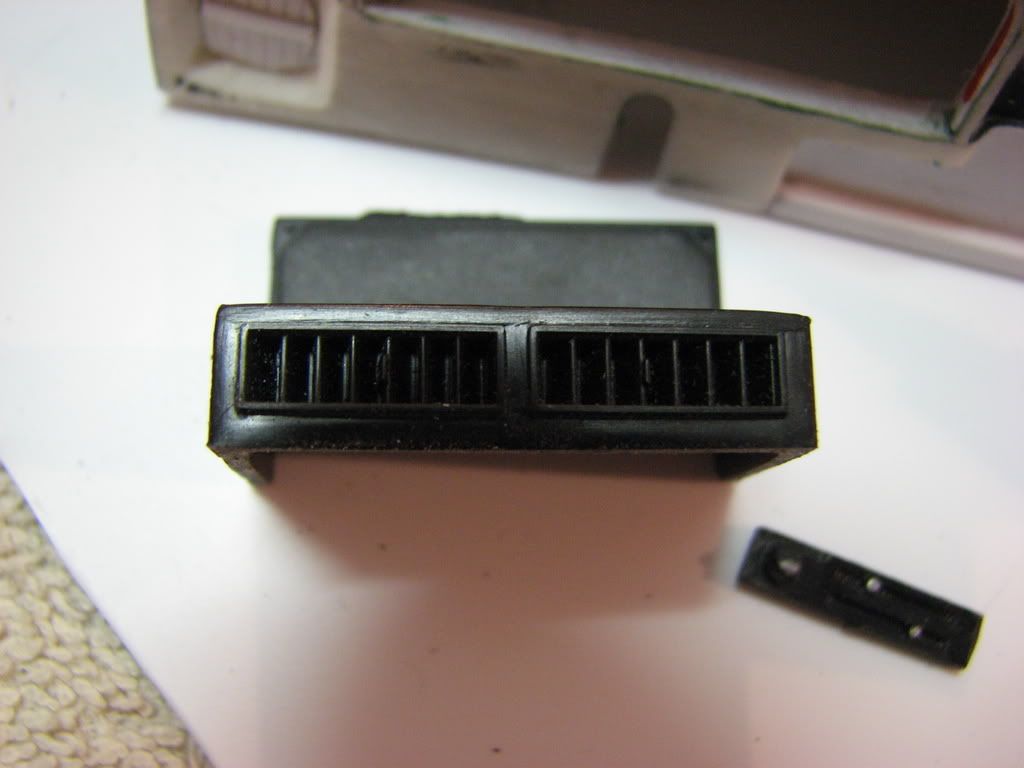 Next up I need to make the column, other controls, another CB radio, lower gage cluster,make my CD deck and Ipod and more Stay tuned -Mike |
|
| |
|
11-04-2007, 09:47 PM
| #40 |
| I lost my vendor privileges Join Date: May 2006 Location: TOP OF THE HILL
Posts: 3,014
|
looking good Mike.
|
|
| |
 |
| |


 Linear Mode


