| |
 12-26-2007, 06:01 PM
| #21 |
| Quarry Creeper Join Date: Jun 2007 Location: Maryville, TN
Posts: 406
|
Yeah, the Landy wheels would look sweet, but I'll probably just stick with the Hummer wheels. I like the Crushers too. I ordered a set of 1.9s a week or two ago. When they show up, we'll see if they fit under the Power Wagon or not. They are pretty tall. 4.25" to be exact. |

|  |
| Sponsored Links | |
| | |
|
12-26-2007, 09:55 PM
| #22 | |
| Quarry Creeper Join Date: Jun 2004 Location: 462-Da Fock
Posts: 352
| Quote:
Those hummer wheels are tough to get like B.D. said. Ive been trying for a while now as well. The best thing to do is just back order them thru RPP hobby and you'll be guaranteed to get a set when they do come in. Looking forward to seeing the body getting some nice red and black paint laid on it.  Good choice in color for it. Good choice in color for it.I just did that paint scheme to a 50's panel truck on a twin force. No pics yet though. The truck aint finished. | |
|
| |
|
12-26-2007, 11:01 PM
| #23 |
| I wanna be Dave Join Date: Dec 2005 Location: Orlando
Posts: 7,420
|
Interesting build. Very clean setup. So far so good.
|
|
| |
|
12-27-2007, 05:08 AM
| #24 |
| I wanna be Dave Join Date: Feb 2005 Location: Cleveland, OH
Posts: 8,009
|
Now this is freakin' sweet I agree with Young Version on the shocks. It's a bit more work, but it'll help the thing to self-center, and your limiters are built in. Plus it won't shake when you drive it on the trail if you use thick enough oil. I'd hit it with 5000 wt diff oil, to give the suspension something to do. |
|
| |
|
12-27-2007, 07:53 AM
| #25 |
| Quarry Creeper Join Date: Jun 2007 Location: Maryville, TN
Posts: 406
|
I have been looking at what to do to limit and dampen the rotation, and I think I'll have to try a few things. The droop style shock is definitely a good idea, and I'll have to fab something up to try that. I could use two small shocks, one on the top of the frame, and one on the bottom, crossed up to give the same effect. I'm also looking at a rotational damper, similar to what they are putting on the top of sportbike forks now. I could also just use a matched pair of torsion springs to provide rotational resistance and help return it to center. What do you guys think I should try first? I also made an order today for some additional materials, including lexan sheets to fill in the front of the bed, and the rear of the cab. That will make it look much cleaner when the frame rotates and makes those areas visible. Also got some scale (and functional) headlights coming, since the Bolink body doesn't have headlights molded in like the Pro-Line or Axial. 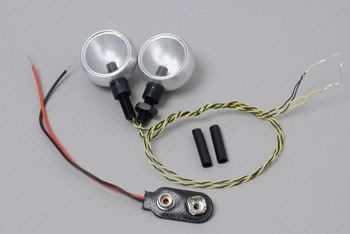 I prefer it that way though, since the 1:1 headlights are mounted to the fender, not part of the fender...  |
|
| |
|
12-27-2007, 08:01 AM
| #26 |
| Oppan Gangnam Style   Join Date: Jun 2005 Location: Shingle Springs
Posts: 5,164
|
I'd stay away from torsion springs as they may cause it to unload unpredictably. do the limiter and add some type of damper to help control it. Not sure what bearings you are using or if this would work but try tightening the pivot bolt a bit and see if that will work (kinda like a slipper clutch). It would be good if space is limited. The only thing that I see would maybe be a problem is that the ball bearings might wear int the bolt/washer try and find some sort of hardened washer, maybe some old slipper clutch washer machined down, just lube it before you try it. If there is room, I'd use a small shock for best consistent results. Nice job so far by the way. Last edited by chino63; 12-27-2007 at 08:06 AM. |
|
| |
|
12-27-2007, 08:08 AM
| #27 |
| Say hello to my dactylion  Join Date: Jun 2004 Location: On the Boat to Whore Island
Posts: 4,470
|
Very nice.... We had a guy here about 4 years ago try to do this with a Tamiya Hummer. He got as far as hacking the chassis in half and gave up. I think your way is the way to go. nice build.
|
|
| |
|
12-27-2007, 09:03 AM
| #28 |
| Pebble Pounder Join Date: Sep 2006 Location: everson
Posts: 184
|
i like this build. i also like the swivel frame dodge power wagons. sweet build. keep it coming. |
|
| |
|
12-27-2007, 10:41 AM
| #29 |
| Quarry Creeper Join Date: Jun 2007 Location: Maryville, TN
Posts: 406
|
This morning I worked on getting everything inside the frame rails. I don't like the stock High-Lift steering servo setup with the servo outside the frame rail and dual linkage cantilever system. I tried to figure out how I wanted to modify it, and still keep the 3-speed transmission shifting servo operational as well. I decided to use the stock shifting servo mounting bracket, upside down, and holding both servos, like this: 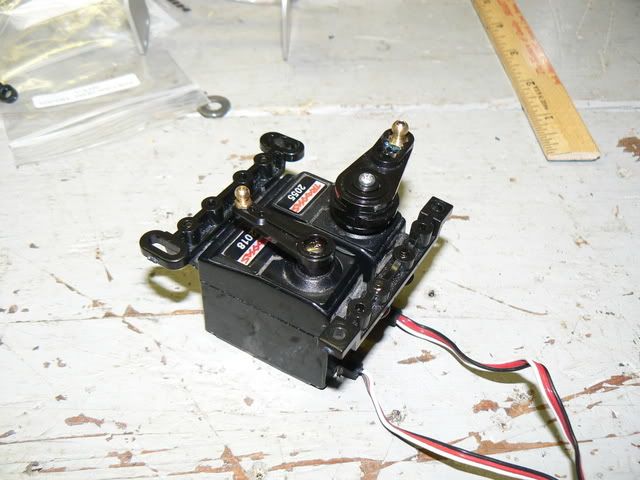 Then I slid that assembly inside the frame rail and bolted it to the top of the bottom frame lip. 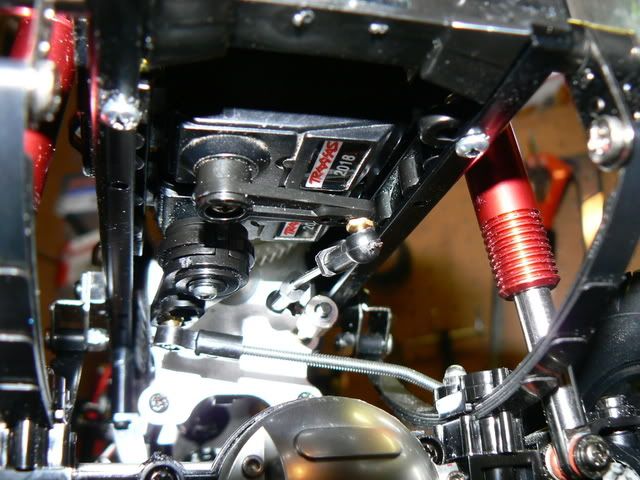 Now there is nothing on the outside of the frame rails except the spring and shock mounts. I think it looks much better. 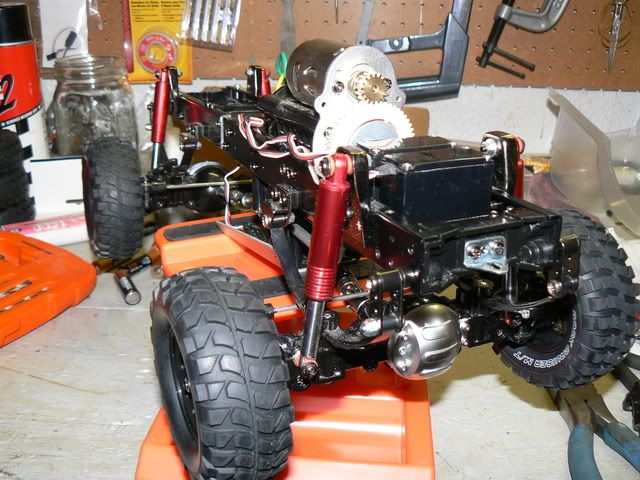 If you notice I have also ground down the outside lip on the front diff cover. I still have to do the rear, and I will probably end up painting them black too. Looks better, but still sticks out (visually) too much for me. |
|
| |
|
12-27-2007, 11:01 AM
| #30 |
| I wanna be Dave  Join Date: Jun 2005 Location: On the G-Train!!!!!
Posts: 6,081
| |
|
| |
|
12-27-2007, 01:05 PM
| #31 |
| Quarry Creeper Join Date: May 2004 Location: Hartford, Connecticut
Posts: 355
|
WOW! Been quite some time since I bothered with RCC, but this build made me do a double-take. I had to sign-in and reply. Great build! Very simple and functional. Looks like something that Tamiya coulda done! OOOHH, a PowerWagon hardbody would be SO COOL!
|
|
| |
|
12-27-2007, 02:13 PM
| #32 |
| Newbie Join Date: Dec 2007 Location: in a little town
Posts: 14
|
that looks awesome keep it up
|
|
| |
|
12-27-2007, 04:59 PM
| #33 |
| Quarry Creeper Join Date: Jun 2007 Location: Maryville, TN
Posts: 406
|
I pulled out my extra TLT parts and started experimenting with how to put a shock on the swivel. I'm still not sure it's completely necessary, but it's probably a good idea. I made some measurements, drilled a couple holes where they needed to be on the frame, found standoffs so the shock body clears the frame in it's full range of motion, and bolted it in. After a couple different attempts, here's what I've got: 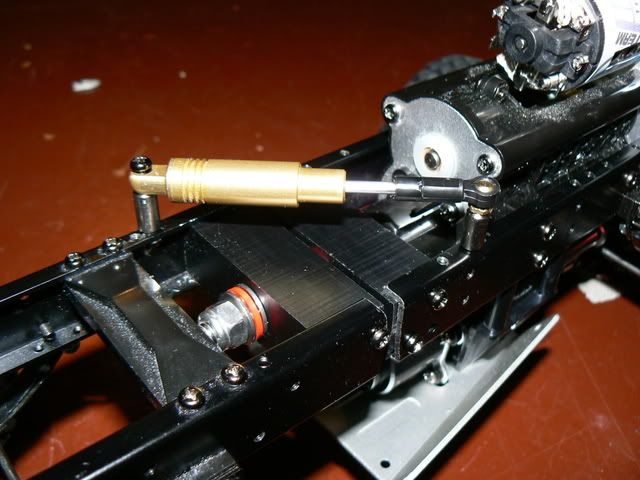 With the frame rotated in one direction, the shock bottoms out, acting as a limiter: 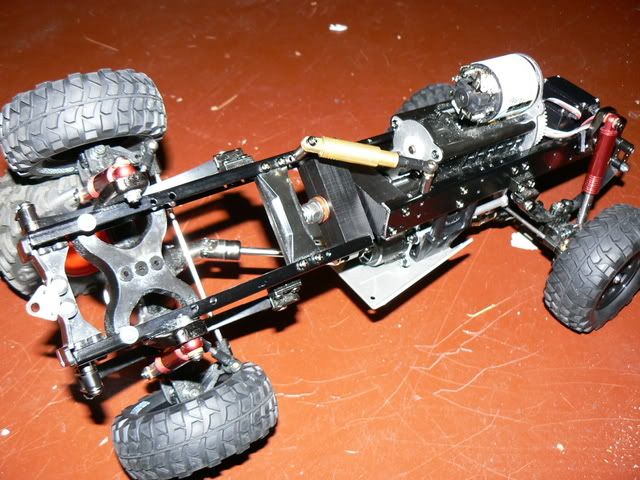 And in the other direction, the shock is fully extended, also acting as a limiter: 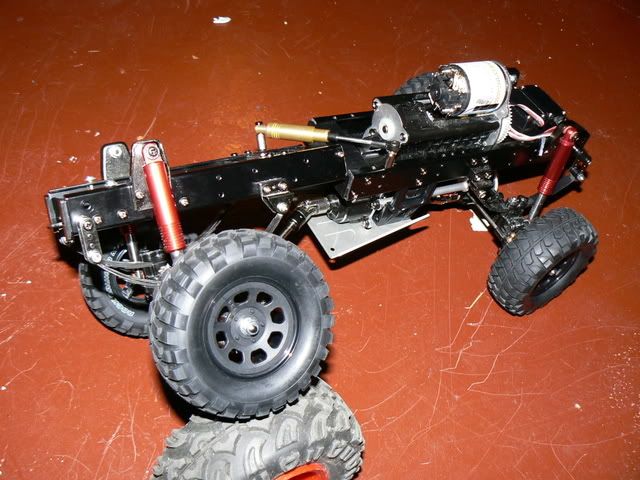 The only issue is that the TLT shock I am using only has a swivel on one end, so it is binding up some. I'll either have to modify the shock to allow a swivel to be installed on both ends, or find a different shock. Then I'll add a couple small springs, inside and outside, to help return the frame to it's flat position. I'll also need to experiment with oil weight to determine how much dampening I want to have. Oh, and I replaced the stock motor with a 45T Integy lathe motor. |
|
| |
|
12-27-2007, 05:28 PM
| #34 |
| Rock Crawler Join Date: Jul 2007 Location: Beechview/Pittsburgh
Posts: 536
|
Looking pretty darn amazing! Silly/ stupid question tho.. Do you think that you will have any trouble with a tourqe twist transfering to the swivel joint? It may be a newb type question but figured its better to ask than not ask... Also if you have your battery in the rear part of the frame wouldnt the gravity of it being there encourage the frame to return to its normal at rest position? |
|
| |
|
12-27-2007, 06:03 PM
| #35 |
| Quarry Creeper Join Date: Jun 2007 Location: Maryville, TN
Posts: 406
|
Okay, regarding the torque twist, I had thought it through and did not anticipate that being an issue at all. However, having not actually tried it, I found myself unable to answer you for certain. So, what's a guy to do except try it. I hooked up some electronics I had laying around, and rubber banded a battery high on the rear frame portion. And... not an issue. No torque twist. Since I had it running under it's own power, I was forced to play around a little bit, and I have to say, it is quite impressive. I ran one side up a ramp to see how far I could go before rolling over, simulating an obstacle on a side hill. Here's a picture of the rear axle almost completely vertical (probably about 80 degrees). Because the limiting shock was fully extended, the front right tire was about an inch and half off the ground. I was able to drive back out of this with no problem. 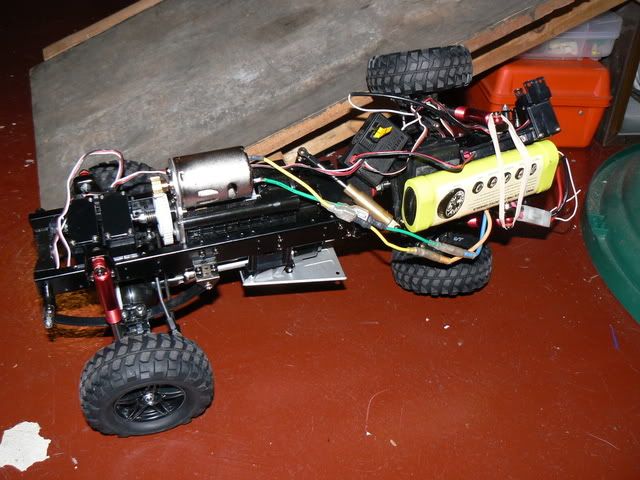 The issue with the battery and weight of the rear bringing the rear half back to center was also being tested here. My biggest reasoning for the swivel shock with springs now, in addition to stabilizing/damping on trail runs, is to ensure that the rear end going "back to center" is upright in a side hill obstacle, not upside down. Looks like this will perform very well. |
|
| |
|
12-27-2007, 06:21 PM
| #36 |
| Quarry Creeper Join Date: Apr 2006 Location: Ready to rock!
Posts: 246
|
Looks like you did your homework before starting. And it shows!! This rig looks amazing! Your truely pioneering a new way of building . Very clean and simple mods. The torque twist was what i was curious, and it looks to not be an issue. Due to good design. But maybe grab a couple clicky pens from your local bank, and try a few different strengths of springs with the different oil weights in that shock. Keep up the great work bro!
|
|
| |
|
12-27-2007, 06:53 PM
| #37 |
| Rock Crawler  Join Date: Apr 2006 Location: Salem, Orcrc
Posts: 756
|
id run a good heavy weight oil to slow it down, and when/if you put on some springs make sure it rests at center other wise it will have some balance problems. for the shocks upper swivel you could try drilling out the hole and using some fuel line as a bushing. have you thought about swapping out the rear drive shaft to a pede or something to fix any binding issues that might come up? |
|
| |
|
12-27-2007, 07:08 PM
| #38 | |
| Quarry Creeper Join Date: Jun 2007 Location: Maryville, TN
Posts: 406
| Quote:
For the drive shafts, I had thought I might have to change them out (at least the rear one), but it is doing very well, and on my test run had no issues at all. I don't think I'm going to mess with it. | |
|
| |
|
12-27-2007, 09:11 PM
| #39 |
| Rock Crawler Join Date: Jul 2007 Location: Beechview/Pittsburgh
Posts: 536
| totally amazing! Really thinking I am going to have to track down a second Hi Lift.. and continue with a second "King Lift" running a swivel setup..... |
|
| |
|
12-28-2007, 09:08 PM
| #40 |
| Quarry Creeper Join Date: Jun 2007 Location: Maryville, TN
Posts: 406
|
I'm a little disappointed because my recent parts order has made it within 6 miles of my house via UPS, but due to the weekend and holiday, I won't get it until Jan 2nd. :-( So, to keep some momentum going, I decided to tackle the battery mounting. I really like the ease of the stock High Lift battery tray, but it just wasn't going to work the way it was designed because of my my modifications. I decided to still use the stock tray though, but mounted lengthwise in the rear portion of the frame. In order to get it to fit, I first had to grind down a couple grooves in the rear cross member with my Dremel: 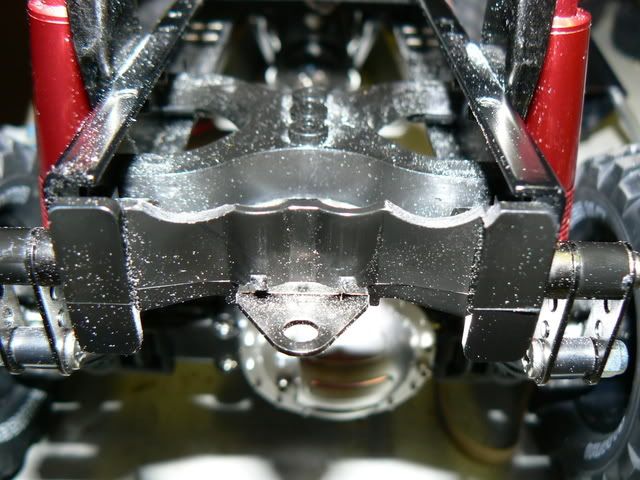 Then I had to grind off a little bit of the latch end of the battery holder to clear the X cross-member towards the rear: 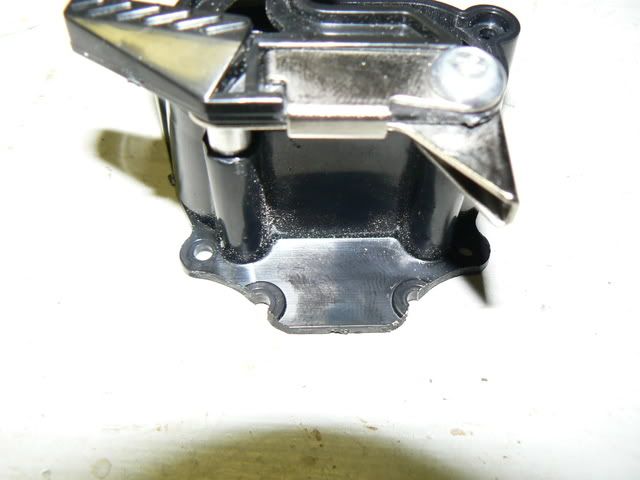 Then I slid the battery tray mounting brackets INTO the frame rails (you have to remove the rear cross-member):  A little bit of foam tape on the top of the cross-member at the front of the battery tray, and it's wedged in good in solid (though I'll still probably fabricate a bracket at some point to make sure it can't shift). It looks good, it's still fully functional with battery access from the back of the truck, and it fits in the only location I could come up with anyway. 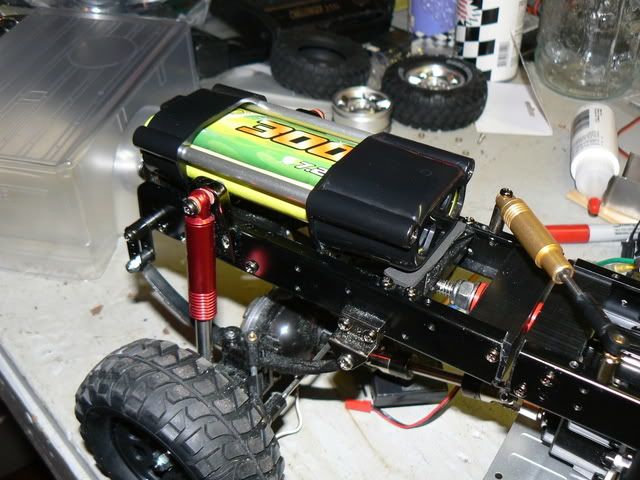 Last edited by OlYelr; 12-28-2007 at 09:49 PM. |
|
| |
 |
 LinkBacks (?)
LinkBack to this Thread: http://www.rccrawler.com/forum/1-9-scale-rigs/97676-swivel-frame-power-wagon-build.html | ||||
| Posted By | For | Type | Date | |
| Зарубежные проекты 1.9 | This thread | Refback | 10-07-2011 09:42 AM | |
| My first High-Lift - finally ! - Scale 4x4 R/C Forums | This thread | Refback | 10-05-2011 01:25 AM | |
| |


 Linear Mode


