| |
 12-28-2007, 10:02 PM
| #41 |
| I wanna be Dave Join Date: Dec 2005 Location: Orlando
Posts: 7,420
|
As my Scottish Uncle would always say: "Dis iz Fookun sweee!" Very nice fab'n skills dude,Lookin killer A+!!
Last edited by ColquittCustom405; 12-29-2007 at 12:22 AM. |

|  |
| Sponsored Links | |
| | |
|
12-28-2007, 10:15 PM
| #42 |
| Oppan Gangnam Style   Join Date: Jun 2005 Location: Shingle Springs
Posts: 5,164
|
I agree with the guy above. You do nice work. Keep it up, can't wait to see it done!  |
|
| |
|
12-28-2007, 10:24 PM
| #43 |
| Rock Crawler Join Date: Feb 2007 Location: Ramstein Air Base Germany ...ya Ive been Ramshafted
Posts: 567
|
This is totaly cool. Great work man!
|
|
| |
|
12-28-2007, 11:09 PM
| #44 |
| RCC Addict Join Date: May 2006 Location: Roseville
Posts: 1,469
|
Wow, wheres the popcorn?
|
|
| |
|
12-29-2007, 10:13 AM
| #45 |
| Quarry Creeper Join Date: Jun 2007 Location: Maryville, TN
Posts: 406
|
This morning I buttoned up the spring/shock/limiter for the frame swivel. First I found a couple matching clicky pens and tore them apart for the springs. Put one inside on the shaft, and one outside, so it will automatically center itself. Then I had to figure out how to get both ends of the TLT shock to swivel. I had put one of the smaller rod ends on the bottom of the shock already, so that was fine. On the other end, I drilled out the hole to fit over a standard Tamiya ball end. Then I ground it down to make it thinner and put it over a ball end nut, with a bolt to hold the shock from coming off the ball. While I was at the bench grinder, I buffed off all the brass coating. I'm not much of a brass fan, and prefer the silver look of bare metal much better. 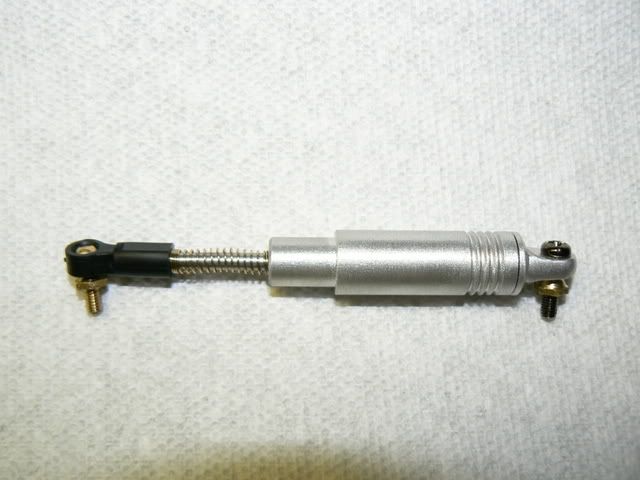 I don't think it's perfect, but it's not too bad. I want to find a couple small o-rings for the top and bottom of the ball end nut to keep the shock centered on it. Then I mounted it on the frame, and everything appears to be working fine. 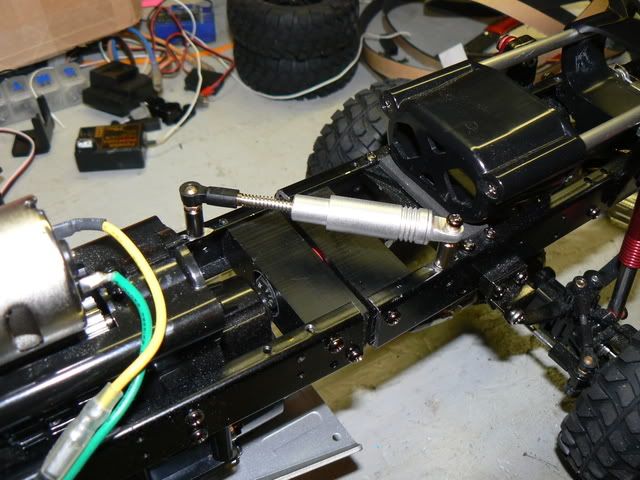 I took Chino63's suggestion and tried tightening the pivot bolt to dampen the rotation, just like a slipper clutch. It works fairly well, though I'm not confident it will stay that way with a lot of use. Once it wears in and loosens up again, I'll start playing with oil in the shock. |
|
| |
|
12-29-2007, 07:37 PM
| #46 |
| Quarry Creeper Join Date: Jun 2007 Location: Maryville, TN
Posts: 406
|
Next step: electronics. I had wanted to keep all the electronics inside the frame rails too. I fabbed up this little bracket to go on the back of the transmission, just behind the motor to hold the receiver. 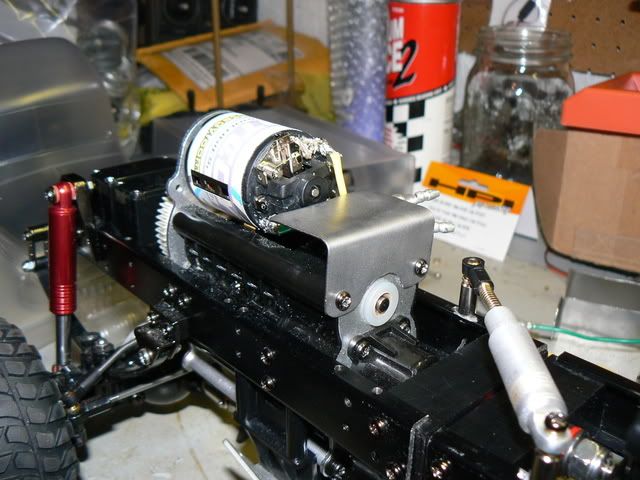 I may be old school, but this is still one of my favorite radios ever, and I will be using it for this truck. The Futaba FP-T3PB Magnum. The 3rd channel is on an auxiliary knob, which controls the shifting servo. I have it set and adjusted so that all the way to the left is 1st gear, centered is 2nd, and all the way to the right is 3rd. 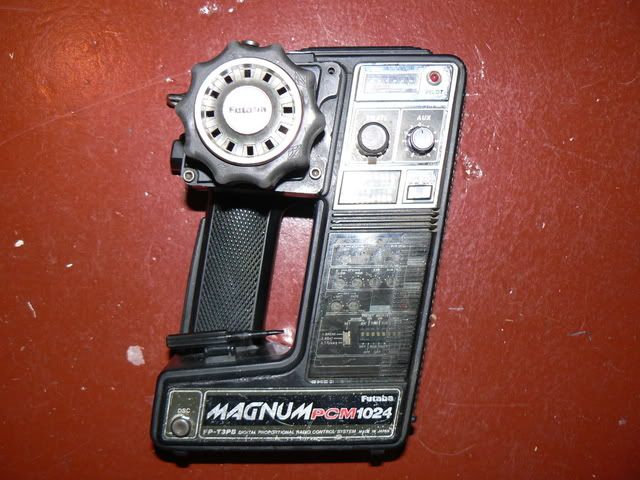 Then I mounted everything up and secured the wires. The ESC is mounted high on the outside of the frame rail for now. Because the swivel and center shock takes up so much space, there wasn't too many other options without causing interference. 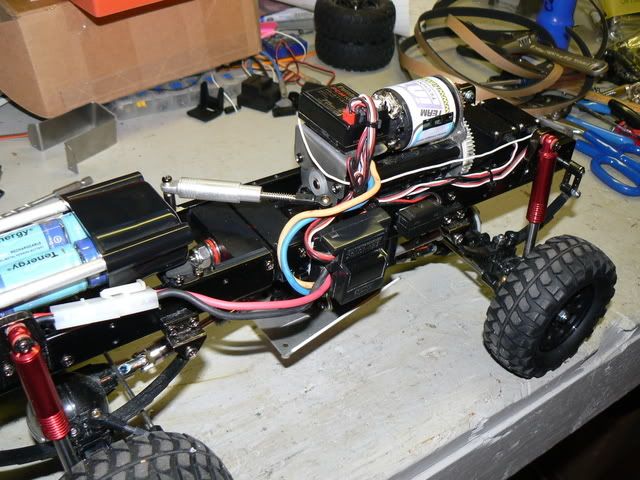 I ran it for a while again, and I'm still very pleased. The 45T motor is perfect with the 3-speed transmission and stock gearing in my opinion. First gear is definitely slow crawling, second is a good all around gear for light crawling and technical areas, and third will get you where you want to go. |
|
| |
|
12-29-2007, 09:32 PM
| #47 |
| RCC Addict Join Date: May 2006 Location: Roseville
Posts: 1,469
|
You are not getting any radio interferrance from the motor being right there?
|
|
| |
|
12-29-2007, 10:14 PM
| #48 |
| Quarry Creeper Join Date: Jan 2006 Location: San Diego
Posts: 212
|
Very nice work Lets see a vid on this.
|
|
| |
|
12-30-2007, 12:39 AM
| #49 |
| Pebble Pounder Join Date: Dec 2007 Location: CA
Posts: 191
|
Nice work ! Just can't wait to see it in action.
|
|
| |
|
12-30-2007, 06:29 AM
| #50 | |
| Quarry Creeper Join Date: Jun 2007 Location: Maryville, TN
Posts: 406
| Quote:
Thanks. | |
|
| |
|
12-30-2007, 08:30 AM
| #51 |
| support@rc4wd.com   Join Date: Nov 2007 Location: Lancaster, Ohio
Posts: 1,417
|
I read through this whole thread and have to say I impressed! Looks great. If you are having problems with the limiter shock and the space it takes up, have you thought of using a small chain from the back to the front half of the chassis (right where you cut it) to limit twist? 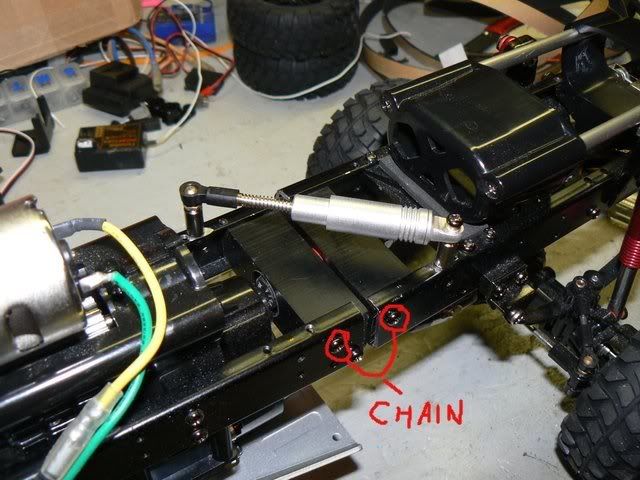 Last edited by roborg5000; 12-30-2007 at 08:36 AM. Reason: added pic |
|
| |
|
12-30-2007, 08:07 PM
| #52 | |
| Quarry Creeper Join Date: Jun 2007 Location: Maryville, TN
Posts: 406
| Quote:
Using a basic limiting strap is a great idea, but it doesn't offer any dampening or force to return it to center. I will keep that in mind as another possible solution though. Thank you! | |
|
| |
|
12-31-2007, 07:54 AM
| #53 |
| Quarry Creeper  Join Date: Jan 2005 Location: uk s,wales blackwood
Posts: 449
|
nice build i have been reading it since you began it on here here are some things i thought about wich might help or not, have you considerd using 2 leave springs one on each side of the frame running lengh ways, or 1 fitted across the frame attached to a bracket in the center of the spring and the ends sit on either side of the half that rotates some old cars used 1 spring fitted across the car to provide suspension on both sides it was fixed in the center of the spring and the ends were attached to either wheel (sounds about as clear as mud) and will your battery fit between the frame rails if you made new cross members and fitted them to the bottom of the frame your battery could then sit on them and be held down by one strap and 2 r clips just trying to lower the cg a bit. |
|
| |
|
12-31-2007, 06:00 PM
| #54 |
| Quarry Creeper Join Date: Jun 2007 Location: Maryville, TN
Posts: 406
|
Okay, people have been asking for a video of the swivel frame in action, so here you go. I stacked up some wood and a brick in my basement to make a very basic 4" tall table top to test the wheel travel. Picture from other side: 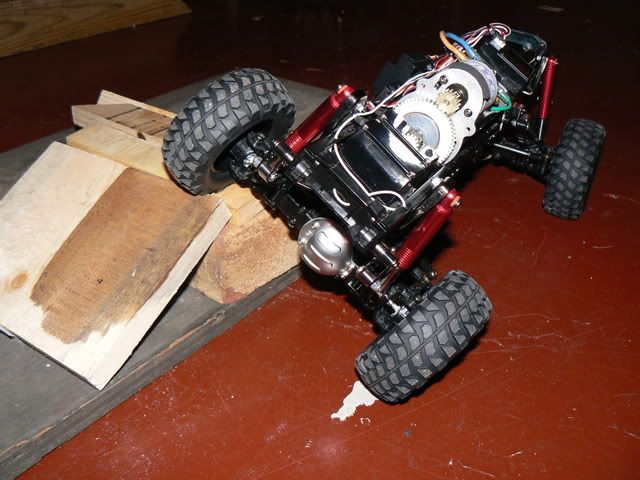 Video (sorry it's kind of dark): http://www.youtube.com/watch?v=YjdKU1oUCPk All four tires stay on the ground at all times. |
|
| |
|
12-31-2007, 07:06 PM
| #55 |
| I wanna be Dave Join Date: Apr 2007 Location: clarksburg
Posts: 2,009
|
Hell with that set up you dont even need shocks at the corners!!!Very cool truck man cant wait to see the body on!!!
|
|
| |
|
01-01-2008, 12:02 AM
| #56 |
| RCC Addict Join Date: May 2006 Location: Roseville
Posts: 1,469
|
Extremely cool. What an extremely well executed project.
|
|
| |
|
01-01-2008, 06:27 AM
| #57 |
| I wanna be Dave Join Date: Feb 2005 Location: Cleveland, OH
Posts: 8,009
|
Very nice, looks like the swivel frame works well You won't have any radio problems with that PCM gear. It may be old-school but it's good stuff, and PCM modulation is as good as it gets. You may have some ESC issues if that's a TEU-101, though. That Tamiya speedo can only support one servo (and it's marginal at that; I think the BEC is half an amp. It's fine in a Frog or a Mini Cooper, but you need something bigger for this rig). If it's a 302 you're good to go. Really diggin' this build. Keep it up. |
|
| |
|
01-01-2008, 10:34 PM
| #58 |
| Pebble Pounder Join Date: Sep 2006 Location: Spokane
Posts: 198
|
Nice work on your project. Looks awesome so far and it brings a whole new meaning to articulation while keeping all 4 wheels on the ground. I purchased a 4wheel drive video a few months ago and someone was running a 1:1 setup like this in a tough truck competition. He was using hydraulics to control the swivel of the frame. I think in theory this is to force weight on the wheel that has the smallest amount of traction and also to help with getting over obstacles. Have you considered using a high torque servo to change the angle of the bed, plus you could also center the chassis at any time. Just a thought and my 2 cents. Keep up with the great work.
|
|
| |
|
01-03-2008, 12:23 PM
| #59 |
| Quarry Creeper Join Date: Jun 2007 Location: Maryville, TN
Posts: 406
|
I finally got the body painted and trimmed this morning. I decided to go with a little darker red instead of a bright red. It's the Pactra Metallic Red. Here are a few initial body on shots. I had a few decals left from my ProLine Power Wagon body, so I threw a few on, which is nice since the Bolink PW body doesn't come with any decals. I will be working on more scale details soon. I still need to figure out what to do with the bed. I don't like the fact that they molded in the TMaxx hole locations. I'll probably just cover it with a smooth black adhesive sheet for now. I also need to get some Hummer wheels too. These are just on until I can track some down. :-( 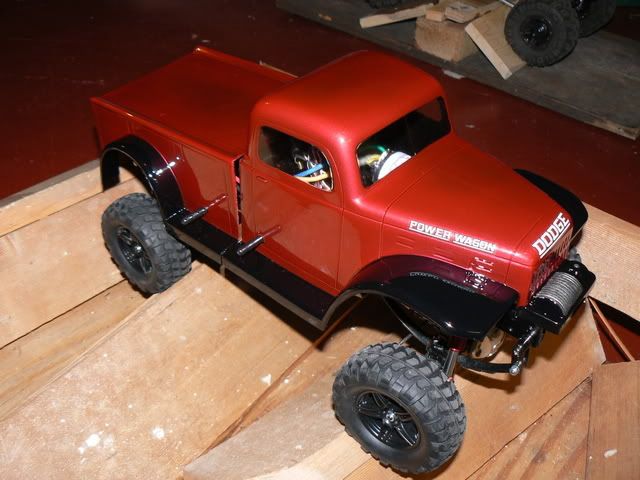 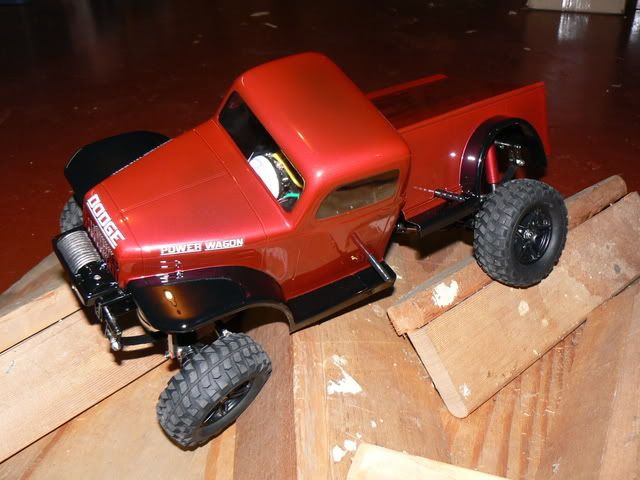 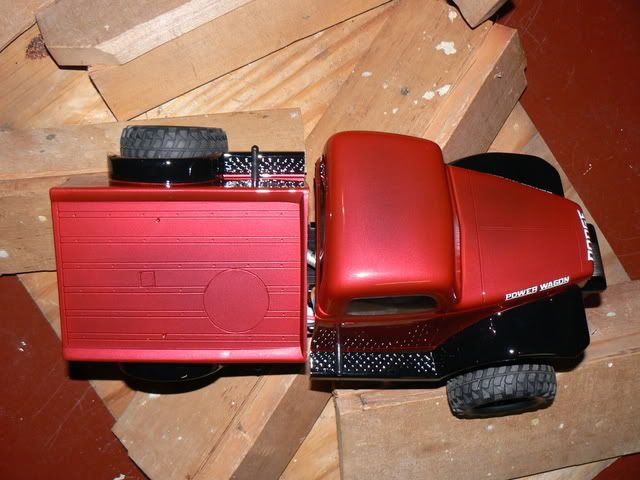 Thanks again for all the comments guys! |
|
| |
|
01-03-2008, 12:47 PM
| #60 |
| RCC Addict Join Date: May 2006 Location: Roseville
Posts: 1,469
|
Bad a$$ man! I believe you can order the Hummer wheels straight from Tamiya USA.
|
|
| |
 |
 LinkBacks (?)
LinkBack to this Thread: http://www.rccrawler.com/forum/1-9-scale-rigs/97676-swivel-frame-power-wagon-build.html | ||||
| Posted By | For | Type | Date | |
| Зарубежные проекты 1.9 | This thread | Refback | 10-07-2011 09:42 AM | |
| My first High-Lift - finally ! - Scale 4x4 R/C Forums | This thread | Refback | 10-05-2011 01:25 AM | |
| |


 Linear Mode


