| |
| |||||||
 |
| | LinkBack | Thread Tools | Display Modes |
 08-01-2008, 02:59 AM
| #1 |
| Pebble Pounder Join Date: Jun 2008 Location: Federal Way, WA
Posts: 139
|
Ok, I Started my first build up about a week ago, but just got a photo hosting site, so I am going to catch you guys up on my build. I wanted to do a unique body, but my wife insisted it be a jeep since I have been wantig a 1:1 jeep for awhile now. So jeep it is. I wanted to build my own chassis, and use as many parts from my junk bin as possible. I am using a Kyosho monster motor with 12t pinion on a 92t spur. My tranny is a Losi XXXT tranny ( remember...parts bin...its what I had) locked with epoxy. Shocks are aluminum threaded shocks from an Evader stadium truck. 3.5 inches in the front and 4 inches in the rear. Axles I splurged and got some locked Axial ax10 axles of off Ebay. Drive shaft are pede shafts. I did get some traxxas metal yokes for the axle and of the shaft. I cut the frame rails out of 1/8th inch aluminum I allready had.     I dont have a scroll saw, so I used my jig saw and cleaned it up with a file and a dremel tool. that was night one. Darn, just previewed the post....stupid hosting sites. I had all my pictures at a reasonable size, now they all shrank....oh well. Last edited by slobert; 08-01-2008 at 03:30 AM. |

|  |
| Sponsored Links | |
| | |
|
08-01-2008, 03:05 AM
| #2 |
| Pebble Pounder Join Date: Jun 2008 Location: Federal Way, WA
Posts: 139
|
I bought some 3 inch wide 1/8 inch aluminum c channel to use to make my tranny mount/skidplate, cross braces, battery and electronics trays. I have white nylon and other plastics, but I wanted the chassis to be all metal.   |
|
| |
|
08-01-2008, 03:06 AM
| #3 |
| Pebble Pounder Join Date: Jun 2008 Location: Federal Way, WA
Posts: 139
|
on 7/23/08 I got the front suspension mostly done  |
|
| |
|
08-01-2008, 03:09 AM
| #4 |
| Pebble Pounder Join Date: Jun 2008 Location: Federal Way, WA
Posts: 139
|
ont the 27th I had both ends done, but had a problem. The location of my front shock towers allowed the tires to rub at full lock and full articulation. Hmmm   By the way, the photo location is my front yard. I landscaped it two years ago with RC in the back of my mind and it has a huge rock garden. |
|
| |
|
08-01-2008, 03:21 AM
| #5 |
| Pebble Pounder Join Date: Jun 2008 Location: Federal Way, WA
Posts: 139
|
On the 30th I installed two cross braces at the front and rear where the bumpers will mount and made a battery tray that also mounts the steering servo. I also mounted the front shocks to the battery tray alowing the clearance I needed. Not ideal, but I wasn't about to cut out new frame rails with the shock mounts further foward. OH well, thats what you get when you are trying to plan out a build without having all the parts in front of you. The steering servo is frame mounted and has slight bump steer in the lower part of its travel, but its not bad at all. You can see a video of it here http://s508.photobucket.com/albums/s...t=MVI_0118.flv   Even without much wieght yet, its going to be flexy. If my measurements are right, I should get this flex with little tire rub on the body. But then we have allready seen how my measurements go, so if I have to I will limit the travel. Still, in the first picture you can see the shocks arent even all the way compressed, so If I limited it to even this I would be happy. |
|
| |
|
08-01-2008, 03:29 AM
| #6 |
| Pebble Pounder Join Date: Jun 2008 Location: Federal Way, WA
Posts: 139
|
Oh yeah, and the tires are proline flat irons. I think they look freakin' awsome! The wheels are RPM revolvers. I chose them for three reasons. They are narrow, they have a narrow track width backspacing so the tires dont stick out from the body like a skateboard, and they are cheap like me. The narrow track width is part of what messed up my shock mount location. the standard rims I had when I was figuring out measurments cleared the shock. Oh well.
Last edited by slobert; 08-01-2008 at 11:08 AM. |
|
| |
|
08-01-2008, 03:53 AM
| #7 |
| Rock Crawler  Join Date: Jan 2007 Location: Secret Crawl Location Deep In England
Posts: 546
|
Not sure why no-ones replied to any of your six posts in this thread! WTF I like it man, Nicley made chassis. Looks real clean. How long till you test it? Matt |
|
| |
|
08-01-2008, 04:17 AM
| #8 | |
| Quarry Creeper  Join Date: Feb 2007 Location: waterford
Posts: 243
| Quote:
But cool build. Like to see some shots out on the rocks. | |
|
| |
|
08-01-2008, 04:55 AM
| #9 |
| Rock Crawler Join Date: Jan 2007 Location: Secret Crawl Location Deep In England
Posts: 546
|
ahhh my bad! lol
|
|
| |
|
08-01-2008, 08:38 AM
| #10 |
| Rock Stacker Join Date: Dec 2007 Location: Morristown
Posts: 87
|
Looks like a good start so far. It is more fun making it your self then going out a buying it.
|
|
| |
|
08-01-2008, 09:10 AM
| #11 |
| I joined the Band! Join Date: Mar 2006 Location: Gardena,Ca.
Posts: 609
|
i like it. great start man  |
|
| |
|
08-01-2008, 10:29 AM
| #12 |
| Pebble Pounder Join Date: Jun 2008 Location: Federal Way, WA
Posts: 139
|
Yeah, all the posts were done last night cuz I finally signed up with a picture hosting site so I could post pictures. Now the build will be in real time. I'm heading out to the garage to do some work...before I have to go to work. I am not budgeted for a good radio for awhile still, but I have some crap I can throw on for now. I hope to have it done in two weeks. ( trying to be realistic ) I love building stuff. Taking a pile of raw material and watching it turn into something awsome is great. Its also a pain sometimes though! |
|
| |
|
08-01-2008, 12:08 PM
| #13 |
| Quarry Creeper Join Date: Aug 2007 Location: Lumberton
Posts: 463
|
Looks like your off to a great start man!!! |
|
| |
|
08-02-2008, 01:22 AM
| #14 |
| I wanna be Dave Join Date: Sep 2005 Location: USA
Posts: 11,196
|
Very nice with the tools you have. Can't wait to see it complete.
|
|
| |
|
08-04-2008, 12:31 AM
| #15 | |
| Pebble Pounder Join Date: Jun 2008 Location: Federal Way, WA
Posts: 139
| Quote:
By the way, I checked out your website...very nice. The scale stuff gave me a warm tingly feeling and I had to have my wife lock up my credit card. | |
|
| |
|
08-04-2008, 12:40 AM
| #16 |
| Pebble Pounder Join Date: Jun 2008 Location: Federal Way, WA
Posts: 139
|
Ok, I still have alot to do, but today I bent up some solid aluminum rod into nerf bars. I drilled and tapped them and they bolt from the back side of the frame rails. Seems pretty sturdy, but we will see. I also painted up the body. ITs a 10 foot paint job. Looks great from ten feet away, but I am a slob and a clutz so It alittle buggered if you look up close. Oh well, I will put some more detail into it and see if I cant bump it up to a 6 foot paint job. I resisted as long as I could, b-b-but I couldn't pass on the poser shots in my rock garden. My neighbors, I am sure , wondered what I was doing at 11:00 at night with a tripod and a flashlight in my front yard but I got the pictures before the cops showed up.   I havent decided wether to just paint up the winch that is molded into the body or build one out of styrene. I would love to buy one of the scale winches I saw but dont have the scratch. In the end I will probably just paint the one on the body since this body will probably be thrashed in a month anyways. Ah Geezzz I just previewed the post and now the pictures are too big. I cant seem to do anything right. |
|
| |
|
08-04-2008, 08:37 AM
| #17 | |
| RCC Addict Join Date: Feb 2008 Location: Hiatus..sutiaH
Posts: 1,620
| Quote:
Great looking build there!. I love the guys (like me) without a full shop who only use simple tools to make things. Seems more personal and meaningful. Damn nice build! | |
|
| |
|
08-04-2008, 06:28 PM
| #18 |
| I wanna be Dave Join Date: Apr 2007 Location: clarksburg
Posts: 2,009
|
Nice build man, I really like the frame looks killer!!! As for a winch their not to hard to scratch build. Heres one I built for my defender build a while back. Made from a sharpie and some styrene.. 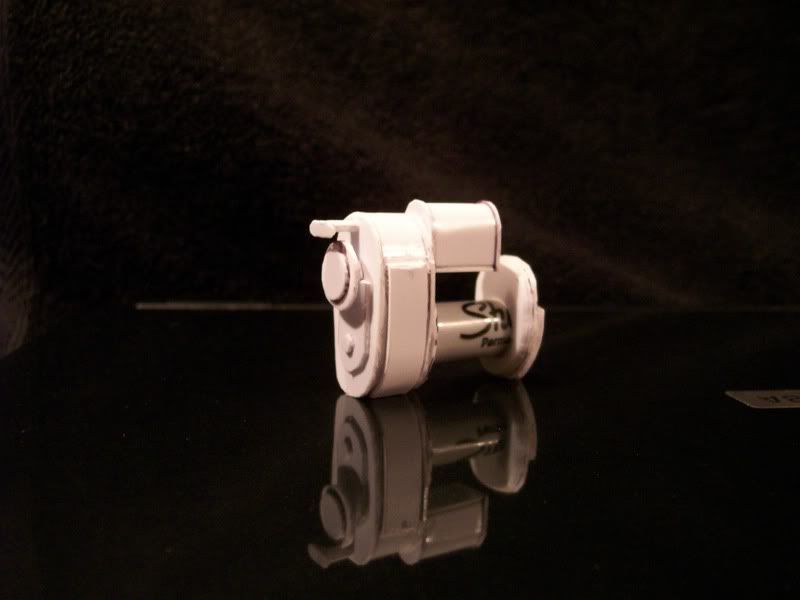 and here it is all painted up. 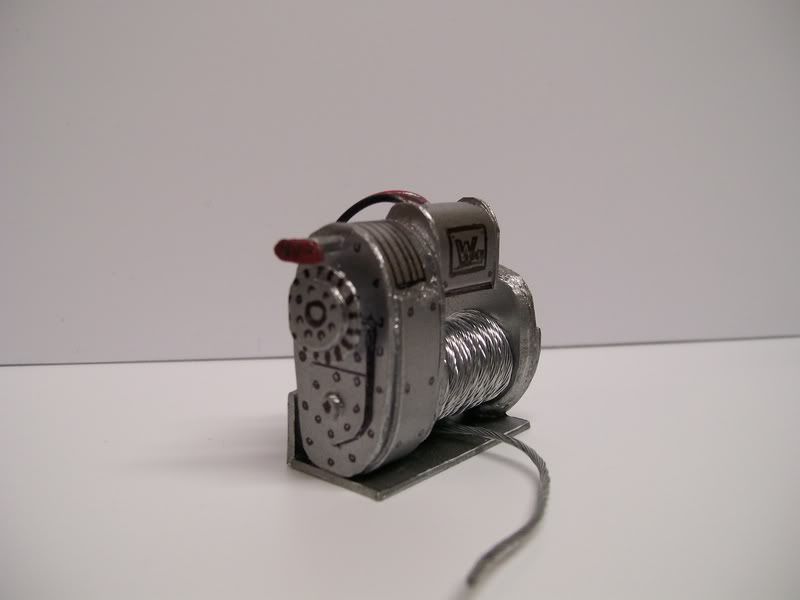 Have at it bro!!!! You wouldnt have been able to scratch build an rc if you didnt try!!!!!!!! |
|
| |
|
08-05-2008, 01:09 PM
| #19 |
| Pebble Pounder Join Date: Jun 2008 Location: Federal Way, WA
Posts: 139
|
I saw RCJeepbuilder's winch when doing alot of readin on this site before starting my build. It was what gave me the idea to build my own.I do like to build with styrene, Just worried that it will not hold together. So I was building this bumper today and I think its design would protect a scale winch. I had a minor setback though. I drilled out the solid rod for the upper loop on the bumper no problem, but for some reason my 6-32 tap snapped inside the rod! Now I have to wait till I can get to the hardware store, and I have to bend up a new tube and re-drill since I can't get the tap out. AArrrrg. I guess thats part of the game. Heres what the bumper will look like.  |
|
| |
|
08-08-2008, 04:44 AM
| #20 |
| Pebble Pounder Join Date: Jun 2008 Location: Federal Way, WA
Posts: 139
|
Progress! Loved my nerf bar idea, but they looked whimpy. Since I was at the hardware store anyway getting a new tap, I got some thicker aluminum rod. Bent it up, drilled and tapped it. It is super sturdy and looks killer. I used the same rod on my bumper and really like the effect. I wanted kinda an 80's theme on my jeep and I think the bumper, nerf bars, and the body graphics get that vibe. I like how the D rings turned out and it was a pretty easy. Just a plate behind the bumper with two tabs hanging below the bumper. Drilled carefully and used electric fence wire I happened to have around. I also redid the front links as the axle was about a quarter inch too far foward. Long night! Any ways, sorry the pictures aren't the best but its 3:30 in the morning and I really should be in bed...tomarrow is going to suck. But at least I am loving the jeep!    Last edited by slobert; 08-08-2008 at 04:53 AM. |
|
| |
|
| |


 Linear Mode


