| |
 10-16-2008, 07:06 PM
| #1 |
| Rock Crawler Join Date: Sep 2008 Location: N.E. Mpls
Posts: 854
|
After building my ax 10 I was hooked and back into trucks after a 10 yr gap. So here we are I have a N/B 1/6 f150. The w/b is 16 in+/- . I was thinking about shortening the w/b by 2 3/4 but then had second thoughts. I will be making my own chassis and as much of the metal work as possible. My trade is machinist/ pattern maker and I get to do alot of eng/des. so this will be a fun project. I plan on useing tlt axels with a ax 10 tranny(for now). The axels had better show!!!!.. Any who ,I havent seen any of these bodies as of yet in the forum(been surching for days) so when I saw the oppertunity I grabbed it. Of course 1st thing I have done is take the body apart and start clearing out all the excess material and make room for the tranny in hopes of keeping it tucked up inside the interior as much as possible for a more scale look. I will be working on the chassis tmo at work. It will be made of 1/2 x 5/16 channel .100 thick walls. Ok enough with the boreing talk here is some pics. Any input or thoughts would be appreciated Thanks Dave |

|  |
| Sponsored Links | |
| | |
|
10-16-2008, 07:14 PM
| #2 |
| Rock Crawler Join Date: Sep 2008 Location: N.E. Mpls
Posts: 854
|
I meant to also add the tires it is mocked up and 2.2 ax10 b/l with rock claws. I have reading alot of the tips and tricks so be prepared for some new and differnt ideas. My creative mind gets away with my projects sometimes...lol. I also plan on useing shock? with leafs which I will also make. I see wheel wells in the future. I work at a plastics company and we do all sorts of fabrication and vacuforming so I have all sorts of options at hand... Stay tuned...
Last edited by Lonewolf; 10-16-2008 at 07:42 PM. Reason: needed to remove statements... |
|
| |
|
10-16-2008, 07:15 PM
| #3 |
| Quarry Creeper Join Date: Apr 2007 Location: St. Louis
Posts: 267
|
Good find there.  Do you plan on bending those channels or keeping them straight? Vacuforming...... Hmmmm...... I 'm looking for some fender flares for a 1/6'th. Last edited by Flip; 10-16-2008 at 07:17 PM. |
|
| |
|
10-16-2008, 07:23 PM
| #4 |
| Rock Crawler Join Date: Sep 2008 Location: N.E. Mpls
Posts: 854
|
Channels will be bent and fitted to the chassi. I have thinking about a chassi mounted steering servo ( have a few unseen ideas). My plans are for a scale appearance with good abilities... Last edited by Lonewolf; 10-16-2008 at 07:44 PM. Reason: Still new to the rules no feelers sorry |
|
| |
|
10-16-2008, 07:43 PM
| #5 |
| Quarry Creeper Join Date: Apr 2007 Location: St. Louis
Posts: 267
|
I would like to see how you bend those channels without kinking them. As for the flares, I've got a 2007 GMC Yukon XL in 1/6'th scale. The tires are 2.2 Rock Stompers which are rather large but I think it will look ok due to the large size of the Yukon. Plans are to only have the tires stick out past the body about 3/8", hence the flares. I had a Ryobi weed eater that I was going to pull the recoil spring out of for leaf spring material but I couldn't get the clutch off, bummer.
Last edited by Flip; 10-16-2008 at 07:58 PM. |
|
| |
|
10-16-2008, 08:19 PM
| #6 |
| RCC Addict Join Date: Dec 2007 Location: Moncton, NB, Canada
Posts: 1,962
|
Last pic looks sweet, there's a black F-150 FX4 by where I live that sits that high, looks awesome in 1:1.
|
|
| |
|
10-16-2008, 08:53 PM
| #7 |
| Rock Crawler Join Date: Sep 2008 Location: N.E. Mpls
Posts: 854
|
Hey if ya can get a pic for me it would be a grat help to see a pic of a 1:1 that is lifted a bit.... |
|
| |
|
10-16-2008, 09:07 PM
| #8 |
| Rock Crawler Join Date: Sep 2008 Location: N.E. Mpls
Posts: 854
|
Let this be known ...At this time I do not have a vendors star and am not able to sell parts or anything I make during this thread. So until I get the big "V" start nothing here is for sale.....And I approve this message!!! Ok back to the build. I will post pics of the tools I use and the processes I use to achieve my goals. I hope to share my build as a how to and plz feel free to ask questions. I have been in the F/E boat world for the last 2 yrs and have done extensive build threads in hopes of shareing what I know and do and how I do it. I hope many will learn something from this build As for bending the channel I will use a vice and some rounded stock and bupport blocks in the vise. I will be bending both channels at the same time to get them symetrical. Till I get my axels and figure out where the shock mounts and leaf mounts go I will keep the chassi paralelle but bent to fit closely to the body and interior like a 1:1. I have figured I will be adding a cooler to the rear seat so that I can cut out the rear seat to allow the tranny to fit higher into the body and be less visable... Hopefully only the chassi framework will be seen the motor and tranny will be up inside the rear seat... more pics of the process and the how too's tmo.... |
|
| |
|
10-16-2008, 09:32 PM
| #9 |
| Quarry Creeper Join Date: Apr 2007 Location: St. Louis
Posts: 267
|
Why not build it like a 1:1, put the motor under the hood with a shaft running to a transfer case. Something like this http://rc4wdstore.com/product_info.p...roducts_id=836 Then run shafts out to either axle.
|
|
| |
|
10-17-2008, 05:22 AM
| #10 |
| Rock Crawler Join Date: Sep 2008 Location: N.E. Mpls
Posts: 854
|
That is a good idea . I will see what kind of room I have when im done bending the chassis.. Heck I might make 2 one of each version in case I change my mind later. May ill make 2 different versions and see what works out better for form fit and function...
|
|
| |
|
10-17-2008, 09:12 PM
| #11 |
| Rock Crawler Join Date: Sep 2008 Location: N.E. Mpls
Posts: 854
|
Well guess its update time. I got the chassi bent but still not totally satisfied,Ill probable head to the shop in the morning and do a lil more tweaking. The bending was a bit og a challenge its more like metal art. I used my mill vise and some roundstock and basically bent it as you would tubing. The channel did cave a bit so I made up a small wdge to open it back up after bending.i want to redo the rear part and get it closer to the bed. As of now I have the tlts mounted useing stock axial shocks just to get a "feel for the look and fit. I also did some work to the bottom of the interior to make more working room and reduce weight. I also just makes for a cleaner build.. Once I get things more or less fitting it will finish the bottom of the interior and make it look more scale. I am looking at transfer cases and gear reduction unite for thie rig also. Alot has changed in the R/C truck world since I was lastmessing around withtrucks.My last real go around was pre internet for me so I had no clue what was out there... Well I got my "vender star" so If someone sees something they like or need something made Ill see what I can do. I do short run items usually less than a dozen unless its is something vacuformed then I might do a couple dozen at a time. I do custom metalwork. No I do not have a cnc or waterjet of any other comp operated equip. For metal work I use a bridgeport mill. As for vacuforming. I can do and supply all sorts of small styrene stock for hardbody fab work. I will aslo offer advice on how DIY. Ok back to the build... pics...... lets hear the input guide me fellow scalers. Links to xfer cases and gear reductions would be awsome... Info on gearing these units would be helpfull also Thanks Dave Ill get some better pics in the morning lighting here is not very good for photos. |
|
| |
|
10-18-2008, 11:40 AM
| #12 |
| Quarry Creeper Join Date: Apr 2007 Location: St. Louis
Posts: 267
|
What size channel are you using?
|
|
| |
|
10-18-2008, 07:43 PM
| #13 |
| Rock Crawler Join Date: Sep 2008 Location: N.E. Mpls
Posts: 854
|
The channel starts out at 1in x 1/2 in. I then go to the table saw and slit the tube to make 3/8 x 1/2... After bending the tube I did get some "cave in". To fix that I used a "wedge/chisel" to open the tube back up. I am sure I could have used some soft plastic(polyethylene) or such to help prevent the cave in. I chose to use a wedge/chisel to open the channel up to original size or close. The important areas, where other parts will mount to are square and "true". So far the frame is plenty strong. For mock up I used c/a to glue in some crossmembers to keep things true. Today I rebent the chassi for a closer fit to the body.. I like the outcome so it is time to move forward. I also did alot of work to the bottom of the interior to make room for the tx fer case and moter/tranny. In the process I added a few strips of 1/4 in styrene to reinforce the interior and allow me to grind away some of the materail to make room for the driveshafts and tx fer case/tranny.(pics to follow).So far I am satisfied with how the ladder frame fits the body and bottom of the interior. Today was more like a day of metal art seeing that the channel wanted to cave more than planned, so I had to open up the channel and true things up more than planned. The end result was as good as I could expect, and is good enough for me and I would not be ashamed to show it off... I did alot of work to the interior section of the build to strengthen the interior so later things will be solid and not much flex... As of now I am not too worried about the interior as that in itself is another weekend.... After the shop I went to the lhs to pic up some hexs and misc hardware to do more mock ups. My next misson will be to make and mount the leafs and links. I am kinna thinking I will make 1 pc units or @ pcs top and bottom as a leaf shock/link mounnt. It might look cleaner and be easier to make install than 2 individual units???? Shall see once I start the process. My leafs will be delrin with possible metal leaf backers,depending how things work out??? Last edited by Lonewolf; 10-18-2008 at 07:54 PM. Reason: Added pics... |
|
| |
|
10-18-2008, 08:01 PM
| #14 |
| Rock Crawler Join Date: Sep 2008 Location: N.E. Mpls
Posts: 854
|
A few more pics...What do ya think
|
|
| |
|
10-18-2008, 08:05 PM
| #15 |
| Rock Stacker Join Date: Sep 2008 Location: gj
Posts: 53
|
looks good only one problem should have went with the panthers instead of the claws but i guess they will do awsome rig |
|
| |
|
10-18-2008, 08:47 PM
| #16 |
| Rock Crawler Join Date: Sep 2008 Location: N.E. Mpls
Posts: 854
|
I will be switch the tires and possibly the rims. I have some rubicon tires ans some vangquish rims also. The parts being used now are for mock up till I get the parts that will actually go on it..
|
|
| |
|
10-18-2008, 08:51 PM
| #17 |
| Pebble Pounder Join Date: Jul 2008 Location: modesto
Posts: 149
|
looken good the only thing that i can tell that looks off is that it looks long and for the wheels to be so close tougher its going to be east to tip over....:-( but thats just my 2.... |
|
| |
|
10-18-2008, 09:00 PM
| #18 | |
| MWRCA'er 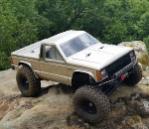 Join Date: Apr 2004 Location: Machesney Park IL
Posts: 3,995
| Quote:
| |
|
| |
|
10-18-2008, 10:40 PM
| #19 |
| Rock Crawler Join Date: Sep 2008 Location: N.E. Mpls
Posts: 854
|
Axial axels are a bit wider they might be a better route????
|
|
| |
|
10-18-2008, 11:11 PM
| #20 |
| Rock Crawler Join Date: Sep 2008 Location: N.E. Mpls
Posts: 854
|
I am also thinking about useing a dewalt gearbox for the tranny and it has 2 speedss??? I would also make a enclosure to make it look more scale and keep the ick out...Thoughts ??? A few guys have tried them here and seem to like them... The gearbox's from dewalt are about 40$, or salvage one from a used drill... We have a few 7.2 drills at work that the guys refuse to use do to lack of power and the batts are old and dont hold a charge....
|
|
| |
 |
| |


 Linear Mode


