| |
| |||||||
 |
| | LinkBack | Thread Tools | Display Modes |
 04-14-2020, 05:21 PM
| #1 |
| RCC Addict Join Date: Feb 2016 Location: Princeton, North Carolina, USA
Posts: 1,499
|
My GF's son received a large scale New Bright Hummer H3T for Christmas 100 years ago. It saw some miles, for a New Bright, but it was obviously loved. Ultimately it sat on a shelf forgotten for years, at that time that boys get "too old for such things". Fast forward some more years till I come along, into the RC hobby, and suddenly maybe he's not too old for the old toy after all. We tried resurrecting it, but kids tend to leave batteries in things...for years...and y'all know what that leads to. It was all shot, corroded to nothing, and the transmitter was long gone. No bueno. Well, it was about then I realized just how much sentimental attachment he had to the truck. So I spent way too much time tearing the whole thing apart, slaving in an Axial ESC and steering servo, creating a steering system, and putting it all back together. Have no doubt, New Bright chassis are not meant for advanced electronics. Anyway, I dedicated a spare tx and rx and actually had it running...for almost one whole battery pack until it detonated. Sadly, the chassis was scrapped but I kept the body, because who ever knows? The other day he asked me for about the tenth time in the last five years if there wasn't some way to turn it back functional. I'm a lot more experienced now and could adapt something near a 1/10 scale body to just about any chassis, but this beast is more 1/8 or maybe even 1/5 in the grand scheme of things, with a 17.5" wheelbase and 10.25" width...no way was it going on anything close to a 1/10 chassis. Hmm... So I have this: 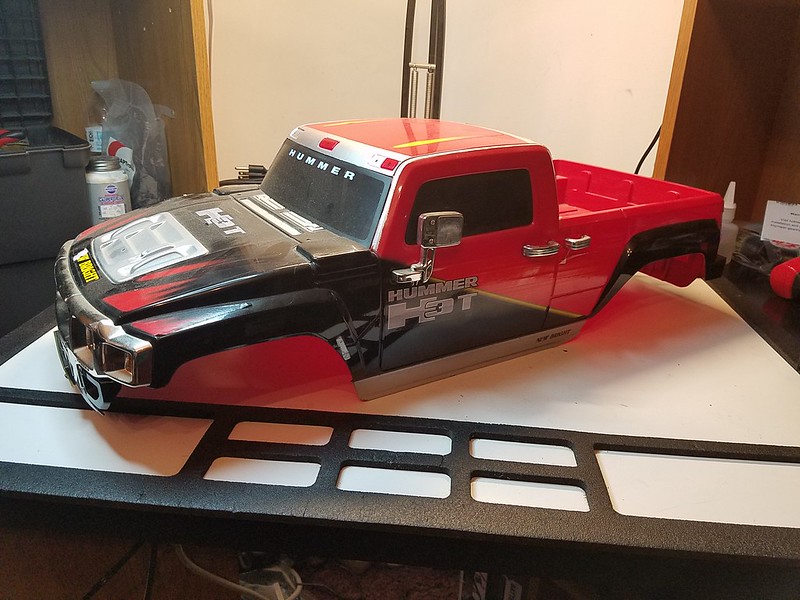 And I pulled this off the shelf recently, thinking to cannibalize the high $ electronics out of it for my SCX10.3 since it hasn't seen the wild but once since I built it two years ago:  And when I put it back up near the dusty New Bright body, it occurred to me there wasn't really all that much difference in proportions between the two. Heck, 2.2 tires were just about correct scale and the axle width was actually about spot on for a stanced crawler: 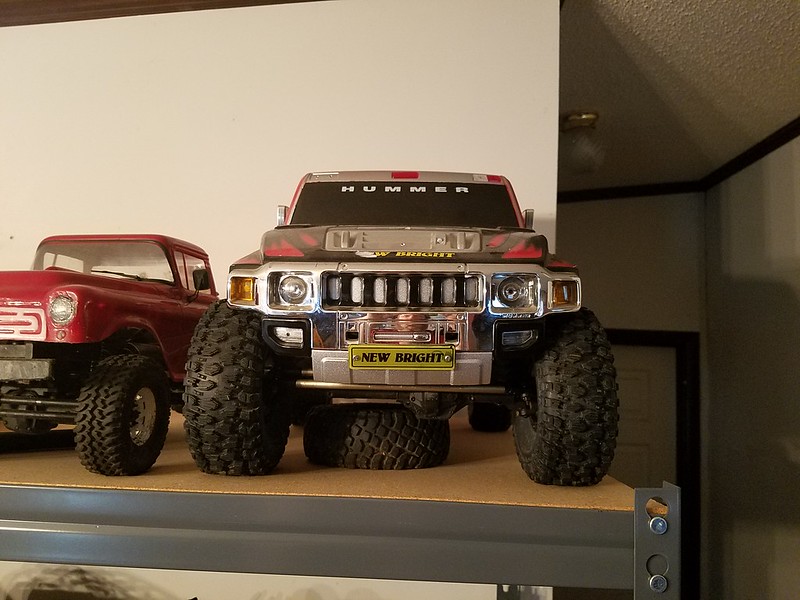 I stared at the Bomber for awhile last night trying to figure out how to stretch that chassis out 2.5", but it just didn't seem to lend itself well. Then it occurred to me it may well be easier to hack the body closer to the 14.75" WB of the Bomber. Some quick tape measure work showed the back door area between the back of the front door and the leading edge of the rear fender flares was right on 2.5". So here we go. I read through all of Hoosierdady's sticky thread on body hacks last night. Shame he hasn't been on here in about three years, lot of knowledge there. I'm guessing the wisdom concerning adhesives and styrene placement still applies, so we'll see what this turns into! |

|  |
| Sponsored Links | |
| | |
|
04-14-2020, 06:39 PM
| #2 |
| I wanna be Dave  Join Date: Apr 2013 Location: Streamwood, IL
Posts: 2,442
|
I'm in, interested to see where you take this. I've got a 1/8 Raminator body, that I use to run on an AX-10 Ridgecrest chassis, but it proved to be too top heavy for a TVP style chassis, so it's been sitting on a shelf for the last 7yrs waiting on a ladder frame. |
|
| |
|
04-14-2020, 06:45 PM
| #3 | ||
| RCC Addict Join Date: Feb 2016 Location: Princeton, North Carolina, USA
Posts: 1,499
| Quote:
Quote:
I have to order some adhesives and then it's hack time.  | ||
|
| |
|
04-14-2020, 06:46 PM
| #4 |
| RCC Addict Join Date: Aug 2017 Location: Fredericksburg, VA
Posts: 1,912
|
Me too! Lots of pics please.
|
|
| |
|
04-14-2020, 06:47 PM
| #5 | |
| RCC Addict Join Date: Feb 2016 Location: Princeton, North Carolina, USA
Posts: 1,499
| Quote:
| |
|
| |
|
04-18-2020, 07:51 AM
| #6 |
| Newbie Join Date: Jan 2010 Location: Datil
Posts: 7
|
Look forward to seeing the outcome as well! Sent from my Nexus 6 using Tapatalk |
|
| |
|
04-18-2020, 12:20 PM
| #7 | |
| RCC Addict Join Date: Feb 2016 Location: Princeton, North Carolina, USA
Posts: 1,499
| Quote:
I started prepping the base chassis, and realized it will be much more a base rig than just a chassis per usual. The outer cage actually provides just about the right body height for the Hummer, so I think I'll just be mounting the body right over the top of the fully assembled Bomber. I did cannibalize the interior as it won't be needed (blackout windows on the Hummer anyway), and as I found out in my TRX-4 Sport build these interiors work well in at least some crawler bodies. I ran the speedfreak Bomber one last spin around the front yard last week before stumbling on this project concept, and of course I broke a tie rod end. While disassembling I discovered I had also broken the short front axle shaft at the universal mount flange. So there's another $42 replacement part, so glad they only offer the axles in sets. I also stripped out the high $ Mamba X ESC and HH Trailmaster Pro brushless powerplant and Spektrum 4 channel rx (why did I have a 4 channel rx in here...?). Two reasons I did this: 1. As a trailer/crawler it just doesn't need this much power, especially in a chassis that IMHO is way too fragile for the purpose it was designed for without a lot of expensive upgrades (the old Axial is dead, all hail Horizon...hopefully) 2. The recipient of this truck was already feeling a little guilty about being told he wouldn't have to contribute anything financially to its construction and felt better upon finding out I'd be keeping most of the $425 electronic set (the robust 3Bros servo will have to stay as a "normal" servo won't stand up to the AR60 axle and 2.2 Hyrax tires) In the interest of economy and purpose appropriateness, I have an Axial AE-5 ESC out of some distant rig and a HH Trailmaster 540 27t motors that I'll probably use, although I have a 35t and 45t RC3WD motor in other trucks that could be swapped since I've become a fan of the 27t flavor. An 11t pinion will replace the current 13t. I'll dedicate a spare 2 channel Ikkonik tx/rx as well. I got some good advice on slowing the rig down as well, so the ESC and motor choice remains fluid. Underdrive gears for both axles are also on the option parts list should I have need to further devolve the rock racer platform. I chose to go with the three-step adhesive process recommended by Hoosierdady for a good bond between the bed & cab (in order): 1. BSI CA glue for initial fast bonding 2. Plastruct Bondene and styrene strips for strength and rigidity 3. E6000 for flexible retention I'm thinking I may have to add a panel or stringers across the front of the bed once cut to get enough mating surface. TBD. A somewhat relevant challenge is that I really don't want to have to repaint the almost pristine body, so all bonding and signs of such are going to need to be on the inside of the bed. I got the Traxxas rod ends, Bondene and styrene from my go-to ebay seller (who I guess I can't name here?) in two days, waiting on the glue and axles now to get this party started! | |
|
| |
|
04-18-2020, 12:56 PM
| #8 |
| I wanna be Dave Join Date: Jun 2017 Location: Humboldt county
Posts: 4,482
|
Looks like a fun project. At first I though the title was a typo lol better than a Bummer I guess. I dont know if I'm seeing this right... is there a set of rear (half) doors? Last edited by HumboldtEF; 04-18-2020 at 12:58 PM. |
|
| |
|
04-18-2020, 01:45 PM
| #9 | |
| RCC Addict Join Date: Feb 2016 Location: Princeton, North Carolina, USA
Posts: 1,499
| Quote:
Yes, it does have simulated rear half doors. But good eye, they're actually part of the bed rather than part of the cab. It's opportune for me because that's the material I'm planning to remove to rectify the WB disparity. | |
|
| |
|
04-19-2020, 11:14 AM
| #10 | |
| I wanna be Dave Join Date: Jan 2016 Location: california under the rock im crawling on
Posts: 4,284
| Quote:
also check ebay he sells them there to i dont remeber his user name though | |
|
| |
|
04-19-2020, 01:16 PM
| #11 | |
| RCC Addict Join Date: Feb 2016 Location: Princeton, North Carolina, USA
Posts: 1,499
| Quote:
See? No punctuation just for you, my friend. | |
|
| |
|
04-19-2020, 06:47 PM
| #12 | |
| I wanna be Dave Join Date: Jan 2016 Location: california under the rock im crawling on
Posts: 4,284
| Quote:
| |
|
| |
|
04-25-2020, 05:57 PM
| #13 |
| RCC Addict Join Date: Feb 2016 Location: Princeton, North Carolina, USA
Posts: 1,499
|
I got the Bomber set up acceptable with the Axial ESC and HH Trailmaster 27t brushed motor as planned. It's a bit torquey with the 11t pinion but it killed the top speed well enough to avoid it being too fast. It'll work. With that squared away...surgery day arrived. First order of business was deciding the instrument. I considered all my available options; circular saw (probably not), hack saw (don't think so), chainsaw (um...no). I seriously considered trying the thread trick ala BECKWORKS, but ultimately chose an as yet unopened tool I've had for a lot of years: 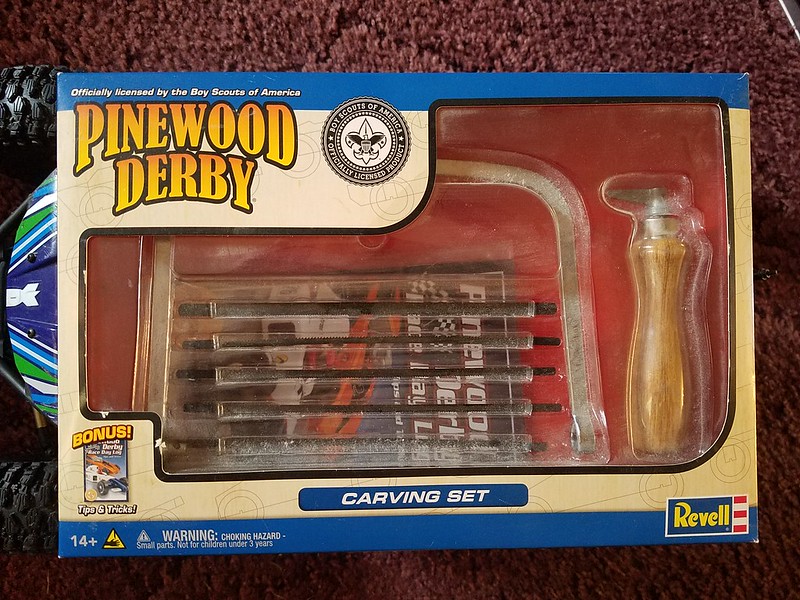 It has a very thin, fine toothed blade, and along with the coping saw spine seemed just the trick. Next, deciding where to make the necessary incisions. My original plan was to cut out the back door area between the cab back and the rear fender wells, but the radiused cab back didn't lend itself well to this, and I really didn't want to remove the cab back or I would've had to recreate it.  So instead I pulled a lateral line across immediately behind the rearmost point of the cab back/bed front. That became cut #1. Measuring back 2.5" gave me cut line #2, conveniently immediately in front of the inner rear fender wells. I marked and cut the bed sides from the outside, figuring to make the cross-bed cut from underneath. I laid down masking tape to mark the cut line to be marked with a Sharpie, then decided to just use the tape to cut by. It worked pretty well, as did the derby saw:  The bed portion I cut from underneath with a cutoff wheel on a rotary tool. Houston, we have separation...  It could have been a bit more perfect, but it squared up well enough with a drum sander. It looks a little wonky, but not as bad as some disproportionate aftermarket lexan bodies. And the wheelbase should be dang near spot on for the Bomber.  A couple things have become clear. One, I was kidding myself about getting away without painting...there's going to be no way around filler work and paint, at least at the joint areas. Stitches will dissolve but the scar remains. Second, I'm going to have to employ more support than a butt joint. I really need some styrene or plastic 90 degree stock to brace the cab back to the bed. Would normally be an easy trip to Lowes, but that may have to wait under the circumstances. The other challenge is going to be bonding the double-wall bed together, with it impossible to get to the inside of the outer bed wall to add support strip. May not be all that relevant if I can get the bed-to-cab adhesion strong enough. More to come. Open to suggestions on any part of this fiasco moving forward! |
|
| |
|
04-25-2020, 07:27 PM
| #14 |
| I wanna be Dave Join Date: Jan 2016 Location: california under the rock im crawling on
Posts: 4,284
|
that looks so much better like that in my opinion you should reinforce it with a steel role bar set up as well as with plastic inside the body im thinking double main hoops Last edited by ferp420; 04-25-2020 at 07:37 PM. |
|
| |
|
04-25-2020, 09:56 PM
| #15 | |
| RCC Addict Join Date: Feb 2016 Location: Princeton, North Carolina, USA
Posts: 1,499
| Quote:
 How would you do a roll bar that would reinforce the cab to the bed? Mount the bar to the cab? | |
|
| |
|
04-25-2020, 10:13 PM
| #16 | |
| I wanna be Dave Join Date: Jan 2016 Location: california under the rock im crawling on
Posts: 4,284
| Quote:
| |
|
| |
|
04-26-2020, 08:18 PM
| #17 |
| RCC Addict Join Date: Feb 2016 Location: Princeton, North Carolina, USA
Posts: 1,499
|
Sometimes I wonder if I spend more time building and modifying or creating posts for build and modification threads. Days like today confirm there is definitely more time put into building, anyway...and that's all right. Reattachment was executed successfully today, inasmuch as I am relatively certain the fusion point is as least as strong as the original body material. Building on yesterday's thought that purely a butt joint would not be sufficient, I harvested the 90 degree portion of the removed bed sides and floor as donor material to use as "L" braces. I had made three good cuts and one that went horribly wrong, most of which you see in one of these pieces. Fortunately it didn't matter. Also pictured here is the most wicked glue on the planet:  Let me say here that the BSI Extra Thick Maxi-Cure CA glue is the real deal. Reminded me of the original super glue that you'd better be damned careful what you got it on because it would be there forever, skin included. Paired with the Insta Set accelerator it was just mind blowing how fast and solidly it set. We now return you to construction already in progress... Gluing the braces to the inside back of the cab went very quickly. Five minutes after bonding I could have picked up the completed rig by the braces. I didn't use the Bondene here. I did rough them up for good adhesion prior to gluing.   Had I actually paid proper attention and matched the bed up to the cab from underneath when deciding where to place the braces it would have come out better. Finding out I had not done so revealed that I had failed to take the inner fender wells into account, leaving half the "L" braces dangling in space. I considered this Serious Error #2, although this was the first one that actually made me cuss like an airman and stalk away from the bench. No matter though. Some quick trimming a bit later followed by a third and fourth OMG-how-could-that-be-cured-already glue joint, and the bed was once again a permanent part of the cab, albeit minus a bit of extra meat.  I ran a bead of Bondene along the bed-to-cab seam here, both above and below, although to be honest it was already solid as hell. I would have liked to say the mating joint was perfectly symmetrical with no gaps whatsoever, but I haven't lied to you yet, no point doing so now. It's good that this was my first attempt at such an activity because it was far from perfect. I've done interior carpentry before too, and thanked the inventor of trim and molding and baseboards. No huge deal inside the bed or underneath as long as the outside of the bed is presentable...relatively. Here I ran into a mixed curse/blessing I had foreseen but had no good way of avoiding. The curvature of the back of the cab and natural outward tension that was a result of it left the straight-cut bed positioned slightly further back once glued then it would need to be for the bed sides to meet their cab-mounted counterparts.  Gluing the bed to the back of the cab and the "L" braces while simultaneously aligning both bed sides and the flimsy fender ends would have been about as feasible as pushing a car uphill with a rope. Instead, the compressible backspring of the cab not only left me access to both the inner and outer walls of the bed sides to apply glue but allowed me to align each individually and hold for the 12 seconds it took for the evil glue to bond. Here's where my hopes of no putty/sanding/paint on the outside joints were dashed to the proverbial rocks. It wasn't horrible, mind you...just not perfect. Oh well, I knew it was a possible eventuality for which I was prepared.   ferp420 (thanks ferp!) suggested something that made me retrieve the pseudo roll bar that I'd taken off the body in the first place thinking I wouldn't be able to use it. As it turns out, after a little modifying, the roll bar will not only cover some of the joint gap on the inside of the bed but just happens to span the joint perfectly, with half the bar frame mating to the top of the cab side bed rail and the other half extending over the bed rail of the part of the box that was removed. It will also be bonded to the bed sides for extra rigidity. When I finish the body work on the outside of the bed, I'll shoot a black paint band down the sides of the bed the same width as the black roll bar framework, not only covering the filler work but looking natural. I'll also taper the trailing edge of the cab sides under where the rear fender wells now reside to resemble the angle on the leading edge for better symmetry.    I spent a good hour and a half cutting and fitting styrene strips for the joints along the top and bottom of the cab/bed and the bed side inner walls and bonding with Bondene, but that's a purely utilitarian step and honestly looks like pure shit, so no pics of THAT...but it's functional. I would bet a paycheck the body integrity is solid. I've also realized I'm going to have to chop off the upper half of the Bomber cage to get proper body positioning, especially with the drop bed, so there's some more rotary tool work to go. Body work next. Does Tamiya putty have a shelf life? I have a brand new five year-old tube that I'm hoping is still viable... Hoosierdady, if you're still out there, thanks for the tips and beers to you! |
|
| |
|
04-27-2020, 08:23 AM
| #18 | |
| I wanna be Dave Join Date: Jan 2016 Location: california under the rock im crawling on
Posts: 4,284
| Quote:
rig is looking good unique and different | |
|
| |
|
04-28-2020, 08:59 PM
| #19 | |
| RCC Addict Join Date: Feb 2016 Location: Princeton, North Carolina, USA
Posts: 1,499
| Quote:
A snowball. That's what this turned into. Sometimes in projects you hit a certain point where you realize the slope just increased, and the brakes aren't holding. Soapbox derby cars rarely fail near the top of that hill either, oh no...they wait until you're halfway down or better with plenty of speed built up before the wheels come off. Either way, enough of that. Some things happened that lead to other things that lead to still more things, and then I got to a place. I didn't trust the one-part Tamiya putty, which I'd never used before, at first...but that stuff is no joke. Unworkable after just a few minutes, concrete after an overnight. Had to drop to 120 grit paper to work it down. I'll be a helluva lot more careful with the stuff in the future. Once I got it worked down, I realized the result was not going to be perfect. I could have primed it, and reworked it, and primed and reworked it again, and I did, but the outcome remained constant: imperfect.  Anyway, fortunately it didn't have to be perfect, so final primer and paint were shot. I hate the tape line at the rearmost end of the vertical black strip, not perfect. Not thrilled I can still see filler lines, not perfect. Was furious that the low tack masking tape lifted portions of the original decals, not perfect. Didn't like the way the bed looked with a black strip across the front 1/4 of it so it received a surprise flat black bedliner treatment. Oh well, it's done. I was pretty happy with the blend job bringing the front edge of the rear fender flares into symmetry with the front. I'll settle for that. The center light lens from the back of the cab (that couldn't be seen anyway) volunteered itself into two halves to fill the indentations and cover the holes left by the removed rear door handles.   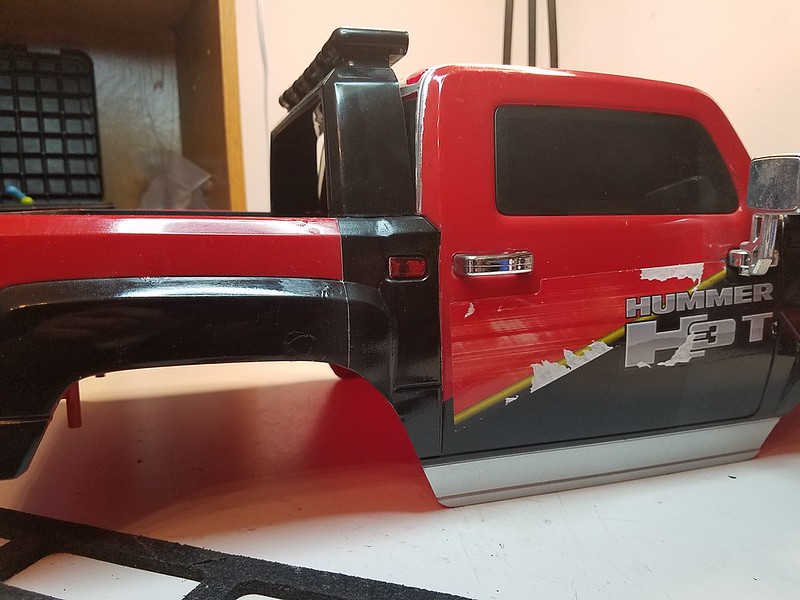 I should've known up front I wasn't going to be able to do this cut/splice without paint, so I should've known that I would have to do full paint for it to look truly right, but I was fooling myself. It's functional, and it's solid, and it doesn't look as bad as it could have. And the wheelbase is pretty much dead nuts. If not for the fact that the tires will sit halfway outside the fender flares, it could presumably handle full tuck!  Time to hack the upper half of the cage off the Bomber so the body will sit at the right height and start engineering body mounts of some sort. I have a starting point for the rear mounts; no clue for the front. Thanks to the three of y'all still following this. Sorry it doesn't look like an imthatguy or Sczerba creation...maybe next time. . | |
|
| |
|
04-29-2020, 11:05 AM
| #20 |
| Quarry Creeper Join Date: Jan 2011 Location: Woody point
Posts: 339
|
You’ve done well really, liking where its heading
|
|
| |
|
 The Humber - New Bright Reincarnation - Similar Threads
 | ||||
| Thread | Thread Starter | Forum | Replies | Last Post |
| Another reincarnation of my RS10 | RICrawler | Redcat Crawlers | 2 | 11-03-2011 02:51 PM |
| How to remove the new bright from new bright windsheilds's | tundrafan01 | General Scale Talk | 13 | 12-06-2010 01:30 PM |
| Thread Tools | |
| Display Modes | |
| |


 Linear Mode


