| |
 06-01-2008, 07:06 PM
| #41 |
| RCC Addict Join Date: Oct 2005 Location: $t. Helen$, OR
Posts: 1,082
|
are those stock links that you bent? (if so that would be good for my bro, he is to lazy to make custom links) I couldnt stand not having bent links and when i first saw ur rig I was like wow a comp rig without bent links Rig looks good man  |

|  |
| Sponsored Links | |
| | |
|
06-01-2008, 07:38 PM
| #42 | |
| Pebble Pounder Join Date: Mar 2007 Location: Sidney, OH
Posts: 190
| Quote:
No, they're CKRC heavy duty bent links. | |
|
| |
|
06-02-2008, 06:47 PM
| #43 |
| Pebble Pounder Join Date: Mar 2007 Location: Sidney, OH
Posts: 190
|
Today the revisions to the chassis were made, and should be in production and in my hands by the end of the week. Hopefully I'll have it tomorrow. I also fabricated some mounting brackets for the Rx and ESC. I'm not sure if this is where they will stay, because I'd like them to be lower. I do like how all the wires are routed out of the way, and where the on/off switch is located. 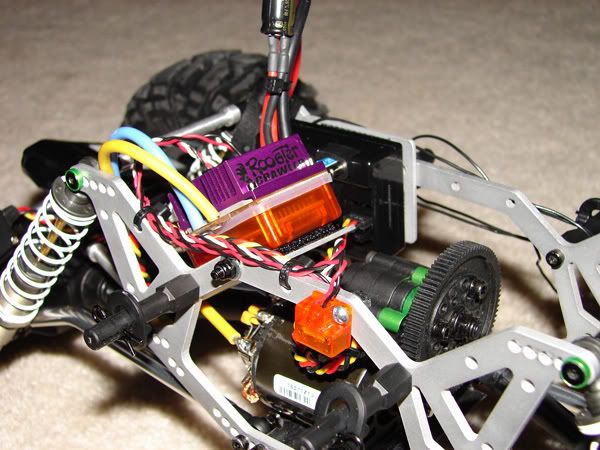 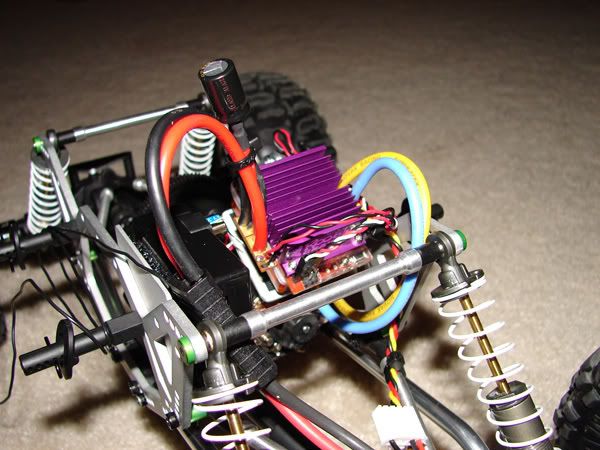 |
|
| |
|
06-04-2008, 07:40 PM
| #44 |
| Pebble Pounder Join Date: Mar 2007 Location: Sidney, OH
Posts: 190
|
I'm glad I didn't shave off that extra post like I had intended. After eyeballing 5 million times, I decided that the battery wouldn't have fit as planned. It surely would've rubbed against the tire. So, I had a brainstorm and remade the front servo bracket to also include room for the battery. This is somewhat like the one offered from Axial, except mine is a bit more...complicated. The servo is still angled down (20 degrees for those interested in doing this themselves), and the battery sits flat. This time, I decided to go with .090 steel instead of aluminum for the bracket. I figured the extra weight and strength would be helpful. It was a difficult piece to fabricate. One screw is directly on the break line, and the servo mount had to be twisted into place over the top of it. I decided to get fancy and mill a couple slots for one of the battery straps. I couldn't do the other one because of where the screws are located. I'm pretty happy with the results. As you can see in the pics, I also relocated the ESC, which is 1 full inch lower than before. The Rx is now velcro'd to the tranny case. 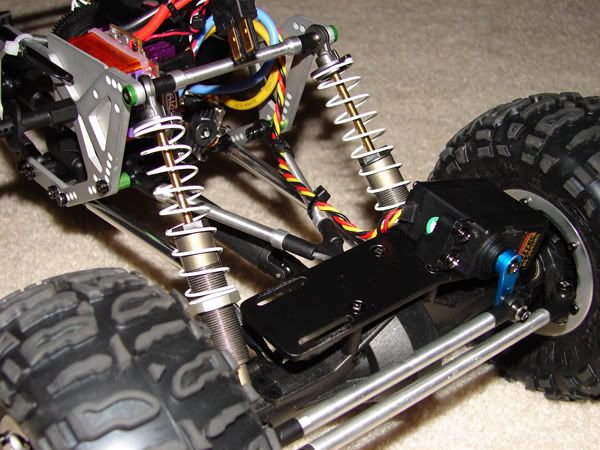 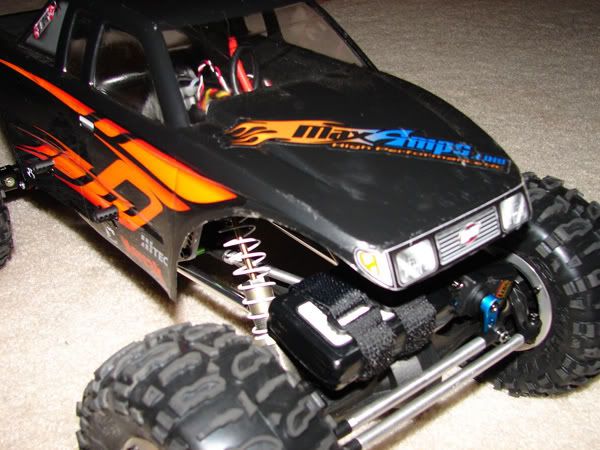 Last edited by Browncoat; 06-04-2008 at 07:42 PM. |
|
| |
|
06-04-2008, 07:53 PM
| #45 |
| support@rc4wd.com   Join Date: Nov 2007 Location: Lancaster, Ohio
Posts: 1,417
|
Your Boss hasnt fired your ass yet Can you get that esc mounted on your upper links? Did you see how mine was set in there?
|
|
| |
|
06-04-2008, 08:16 PM
| #46 | |
| Pebble Pounder Join Date: Mar 2007 Location: Sidney, OH
Posts: 190
| Quote:
I've had it mounted on the upper links, and I don't like it there because the wiring gets all funky and twisted up. I have issues with wiring, it's a personal hang-up. I've been working with a COG calculator, and I'm going to try to figure things both ways. If it makes a significant difference with the ESC on the links, I'll move it there. Otherwise, it'll probably stay put. | |
|
| |
|
06-04-2008, 08:41 PM
| #47 | |
| support@rc4wd.com Join Date: Nov 2007 Location: Lancaster, Ohio
Posts: 1,417
| Quote:
| |
|
| |
|
06-05-2008, 04:06 PM
| #48 |
| Pebble Pounder Join Date: Mar 2007 Location: Sidney, OH
Posts: 190
|
Here it is, kids...  |
|
| |
|
06-07-2008, 04:00 PM
| #49 |
| Pebble Pounder Join Date: Mar 2007 Location: Sidney, OH
Posts: 190
|
I made a crucial decision to give my crawler a heart transplant. While the Rooster Crawler ESC/Fifty-Five motor may be a good combo, it's not the greatest. Had I done more research in the beginning, I would've discovered the glitching issues with the ESC, and the motor's average performance. This build has gotten a lot more advanced than I ever thought it would. In addition, I wasn't sure if competition crawling would be something I was interested in. If nothing else, I just wanted a backyard basher. All that has changed. Battle Grounds is coming up, and after spending just one session with the guys from TSC, I'm hooked. So, I'm upgrading to a Tekin FX-R and pairing it with a T55 Pro hand-wound motor. For a brushed system, it's hard to find anything better. In addition, I've got some new bling on the way: smoke colored Mudrocks from Junfac.  Last edited by Browncoat; 06-17-2008 at 05:53 PM. |
|
| |
|
06-08-2008, 04:15 PM
| #50 |
| Quarry Creeper Join Date: Dec 2006 Location: Corbin KY
Posts: 392
|
What kind of battery is that? Great looking build.
|
|
| |
|
06-08-2008, 09:07 PM
| #51 | |
| Pebble Pounder Join Date: Mar 2007 Location: Sidney, OH
Posts: 190
| Quote:
Things are getting serious... Today I took the body to the chop shop, lowering the whole thing over 1", and trimmed quite a bit off the bottom and around the wheel wells. In addition, I mounted up the new Cyborg chassis and started tweaking. I decided to follow EeePee's advice, and made the whole thing as slim as possible. I had to reconfigure the shocks and links, which was a good thing, because now the triangulation is better so the whole rig will be more stable. After getting everything stuffed in there with no skid plate, I eyeballed the new pieces I was going to have to fabricate at work tomorrow, and everything should fit just fine. As is, the chassis is a meager 55mm wide, which is about 30% thinner than stock, at 80mm. The stock Axial 7x55mm post is the only thing between the chassis sides, as the shocks are mounted outside the frame now. Hopefully I can get everything made tomorrow and post some pics! Last edited by Browncoat; 06-12-2008 at 11:33 AM. | |
|
| |
|
06-09-2008, 05:13 PM
| #52 |
| Pebble Pounder Join Date: Mar 2007 Location: Sidney, OH
Posts: 190
|
Here's the new, slimmer and sleeker Cyborg: 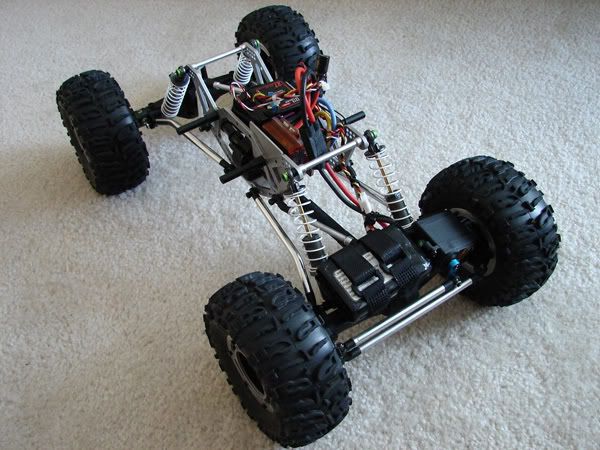 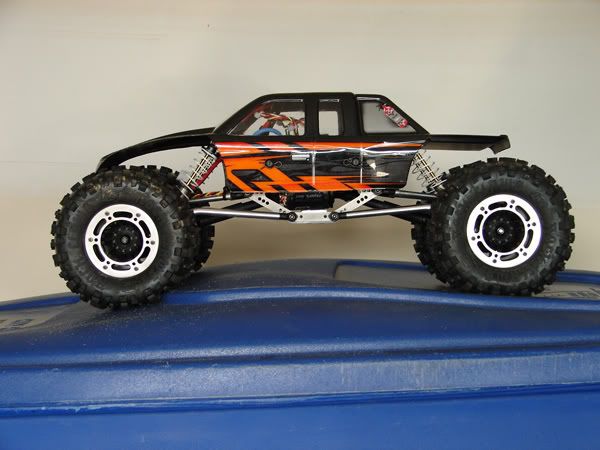 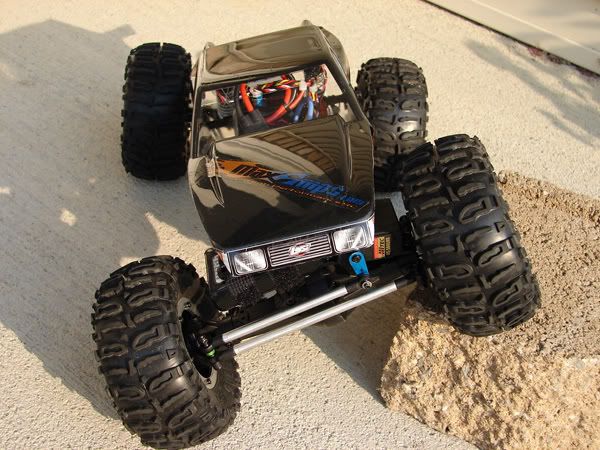 |
|
| |
|
06-09-2008, 07:48 PM
| #53 |
| Pebble Pounder Join Date: Mar 2007 Location: Sidney, OH
Posts: 190
|
Almost forgot... One of the more interesting features of the new, thinner chassis setup is the skid plate I made. It's super-slick delrin, around 3/8" thick, and I rounded off the edges to make it nice and smooth on the ends. It's a bit longer than stock to help protect the motor better. But, look ma! No screws!  The motor and tranny are now screwed down to an aluminum plate that I had to make because they actually hang outside of the chassis a bit. The plate is screwed down from the top onto the delrin, so there's no screw heads on the bottom. Just 100% pure slick delrin goodness. Also, the above pic shows the new triangulation of the links much better. The upper links are now bolted on the outside of the chassis due to the slim width, and the lower links are set wide on the axles. The result is a very stable rig that sidehills very well. I'll have more results after some rigorous testing tomorrow night. It's hard to tell just how big a difference this setup is. I wish I had a stock AX10 to compare it to. The body is actually too wide, and is being pulled in by the body clips. If you look closely, you can see that the body posts aren't even in line with the inside of the wheels! Here's a pic of the spur gear, and how close it is to the sides of the chassis: 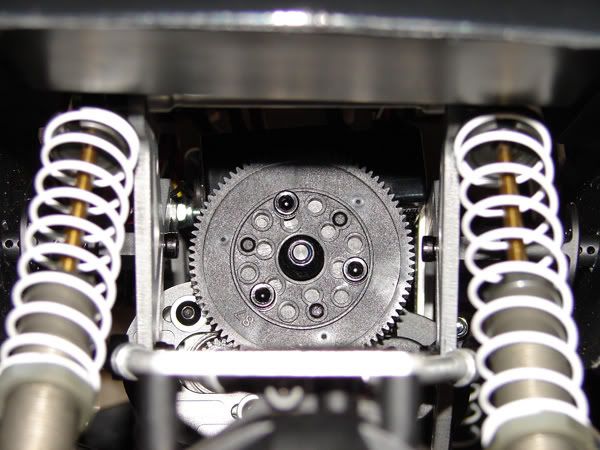 Last edited by Browncoat; 06-17-2008 at 05:42 PM. |
|
| |
|
06-11-2008, 05:55 PM
| #54 |
| Pebble Pounder Join Date: Mar 2007 Location: Sidney, OH
Posts: 190
|
After another crawling session Tuesday night, I'm happy with the build's progress thus far. The thinner chassis and new link triangulation definitely added some much needed stability, and it sidehills extremely well. However, there is still one glaring issue...weight. When comparing my AX10 to Rob's, I think it's safe to say mine weighs about half as much. Granted, he's running aluminum wheels now in addition to a different tranny and a dig. He may be a bit on the heavy side, but I definitely need to add some weight. This is probably going to be a balancing act. I'm opting to use bb's in the tires for now and see how that works out. I don't like the idea of putting in a bunch of weight since it strains the drivetrain so much, so I'll just have to tinker with it until it feels right. I ordered the FX-R and T55 hand wound, and am waiting for those. For now, I'm crawlerless again...since I sold my Rooster/Novak 55 to a co-worker. Looks like I'll have a week or so to mess with the bb's and tire foams until I'm up and running again. For now, here's some pics:  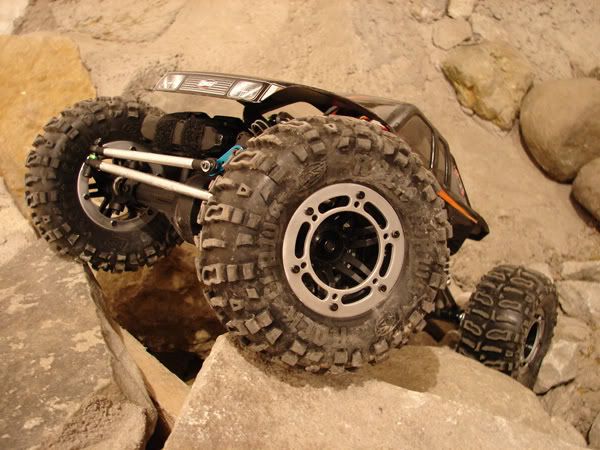 |
|
| |
|
06-11-2008, 07:40 PM
| #55 |
| support@rc4wd.com Join Date: Nov 2007 Location: Lancaster, Ohio
Posts: 1,417
|
Great pics man Keep working on it. It coming along great. And you are focusing more on your driving I noticed |
|
| |
|
06-17-2008, 01:15 PM
| #56 |
| Pebble Pounder Join Date: Mar 2007 Location: Sidney, OH
Posts: 190
|
New shoes! These are the Junfac Mudrocks, smoke colored. Mounting them was a bit tricky, as I had to grind down the Axial 12mm hex for them to fit. For some reason, the hex on the back of the rim was a little undersized. While I was at it, I added 6oz of weight to each front wheel, and 4oz to the rear. I have mixed feelings about these rims. They're wider than the stockers, and don't pinch in the sides of the tires as much. However, I like the Junfac beadlock system, and that my track width is now 10 1/4" instead of 10 1/2" with the stock Axial beadlocks. 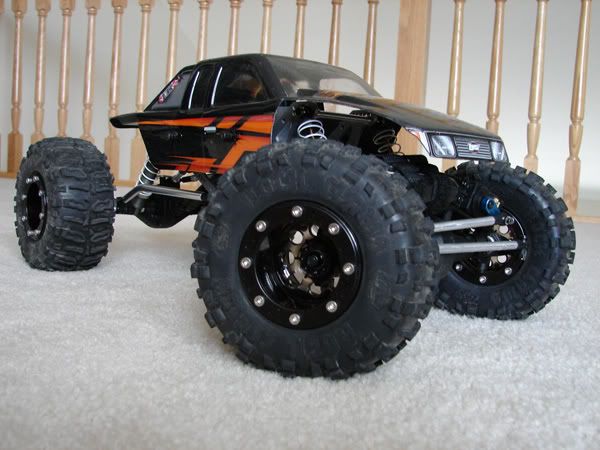 |
|
| |
|
06-17-2008, 05:16 PM
| #57 |
| Pebble Pounder Join Date: Sep 2004 Location: next to my pet rock!
Posts: 117
|
Just read your whole thread, and your truck rox! I like all the mod's and the chassis is killer! I think I'm gonna get those same wheels also. One question on that Novak esc and motor setup, did yours glitch you say? I thought all that was supposed to be fixed by now!
|
|
| |
|
06-17-2008, 05:37 PM
| #58 | |
| Pebble Pounder Join Date: Mar 2007 Location: Sidney, OH
Posts: 190
| Quote:
Yeah, the Rooster Crawler wasn't the greatest. Let's see if I can give an image of where I was having issues: R----------N----------F R = Full reverse N = Neutral F = Full forward The areas in red are where I would have trouble. Meaning, if I would ease into the throttle in either forward or reverse, it would glitch...not 100% of the time or even 50% of the time, it was a totally random thing. But always in that section of the throttle. I'm a precision kind of driver. I like to pick my lines carefully and drive slowly. It was really annoying to be crawling along at low speed and have the throttle start jumping around. | |
|
| |
|
06-24-2008, 03:37 PM
| #59 |
| Pebble Pounder Join Date: Mar 2007 Location: Sidney, OH
Posts: 190
|
New lid! I like the looks of the new Axial XC-1 body, plus...not everyone and their brother is running it. I was going to get all fancy with this paint job, but in the end, decided on something simple. Hopefully the silver paint will help hide scratches better than the black. 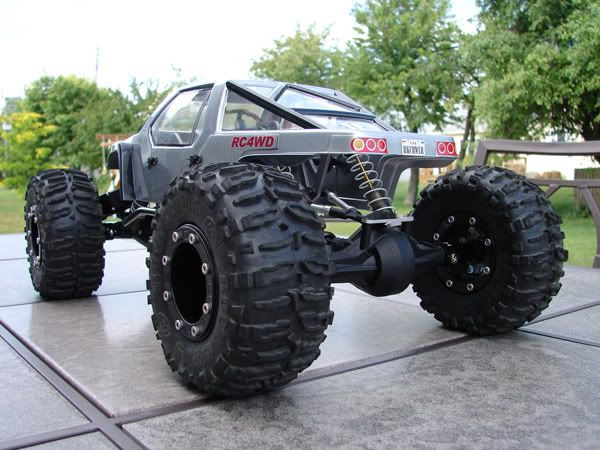 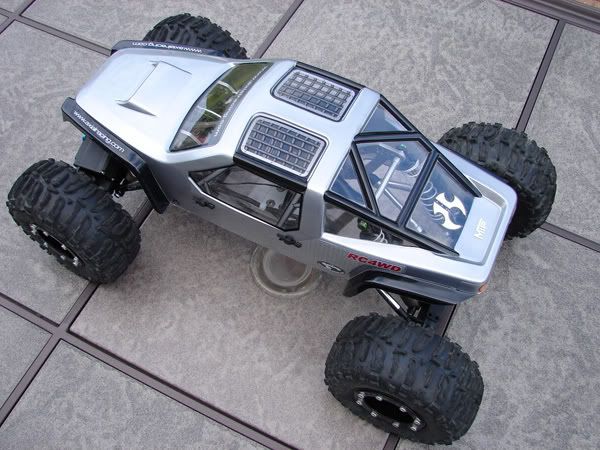  |
|
| |
|
09-04-2008, 03:46 AM
| #60 |
| Newbie Join Date: Aug 2008 Location: Norway
Posts: 35
|
I was just reading through Bender's Comp build thread, and noticed your post linking to this thread. I really like what you've done. How does it perform? Are you happy with the wheels, or are they too wide? Might as well add that the Novak "jitter" problem in the range you described is now fixed. Btw, where did you get your motor and how do you like it compared to the Fifty-Five? I got a Fifty-Five atm, but considering replacling it. I have nothing to compare it against though. |
|
| |
 |
| |


 Linear Mode


