Go Back   RCCrawler Forums > RCCrawler Brand Specific Tech > Heritage Crawlers > Axial AX-10 Scorpion
Loading

Notices

Thread: CKRC FT Dig

Reply
 
LinkBack Thread Tools Display Modes
Old 09-08-2008, 09:35 PM   #21
I wanna be Dave
 
Join Date: Mar 2008
Location: In the Dark Edges of your Mind
Posts: 6,386
Default

So in this pic then, the outdrive you see with the hole in it is not the outdrive that you sand flat... correct. The one you sand flat engages the one you see in the pic somehow? Thanks...

Harvo is offline   Reply With Quote
Sponsored Links
Old 09-09-2008, 04:50 AM   #22
Quarry Creeper
 
Join Date: Nov 2007
Location: NH
Posts: 427
Default

Quote:
Originally Posted by Harvo View Post
So in this pic then, the outdrive you see with the hole in it is not the outdrive that you sand flat... correct. The one you sand flat engages the one you see in the pic somehow? Thanks...


correct, you file a flat on the output from the trans. On the opposite end of the one on the dig has a slot cut into it that will mate up with the trans output to lock it into 4wd
allgm1 is offline   Reply With Quote
Old 09-09-2008, 07:50 AM   #23
Custom Carbon Fiber
 
Robbob's Avatar
 
Join Date: Oct 2007
Location: Connecticut :(
Posts: 4,501
Default


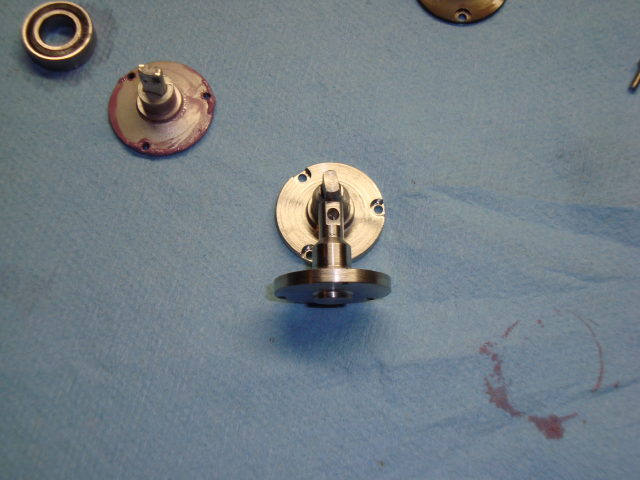
thats a set of CDW's done using a handfile

left corner you can see the original aluminum one, definitely worn out

Last edited by Robbob; 09-09-2008 at 07:53 AM.
Robbob is offline   Reply With Quote
Old 09-14-2008, 06:27 AM   #24
I wanna be Dave
 
Join Date: Mar 2008
Location: In the Dark Edges of your Mind
Posts: 6,386
Default

One thing that I didn't really think about with this dig is that it mounts to the spur gear side, which I guess is opposite of the VF.

If you get a chassis made for the VF (like the Black Widow from MFM) it's not going to work out just right. You should definitely get the undrilled skid, because the pre-drilled just doesn't work.

Also... I got 3 brass bushings. One big one for the main shaft, one for the slider, and one that was the ID of the slider shaft, but it had a shoulder on the outside. The directions just say "Assemble the dig and put it on"... so what is that other bushing for? It works without it...
Harvo is offline   Reply With Quote
Old 09-14-2008, 07:07 AM   #25
Custom Carbon Fiber
 
Robbob's Avatar
 
Join Date: Oct 2007
Location: Connecticut :(
Posts: 4,501
Default

Quote:
Originally Posted by Harvo View Post
Also... I got 3 brass bushings. One big one for the main shaft, one for the slider, and one that was the ID of the slider shaft, but it had a shoulder on the outside. The directions just say "Assemble the dig and put it on"... so what is that other bushing for? It works without it...
The third one is for the R2D tranny, you dont use it. The actual dig pieces are packaged from RC4WD for their tranny so its in there.
Robbob is offline   Reply With Quote
Old 09-14-2008, 10:56 AM   #26
I wanna be Dave
 
Join Date: Mar 2008
Location: In the Dark Edges of your Mind
Posts: 6,386
Default

Thanks!!
Harvo is offline   Reply With Quote
Old 09-14-2008, 03:46 PM   #27
I wanna be Dave
 
Join Date: Mar 2008
Location: Pacific Ocean
Posts: 2,342
Default

Quote:
Originally Posted by Robbob View Post
The third one is for the R2D tranny, you dont use it. The actual dig pieces are packaged from RC4WD for their tranny so its in there.
I think that 3rd piece would com in handy of you wanted to mirror your tranny though as you would have to flip the plate. I think I saw someone do that.
dpdsurf is offline   Reply With Quote
Old 09-14-2008, 07:39 PM   #28
Custom Carbon Fiber
 
Robbob's Avatar
 
Join Date: Oct 2007
Location: Connecticut :(
Posts: 4,501
Default

Quote:
Originally Posted by dpdsurf View Post
I think that 3rd piece would com in handy of you wanted to mirror your tranny though as you would have to flip the plate. I think I saw someone do that.

Could have been mine.

Robbob is offline   Reply With Quote
Old 
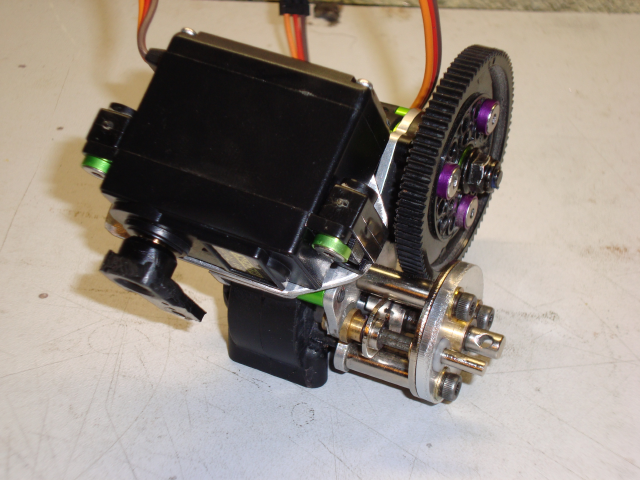
09-14-2008, 08:17 PM   #29
Pebble Pounder
 
Join Date: Mar 2008
Location: yes
Posts: 182
Default

Honestly, I had a terrible time installing my dig. The allen head screws included in the kit were too long and hit the tranny case with 1/8" left to go before they would actually tighten against the outermost plate. The screws included in the kit are the same length as my tranny case screws. The delrin spacers included in the kit were also too long and I couldn't attach the motor plate until I cut those down. Not to mention, only two screws were included in the kit itself and I had to supply one extra long screw for the dig mount tab farthest from the motor. Basically, the dig rocks but the hardware package is inadequate. Be prepared to supply your own screws and a dremel to pollish and cut some of the parts to make it work.

Last edited by tanmonster; 09-14-2008 at 08:23 PM. Reason: duh
tanmonster is offline   Reply With Quote
Old 09-14-2008, 10:03 PM   #30
I wanna be Dave
 
Join Date: Mar 2008
Location: In the Dark Edges of your Mind
Posts: 6,386
Default

Quote:
Originally Posted by tanmonster View Post
Honestly, I had a terrible time installing my dig. The allen head screws included in the kit were too long and hit the tranny case with 1/8" left to go before they would actually tighten against the outermost plate. The screws included in the kit are the same length as my tranny case screws. The delrin spacers included in the kit were also too long and I couldn't attach the motor plate until I cut those down. Not to mention, only two screws were included in the kit itself and I had to supply one extra long screw for the dig mount tab farthest from the motor. Basically, the dig rocks but the hardware package is inadequate. Be prepared to supply your own screws and a dremel to pollish and cut some of the parts to make it work.
Had the same issue with the long screws hitting the case, but washers took care of that. My only issues with the kit were the poor instructions and a packaging problem. All the pieces were thre though and it works.
Harvo is offline   Reply With Quote
Old 09-15-2008, 12:19 AM   #31
I wanna be Dave
 
Join Date: Mar 2008
Location: Pacific Ocean
Posts: 2,342
Default

Quote:
Originally Posted by Robbob View Post
Could have been mine.
Nope, wasn't that one. Just kidding, nice work. Did you have to drill the plate to accept the bushing?

Edit: I guess you did as it looks like there's a little JB weld holding it in place.

Last edited by dpdsurf; 09-15-2008 at 12:21 AM.
dpdsurf is offline   Reply With Quote
Old 09-15-2008, 03:05 AM   #32
RCC Addict
 
Join Date: Jul 2008
Location: Sin City
Posts: 1,332
Default

Quote:
Originally Posted by Harvo View Post
Had the same issue with the long screws hitting the case, but washers took care of that. My only issues with the kit were the poor instructions and a packaging problem. All the pieces were thre though and it works.
Same problem here. I did the washer fix also but the issue im seeing is there is so much slop in the main bushing that when the servo moves it back into 4wd mode it doesnt want to engage. The pressure on the link from the servo angles it just enough that it just spins and wont drop in.

The binding everyone was talking about from over tighening the mount screws is cause from the slot in the main shaft not being perfectly centered so it gets tighter every 180 degrees. File the slot just a little bit and you can tighten the mount screws all the way.

FYI to anyone ordering one of these. If your rig has seen alot of use get a new drive shaft for the rear end to cut. A well used one wont slide well once its cut short due to wear on the exposed pieces that will now be inside. You can save yourself alot of work spending the extra 6 bucks on a new shaft (or get the shorty MIP ones from TTR)
Culetto is offline   Reply With Quote
Old 09-15-2008, 05:50 AM   #33
Custom Carbon Fiber
 
Robbob's Avatar
 
Join Date: Oct 2007
Location: Connecticut :(
Posts: 4,501
Default

Quote:
Originally Posted by dpdsurf View Post
Nope, wasn't that one. Just kidding, nice work. Did you have to drill the plate to accept the bushing?

Edit: I guess you did as it looks like there's a little JB weld holding it in place.
thank you.


yeah drilled it for the bushing but was a bit oversized, no side to side wobble but could pull it out easily. put a small hair line amount of jb on it and been working great since.
Robbob is offline   Reply With Quote
Reply


Posting Rules
You may not post new threads
You may not post replies
You may not post attachments
You may not edit your posts

BB code is On
Smilies are On
[IMG] code is On
HTML code is On
Trackbacks are On
Pingbacks are On
Refbacks are On


All times are GMT -6. The time now is 02:57 PM.


Powered by vBulletin® Version 3.8.7
Copyright ©2000 - 2024, vBulletin Solutions, Inc.
Content Relevant URLs by vBSEO ©2011, Crawlability, Inc.
Copyright 2004-2014 RCCrawler.com