| |
| |||||||
 |
| | LinkBack | Thread Tools | Display Modes |
 10-13-2008, 04:49 AM
| #21 |
| Quarry Creeper Join Date: Jul 2008 Location: casa grande
Posts: 221
|
Hey I really like those links are you producing them for anyone and if so how much do they cost. I need to get some for my rig.  |

|  |
| Sponsored Links | |
| | |
|
10-13-2008, 10:22 AM
| #22 |
| Rock Crawler Join Date: Sep 2007 Location: Denmark
Posts: 904
| I´m gonna watch this one in awe Great looking chassis |
|
| |
|
10-13-2008, 01:09 PM
| #23 |
| RCC Addict Join Date: Jun 2007 Location: Indian Village Pontiac
Posts: 1,910
|
Thank you for the kind words guys!! Much appreciated!! 65VW- no these are not intended for production or resale, just another solution to a problem. OK time to get to the shocks. |
|
| |
|
10-13-2008, 02:11 PM
| #24 |
| RCC Addict Join Date: Jun 2007 Location: Indian Village Pontiac
Posts: 1,910
|
I chose to use the Aluminum Revo Shocks since they are approx the proper length and are smooth as buttah. As explained earlier I plan to use a droop/sprung setup. However, the Revo shocks in droop trim are just 2 short by 3/4". In previous searches for rod ends I remembered that the Losi 8 Rod Ends fit on the shock shaft of the Revo shocks And they are about 1/2" longer that the Revo rod ends. I then felt the Sprung shocks were just a bit long. And I wanted to limit articulation to about 40degrees so I moved the blue conical bumbstops to the inside of the shocks, this will bring the rear down just abit and limit the articulation as well. Now for movement. I like 30wt as a starting point for all of my shock setups since I can get a good feel for how stiff I like that partcular rig by starting somewhat soft then work up from there. And I knew the Revo pistons are drilled for somewhat slower rebound. And fortunatley the Revo pistons were already drilled out by the previous owner, I tried it. So far I like it, but further testing will tell the whole story. Below you can see the Length of the droop fronts compared to the sprung rears. Check the difference on the rod ends.  In this picture you can see the setup of the droop shock and the spung shock. I placed the parts in the order they are installed.  Below, notice the third hole drilled into the pistons, that hole is the same diameter as the OEM holes. TIP: to fine tune your pistons if you dont have alternative pistons you can drill more holes or open up the existing holes.  Any questions?? Comments?? Fkya!! |
|
| |
|
10-14-2008, 12:45 PM
| #25 |
| RCC Addict Join Date: Jun 2007 Location: Indian Village Pontiac
Posts: 1,910
|
Time to put all the parts to this point, together. I made the upper links from some 1/4" Delrin rod I have in stock. I drilled the included 1/4" Delrin skid plate for the Axial tranny and dig unit to sit as far forward as possible to equalize the drive shaft lengths and move the weight as far forward as possible to help COG. I dont feel there is as much advantage to dble triangulation as the hype states, so I did not cut the skid for it I kept the links inside the chassis but fairly straight. I setup the upper rear links to kick the pinion up out of the rocks. The front took abit more thinking I wanted the pinion up high but could not get it as high as I would like since I would end up with positive caster on the front wheels, so I looked at how much postive caster I could get away with, without comprimising steering. I was surprised to find that about 1* positive caster actually helped steering with locked diffs. And it seemed to helpe dig abit too, maybe it's just me.. One of the nice things about this chassis, is that the upper link chassis mount has a series of three semi verticle holes. This is key to dialing out torque twist and setting up anti-quat. I like to use the bottom holes, This postition seems to help with steep climbs in combitnation with the front rake of the chassis, caused by the Droop/Sprung setup. Anyway, assembling all the chassis parts gets this rig to roller state even tho there are no wheels mounted, trying to find some good aluminum beadlocks. Pics, Pics and more Pics  I just love the TCS Boomerang Upper Link Mount, and I mount the links on top the help anitsquat and you can see how far back the axle is tipped to get the D-shaft up out of the rocks. I also countersunk some flat head stainless screws to help sanitize the rear. 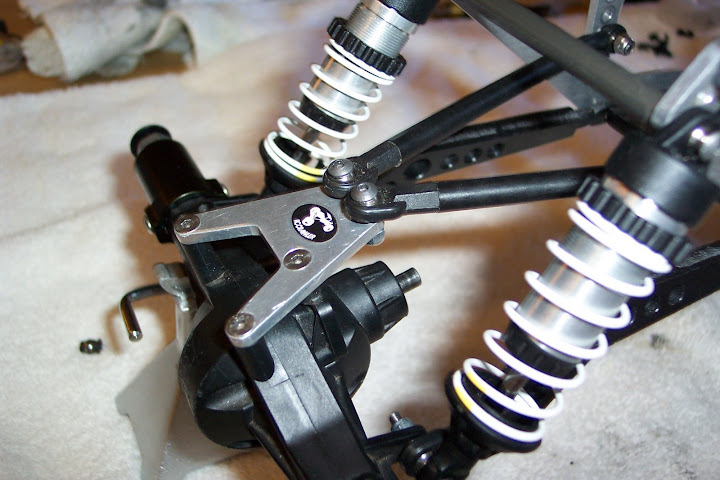 And the front servo/battery mount. Also the shoks seem to fit inside the chassis like it was made for them. 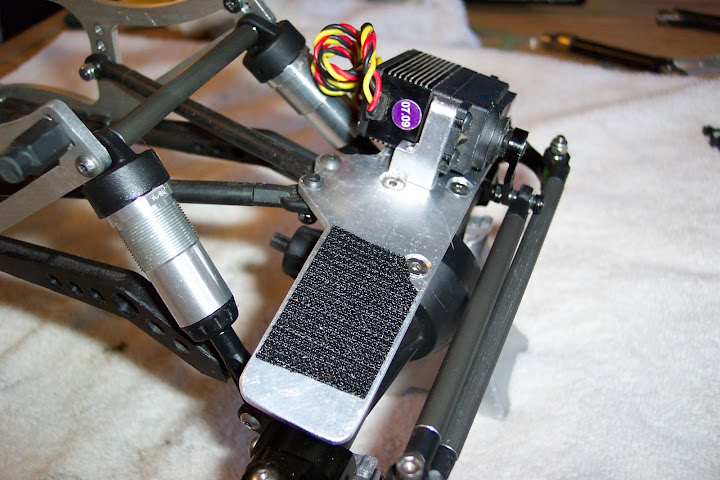 A view form the top you can see the nice big open area for the next stage of the buildup, the tranny!!! 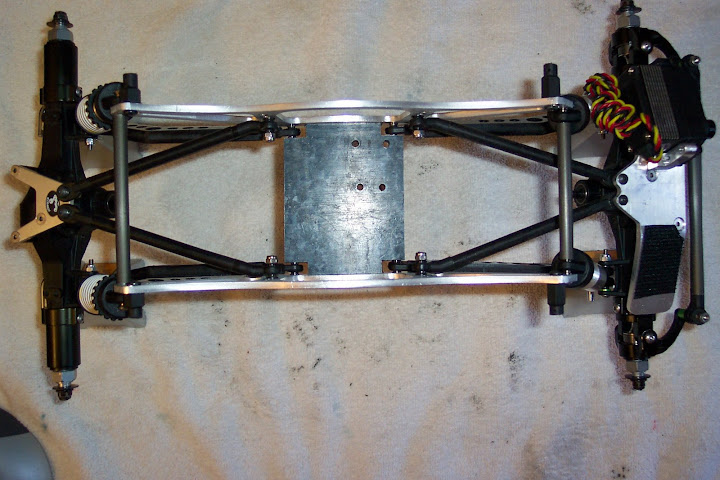 And the bottom view shows the link/shock configuration. The links ended up with just a bit of triangulation, but not much.  This is getting exciting almost there, now were in the home stretch!! Up next, Tranny and dig unit!! Last edited by The Real Dogman; 10-14-2008 at 12:58 PM. |
|
| |
|
10-14-2008, 02:16 PM
| #26 |
| RCC Addict Join Date: Jun 2007 Location: Indian Village Pontiac
Posts: 1,910
|
This is how the tranny/dig unit as it appeared fresh out of my '08 Summer Points Series rig. This thing has performed flawlessly since setup. I meanthere have been times I was in a major bind and I released the dig unit to help get out of the bind and it popped right out!!! What a great design!! I did burn up one hs225mg while setting up the endpoints but that was because I was trying to do it with the linkage attached, no no no no no!! But since getting it setup I have had absolutley no issues with the servo, NONE! Even under heavy bind or on heavy load!! 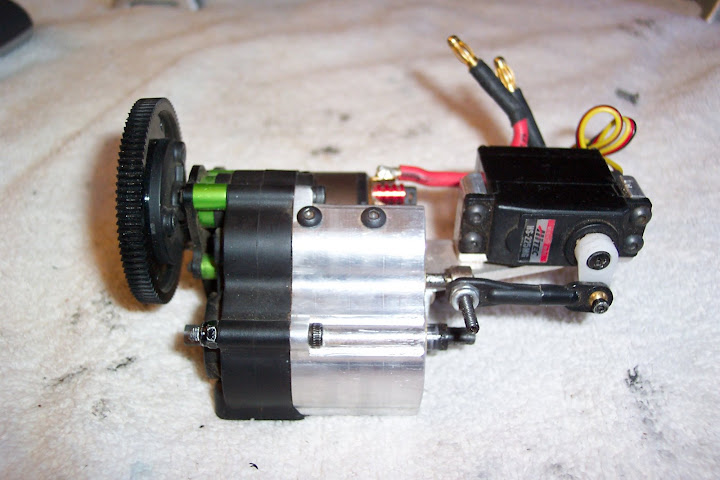 When I split the cases I was anxious to see how bad all the pounding, binding and banging the dig unit beat up the cogs..  Ok to be honest the brass centering pin was slightly bent from when I first installed this rig. I straightened the pin when I assembled the brand new unit, and there was no binding or wobble on the out drive, but its bent now. Must have taken a hit in one of the many long tumbles that rig has taken. The plastic gears inside the Axial tranny are pristine so there was no need to do anything there. But, I also threw MANY d-shafts during the Summer Series and cost me many good finishes, so instead of going with steel driveshafts and risk breaking some other expensive parts, I am going to install an axial slipper, while I have things apart! 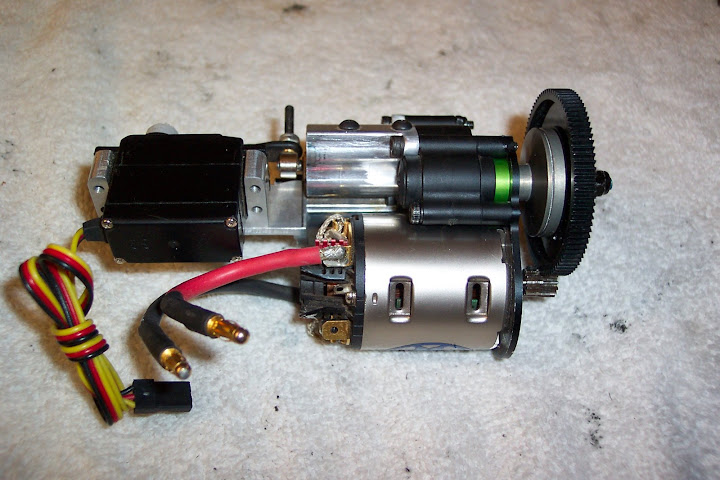 I just love the modular packaging of this tranny/dig unit. The Servo Bracket I made for this really pulls the whole unit together. It helps to lower COG and now I can remove 4 screws and pull acouple wire and I have this unit out ofthe chassis. This also makes it possible to adjust the Servo and linkage out of rig. I have to pat myself on the back for that one!! And of course, the Handwound 35t Warrior. What Torque War?? 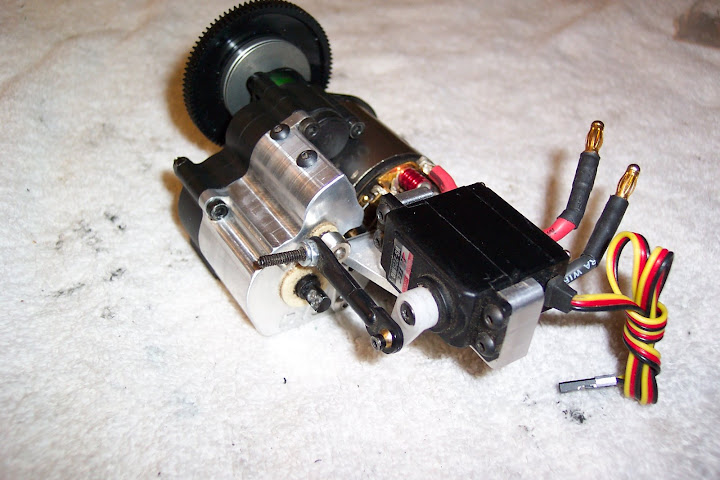 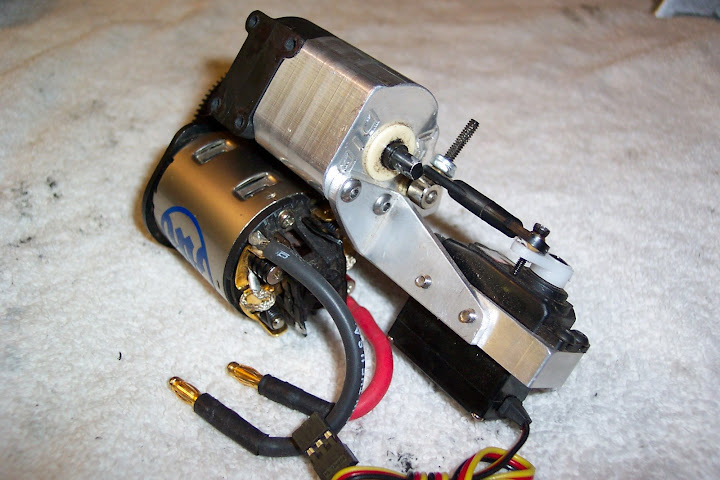  Now thats a perfect fit!!  Everything clears and there is still room to adjust the Upper link chassis mounts  And everything sits below the top of the chassis rails. That allows the body to be mounted nice and low!!  Electronics anyone?? Last edited by The Real Dogman; 10-14-2008 at 03:30 PM. |
|
| |
|
10-15-2008, 10:06 PM
| #27 |
| RCC Addict Join Date: Dec 2005 Location: Tucson
Posts: 1,190
|
Damn you got alot of time on your hands. J/k not
|
|
| |
|
10-15-2008, 10:09 PM
| #28 |
| RCC Addict Join Date: Jun 2007 Location: Indian Village Pontiac
Posts: 1,910
|
When you gonna bring those axles by so I can the get plates made for them. I just now getting used to feeling like I DONT have to be at work!! LOL |
|
| |
|
10-16-2008, 11:59 AM
| #29 |
| RCC Addict Join Date: Jun 2007 Location: Indian Village Pontiac
Posts: 1,910
|
I like my ECS and reciever protected under the body if possible. I just happen to have a fair amount of room up front on the upper links, so I made a custom acrylic "shelf" and zip ties it down securely. It just so happens with the slipper adjusting nut, I still had plenty of room for the MM while tucking the CC BEC under the front spreader, then there was just enough room ahead for the SP3100 RX. I switched the antenna to the oposite side of the RX so it would lay down the inside of the chassis quite nicely. I ziptied an antenna straw to help keep it well protected. 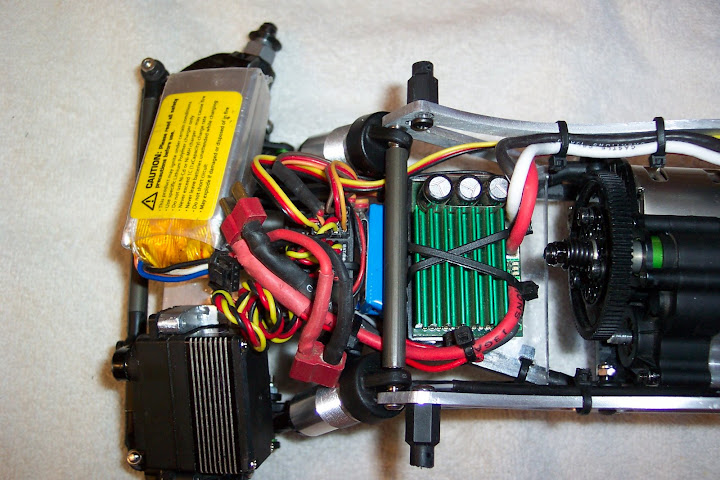  I also needed to bundle the "extra" Servo Leads coming from the BEC, ESC and dig servo, so I used an 1 1/4" length of 1/2" Heat Shrink as a sleeve to keep them nice and compact. 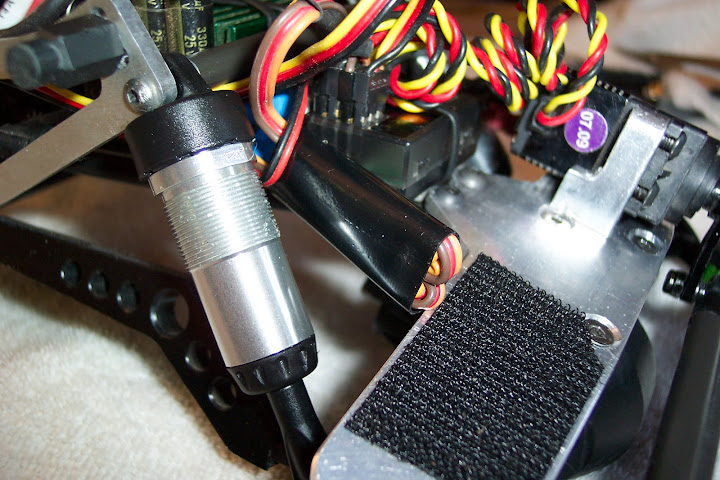 And lastly a quick shot of the "Shelf" from below  Still has that birds nest look!! god I hate that!! Ok, now for the last build installment, Drive Shafts!! Last edited by The Real Dogman; 10-16-2008 at 12:02 PM. |
|
| |
|
10-16-2008, 07:29 PM
| #30 |
| Rock Crawler Join Date: Aug 2007 Location: Tucson
Posts: 584
|
I like your build bud. Geese you have a lot of time on your hands. HAHA
|
|
| |
|
10-16-2008, 08:36 PM
| #31 |
| Quarry Creeper Join Date: Sep 2008 Location: Rocklin
Posts: 374
|
Sweet Build! Like what you did with the dig servo. took forever to set my up. Just got it the week.now that it is setup it works very well. Keep up the awsome write up!
|
|
| |
|
10-16-2008, 08:54 PM
| #32 |
| RCC Addict Join Date: Jun 2007 Location: Indian Village Pontiac
Posts: 1,910
|
Thank you, You will love the DNA Dig once it is setup properly. As stated below I have beat on this unit rather hard and it is in fantastic shape, although I did somehow bend the Brass Pilot Pin on the drive Cog. As hard as I was on that rig it suprises me that there was not more damage or wear on any of the components. But that just Speaks to the quality of products the vendors here on RCC offer. I am so very confident this New Chassis will be one of those high quality products being offered here on RCC very soon. In fact, I'm so confident that I am going to run this Chassis for the entire Winter Points Series and possibly 2008 Southern Arizona Winter Shoot-out in January. I will be updating this thread throughout the season.. |
|
| |
|
10-16-2008, 09:17 PM
| #33 |
| RCC Addict Join Date: Jun 2008 Location: Fresno
Posts: 1,464
|
how long are the lower links eye to eye?
|
|
| |
|
10-16-2008, 09:57 PM
| #34 |
| RCC Addict Join Date: Jun 2007 Location: Indian Village Pontiac
Posts: 1,910
|
They are 4 5/8" E-E with traxxas #1942 Rod Ends They dont come with the Chassis. |
|
| |
|
10-16-2008, 11:01 PM
| #35 |
| Rock Crawler Join Date: Sep 2008 Location: estacada
Posts: 697
|
i dig that servo mount for the dig, any chance of those being in production?
|
|
| |
|
10-16-2008, 11:06 PM
| #36 |
| Newbie Join Date: Jul 2008 Location: chino valley
Posts: 7
|
dogman where did you get jackstands???
|
|
| |
|
10-16-2008, 11:31 PM
| #37 | |
| I wanna be Dave Join Date: May 2006 Location: FOUR 8 OH
Posts: 4,913
|
Your rig is looking great Lee! Compact, low and super clean! A very well though out system. Quote:
| |
|
| |
|
10-17-2008, 01:30 AM
| #38 | |||
| RCC Addict Join Date: Jun 2007 Location: Indian Village Pontiac
Posts: 1,910
| Quote:
. Quote:
I think that is the cheapest place to get them Quote:
Thank you James. I am very pleased with this rig!! No they are shorter than the Axial and mine are delrin and thicker. Going to do some testing ths weekend out @ Medera Canyon. Interested in coming down?? Last edited by The Real Dogman; 10-17-2008 at 01:32 AM. | |||
|
| |
|
10-17-2008, 02:13 AM
| #39 | |
| I wanna be Dave Join Date: May 2006 Location: FOUR 8 OH
Posts: 4,913
| Quote:
Ha! I wish... spent way more than I should have during my weekend in the valley. :-( The next paycheck is for bills. Someday though. | |
|
| |
|
10-17-2008, 04:06 AM
| #40 |
| RCC Addict Join Date: Jan 2007 Location: San Jose
Posts: 1,697
|
thanks a lot for the pics dog man. really helps to see the dna. I think i am going to get one. jack stands......nice. want some.
|
|
| |
|
| |


 Linear Mode


