| |
| |||||||
 |
| | LinkBack | Thread Tools | Display Modes |
 03-06-2009, 07:18 AM
| #1 |
| Rock Stacker Join Date: Dec 2008 Location: Northumberland, UK
Posts: 69
|
Hi all I hope this is in the right forum ! Mods feel free to move it if I've messed up. This is my build thread on my Jurassic Park Jeep Wrangler. This is the first time I've ever attempted to paint a shell so please forgive the little errors I'm certain to make! I've started with an HPi Jeep Wrangler Rubicon shell and used slight artistic license to adapt the movie design to fit my shell. The version used in the JP movie was the 90's Sahara so there are some variations in the design such as the front headlights being round on my model and the wheel arches are more pronounced on my shell. Also the roof is different but I think I'd rather leave it in place because when I tip it over it won't just crumple. Maybe in the future when I get better at this I will construct a roll bar / cage like to further imitate the look of the movie version but for now this will have to do! So anyway this thread is useless without pics! Here I go masking up the different sections as best I can... Took much longer than anticipated!! 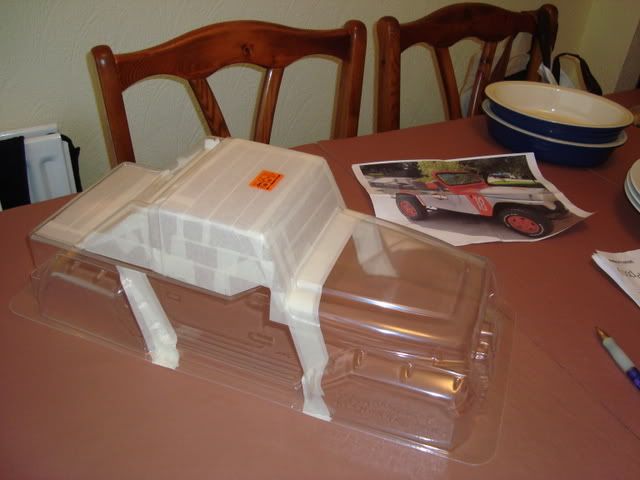 Applied the grey coat, decided half way through I should have done this last since it's lightest? I dunno too late now anyway, keep going! 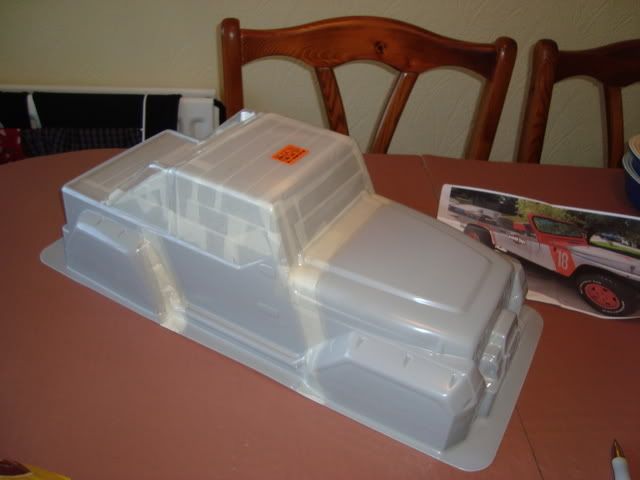 Once dry I masked around the edges of the grey and added some red. 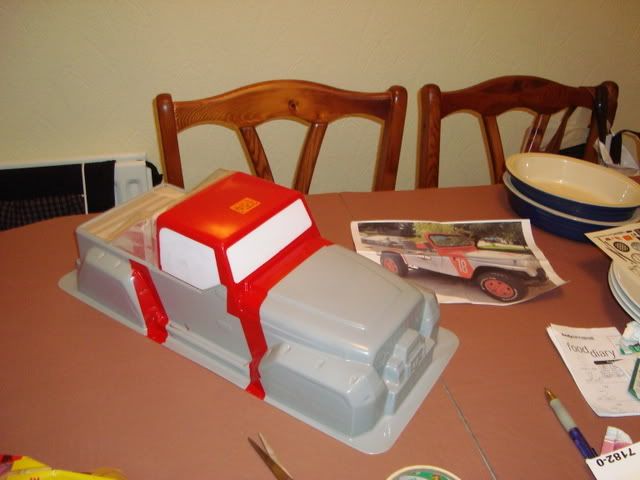 I plonked it ontop of the Axial to see what it might eventually look like, I realise that I can't call this thing a scaler but I think it will fit ok for my purposes! 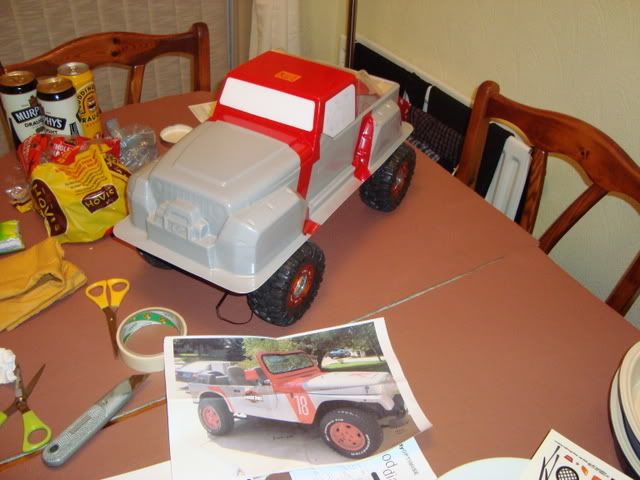 Seems as if the tape I used was a bit too pourus and a little bit of red has seeped in so I'll go around it and touch it up later... A bit more done now, the hardest bit is getting the font for the numbering on the stripe and bonnet right, but I think I've almost got that sorted, that's the last bit to do before I get some sort of sealer to spray over the outside to protect the graphics. I need to make a mini bullwhip for the back, I'm going to dig through the workshop at the weekend and find something suitable... not sure how to mount it yet... Then I need to figure out how to mount the shell onto the ax10 chassis. Ok here it is mostly paitned up. I had to use a bit of artistic license for now, I don't want to really compromise the integrity of the shell. 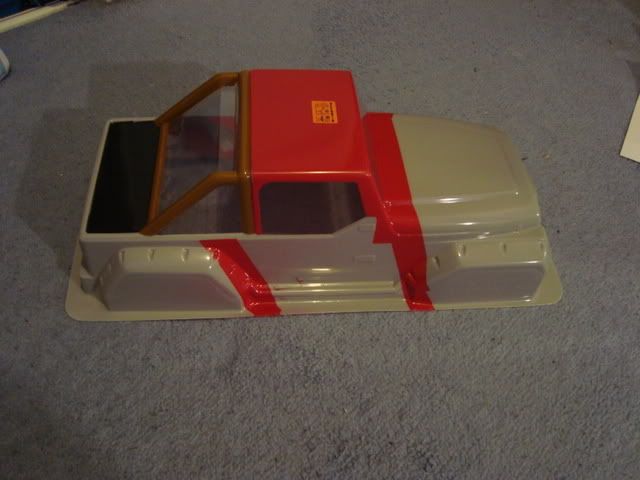 Here I am having cut the thing out, much harder to do than I anticipated! Argh!! 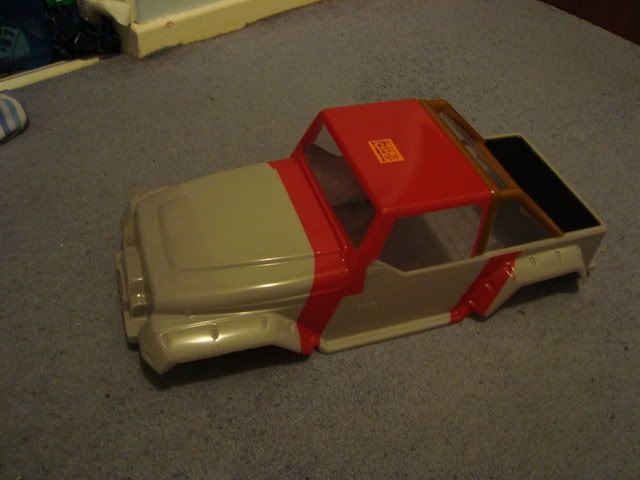 Plonked it ontop of the chassis to see how it fit. I don't think it looks too oversized so I'm quite happy for now. 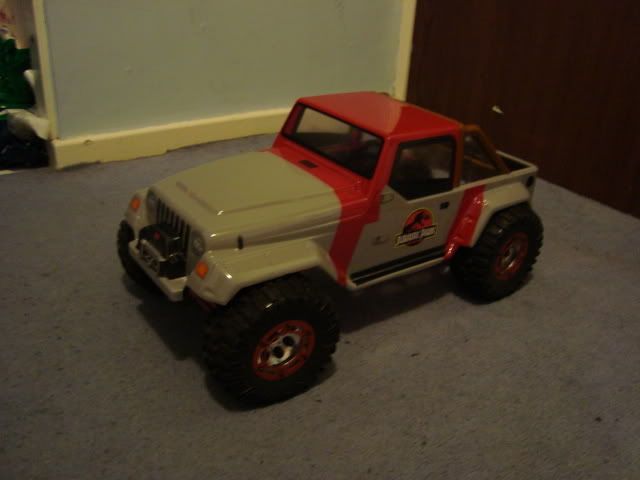 I have a few more little bits of graphics to get on there but I keep forgetting to bring them to the office to get laminated, I made a mini license plate and a tour pass to hang in the cab. I will post some pics when I get it finished and mounted to the chassis. I managed to find some sticky back transparency paper which works well enough for my purposes and allowed me to print off the illusive 'JP 18' and '18' decals I needed. The last bits I need to do now is source a new set of wheels and paint them red, add the CB bullwhip, get my mini license plates lamited and stick on then seal it all with a fixing spray. Some pics I took earlier: 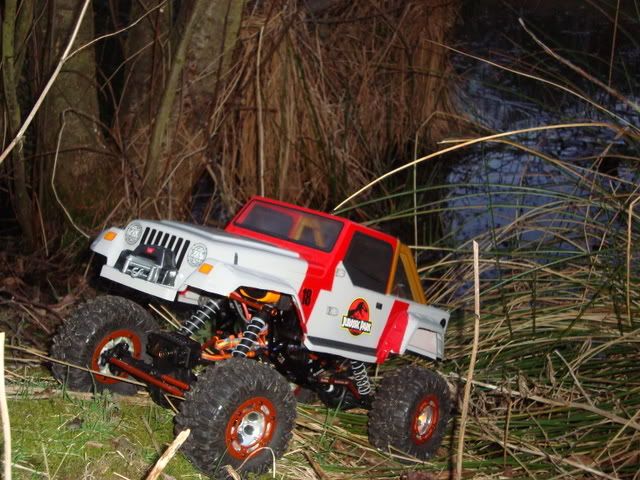 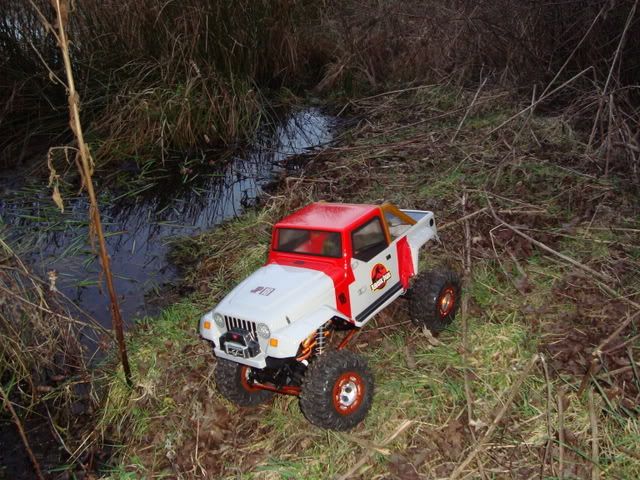 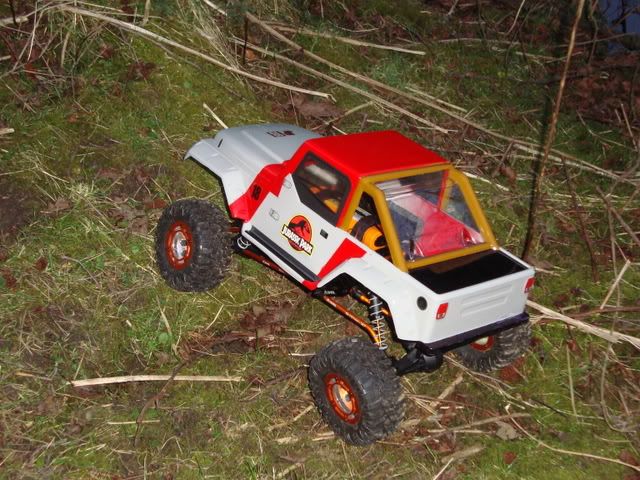 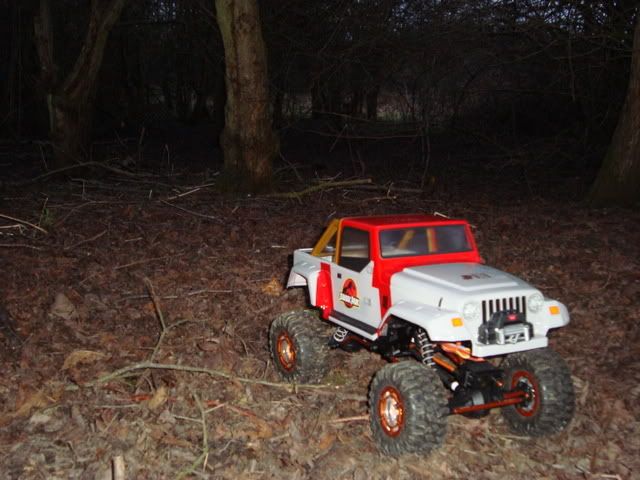 So after all that I drove my Ax10 half way up to the 'Drake Stone' which is a huge sandstone rock deposited on the top of a hill during the last ice age. Local legend has it that they used to march witches up there and have them climb the drake stone as a test to see if they were magic. The thinking behind it being that it's impossible to climb over the drake stone without dying... Hmm. Anyway, made it half way up the trail before loosing a grub screw and forcing retirement. I'll make it all the way up next time. A fantastic trail ranging from really easy to almost impossible looking with a fair bit of mud to negotiate. Loved it! An overview of the trail, it's deceptive and snakes back on itself quite a few times. You can see the big lump at the top middle left which is the Drake Stone, you can almost make out the stone pile I got to which is in the middle of the picture. 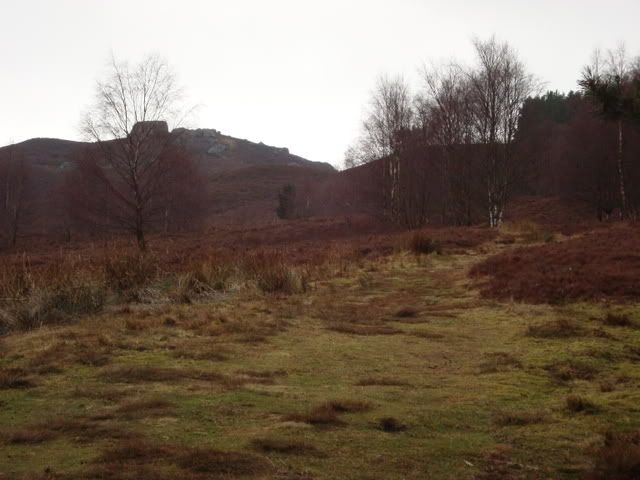 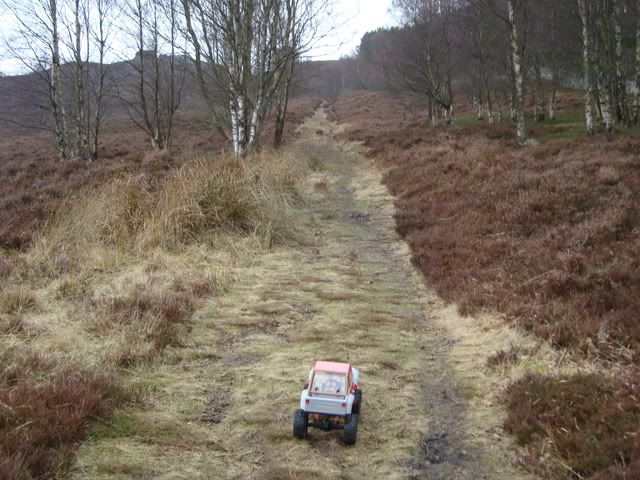 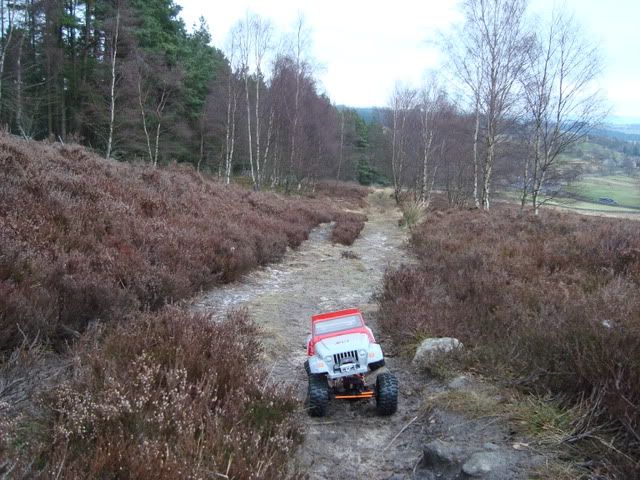 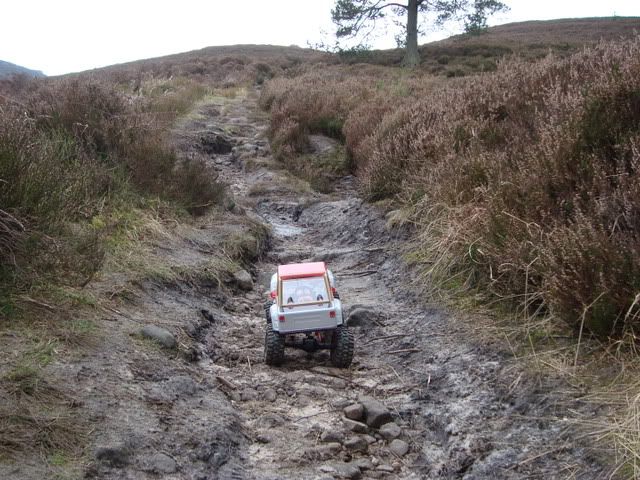 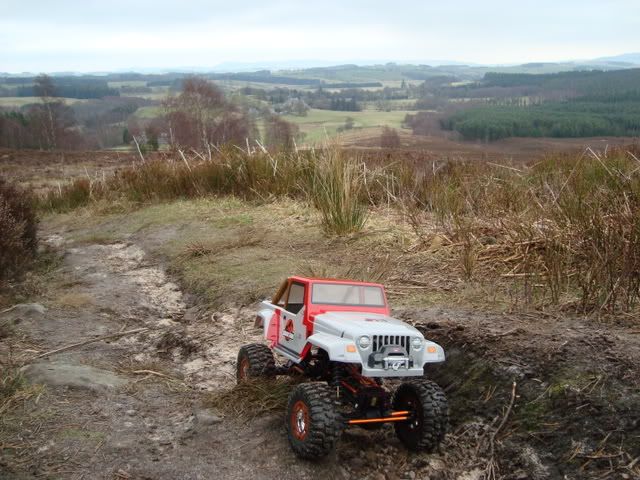 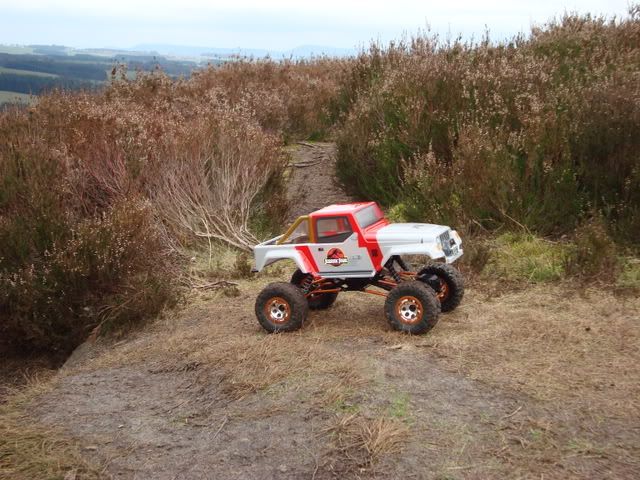 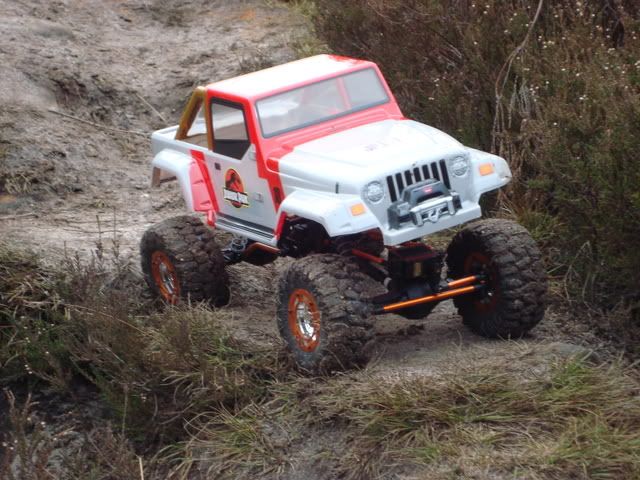 Here's a link to my youtube video I made of the run, which I'm quite proud of http://www.youtube.com/watch?v=Uw6BOXMt5eA I hope you all enjoyed my thread, I did finally get my mini license plate and tour pass laminated and stuck onto my shell although I havn't taken a picture of it yet, I will post one when I do! |

|  |
| Sponsored Links | |
| | |
|
03-06-2009, 07:23 AM
| #2 |
| I wanna be Dave Join Date: Sep 2005 Location: Houston, TX
Posts: 16,952
|
That looks awesome! Now all it needs is a large T-Rex chasing it and a Newman figure sitting in the seat!!
|
|
| |
|
03-06-2009, 11:28 AM
| #3 | |
| I joined the Band! Join Date: Oct 2008 Location: Bay Area
Posts: 1,024
| Quote:
Quick! Drive faster he is gaining on us!!!  | |
|
| |
|
03-06-2009, 11:29 AM
| #4 |
| Quarry Creeper Join Date: Nov 2008 Location: N. California
Posts: 424
|
Haha that is way cool. I loved that movie as a kid. Nice work, turned out good
|
|
| |
|
03-06-2009, 11:30 AM
| #5 | |
| Quarry Creeper Join Date: Nov 2008 Location: N. California
Posts: 424
| Quote:
Hahaha "Must drive faster must drive faster" | |
|
| |
|
03-06-2009, 12:19 PM
| #6 |
| Rock Stacker Join Date: Dec 2008 Location: Northumberland, UK
Posts: 69
|
Thanks for the comments guys ! I'm very pleased at how it came out in the end! I think maybe, if I could find a more true to scale shell I'd like to have another go but do one with a correct roll bar and get some more scale items for it but for now, I'm happy Lol that picture is great I'm going to put it on my website, thanks mate !  |
|
| |
|
03-06-2009, 12:23 PM
| #7 |
| I wanna be Dave Join Date: Nov 2008 Location: Where freedom is earned.
Posts: 2,011
|
Go droop and get the body lower, it'll look more realistic.Still a good build tho.
|
|
| |
|
03-06-2009, 12:26 PM
| #8 |
| RCC Addict  Join Date: Feb 2008 Location: Tekin, ID
Posts: 1,940
|
Noice! Ever thought of running a droop setup to get the ride height down a bit? I think it would look really good dropped a bit. Someone do the Explorer now! |
|
| |
|
03-06-2009, 12:48 PM
| #9 |
| I wanna be Dave Join Date: Sep 2006 Location: Stuck on a Rig in the middle of nowhere Utah.
Posts: 2,024
|
Great job on the paint . Looks like a fun place to drive your rig.
|
|
| |
|
03-06-2009, 01:07 PM
| #10 |
| Rock Stacker Join Date: Dec 2008 Location: Northumberland, UK
Posts: 69
|
Thanks again guys ! I'd love to have a go at the explorer but I think you'd need some serious vinyl stickers to do it... I'm afraid I'm still a newbie and this droop illudes me, is that when you run shocks without springs ? |
|
| |
|
03-06-2009, 01:39 PM
| #11 | |
| Rock Crawler Join Date: Jul 2008 Location: Port Angeles
Posts: 656
| Quote:
That is one way to run droop, you can also use springs under the pistons to help keep your shocks compressed when sidehilling. Poke around a bit in this forum and in the general crawlers section there are some great threads on droop | |
|
| |
|
03-06-2009, 01:48 PM
| #12 |
| RCC Addict Join Date: May 2006 Location: USA
Posts: 1,043
|
Love the body its very original!
|
|
| |
|
03-06-2009, 02:49 PM
| #13 | |
| Rock Crawler Join Date: May 2004 Location: DFW, Texas
Posts: 662
| Quote:
http://www.shop.rpphobby.com/product...productId=1499 Nice build...very original! | |
|
| |
|
03-16-2009, 02:59 AM
| #14 |
| Rock Stacker Join Date: Dec 2008 Location: Northumberland, UK
Posts: 69
|
Just a couple more pics to finish this thread off. I got some mud slingers and added some little bits of detailing to the shell such as the licence plate and the 'tour pass'. I hope you all enjoyed my thread, thanks for all the comments! 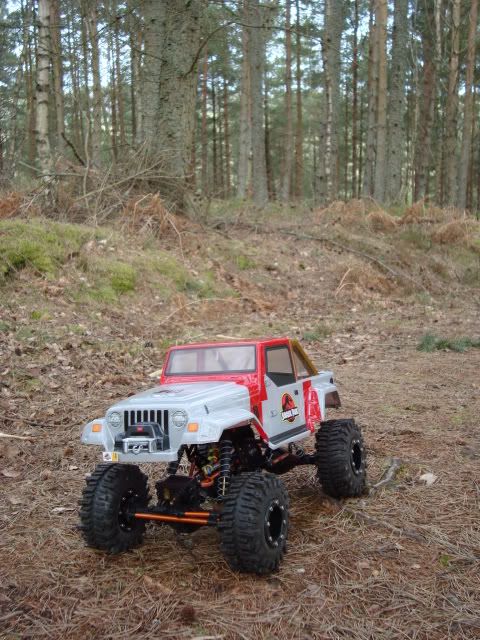 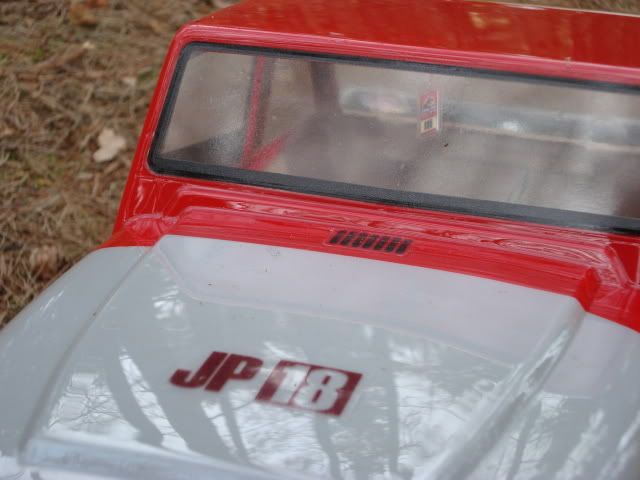 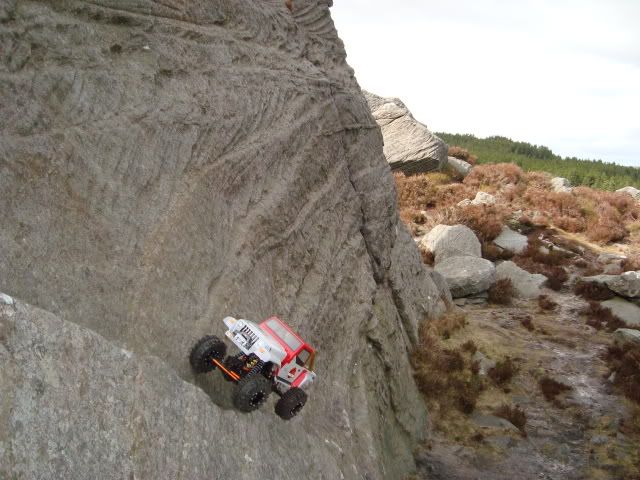 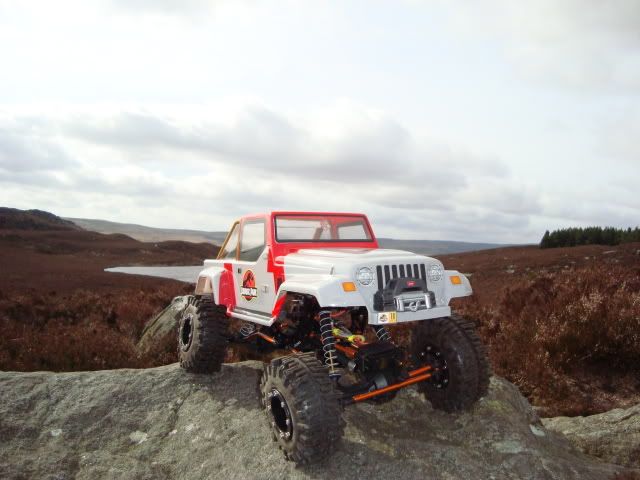 |
|
| |
|
03-16-2009, 03:21 AM
| #15 |
| Rock Crawler Join Date: Sep 2008 Location: You will never find a more wretched hive of scum and villainy
Posts: 901
|
this is a kick a$$ build i took my lil nephew to jp when it came out and it scared the poo out of him
|
|
| |
|
03-16-2009, 03:26 AM
| #16 |
| Newbie Join Date: Jan 2009 Location: OKC 405
Posts: 33
|
great job on the body and the backgrounds in your pics look cool lol
|
|
| |
|
03-16-2009, 04:16 AM
| #17 |
| Rock Stacker Join Date: Dec 2008 Location: Northumberland, UK
Posts: 69
|
Yeah it's been over ten years since JP and I still check buildings for 'potential raptor entry points' |
|
| |
|
| |


 Linear Mode


