| |
 05-07-2009, 07:15 PM
| #41 |
| Ex Nor-CalRCRC slave  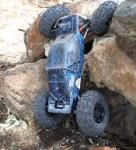 Join Date: Dec 2008 Location: San Mateo, CA.
Posts: 2,242
|
I like that axle/chassis jig, can't wait to see how that rotor works out. Lookin good Mini!  |

|  |
| Sponsored Links | |
| | |
|
05-08-2009, 01:57 AM
| #42 |
| RCC Addict Join Date: Jan 2007 Location: San Jose
Posts: 1,697
|
from what i understand, dont you want the tie rod and drag link close to parallel?
|
|
| |
|
05-08-2009, 07:24 AM
| #43 | |
| "HOLLYWOOD" 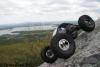 Join Date: Dec 2008 Location: Miami
Posts: 3,119
| Quote:
That's the best thing about the great hobbie of our's every rig run's diffrent, I think my are pretty close to parallel, Last night after I finish take the pics took the rig out to me little man made brick course and it ran alot better than befor my angel of twist befor the truck flipped over was great, gotta get some vid of the rig, also did the around the tree it's a little thing I do where I climb a tree with the rig and just drive around it while keeping the chassis touching the tree I guess you can call it a super sharp turn lololol. I'll try to post up some vids. of all this, this weekend. | |
|
| |
|
05-08-2009, 07:26 AM
| #44 | |
| "HOLLYWOOD" Join Date: Dec 2008 Location: Miami
Posts: 3,119
| Quote:
Yea going today to my LHS to see if it came in along with the new gearing from axail I got both of them just incase lol. Will have pics and vid of all the goodies once they come in. | |
|
| |
|
05-08-2009, 07:27 AM
| #45 |
| Pebble Pounder Join Date: Apr 2009 Location: Grand Junction
Posts: 153
|
nice comp crawler. I like your wheels. There cool.
|
|
| |
|
05-08-2009, 09:00 AM
| #46 | |
| Ex Nor-CalRCRC slave Join Date: Dec 2008 Location: San Mateo, CA.
Posts: 2,242
| Quote:
| |
|
| |
|
05-09-2009, 01:33 AM
| #47 | |
| RCC Addict Join Date: Jan 2007 Location: San Jose
Posts: 1,697
| Quote:
mini, that is true about this hobby. I was just curious to hear a response in logic too. nice job. | |
|
| |
|
05-10-2009, 12:37 PM
| #48 |
| "HOLLYWOOD" Join Date: Dec 2008 Location: Miami
Posts: 3,119
|
It's cool, thats another great thing about this hobbie, every help everyone out.
|
|
| |
|
06-05-2009, 07:23 AM
| #49 |
| "HOLLYWOOD" Join Date: Dec 2008 Location: Miami
Posts: 3,119
|
Just got this in. 43-13 Gonna tear down my rear today and see what this puppy does.
Last edited by Mini; 06-05-2009 at 07:39 AM. |
|
| |
|
06-05-2009, 07:29 AM
| #50 |
| Ex Nor-CalRCRC slave Join Date: Dec 2008 Location: San Mateo, CA.
Posts: 2,242
|
Yea, those gears help alot, plus, you could put the pinion in a cordless drill, and scratch the dog's butt with it.
|
|
| |
|
06-05-2009, 07:40 AM
| #51 |
| "HOLLYWOOD" Join Date: Dec 2008 Location: Miami
Posts: 3,119
|
Your sick dude lolololololol.
|
|
| |
|
06-05-2009, 07:46 AM
| #52 |
| Ex Nor-CalRCRC slave Join Date: Dec 2008 Location: San Mateo, CA.
Posts: 2,242
|
I run the drill slow, so I don't "tear" down the dog's rear. LOL Those gears help good on climbs and turning, you'll like em.
|
|
| |
|
06-05-2009, 07:53 AM
| #53 |
| "HOLLYWOOD" Join Date: Dec 2008 Location: Miami
Posts: 3,119
|
Yea looking foward to putting it on can't wait. Hopefully if it would stop raining down here I might be able to take it out on saturday for a min and try it out. Or go to the back yard to my brick course I made lolol. It sucks cause my rig has so much power it pulls the bricks so I have to stack them in a certain way lol, we'll see.
|
|
| |
|
06-09-2009, 01:03 PM
| #54 |
| "HOLLYWOOD" Join Date: Dec 2008 Location: Miami
Posts: 3,119
|
Well installed the the new bevel Gear in the rear and all I have to say is holy climb power lol. I did not loose too much wheel speed eaither gotta love brushless. Gonna try to have some video up of the rig in action. Also have to say big up's to axail on making some solid stuff when I removed the bevel gear from that rear that thing still looked brand new, all the teeth were still perfect. |
|
| |
|
06-25-2009, 09:12 AM
| #55 |
| "HOLLYWOOD" Join Date: Dec 2008 Location: Miami
Posts: 3,119
|
Wel got some goodies in starting with a new front 4 link plate. Found a machine shop down here with a flow jet machine and got it done. Installed and found a slight problem with the size I had given the guy, since and running high steering knuckel was hitting the knuckels so had to do a little fab work and now works perfect, and did not loose and turnning at all. Next I installed the servo guard love it, had noticed a couple of nice dings on the plastic part of the servo and really did not feel like spending another 150.00 on a servo .After installing the front new 4 link and servo guard the rig felt really stiff so removed the strc font plate and mounted the reciver on the space next to the servo and mounted the ESC inside the chassis toward the front huge diffrence right away. I did a little foam tunning cause my front foam was just way too soft I think it's the summer weather down here taking effect so went a little stiffer with some cuts and shaving on the foam got it to my liking also adjusted the springs to bring my COG down. Did a couple of torque twist run's cause noticed like a week or two back the front of the chassis was coming up, well all gone and works great now. Here are the pics of the mods enjoy. |
|
| |
|
06-25-2009, 09:16 AM
| #56 |
| Official Cook of the ECC  Join Date: Dec 2005 Location: Hawthorne, Florida
Posts: 2,653
|
Better get the bugs worked out before Sunday. My Berg is hungry. |
|
| |
|
06-25-2009, 09:21 AM
| #57 |
| "HOLLYWOOD" Join Date: Dec 2008 Location: Miami
Posts: 3,119
|
Oh don't worry there's a reason why am going a day early lol. Still got a little madness to try out and see if it works. Gonna go for the gold at this round.
|
|
| |
|
06-25-2009, 09:27 AM
| #58 |
| Ex Nor-CalRCRC slave Join Date: Dec 2008 Location: San Mateo, CA.
Posts: 2,242
|
Looks good Mini. Could you lower the plate even more by cutting down the plastic risers on the axle, so the plate nearly touches the top of the axle? If your servo throw will allow, you might want to try lowering the link on the horn one hole also, will give more torque and reduce the drag link angle.
|
|
| |
|
06-25-2009, 09:27 AM
| #59 |
| Official Cook of the ECC Join Date: Dec 2005 Location: Hawthorne, Florida
Posts: 2,653
|
I believe bronze or silver will be the color for you. |
|
| |
|
06-25-2009, 09:51 AM
| #60 | |
| "HOLLYWOOD" Join Date: Dec 2008 Location: Miami
Posts: 3,119
| Quote:
| |
|
| |
 |
| |


 Linear Mode


