| |
 11-06-2011, 08:56 PM
| #1 |
| I wanna be Dave Join Date: Oct 2007 Location: Castle Rock, WA
Posts: 8,785
|
Starting up a second comp crawler build. Been wanting to build a shafty for a while just to have fun with and let my little brother drive when he comes to comps with me. I took the ever so great FF-4 chassis and raked the lower skid. Hand cut new plates in 3mm carbon fiber. Thanks to Juan at Underground Crawlers Home for scrounging up me a discontinued FF-4. 4th picture shows the FF-4 laid over the FF-SZ side plate. The rake amount is about another mount hole up from original location. I placed a screw where the mount is on the FF-SZ chassis. I will be looking to save weight where ever I can. 540 motor is for mock up. I have another motor in mind that is smaller. Metal axial trans case will be replaced with new plastic one, saves like 1oz of weight. The CF side panels weight 0.5oz less than the FF-4 panels. The Traxxas driveshafts and 5mm adapters weight 1.5oz less than the MIP shafts. Parts in so far. I went with the C.I. Maxx Drive Shaft Upgrade Kit from Crawler Innovations. I chose the 90t spur. I also picked up a Robinson Racing metal trans diff gear and idler gear. More parts and info before too long, like XR steering, longer beef tubes, etc, etc. Chassis cut and mocked up. Last edited by Szczerba; 11-06-2011 at 09:06 PM. |

|  |
| Sponsored Links | |
| | |
|
11-06-2011, 10:21 PM
| #2 |
| Ex Nor-CalRCRC slave   Join Date: Dec 2008 Location: San Mateo, CA.
Posts: 2,242
|
That chassis is much too wide... J/K, continue the build, the new sides look great  Last edited by gunnar; 11-06-2011 at 10:26 PM. |
|
| |
|
11-07-2011, 07:23 AM
| #3 | |
| I wanna be Dave Join Date: Oct 2007 Location: Castle Rock, WA
Posts: 8,785
| Quote:
| |
|
| |
|
11-07-2011, 09:07 AM
| #4 |
| Ex Nor-CalRCRC slave Join Date: Dec 2008 Location: San Mateo, CA.
Posts: 2,242
|
I think you could use the same skid, but if you want to move the back of the chassis up, don't cut out the same shape as the FF-4 and trim the bottom. Take the stock plate and trace just the front upright portion first. Then slide the chassis plate up 1/4" or 5/16" and trace the rear upright/shock mount portion. Take the plate away and draw straight lines joining the front and rear portions together. This way you can use the same skid, and the lower part of the chassis will maintain the same thickness, and the upper stringer won't have to be trimmed for motor clearance. The joke part of my answer about my attempt at a narrow FF-4: 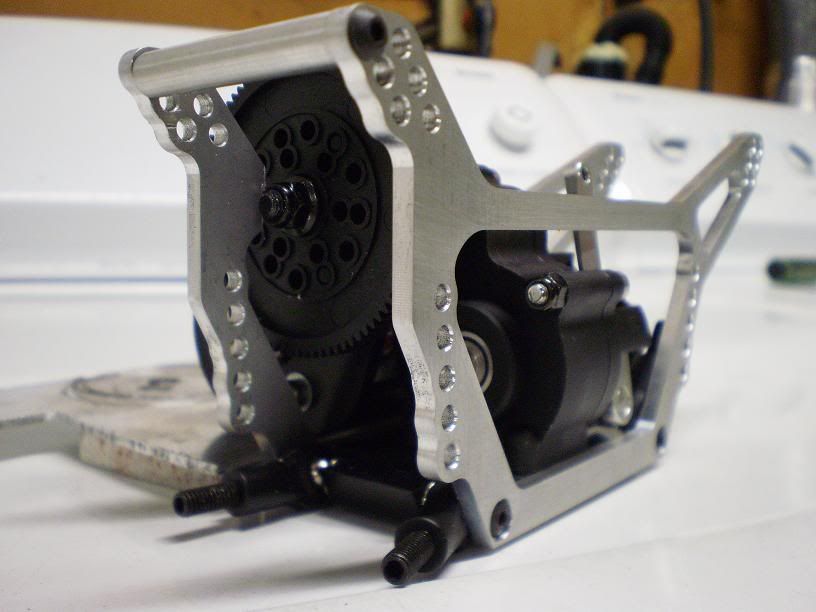 I would not build it that narrow though. |
|
| |
|
11-07-2011, 04:59 PM
| #5 |
| Suck it up!   Join Date: Mar 2008 Location: Arkansas
Posts: 11,652
|
Woohoo!
|
|
| |
|
11-07-2011, 07:26 PM
| #6 |
| RCC Addict Join Date: Nov 2006 Location: Lowell, Arkansas
Posts: 1,307
|
Hmm. Saving weight where you can, eh? Then you put in metal gears? The stock plastic gears are fairly stout. I've only killed one idler in the comp rig, and one set of gears in a basher doing forward/reverse/forward/reverse WOT slams on concrete just to see what the weak link was. Yep, it's the trans gears. Just fyi, aluminum is 2.4 grams per cc, steel is 7.8 grams per cc, and plastic is 1.0 gram per cc. Give or take a bit. Just sayin'. As you were......... |
|
| |
|
11-07-2011, 08:54 PM
| #7 | |||
| I wanna be Dave Join Date: Oct 2007 Location: Castle Rock, WA
Posts: 8,785
| Quote:
Quote:
Quote:
Mini update: A little unorthodox but stole an ol' 2 inch wide KK 3.5 skid I had in the parts bin and drilled some Axial trans holes. I wanted to keep the 60/40 setup, So i just added some spacers to the rear link mount and secured the skid to with 2 other screws. I will make an new sideplate to clear the spur and add a piece of thin lexan as a chassis skid. Last edited by Szczerba; 11-07-2011 at 08:56 PM. | |||
|
| |
|
11-08-2011, 08:02 PM
| #8 |
| I wanna be Dave Join Date: Oct 2007 Location: Castle Rock, WA
Posts: 8,785
|
Spur panel complete. I'll use clear nail polish to seal er' up.Waiting on parts. Couple tips for cutting/sanding carbon fiber. Copied from here. CARBON FIBER SAFETY AND HANDLING - FULLFORCE RC Personal safety: - Work in a well-ventilated area! CF dust is very hazardous to your lungs! Do not try to cut without good ventilation. - Protect your eyes! Wear goggles or some form of eye protection. The CF dust does present a eye irritant and you do not want this dust to scratch anything fragile inside the eye. - Protect your skin!! CF is a skin irritant that can provide red rashes and some degree of pain. Where long sleeved shirts, gloves, and wrap your face up if you feel that you need to. -Protect your lungs! Wear a mask so that you dont breath in the strands of CF or dust. This will attack your mucous membranes. Last edited by Szczerba; 11-08-2011 at 08:49 PM. |
|
| |
|
11-08-2011, 09:28 PM
| #9 |
| I wanna be Dave Join Date: Nov 2007 Location: Memphis
Posts: 4,786
|
Nice work, jabroski.
|
|
| |
|
11-09-2011, 04:29 AM
| #10 | |
| I wanna be Dave Join Date: Mar 2007 Location: roland,ar
Posts: 5,981
| Quote:
and yes,it hurts from time to time.. i got mine from cutting cf arrows for my compound bow.. WEAR PROTECTION!! LOOKING GOOD WITH THE PIMP PURPLE TRANNY!! | |
|
| |
|
11-09-2011, 08:37 AM
| #11 |
| No idea what I'm doing Join Date: Oct 2008 Location: Underground, CO
Posts: 4,529
|
lol...I don't see anything I sent you anymore Interested in seeing where this goes |
|
| |
|
11-09-2011, 09:21 AM
| #12 |
| I wanna be Dave Join Date: Nov 2007 Location: Memphis
Posts: 4,786
|
What's up with a CF front lipo/4-link and a rear 4-link? FYI You're going to have to make 2 sets. |
|
| |
|
11-09-2011, 10:01 AM
| #13 | |||
| I wanna be Dave Join Date: Oct 2007 Location: Castle Rock, WA
Posts: 8,785
| Quote:
Quote:
Quote:
I got a UGC D-Link for the rear axle. Not decided on front axle setup yet. Slug of parts will be in today. Big ticket item I am lacking is the longer beef tubes. Probably won't have those till middle of next week at the earliest. | |||
|
| |
|
11-09-2011, 10:05 AM
| #14 | |
| I wanna be Dave Join Date: Nov 2007 Location: Memphis
Posts: 4,786
| Quote:
Hurry up with some progress. I'm getting bored over here. | |
|
| |
|
11-09-2011, 12:39 PM
| #15 |
| Shelf queen  Join Date: Aug 2008 Location: Internet
Posts: 5,857
|
May i offer a few suggestions? I would also trim the fat section in RED The reson behing my thinking is that the section is significantly stiffer than the section in BLUE and thus tremendous load is placed on the blue section. By trimming the red section to the same width as the blue part, The load placed on theat section of the chassis will be more evenlly distributed. I would thicken the section indicated in YELLOW. The part in yellow is probably plenty strong, but I think evening out the thicknesses will give it more visual appeal. 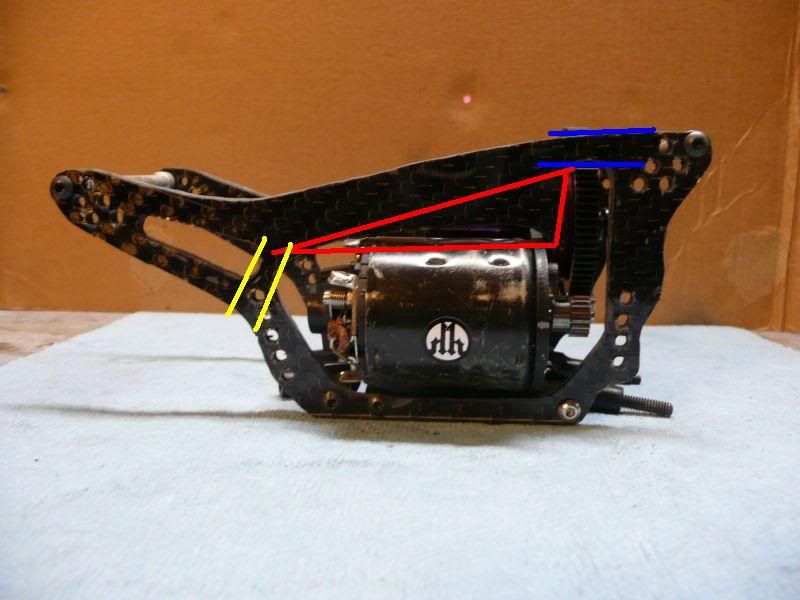 Suggestions nonwithstanding, this build is looking awesome. Keep up the great work. Gunnar's Narrow FF4 build was dope and it's a shame he deleted the thread. |
|
| |
|
11-09-2011, 12:48 PM
| #16 | |
| I wanna be Dave Join Date: Oct 2007 Location: Castle Rock, WA
Posts: 8,785
| Quote:
I got alot of CF fuzz left over, as opposed to the first plate I made. After making that spur side panel I saw where I could add more front upper link mount holes. The FF-4 has 5 holes, I had to go down to 4 holes on this design at first. I can make the non-spur plate look like the spur plate and get more adjustability back into it. I did get thin on a few areas, just figured I would roll with it. My longer beef axle tubes won't be in for a week or so, so I may play around some more with the design. Last edited by Szczerba; 11-09-2011 at 12:50 PM. | |
|
| |
|
11-10-2011, 06:20 PM
| #17 |
| I wanna be Dave Join Date: Oct 2007 Location: Castle Rock, WA
Posts: 8,785
|
Some weight comparisons. Upgraded axial trans/driveline = 7 oz All steel gears CrawlerInnovations driveline upgrade kit (outputs, 5mm adapters, maxx shafts, etc) Stock/plastic axail trans/driveline = 7 3/4 oz All plastic gears, MIP driveline, top shaft metal gear (stock) |
|
| |
|
11-11-2011, 06:54 AM
| #18 | |
| No idea what I'm doing Join Date: Oct 2008 Location: Underground, CO
Posts: 4,529
| Quote:
| |
|
| |
|
11-11-2011, 07:09 AM
| #19 |
| Quarry Creeper Join Date: Nov 2010 Location: Toronto Canada
Posts: 445
|
Looks great so far, I've wanted to make my own slanted skid shafty chassis for awhile now just can't find the materials. I'll be watching this for sure.
|
|
| |
|
11-11-2011, 07:51 AM
| #20 | |
| I wanna be Dave Join Date: Oct 2007 Location: Castle Rock, WA
Posts: 8,785
| Quote:
Just waiting on longer beef tubes to start putting things together. | |
|
| |
 |
 Szczerba's FF-SZ 2.2s - Similar Threads
 | ||||
| Thread | Thread Starter | Forum | Replies | Last Post |
| Szczerba's F-Toy #744 | Szczerba | 1.9 Scale Rigs | 240 | 02-17-2022 08:32 PM |
| Szczerba's JK (Minus some doors) | Szczerba | G-Made Crawlers | 193 | 11-06-2012 07:26 AM |
| Szczerba's Trophy Truck Build.. With Videos | Szczerba | Non Crawler RC's | 110 | 07-18-2012 09:34 PM |
| Was Szczerba's Defender 90 Build. On to the Next. | Szczerba | 1.9 Scale Rigs | 22 | 07-07-2012 05:18 PM |
| Szczerba's Cherokee (Minus some doors) | Szczerba | Axial SCX-10 | 166 | 03-25-2012 07:45 PM |
| Thread Tools | |
| Display Modes | |
| |


 Linear Mode


