| |
| |||||||
 |
| | LinkBack | Thread Tools | Display Modes |
 02-27-2020, 03:13 PM
| #1 |
| I wanna be Dave Join Date: Sep 2019 Location: US
Posts: 2,408
|
FACTOID: Group of goats is called a "tribe". A long time ago, in a galaxy far, far away, there was a White Goat...an Imperial Goat. Ok, so it wasn't really all that long ago, and it wasn't "far, far away". It was right here, on planet Earth, in the SF Bay Area. However, that lil goat gave its owner a bug...a 'buggy bug', that is. Before his Stormtroopers had even "hopped aboard" their droid-searching vehicle, this Black Cat was already planning a sequel. Before that Imperial Capra even had its maiden voyage, I had already acquired some of the necessary spare parts while scouring the junkyards of Tatooine & Jakku. Moving forward four months, enough of the puzzle was figured out, that "surgery" on this whatchamacallit could finally begin. If the name isn't enough of a giveaway, this phat Capra is a 'bastard'...no, not like Mike Myers' "Fat Bastard" (if you don't know, look it up)...we're taking the "illegitimate child" type of 'bastard'. Similar to my first Rustler 4x4 project (Rusty-Frankie), CAPbRAstard is made up of parts intended for multiple vehicles. In 'honor' of that first "kit-bashing" project, I will even incorporate some Traxxas parts into this build. I figure, if I can figure out a way to stuff a couple of Stormtroopers inside of one Capra, I can figure out a way to use Traxxas parts in another Capra. This will be my first time completely building a vehicle from parts. Yes, I've taken a Traxxas Rustler 4x4, and 'converted' it into a "true" stadium truck; yes, I'm in the process of taking a Traxxas Rustler 4x4 pre-roller, and converting it into a track-ready, competition-capable 1/8, eBuggy...but, this will be my first time starting with nothing but a pile (actually, more like several boxes) of parts, and turning them into a complete vehicle. Ok...enough jibber-jabber...with that said, let the games begin.......... I know many reading this have probably done this many times...and, for those of you who've done build threads on your creations, I thank you, as it's your builds that have inspired me to try my hand at it. Unlike Axial's Capra, mine will have 4-wheel steering, and an AX10-style 3-gear transmission. Pre-production of CAPbRAstard began in late-January, with nothing more than assembling the cage. I wasn't 100% certain if need to modify the cage-frame for my intended 4WS, but I had a feeling I'd need to...and, I was correct. The rear servo easily hit the lower-rear part of the cage...so, out came my trusty Dremel, to remove some plastic from the rear end (to make room for the rear steering servo. Since my plan was to not use the Capra's stock fuel cell, i wasn't worried. After a little cutting here, and a little grinding there, you'd never have known anything was removed (except for the sanding that would still need to be done).    After finally receiving the Vanquish servo mounts for the Currie F9 SCX10.2 axles (which included upper links), I installed the servo mounts to the (empty, as I have yet ordered the gears, or steering knuckles) axles, as well as the (longer-than-Capra) upper links, for a quick test-fit. I could see there'd be no further problem of the rear servo hitting anything...but the front was close. Thankfully, the front still cleared, with enough room for the horn.    Initially, I had planned on including the Vanquish Hurtz V2 3-position dig...but, in test-fitting the transmission, I discovered that the dig servo bracket extended past the skid, into the area occupied by the fuel cell. In other words, it ain't gonna fit...so much for that idea....out went the dig.  Thus ended the first day. I would have liked to have gotten more of the build completed, but was unable to do so, I'm still awaiting parts. Thus ended the first day. I would have liked to have gotten more of the build completed, but was unable to do so, I'm still awaiting parts.~ More peace, love, laughter & kindness would make the world a MUCH better place  Last edited by Panther6834; 02-27-2020 at 03:16 PM. |

|  |
| Sponsored Links | |
| | |
|
02-27-2020, 06:40 PM
| #2 |
| Rock Crawler Join Date: Dec 2005 Location: Marietta
Posts: 917
|
What skid is that?
|
|
| |
|
02-27-2020, 07:18 PM
| #3 |
| Rock Crawler  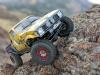 Join Date: Dec 2012 Location: Utah
Posts: 955
|
Any room in that chassis to build a bracket and mount the dig servo in another location? Then you could run a drag link to it and still have dig...  |
|
| |
|
02-27-2020, 07:24 PM
| #4 | |
| I wanna be Dave Join Date: Sep 2019 Location: US
Posts: 2,408
| Quote:
Of particular note are the reinforced upper link mounts. The only real "downside" is that, while the stock skid has 3 positions per upper link mount, the InTheWorks skids only have 2 - the lower is in the same position as the stock lower, while the upper is between the stock's mid & upper positions. ~ More peace, love, laughter & kindness would make the world a MUCH better place | |
|
| |
|
02-27-2020, 11:59 PM
| #5 | |
| I wanna be Dave Join Date: Sep 2019 Location: US
Posts: 2,408
| Quote:
~ More peace, love, laughter & kindness would make the world a MUCH better place | |
|
| |
|
03-01-2020, 08:35 PM
| #6 |
| I wanna be Dave Join Date: Sep 2019 Location: US
Posts: 2,408
|
In case anyone reading this is wondering, this isn't intended to be, nor will it be, a typical "build thread". There's are already plenty of them, so one more isn't really needed...unless the builder is doing something 'different'. In the case of CAPbRAstard, that's exactly what I'm doing. As such, I'll only be covering 'differences'. For this installment, two truly 'different' (at least, when it comes to a Capra) things were worked on today. Technically, one was started approx a week ago, and was just finished today. A 1:1 vehicle, including buggies, have engines...so, I figured, my should. In order to properly paint, it had to be disassembled...which required removing 22 screws (two of which were held in place with very miniscule nuts...and, when I say "miniscule", I REALLY mean it - the nuts are approx 2-2.5mm in diameter). After disassembling the engine, I was left with either individual pieces (this photo was taken after some of the painting had been completed, and after the tattoo pieces hells together with the miniscule screws & nuts were back together.  With the remainder of the painting complete (almost, as there are a few other items I'll be adding to the engine, but I'm still working on those), and dropped, it was time to reassemble the ending. 20 screws later (gentlemen, get your minds outta the gutter), the engine was back together, and ready for it's glamour shots.    Next up was the radiator, which comes courtesy of Ricky at LSD Concepts (that would be Layered Scale Design, out of Truckee, CA. I do have something else from him for this rig, but I'm saving that for a future installment. I meant to take a photo of the inside parts, but forgot. That's what happens when you get old(er). Anyway, here's what it looks like after being painted & assembled.  Last on the table (or floor, as that's where I say while working on these) would be the wheels & tires. Yes, I know, all vehicles have wheels (unless your riding a speed bike, a hoverboard, or a Leonopteryx)...but, I did do something sightly different to these wheels. The wheels going on CAPbRAstard are some VP 2.2 OMF NGX1s. In addition to the large quantity of screws used to attach the beadlock ring to the front ring, the OMFs also use a bunch of screws attached to the front ring as "decorative" screws. For these, I sprayed a couple of light layers of primer, followed by a few layers of black.   With the beadlock ring & all screws in place, this is what they now look like.  That's all for now............. ~ More peace, love, laughter & kindness would make the world a MUCH better place Last edited by Panther6834; 03-01-2020 at 08:37 PM. |
|
| |
|
03-05-2020, 05:29 PM
| #7 |
| I wanna be Dave Join Date: Sep 2019 Location: US
Posts: 2,408
|
Over the past several days, I've been working on the 3D printed fuel cell. You've seen it in some earlier photos, while test-fitting. Initially, the main section was red, while the end pieces were blue. Through the 'magic' of paint, and several days of looking through a magnifying headset, the parts now look like this:    I've also been busy painting the interior...but, I'm not quite ready to give the surprise away. However, I will mention that I've 'recruited' a very special driver from the Marvel Universe. I've also been busy painting the interior...but, I'm not quite ready to give the surprise away. However, I will mention that I've 'recruited' a very special driver from the Marvel Universe.~ More peace, love, laughter & kindness would make the world a MUCH better place Last edited by Panther6834; 03-06-2020 at 10:34 AM. |
|
| |
|
03-06-2020, 06:49 PM
| #8 |
| I wanna be Dave Join Date: Sep 2019 Location: US
Posts: 2,408
|
I started off the day by test fitting the LS3 engine, which required multiple uses of the Dremel. In the end, the engine finally fit. I can't actually install it yet, as there are still a few other steps needing to be done. However, this should give people a general idea of what the completed engine bay will look like.  Next up was trying to finish the interior. It's (finally) almost finished...and, once again, I've been cookin' up something special. No, it's not as detailed as my Imperial Goat. No, I didn't chop up any collectible action figures into little pieces, and then glue them back together. And, no, this Capra doesn't have any connection to Star Wars. That being said, I can also confirm that, once again, the interior is not the stock Capra interior. I wanted something completely different, and I found it in the Carisma M10DB's cockpit. However, even as small as the M10DB's cockpit is, the piece was still too big to fit inside the Capra's cage. Some snips here, some snips there, and it finally fit. Then came approx a week's with of painting. As I mentioned at the beginning of this post, it's not entirely finished. There's still The cutting & peeling of the protective film, spraying the satin finish clear coat, removal of any remaining protective film, and, finally, installation of the driver's head. With my crazy work schedule this coming week, hopefully, I'll have the cockpit completely finished within the next 2-3 days.  ~ More peace, love, laughter & kindness would make the world a MUCH better place Last edited by Panther6834; 03-06-2020 at 06:51 PM. |
|
| |
|
03-07-2020, 04:49 PM
| #9 |
| I wanna be Dave Join Date: Sep 2019 Location: US
Posts: 2,408
|
Just a quick update for today, as I didn't have a huge amount of time between clients. Other than the driver's head still missing (headless horseman holes are allowed), the cockpit is finally finished. Technically, the head is ready to be installed, but I just thought he'd look more "interesting" this way.   Tomorrow, I should be able to install the head, (partially) disassemble the cage, and install the cockpit. I'm sure I'll get a few other things done, just don't know what, exactly, they'll be. Ok, time to get back into my suit, as I have get to the airport to pick up one of Stanford's sports teams. ~ More peace, love, laughter & kindness would make the world a MUCH better place |
|
| |
|
03-08-2020, 07:24 PM
| #10 |
| RCC Addict Join Date: Dec 2012 Location: Crookston
Posts: 1,871
|
Coming along nicely
|
|
| |
|
03-09-2020, 01:48 AM
| #11 | |
| I wanna be Dave Join Date: Sep 2019 Location: US
Posts: 2,408
| Quote:
I started today's work off by installing the remainder of the lighting (taillights & under-roof-mounted lightbars). Unfortunately, while I remembered to properly test the headlights & taillights prior to installing them, I forgot to test the lightbars. In-short, they aren't working. Thankfully, I don't think it's because they're defective. Remembering back to my Imperial Goat's headlights, they require a 12V power supply...which meant worked peeing then directly from the battery (which would have eliminated controlling them via the Tx), it installing a lighting power-booster (such as the Powershift PST Light Booster, which is what I did). So, in order to resolve this 'problem', I need to get another Light Booster...except that they're currently out-of-stock at Amain. Unless they have them back in-stock within the next week, it looks like the lightbars won't be working in time for Scale Nationals. Next up was installing the ESC & Rx in their proper places. Unfortunately, that's when I discovered I had forgotten to order another Castle Link Quick Connect...so, I opened up the Imperial Goat, and removed the one installed there (I figured, it's programming is about as complete as it needs to be, especially as it's just a "for fun" rig, and plugged it into CAPbRAstard's ESC. Unfortunately, this 'problem' wasted a good 30 minutes. After installing the ESC & Rx, it was time to program the servos (via direct connection to my 7PX). My original plan was to program the Castle BEC 2.0 to run at 7.4V, and the Mamba X's internal BEC @ 6V, with the external powering the servos, and the internal powering the LEDs. In 'attempting' to connect them, I discovered I had "misplaced" the Holmes Hobbies Receiver Dual Bypass Harness, as well as the Futaba S.bus hub. So that I didn't have to cut any wires, thus was the reason for using the HH bypass. I spent the next 90min "panicking", and searching through everything...ok, maybe not 'everything', considering I never found either item. So, having wasted a couple more hours, I decided to (temporarily) give up on the S,bus servos & external BEC connections, and plug the servos directly into the Rx...which led to the next problem..... In directly connecting...or, should I say, attempting to directly connect...the servos to the Rx, I discovered that the wires are to short. Technically, the front servo's wires are (just barely) long enough, but the rear servo's wires are short by at least 4". To "resolve" this 'problem', I've ordered a 4" extension for the front, plus an 8" extension for the rear. Sure, I probably could have gone with shorter extensions, but better to have more (as opposed to less) than what's actually needed. I also discovered another 'problem' (although, in all honestly, I always knew this one could surface) - the front & rear steering (or is it drag...I'm always getting them confused...I'm referring to the long links, connecting left & right) links are two short. Right now, I have "toe-in" on the front, and "toe-out" on the rear...exactly the opposite of what they should be. Thanks, this will be a simple 'fix', as I just need to lengthen then by (estimated) 2-4mm. So...that was my day. While I didn't compete CAPbRAstard (not including the driveshafts), I did, at least, get a reasonable amount of work done. Here's the latest photos (note: the last photo is just for laughs).         ~ More peace, love, laughter & kindness would make the world a MUCH better place | |
|
| |
|
03-10-2020, 09:20 PM
| #12 |
| I wanna be Dave Join Date: Sep 2019 Location: US
Posts: 2,408
|
In today's episode, we discuss "protection". No, not THAT kind of protection...although, I am referring to the protection of those low-hanging round things. Ok, get your minds out of the gutter...I'm talking about the axle's pumpkins. For those of you with plastic axles, you don't need to worry much, as your axles (sorta-kinda) have built-in "protection". On the other hand, those of us with machined aluminum axles, they don't slide over rocks very well. Depending on the machined axles, you can purchase 'protection' for some, in the form of "stainless steel axle guards". Unfortunately, for the VP AR44 Currie F9 axles, neither Vanquish, nor anyone else (as far as I've been able to determine...and, if anyone knows otherwise, is greatly appreciate you posting that info), had released such a product. So.....it's up to me to create my own. I don't have the equipment to make some from stainless steel, so that's out. However, I am good with a Dremel, I know how to work with plastics, plus I have a Ninja Air Fry Oven (guess you might call this a "half-baked idea"). So, I headed to my local TAP Plastics, picked up a scrap piece of 1/4" black Delrin (approx 1.5" x 10"), and went to work. I started off by attaching my Dremel to the WorkStation, put the grinding stone bit on, and, after two passes (which took over an hour), I lathing it down to approx 5/32". Next, I cut two 55mm wide pieces, and then, using the 'thin cut' disc, I got the pieces into the shape needed. The final step...molding the pieces to the side of the pumpkins...involved using the Ninja. I set it to "Air Bake", set the temp to 340, and heated the pieces (one at a time) for 6 minutes. I should mention that determining the best temp & time took several tries, using "leftover" material. Once each piece was heated enough that the Delrin was 'pliable', I shaped it to (as closely as possible) match the general shape of the pumpkins. The end-result was this:     Now, I'm off to Home Depot, to pick up some E6000. ~ More peace, love, laughter & kindness would make the world a MUCH better place |
|
| |
|
03-11-2020, 12:09 PM
| #13 |
| Rock Crawler Join Date: Dec 2015 Location: Charlotte, NC
Posts: 565
|
Not sure if you saw this for your dig servo, but perhaps it would work in your setup? https://sth.ecwid.com/Hurtz-Dig-Comp...unt-p168574172 |
|
| |
|
03-11-2020, 12:40 PM
| #14 |
| Moderator   Join Date: Sep 2008 Location: PA
Posts: 13,935
|
That engine is great! Did you design and print it yourself?
|
|
| |
|
03-11-2020, 05:38 PM
| #15 | ||
| I wanna be Dave Join Date: Sep 2019 Location: US
Posts: 2,408
|
First thing's first. Today's update includes no photos...not because I couldn't, or didn't, but because I purposely choose not to. As work a few days ago, my initial intension was to complete the final build, not counting the driveshafts (which still haven't arrived...tho, as a backup, if A.J. can't get them to me in time, I've ordered a "backup plan" from Amain). However, I ran into a couple problems, including a defective 3-way Y-harness for the LEDs (Amain is 'fixing' the problem, and the replacement should arrive by the weekend). Quote:
At the same time, considering what I recently found out, it might not have ever mattered. Supposedly, for the comp classes, you can have 4-wheel steering, or a dig, but not both. Since I had already heavily committed to the 4WD route (especially financially), missing out of the dig isn't a big deal. However, when it comes time to build my 3rd Capra (as a U4 comp crawler), I'll be going with a dig. Heck, if the rules allow (for U4), is be up to 4WS & dig. Quote:
In some ways, they're not as detailed as the 3D printed ones...and, in some ways, they're more detailed. I'd suggest searching Amazon (that's where I found mine), as you'll find different versions (ie. different "engines")...they're typically about $35-40. If you've got a steady hand, you should be able to turn out something every better than mine (my hand isn't very 'steady, but I do happen to have a jeweler's head-mounted magnifier w/ light). --------------------------------- Ok...now, today's update. I was soooooooo close to finishing the build (except for the are-they-ever-going-to-arrive driveshafts), until I ran into a serious...and, I do mean SERIOUS...problem. The planned lighting wiring is fairly simple...Rx, then Futaba CPS-1, then JR-to-JST adapter, then 3-way Y-harness. The headlights & taillights, as well as a 2-way Y-harness, plug into the 3-way, and then the two lightbars plug into the 2-way. Unfortunately, the 3-way toned our to be defective. Now, that might not sounds like a SERIOUS problem...but.......... The defective nature caused a loud "pop", a good-sized puff of smoke, a long-lasting "burnt" smell...oh, yea, and a spark large enough to have started a fire. Plus, the white plastic covering the 'positive' wire melted off (as my wife is busy working on something, the bed became the "workstation", and there's some white plastic singed onto the blanket). As I mentioned at the beginning, Amain had already been contacted, and they're shopping a replacement. As I now have to rewire the lighting, this caused a delay. I was able to finish the rewiring, get the body panels installed, and finished up everything else related to the "upper half". As for the lower half, I discovered yeah problems...ok, technically, one I already knew about, but hadn't done anything about. First, the Dravtech shocks are to long, but that's due to the "cap mod". This will be corrected tomorrow, when I replace the "cap mod" caps work the standard 4Tec 2.0 caps. Second (the problem I knew about), the screws holding the shocks & lower links to the axle are too short. When I initially tray for everything, I used 3x16mm screws. What is needed are 3x18mm, but I don't have enough (8 are needed, I have 3)...so, once again, Amain to the rescue - I placed the order early this afternoon, they should ship by tomorrow, and I should receive them by Saturday. Other than these new problems, everything is coming together quite nicely. I've already paired the Rx, and programmed everything on the Tx side, including the 4WS...but, I still need to calibrate & program the ESC, which I'm planning to get done tomorrow. If all goes well, everything (other than the driveshafts, the replacement lighting parts, and the replacement screws) will be completed tomorrow. If the parts in waiting on arrive as scheduled, I should have her out for her first tray run before the end of the weekend. I do have one final piece of sad...very sad...news. I was to be done the final testing in Yosemite next Thursday & Friday, as we were supposed to be taking 20 Motorcoaches fill of Google employees on an overnight trip. Unformatted, due to the "hysteria" created by the media in relation to the coronavirus, the Yosemite trip has been cancelled. Yosemite would have been an outstanding place for final testing...especially along the base of Half Dome...but, such is not going to be. Instead, I'll be leaving for Vegas 1.5 days ahead of my original schedule, so final testing will now be taking place somewhere in the Las Vegas area.   ~ More peace, love, laughter & kindness would make the world a MUCH better place | ||
|
| |
|
03-13-2020, 12:09 AM
| #16 |
| I wanna be Dave Join Date: Sep 2019 Location: US
Posts: 2,408
|
First, the bad news. For those who might not yet be aware, Scale Nationals 2020 had been postponed, with the 'rescheduled' dates yet to be determined. There is nothing definitive at this point in time, but 'rumor' is pegging sometime in the Fall. For those of you building/testing vehicles for Scale Nationals, there's no longer any need to rush...we all now have plenty of time. I'll still be heading to Vegas, as the yep was also to visit family, and the (belatedly) celebrate my birthday...but, at the same time, I'm not exactly happy about this latest development (which, I'm certain, many others are feeling the same way). Ok...now the good news...not that it really matters - CAPbRAstard is all but complete. "Final" assembly, as planned (and mentioned in my last post), was completed today. Granted, I will have to partially disassemble the rig to install the driveshafts & replacement 3-way lighting Y-cable (when they arrive), and attach the wheels/tires, but almost everything else is complete - the throttle has been calibrated, the ESC has been programmed, and all other parts have been installed.     I do still need to set the front & rear sub-trim, adjust the front & rear drag links, and then get some testing done (to (potentially) refine the ESC programming...but, other than that, is say she's good to go. I do want to 'shout out' some special "thanks" to those who assisted with this build: A.J. at Supershafty, Rick at Layered Scale Design, Brandon & Michael at Vanquish, and Rob at Krazed Builds. Without input (as well as various parts) from each of them, I would not have gained the knowledge, or the confidence, to complete, much less start, this type of build. They provided advise, suggestions, and recommendations when needed. They were also honest when I brought up an idea that they felt wouldn't work as I was thinking, and told me so. To each of you, THANK YOU!!! Finally, extra-special thanks to Carter Fab & Machine. I had contacted them about some body panels they had been making, only to find out they were completely sold out, would no longer be making the primary one I was interested in, and the next batch of the others wouldn't be available for at least a couple months. However...and this is a HUGE "however"...the owner did have a prototype of a 1-piece design that he decided not to produce in quantity. As such, it is truly a one-of-a-kind. Not only did he offer to sell it to me, but he was the one who brought up the idea. There are several other Capras (Capri?) out there with "one-off" bodies/body-panels, but, in all likelihood, they were all made by their owners, or by someone said owner personally knows. I have neither the equipment to make a body, nor sdo I personally know anyone with the equipment. Thanks to the kind offer of Carter Fab & Machine's owner, I was able to install a "one-off" body on CAPbRAstard. Carter Fab & Machine...thank you, Thank You, THANK YOU !!! ~ More peace, love, laughter & kindness would make the world a MUCH better place |
|
| |
|
03-13-2020, 06:40 AM
| #17 |
| Moderator Join Date: Sep 2008 Location: PA
Posts: 13,935
|
That looks great! Your engine looks better than the 3D printed varieties. Where did you get that Jeep grille? It looks very familiar to the one I made... |
|
| |
|
03-13-2020, 11:14 AM
| #18 | |
| I wanna be Dave Join Date: Sep 2019 Location: US
Posts: 2,408
| Quote:
If you look closely, and compare the most recent photos against a few of the earlier photos, you'll notice two changes. First, the "cap mod" caps on the Dravtech shocks were replaced by standard 4Tec shock caps. Second, I removed the engine's header pipes. As previously mentioned, the shocks were too long, causing the roof to be too high, thus the reason for swapping shock caps. However, after swapping the caps, and then assembling the 'upper' & 'lower' halves, I discovered that the headers were preventing the shocks from fully compressing...so, off they came. I'll just hold onto them for some future build. As for the grill, it's the AC005 "Angry Grill" by Knight Customs, available through Shapeways. Gotta admit, during the first two months after the Capra was released, there were very few Capra items on Shapeways (5-6). Now, four months later, the collection is quite large, and getting larger. Initially, it was nothing more than a few alternate grills, a single "high clearance" skid, and a single "high clearance" rear brace. Glad to see so many options are appearing, through Shapeways, Thingiverse, and other sources. I'm sure the number of aftermarket items for the Capra will never reason the number available for the SCX10/SCX10.2...but, the available parts for the Capra are increasing on a weekly basis. Sometime, in the near future, I just might have to 'retire' the Stormtrooper parts of my Imperial Goat, and redo it with more recently-available aftermarket parts...either that, or buy a second kit (CAPbRAstard is, obviously, not from a 'kit'), and build up from that. ~ More peace, love, laughter & kindness would make the world a MUCH better place | |
|
| |
|
03-13-2020, 11:01 PM
| #19 |
| I wanna be Dave Join Date: Sep 2019 Location: US
Posts: 2,408
|
Good news, and "strange"/bad news. Good: Two days ago (technically, approx 1am on March 11), knowing that A.J. still hadn't gotten around to shipping my driveshafts, I decided to order some "backup" MIP driveshafts from Amain. Well, they arrived this afternoon (along with the replacement 3-way Y-cable for the lighting) and I just put them together. Tomorrow, the plan is to install the driveshafts, 'correct' the lighting's "wiring problem", get the steering centered, and adjust the drag links for the proper toe-in/toe-out. Provided I get all this done, I'll take her out for her first test run on Sunday. Bad: Honestly, not sure what's going on with the driveshafts I ordered from Supershafty. The order was 'processed' on 3/3, and the shipping label printed on 3/6, yet the driveshafts still haven't shipped. A.J. had even sent me a text (on 3/3), asking me a question, to which I told him I'd check when I got home. I arrived home approx 2 hours later (a little after 1pm), checked what I need to check, and shot him a text with the answer...and he never responded. I understand people get busy...that's understandable. But, I sent him a text 4 days later (3/7), asking if he had any update...and, again, he never responded. I don't want to complain, as he does outstanding work...but, at the same time, you can't just ignore your customers. Am I upset about the current situation? You're darn straight, I am. Will I still order from him in the future? You're darn straight, I will...as I said, he does outstanding work (but, I'm still a little upset). ~ More peace, love, laughter & kindness would make the world a MUCH better place |
|
| |
|
03-15-2020, 07:03 PM
| #20 |
| I wanna be Dave Join Date: Sep 2019 Location: US
Posts: 2,408
|
Other than a minor lighting problem, she's finished, and fully operational...but, first, a word from our sponsor. Oh, wait, I have no sponsored. Moving on.......... Regarding the lighting "problem", it's more of another 'defect', and less of a 'problem'. As I mentioned, the replacement 3-way lighting Y-cable, as well as the replacement power-booster arrived. Took care of all the rewiring on the lightbars...only to discover that one of the lightbars is defective). At first, one lightbar was working, but not the other...so, not knowing whether there was a potential connection problem where the non-working lightbar's wires connect to the extension wires, or whether there was a potential connection problem where the extension wires connect to the 2-way Y-cable, I decided to simplify things. Knowing that the 'driver side' lightbar was operational, I disconnected that lightbar from its extension wires, and connected both lightbars to the same extension wires...and I still only had one working lightbar. So, now I'm certain that the other lightbar is defective. Adding "insult to injury", the headlights were 'flashing' in sync with the steering servos being operated, so now I'm also certain that I'll have to go back to my original idea of installing an external BEC & HH dual servo bypass harness. The external BEC (set at 7.4V) will power the servos, while the ESC's internal BEC (set at 6.0V) will power the lighting via the power booster. Thanks to Scale Nationals being postponed, I've got plenty of time to get these minor "bugs" worked out. As for CAPbRAstard, itself, she's ready for a full-on test. I did have too make three final adjustments before she was operational (two of which I expected. Here's the "prom photo", prior to final adjustments & (short) initial test:  First, I had to increase the length of the drag (or is it 'steering'...again, I'm always confusing the two...I'm referring to the links that connect the left & right knuckles) links, as they were too short. As I mentioned in a recent post, I had toe-in on the front, and toe-out on the rear, exactly the opposite of what's needed. I don't remember the eye-to-eye length before I adjusted them, but I believe they were 137.5mm. Starting work only the rear link, and after adjusting, installing, and checking a few times, 142.5mm was determined to be the 'magical' number. I removed the front link, adjusted it to the same length, reinstalled both links, and rechecked...and it appears to be extremely close to what I was hoping for. Based on advice from a few others, it was 'suggested' that the toe-in/out, should be approx 1mm, from front-to-rear of a 1.9 wheel. Since I'm using 2.2 wheels, and my toe-in/out is approx 1.5mm, I'm guessing that should work well enough. Next (the unexpected step), I had to remove the horns from the servos, and reposition them. Seems, one was off by 1 tooth, while the other was off by 2...no worries, an easy fix resolved in under 3 minutes. Finally, I needed to adjust the sub-trim. I've done this multiple times on vehicles, always easily accomplishing the task...however, I've never seen up a 4WS vehicle before, so this proved "interesting". Using my Judy setup board, I eyeballed it, first the front, them the rear...and, on my first hallway test, she went about as straight as straight goes. Mission accomplished. To be honest, I thought I was going to have to readjust the sub-trim on both ends, but then I realized it wasn't the vehicle that want going straight - I hadn't placed the vehicle straight. I use a line on the floor to test 'straightness', but I'm the one who hadn't placed the vehicle straight...but, after repositioning the vehicle, she went straight on the 2nd & 3rd hallway tests. With no further adu, I give you CAPbRAstard:   ~ More peace, love, laughter & kindness would make the world a MUCH better place Last edited by Panther6834; 03-15-2020 at 07:05 PM. |
|
| |
|
 Introducing CAPbRAstard: Now a 'Tribe' of 2 - Similar Threads
 | ||||
| Thread | Thread Starter | Forum | Replies | Last Post |
| New to RC.Just introducing myself | exion | Newbie General | 5 | 03-06-2015 10:30 PM |
| introducing | dikun19 | Newbie General | 3 | 01-26-2015 04:11 AM |
| Just introducing myself! | frankencrawler | Newbie General | 2 | 07-08-2014 01:29 PM |
| |


 Linear Mode


