| |
 11-19-2015, 07:16 PM
| #21 |
| I wanna be Dave Join Date: Sep 2012 Location: Victoria, BC
Posts: 2,257
|
Time will tell..... that's what makes this hobby fun, figuring out solutions.
|

|  |
| Sponsored Links | |
| | |
|
12-03-2015, 12:55 PM
| #22 |
| I wanna be Dave Join Date: Sep 2012 Location: Victoria, BC
Posts: 2,257
|
Praying to the RC Gods delivery is tomorrow...the collection of parts is growing! 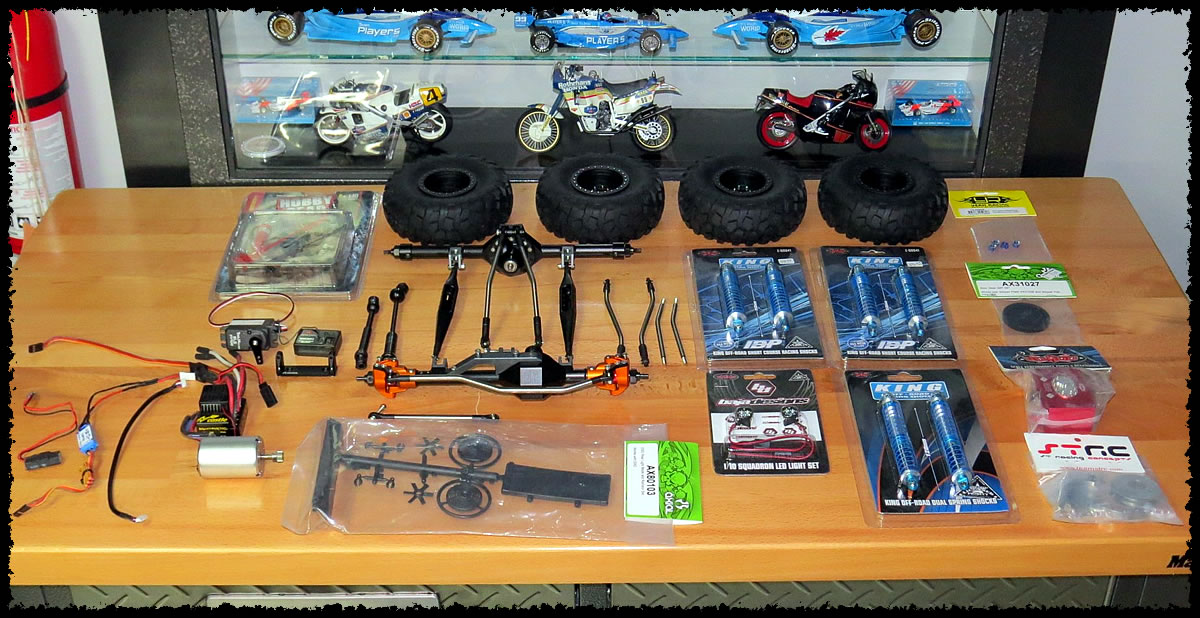 Last edited by bilinvic; 08-18-2017 at 08:40 PM. |
|
| |
|
12-04-2015, 02:18 PM
| #23 |
| I wanna be Dave Join Date: Sep 2012 Location: Victoria, BC
Posts: 2,257
|
Bombs away.... Let the build begin!  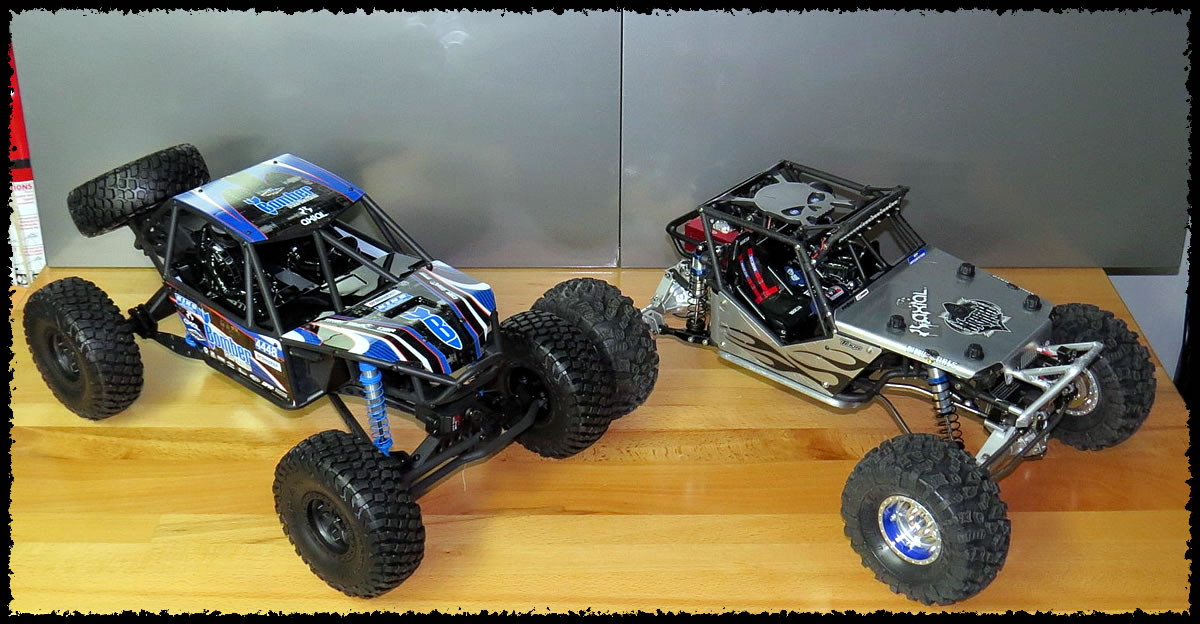 Last edited by bilinvic; 08-18-2017 at 08:40 PM. |
|
| |
|
12-04-2015, 03:09 PM
| #24 |
| Rock Crawler Join Date: Nov 2013 Location: In the country
Posts: 522
|
Hmm, if the bomber is 1/2 as badass as the wraith its gona be awesome!!!!! Sent from my LG-E980 using Tapatalk |
|
| |
|
12-04-2015, 05:33 PM
| #25 |
| Newbie  Join Date: May 2013 Location: Craig, Colorado
Posts: 28
|
One of the clearance issue is on the receiver box and the lower link if you want to install MIP front shaft. I tried the ax and the wraith. I clearance the receiver box and then the lower control arm hits the drive shaft. So I went all back to stock and will wait and see how all this plays out.
|
|
| |
|
12-04-2015, 06:02 PM
| #26 |
| Pebble Pounder Join Date: Dec 2013 Location: Marion
Posts: 187
|
Did you use the two short ends? Heard of others doing this and then letting the rub just work its way out.
|
|
| |
|
12-05-2015, 10:24 PM
| #27 |
| I wanna be Dave Join Date: Sep 2012 Location: Victoria, BC
Posts: 2,257
|
My initial impression is what a great looking machine; the performance definitely needs some help though. The shocks are way too soft (hence the crazy torque twist) and of course, the stock electronics just don't make the grade. That was after a mere two minute test drive in my shop...then the tear down commenced. Please keep in mind, everything I am doing right now is for mock-up and once I am satisfied, I will tear down again ensuring Loctite and grease is used accordingly during the re-build. Front links are VP Wraith Ti uppers and lowers with Revo link ends. Front driveshaft is JunFac ardened universal shaft 120-155mm. The Junfac driveshaft has proven to be extremely reliable with my BL powered rigs and their smaller diameter (compared to MIP) looks more the part. The gunmetal STRC motor mount is installed with the Holmes Hobbies Trail Master BL 540 3100 kV motor. For now, I'll stick with the stock gearing of 12T/64T and see how that performs. 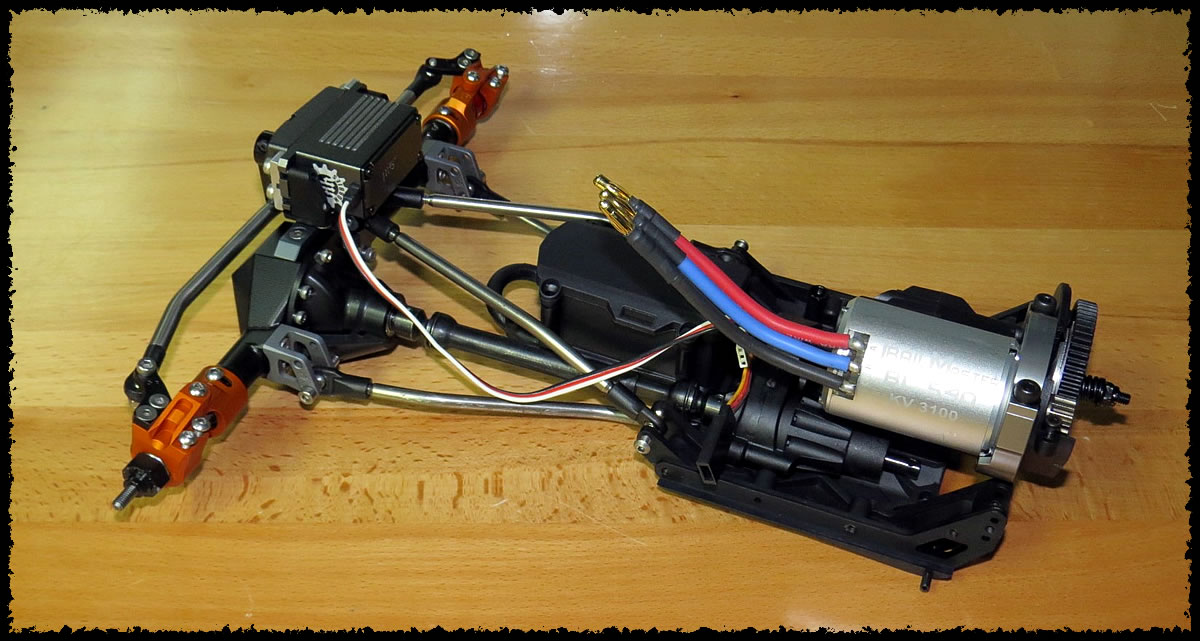 Last edited by bilinvic; 08-18-2017 at 08:41 PM. |
|
| |
|
12-05-2015, 10:39 PM
| #28 |
| I wanna be Dave Join Date: Sep 2012 Location: Victoria, BC
Posts: 2,257
|
I couldn't use the regular Axial Wraith servo mount plate and the VP aluminum servo mounts; it located the servo too far forward and the servo would be obstructed by the front bumper under minimal suspension articulation. I used the stock RR10 one-piece servo mount and flipped it backwards. This put the servo in a perfect position relative to the bumper resulting in 100% articulation with no interference. (Only two screws for mock-up) 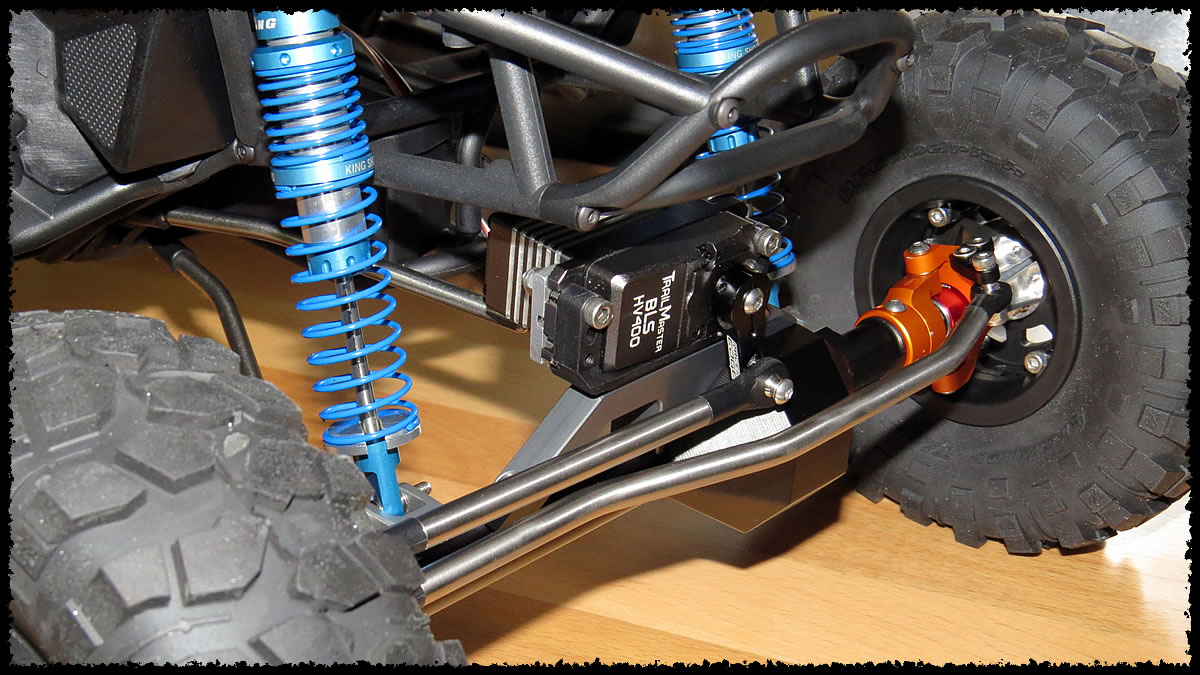 Last edited by bilinvic; 08-18-2017 at 08:41 PM. |
|
| |
|
12-05-2015, 10:48 PM
| #29 |
| I wanna be Dave Join Date: Sep 2012 Location: Victoria, BC
Posts: 2,257
|
Suspension mocked up now.... Blue Monkey RC Yeti trailing arms w/ Revo link ends Blue Monkey RC Ti upper links w/Jato link ends RC4WD King Off-Road Short Course 110mm Racing Shocks (Slash Rear) front & rear RC4WD King Off-Road Dual Spring 120mm Shocks for the dual rear shock set-up The shocks will require fine tuning once the machine is up and running for it's shake-down! MIP Yeti rear driveshaft Wheelbase is now 15 1/8" compared to the stock WB of 14.75" 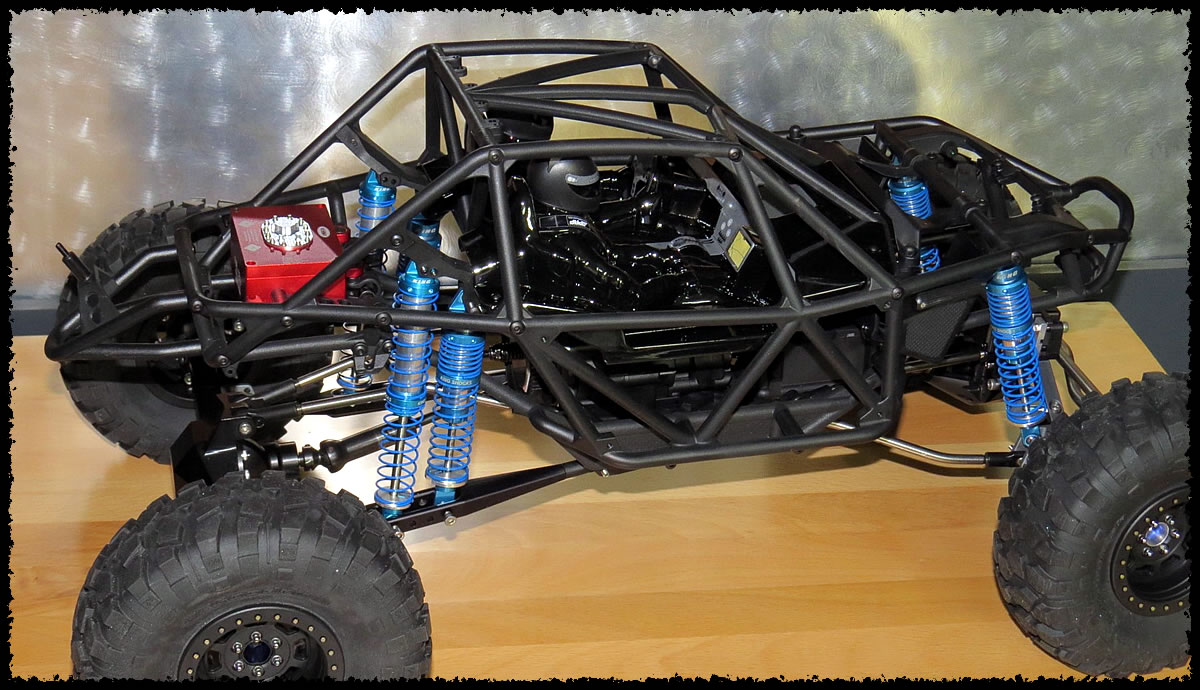 Last edited by bilinvic; 08-18-2017 at 08:42 PM. |
|
| |
|
12-05-2015, 10:50 PM
| #30 |
| I wanna be Dave Join Date: Sep 2012 Location: Victoria, BC
Posts: 2,257
|
Out with the stock plastic "fuel cell", in with the RC4WD aluminum "fuel cell". 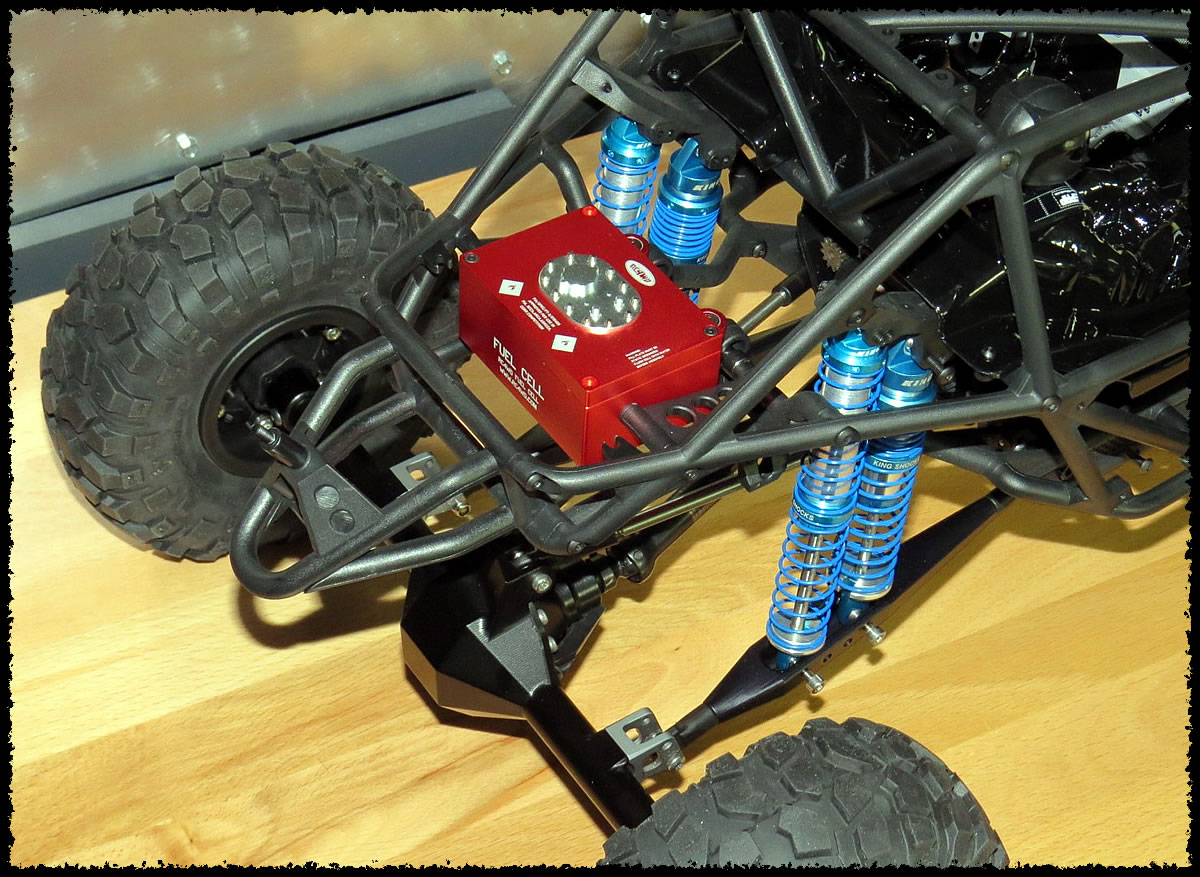 Last edited by bilinvic; 08-18-2017 at 08:43 PM. |
|
| |
|
12-05-2015, 10:55 PM
| #31 |
| Rock Crawler Join Date: Aug 2015 Location: Big Island
Posts: 863
|
Looking good! I like what you did with that servo mount, it gives me ideas for my Wraith.
|
|
| |
|
12-06-2015, 07:18 AM
| #32 |
| RCC Addict Join Date: Aug 2012 Location: The Garage!!!
Posts: 1,386
|
What made wheelbase longer?
|
|
| |
|
12-06-2015, 08:09 AM
| #33 |
| RCC Addict Join Date: Nov 2009 Location: New Wilmington, PA
Posts: 1,234
|
Looks like he mounted the lower rear link mounts upside down for more length, then unscrewed the upper rod ends to accommodate.
|
|
| |
|
12-06-2015, 09:41 AM
| #34 |
| RCC Addict  Join Date: Nov 2011 Location: cold state
Posts: 1,334
|
Great info, say was wondering if you could show how much clearance given w/yeti driveshaft on the centered axle. With full compression too, underside pic. Looking forward to more ideas, keep up the great updates .
|
|
| |
|
12-06-2015, 11:22 AM
| #35 |
| Pebble Pounder Join Date: Dec 2013 Location: Marion
Posts: 187
|
Blue monkey is out of trailing arms. Waiting for those to come in and order rear links too. Got my entire front end done today. Not putting in the mip stuff yet. Going to try the collars from chamber fab and use those on the wb hds and see how it goes. Looks like things will get sorted out if I plan on using them for a center diff later. Or might send them back. Lots of cash in driveshafts.
|
|
| |
|
12-06-2015, 12:59 PM
| #36 | |
| RCC Addict Join Date: Aug 2012 Location: The Garage!!!
Posts: 1,386
| Quote:
| |
|
| |
|
12-06-2015, 03:40 PM
| #37 |
| I wanna be Dave Join Date: Sep 2012 Location: Victoria, BC
Posts: 2,257
|
The electronics are sorted out. I did have to move the MMP rearward after this photo was taken to clear the rear battery compartment panel. 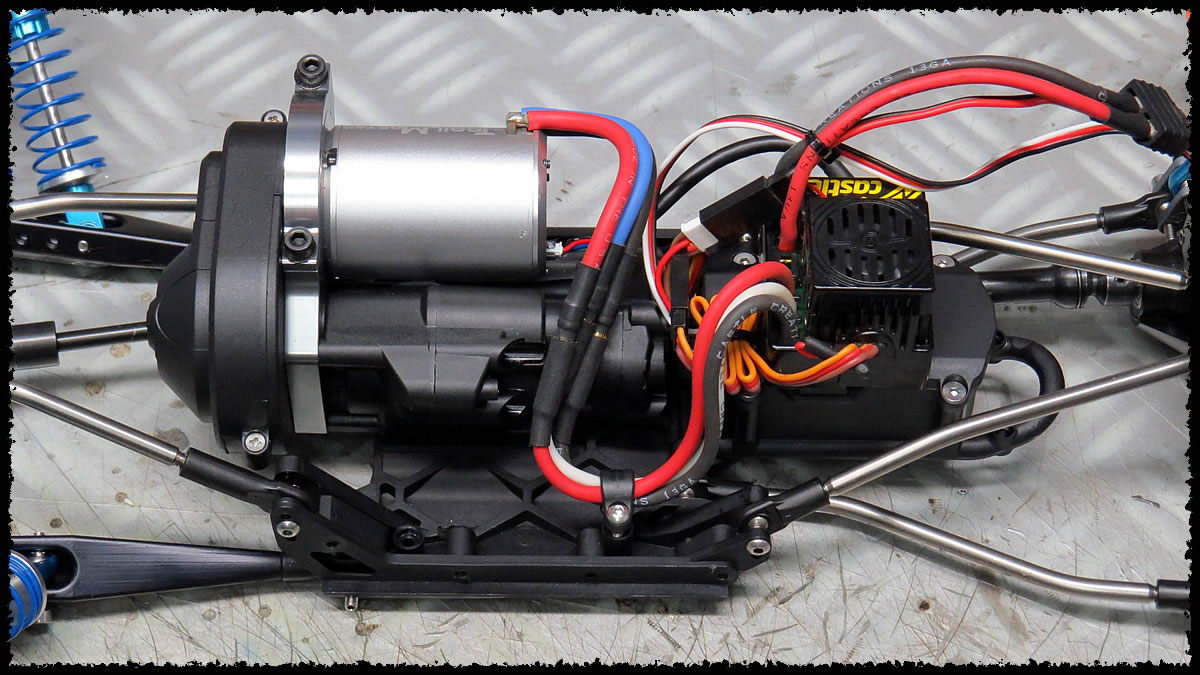 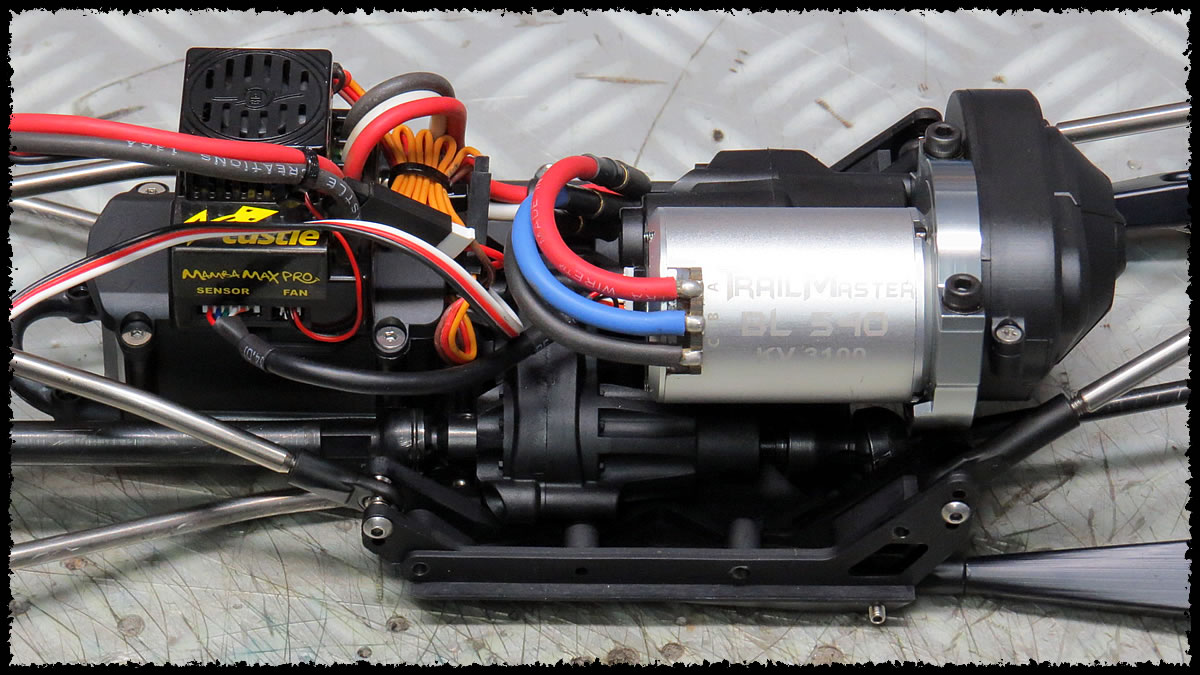 Last edited by bilinvic; 08-18-2017 at 08:44 PM. |
|
| |
|
12-06-2015, 03:49 PM
| #38 |
| I wanna be Dave Join Date: Sep 2012 Location: Victoria, BC
Posts: 2,257
|
Regarding the center rear axle and MIP driveshaft, here are some pics with the rear suspension compressed. 1. With the driver's side compressed. It's hard to tell the driveshaft is clearing the spur cover, but you can clearly see light between the shaft and housing. 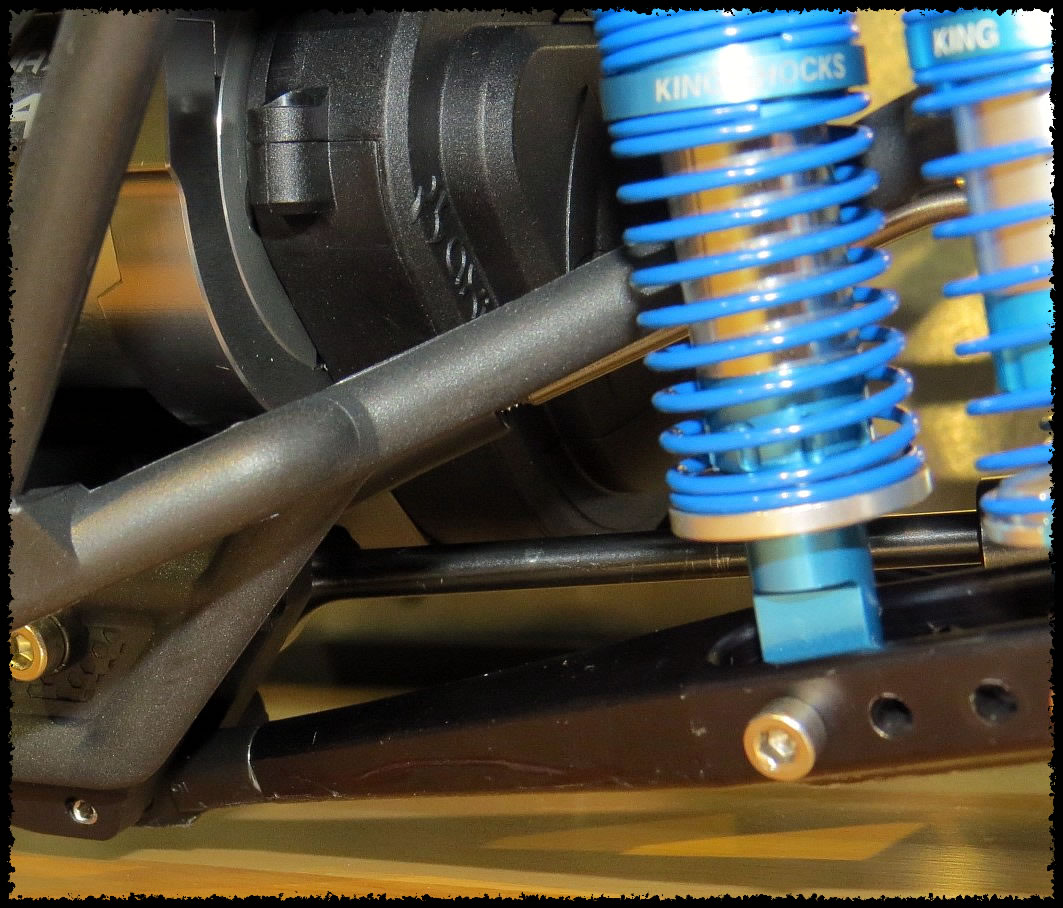 2. With the passenger side compressed. There's approximately 3mm of clearance. 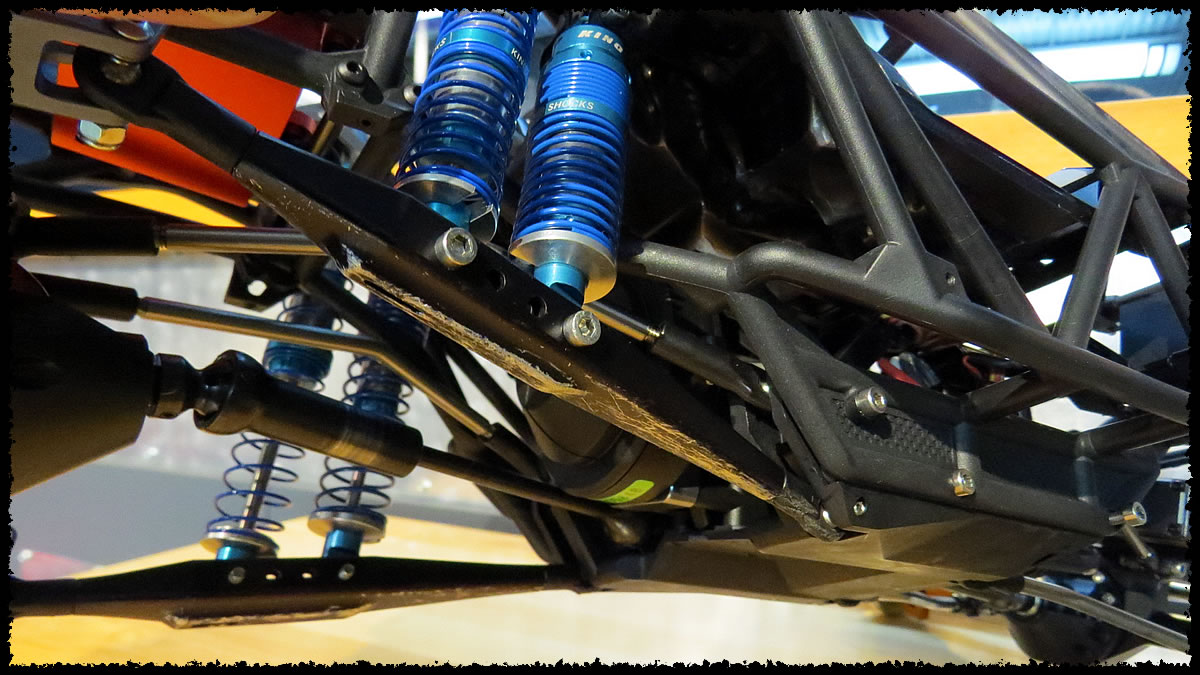 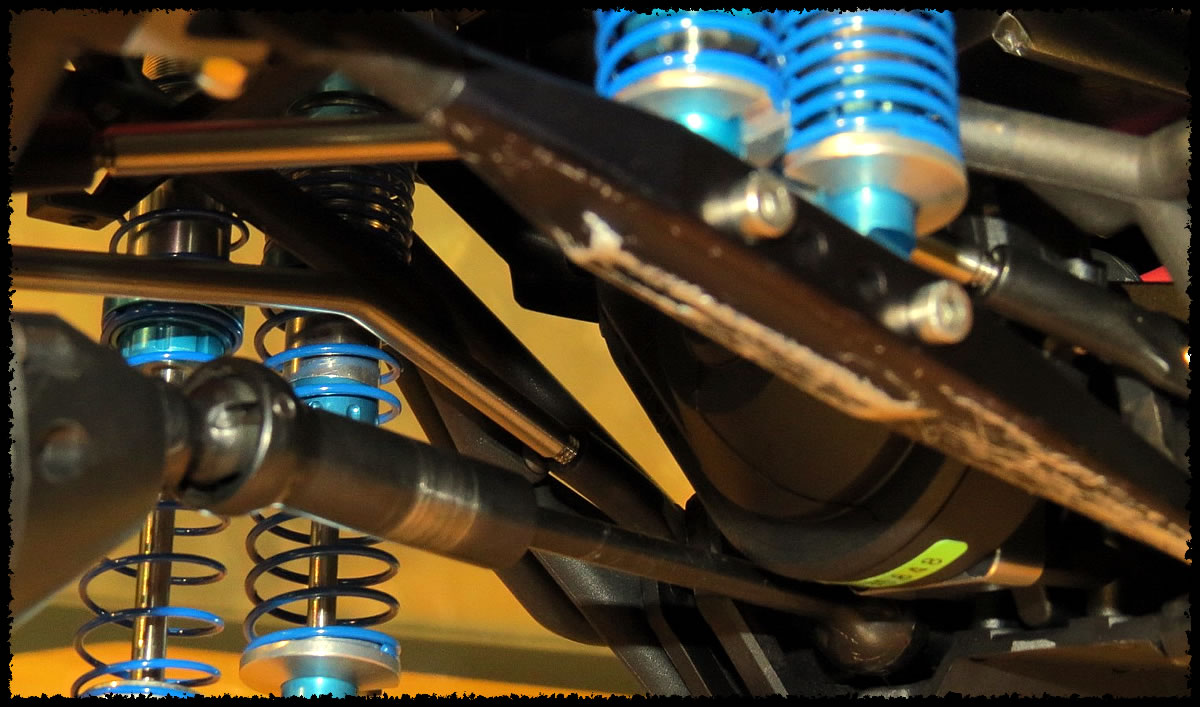 3. With both sides fully compressed. Note: I did add a rubber bump-stop so that the top of the SSD link mount wouldn't travel beyond the chassis underneath the fuel cell. 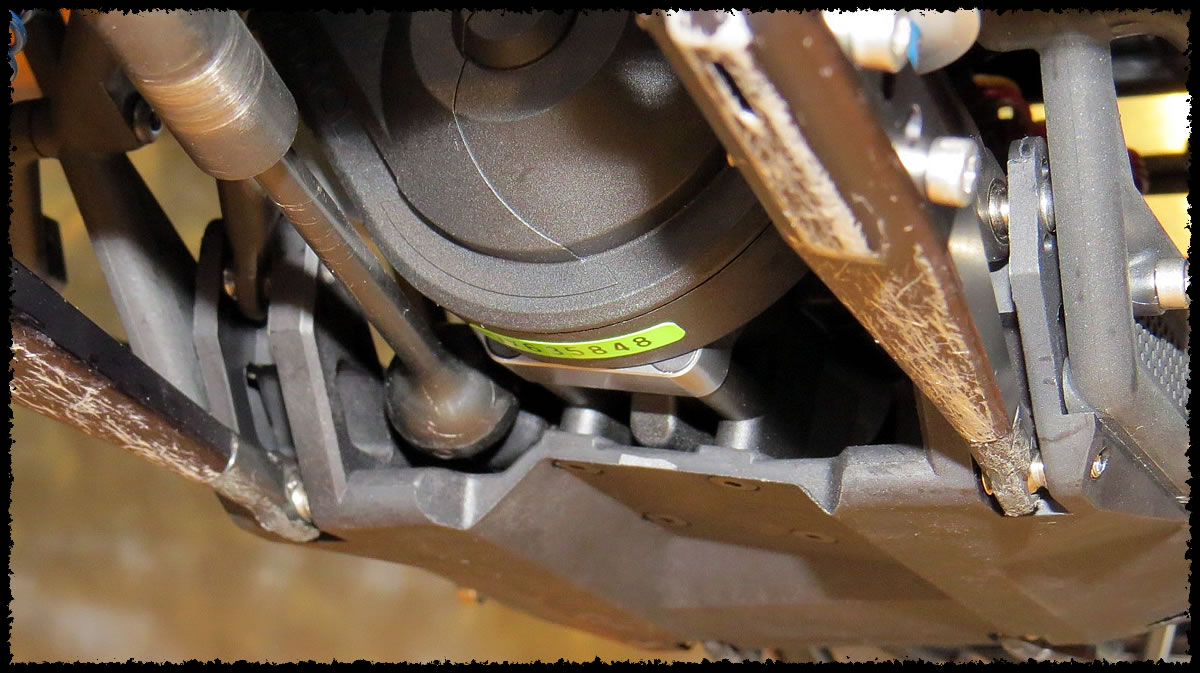 Last edited by bilinvic; 08-18-2017 at 08:46 PM. |
|
| |
|
12-06-2015, 03:50 PM
| #39 |
| RCC Addict Join Date: Nov 2011 Location: cold state
Posts: 1,334
|
About 2mm, good enough for me. Thank you
|
|
| |
|
12-06-2015, 04:05 PM
| #40 |
| I wanna be Dave Join Date: Sep 2012 Location: Victoria, BC
Posts: 2,257
|
...and how the Bomber sits now: 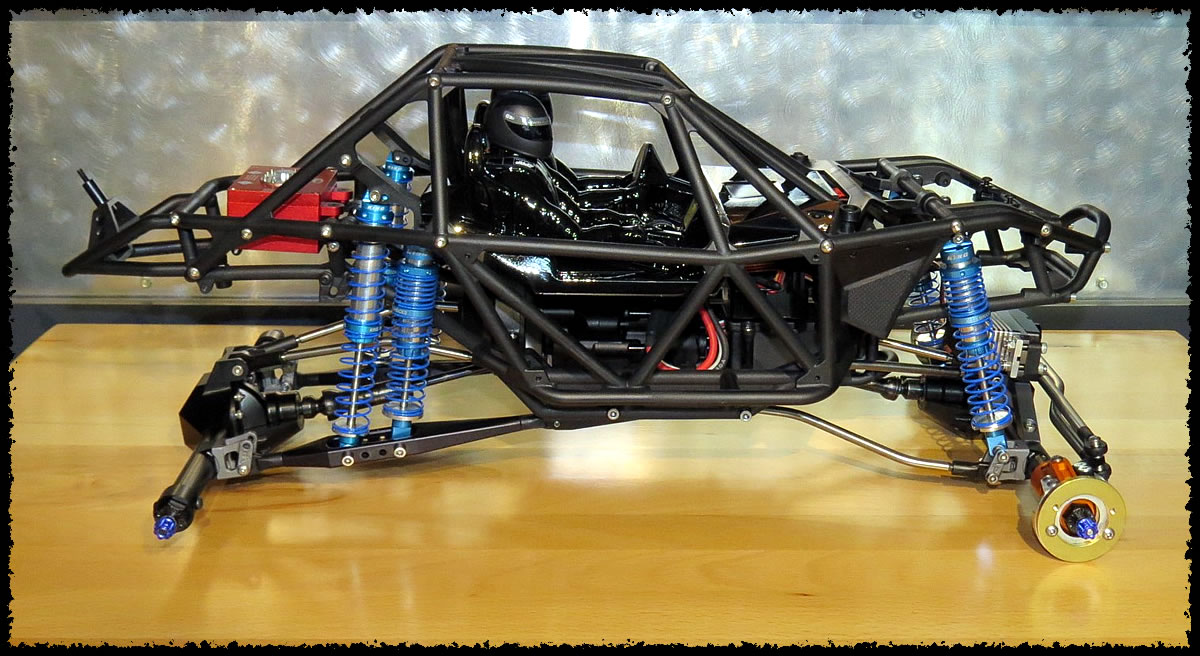 Last edited by bilinvic; 08-18-2017 at 08:46 PM. |
|
| |
 |
 bilinvic's RR10 Bomber Build - Similar Threads
 | ||||
| Thread | Thread Starter | Forum | Replies | Last Post |
| Rr10 bomber available from tower | jaykim5708 | Axial RR10 Bomber | 12 | 05-05-2016 07:28 PM |
| axial RR10 bomber new U4 class? | Cork | U4RC | 2 | 01-15-2016 11:22 AM |
| New Axial RR10 Bomber available for pre-order! | RPP Hobby | RPP Hobby | 0 | 11-09-2015 05:48 PM |
| |


 Linear Mode


