| |
| |||||||
 |
| | LinkBack | Thread Tools | Display Modes |
 04-22-2016, 07:38 AM
| #41 |
| RCC Addict Join Date: Aug 2013 Location: Missoula
Posts: 1,346
|
My pitbulls and medium double deuces got considerably softer after 5 or 6 hours.
|

|  |
| Sponsored Links | |
| | |
|
04-22-2016, 10:19 AM
| #42 |
| I wanna be Dave  Join Date: May 2015 Location: Moving
Posts: 2,580
|
So jealous of the areas in Utah. The one and only time I ran soft outers, after the first two packs the outer foams seemed to disappear. It literally felt like I was running the closed cell inner without the outer. From then on mediums outers are the only foam I run with double deuces. Hell, even the deuces wilds I'm running in Qwiksilver are starting to soften up quite a bit. I think the softer the outer foams are, the quicker they break down especially when vented. Unvented tires would at least put some of the support duties on the air pressure present. In the case of ballooning at high elevation maybe just stick a needle through a lug to equalize pressure then remove and it's closed up again. Just thinking out loud here. |
|
| |
|
04-23-2016, 06:09 PM
| #43 |
| Rock Stacker Join Date: Mar 2016 Location: in a van down by the river
Posts: 60
|
Postman dropped off my Flat Irons today, so got to work on installing my DD foams. I have to say as a novice and first time doing this, the first one was like trying to stuff 10lbs of you know what in a 5lb bag. The next 3 were easy after I figured out the first one. After mocking up the first one and fondling it, I decided to vent the tires. (2) 2mm holes @ 180º I currently have 5.5 comp cut soft on all fours, but will pick up a set of medium for the rear when I put the spare back on.  |
|
| |
|
04-23-2016, 06:46 PM
| #44 |
| I wanna be Dave Join Date: May 2015 Location: Moving
Posts: 2,580
|
Looks good FJ. Flat Irons always look like such huge tires in pictures but in person they are much more size appropriate to the truck, especially the Bomber. Every picture I take I'm like, geeze, are they really that fat?, but in front of you they look normal. Weird. I'm probably alone in this thought.
|
|
| |
|
04-23-2016, 08:40 PM
| #45 | |
| Rock Stacker Join Date: Mar 2016 Location: in a van down by the river
Posts: 60
|
Building mine more as a crawler and agree the Flat Irons look better. Happy with my purchase. Quote:
| |
|
| |
|
04-25-2016, 04:36 PM
| #46 |
| Quarry Creeper Join Date: Feb 2016 Location: Salt Lake City
Posts: 395
|
Here's a quick slow-mo vid showing Flat Iron XL's and Double Duece 5.5" soft foams in a worse case scenario-ish setting... meaning that this obstacle is ascending and sloped down on the driver's side... putting the greatest forces on the rear driver tire. All in all, I love my new wheel/tire set-up. I don't feel I have to change anything right this second. I loved how the tires gripped and conformed. however, assuming things are going to break in/down and get softer, I may go to medium foams or up to 6.0" in the rear. I also may try the pineapple mod to see how that affects sidewall ripples. There is dead space between the sidewalls and foams. Are CI tuning rings for this? |
|
| |
|
04-25-2016, 05:25 PM
| #47 |
| I wanna be Dave Join Date: May 2015 Location: Moving
Posts: 2,580
|
That's exactly what the tuning discs are for.
Last edited by SCREAMER; 04-25-2016 at 05:39 PM. Reason: Corrected terminology |
|
| |
|
04-25-2016, 05:36 PM
| #48 |
| Quarry Creeper Join Date: May 2011 Location: Battle Ground WA
Posts: 429
|
Tuning discs are for the sidewall IIRC, tuning rings are for the OD of the foam.
|
|
| |
|
04-26-2016, 10:20 AM
| #49 |
| Quarry Creeper Join Date: Feb 2016 Location: Salt Lake City
Posts: 395
|
I just realized that I may have made yet another beginner mistake. Are my lower links upside down? ^^^see vid. I was thinking the bends needed to be such that they wrapped around the driveline; but, it appears that I instead have a bend that may get hung up. There were no instructions included so I basically guessed on the orientation of all 3 links as I installed them. |
|
| |
|
04-26-2016, 10:33 AM
| #50 |
| I wanna be Dave Join Date: May 2015 Location: Moving
Posts: 2,580
|
Yeah you can twist them around while still installed. Just rotate them 180 degrees and you'll be in high clearance mode. That's how I run mine.
|
|
| |
|
04-26-2016, 11:50 AM
| #51 |
| Quarry Creeper Join Date: Feb 2016 Location: Salt Lake City
Posts: 395
|
Thanks Screamer. Newest Update: I just ordered a beef tube for the front end. Instructions say that the ar60 is the simplest version to install. It sounds like plug and play other than one set of screws that may need to be lightly filed or sanded. Is there anything else that I need to know or order to make this work? I am making the assumption that all stock hardware can be used without buying other lengths and that no modifications need to be made to the front axle for this to fit. I am using the stock ar60 axle with Vanquish VVD V1-HD and Vanquish stage one kit (knuckles and C-hubs). Eventually, I will add one to the back end; but, I don't see the immediate need like I do in the front. The amount of money into this so far is comical considering I had no intention of being this involved. I have been happy with the lines I have been crawling other than one particular obstacle. The first week guys were calling it the puke obstacle because it kept spitting everyone out. Of 4 or 5 cars no one could complete it in well over an hour of attempting. Twice as many vehicles were present and trying during my next visit and 4 vehicles were able to figure it out. Some crawled it and some were able to bounce through it. I was able to put my rig into a better position; but, still could not complete the task. |
|
| |
|
04-26-2016, 12:21 PM
| #52 |
| Pebble Pounder  Join Date: Jul 2009 Location: Douglas
Posts: 107
|
Sent from my iPhone using Tapatalk
Last edited by lv-eg; 04-30-2016 at 01:45 AM. |
|
| |
|
04-29-2016, 08:12 PM
| #53 |
| Rock Stacker Join Date: Mar 2016 Location: in a van down by the river
Posts: 60
|
Was going to ask this in the vendors section, but do not have access to post there. Looking to pick up a set of CI DD comp cut 5.5 med for the rear, but website does not list anything available for 2.2 - 5.5 for the past few days.  |
|
| |
|
05-01-2016, 04:03 PM
| #54 |
| Quarry Creeper Join Date: Feb 2016 Location: Salt Lake City
Posts: 395
|
I installed my Beef Tube in the front axle last night. Fit tight and I was excited. ...however, when I was tightening the screws through the C-hubs, one was stripped or something and wouldn't tighten down. I emailed Beef Tube and they said to contact RPP where I made the purchase. We'll see what they say. Has anyone else seen that? Last edited by powder4breakfast; 07-06-2016 at 03:34 PM. Reason: spelling |
|
| |
|
05-01-2016, 08:29 PM
| #55 |
| Quarry Creeper Join Date: Feb 2016 Location: Salt Lake City
Posts: 395
| This may be really stupid; but, my motor should not be moving like this... right? I heard thumping during the last two runs and finally started digging around to see what was hitting and moving. I took it down a bit; but, I don't see how I would take out the movement. Do I tighten something somewhere? Also, do I take this opportunity to just add a metal Axial motor mount or something? Thanks for any help. |
|
| |
|
05-01-2016, 09:42 PM
| #56 |
| I wanna be Dave Join Date: Apr 2015 Location: Roseville, Ca
Posts: 2,506
|
No, thats definitely not supposed to do that. There's 2 bolts that hold the motor to motor plate then a top piece with 2 bolts that clamps and holds motor plate from moving. VP motor mount and motor plate or HR are 2 options, but I think VP is cheaper.
|
|
| |
|
05-01-2016, 09:52 PM
| #57 |
| Quarry Creeper Join Date: Feb 2016 Location: Salt Lake City
Posts: 395
|
Thanks Yoda. I just found a video of swapping a motor out that showed the two bolts holding it to the motor plate. I'm going to pull it and tighten everything back down. Am I supposed to grease the gears here? they look dry so either they aren't supposed to be or they need some tlc. Lastly, do I need to worry about resetting the gear mesh here? If so, does anyone have a good link to follow? |
|
| |
|
05-01-2016, 10:12 PM
| #58 |
| I wanna be Dave Join Date: Apr 2015 Location: Roseville, Ca
Posts: 2,506
|
No grease on pinion/spur. Grease in axles and tranny only. Yes you will have to reset gear mesh. Just rotate the motor plate till you get the mesh you want then put top clamp on and tighten it. Gear mesh is really easy, get the pinion/spur tight against each other then back it off a hair till you get some back lash between them (a little back and forward play) but you dont want a lot, just a little. But you also need to spin the spur around 360° and check the mesh every few teeth to see what the mesh is like. It's not always 100% true so some spots might be tight or more loose. Make sure if you find a spot that is tight and no back lash at all, back the pinion off a hair so you get some back lash at that spot and make sure you have no more tight spots when you spin the pinion/spur around. If you get it back together and it sounds different, gear mesh might be to tight just fyi.
|
|
| |
|
05-02-2016, 02:58 PM
| #59 |
| Quarry Creeper Join Date: Feb 2016 Location: Salt Lake City
Posts: 395
|
While dealing with the lose motor, I noticed that things had bounced enough to tear the black connection almost clean off the post. there was literally 2 or 3 wires from the bundle still holding on for dear life. As I pulled on the wire sheath to inspect, it came all the way off. [IMG] 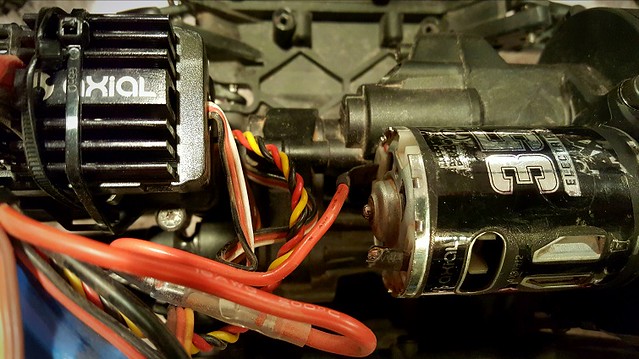 [/IMG] [/IMG]Stripped, soldered and heat shrinked the connection and tightened the motor mount plate with blue locktite. [IMG] 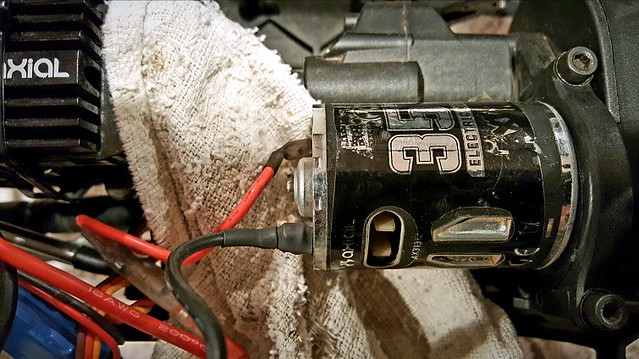 [/IMG] [/IMG]My Bomber is back in order now minus the stripped Beef Tube. |
|
| |
|
05-04-2016, 06:58 PM
| #60 |
| Rock Stacker Join Date: Mar 2016 Location: in a van down by the river
Posts: 60
|
My son and I are hooking up with a buddy of mine and heading west on an overland trip after my son graduates from High School next weekend. Decided I needed some kind of transport / storage solution for the Bomber for the trip as it will be tossed into my buddy's expedition trailer. Here is my Home Depot solution.   Still working on the layout of the tool box.  Unfortunately, tires have to be removed to fit in crate.  Bonus! storage bins double as car stand  |
|
| |
|
 Beginner's Bomber Build - What I've Learned and Help I Need - Similar Threads
 | ||||
| Thread | Thread Starter | Forum | Replies | Last Post |
| Basic Toyota Land Cruiser FJ40: Beginner's Build | eddievedder | 1.9 Scale Rigs | 41 | 02-12-2020 08:28 AM |
| Bomber Build | bombardorphil@gmail. | Axial RR10 Bomber | 1 | 03-08-2016 10:58 AM |
| Ben's Bomber Build | Mnster | Axial RR10 Bomber | 11 | 03-08-2016 12:46 AM |
| My Bomber build | bredmx | Axial RR10 Bomber | 8 | 12-28-2015 11:51 AM |
| Beginner's Tool kit. | heefageLA | Tools, and Procedures | 12 | 09-17-2011 08:24 PM |
| |


 Linear Mode


