| |
 05-23-2018, 09:50 AM
| #61 | |
| RCC Addict Join Date: Dec 2014 Location: So Cal
Posts: 1,005
| Quote:
My mind says 33 mph / 41 mph = a broken driveline after a wide open speed run through a good whoop section. That has to be stricktly a crawler setup and not U4, right??? I'm back to keeping the Summit diffs, I figured out a way to mount the stupid akward things and have them survive drivline torque twist. (They have the most useless mounting points and I can't use the goofy stock bulkheads) Lock 'em for the crawl and unlock for speed. If I were to start over, I would have built a chassis that the trimmed as required Bomber cage would mount to and be done building/rebuilding/rebuilding/rebuilding and actually be driving it. Wisdom applied in DMG's B2B program that I neglected to apply to mine. There is always room for a V2, right??? | |

|  |
| Sponsored Links | |
| | |
|
05-23-2018, 01:01 PM
| #62 | |
| Quarry Creeper Join Date: Mar 2018 Location: Park Hills
Posts: 251
| Quote:
Under-driving the rear helps uphill/crawling because it keeps the vehicle from wanting to wheelie so much and flip over backwards. They make the under-drive set for this reason. Last edited by angrchair; 05-23-2018 at 01:24 PM. | |
|
| |
|
06-01-2018, 10:52 PM
| #63 |
| RCC Addict Join Date: Dec 2014 Location: So Cal
Posts: 1,005
|  20180601_203333 by MAC FAB, on Flickr 20180601_203333 by MAC FAB, on Flickr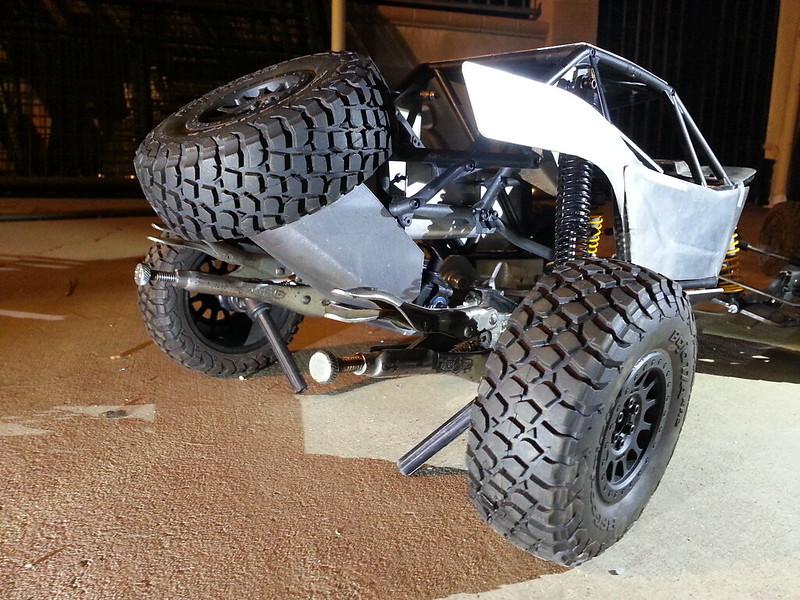 20180601_203357 by MAC FAB, on Flickr 20180601_203357 by MAC FAB, on Flickr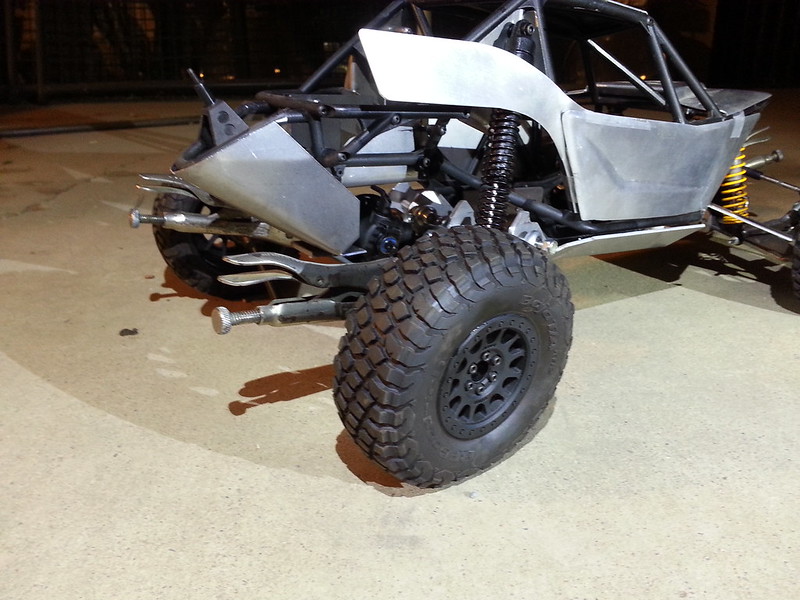 20180601_203219 by MAC FAB, on Flickr 20180601_203219 by MAC FAB, on Flickr 20180601_203521 by MAC FAB, on Flickr 20180601_203521 by MAC FAB, on Flickr5 steps forward, 2 steps back as usual. If all goes well tomorrow, the rear diff will get mounted. I was planning on mounting it to the 1/8" hr steel chassis skid plate that got built tonight, not so. Pinion has to point up about 20 degrees to miss all the suspension stuff going on out back, so now it has to hang from the 18 ga cr steel box I built that took the place of the "fuel cell". That box and it fasteners will tie into the shock mounts and to the chassis pan as well to get some more structural integrity. Notice the back skid plate. Another 18 ga cr piece. Helping to get the rig back to a 50/50 weight bias. So here is the question: Keep it because it will slide over stuff or remove it because it will hang up on stuff? What says the peanut gallery? |
|
| |
|
06-02-2018, 07:31 PM
| #64 |
| RCC Addict Join Date: Dec 2014 Location: So Cal
Posts: 1,005
|  20180130_182449 by MAC FAB, on Flickr 20180130_182449 by MAC FAB, on Flickr 20180602_173206 by MAC FAB, on Flickr 20180602_173206 by MAC FAB, on FlickrEver wonder why you always see vise grips on my build? Things are always changing!!! New front shock mount today. Top pic is the old, OEM location on top, bottom pic is the new. Stiffer front end now which was needed. Yeti shocks may work now. The steering bell cranks can move forward to where they should be, which is another good thing. No shocks to interfere with the tie rods, only the axles, which the gremlin I had with them is now figured out. It now will also be easier to tie the nose to the chassis pan with the new shock mount as well. 5 steps forward and none back today.  It wishes it ran!!!!!  20180602_172911 by MAC FAB, on Flickr 20180602_172911 by MAC FAB, on Flickr
|
|
| |
|
06-02-2018, 08:11 PM
| #65 |
| Rock Crawler Join Date: Jul 2017 Location: BC, Canada
Posts: 742
|  I don't own any vice grips lol I don't own any vice grips lolSent from my Nexus 5 using Tapatalk |
|
| |
|
07-06-2018, 10:23 AM
| #66 | |
| RCC Addict Join Date: Dec 2014 Location: So Cal
Posts: 1,005
| Quote:
Notice that 1 vise grip is missing!!!!!!! Temporary shock mount instead. I have some shocks that are long enough to be bypasses, maybe....... Little update: New shocks up front off some AE monster truck, same length shock body as the Slash rears, but with an additional 1/4" of stroke. Rear diff is 80% mounted so I can see whats happening with the axles. Somehow that mess needs to get tied into the chassis as a structural element. What you see here (axles) is for mock up, not the parts that will actually be run, those are the driveline pieces going through the chassis to the trans/motor. Shooting for this to be a roller by next weekend, fingers crossed. 20180706_084918 by MAC FAB, on Flickr 20180706_084918 by MAC FAB, on Flickr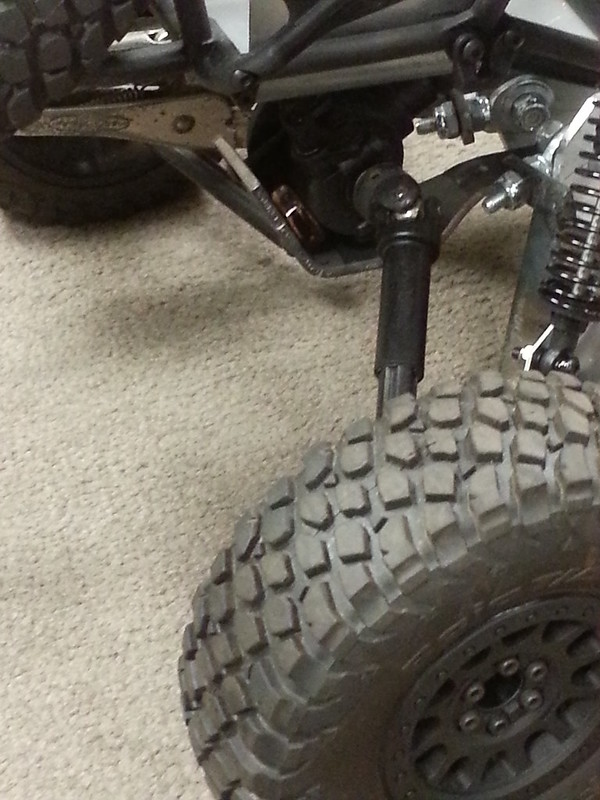 20180706_084757 by MAC FAB, on Flickr 20180706_084757 by MAC FAB, on Flickr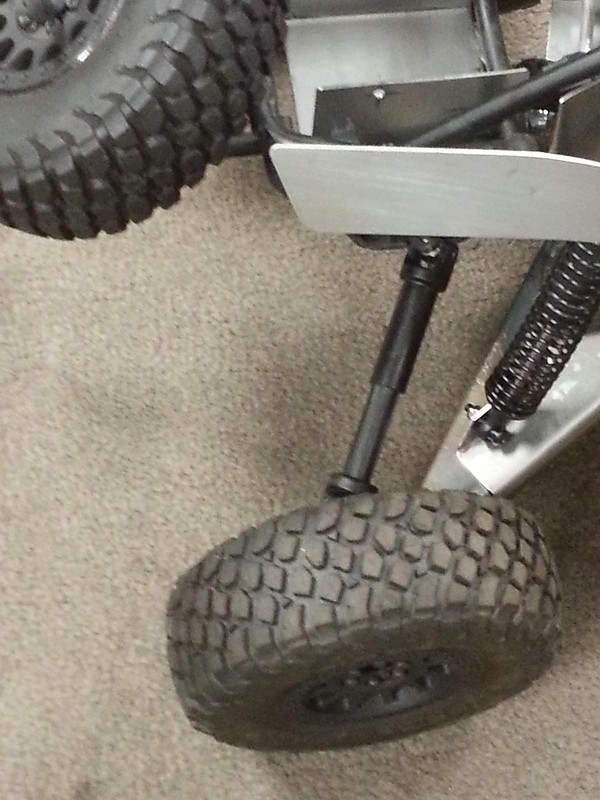 20180706_084741 by MAC FAB, on Flickr 20180706_084741 by MAC FAB, on Flickr
| |
|
| |
|
07-06-2018, 01:10 PM
| #67 | |
| Rock Crawler Join Date: Jul 2017 Location: BC, Canada
Posts: 742
| Quote:
Sent from my Nexus 5 using Tapatalk | |
|
| |
|
07-15-2018, 09:50 PM
| #68 | |
| RCC Addict Join Date: Dec 2014 Location: So Cal
Posts: 1,005
| Quote:
| |
|
| |
|
07-15-2018, 10:26 PM
| #69 | |
| Rock Crawler Join Date: Jul 2017 Location: BC, Canada
Posts: 742
| Quote:
Sent from my A0001 using Tapatalk | |
|
| |
|
07-24-2018, 09:22 PM
| #70 |
| RCC Addict Join Date: Dec 2014 Location: So Cal
Posts: 1,005
|
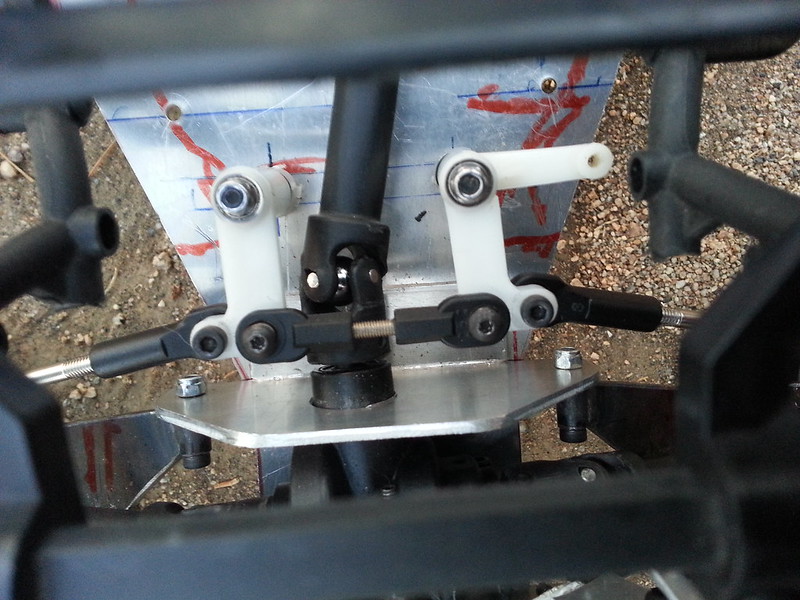
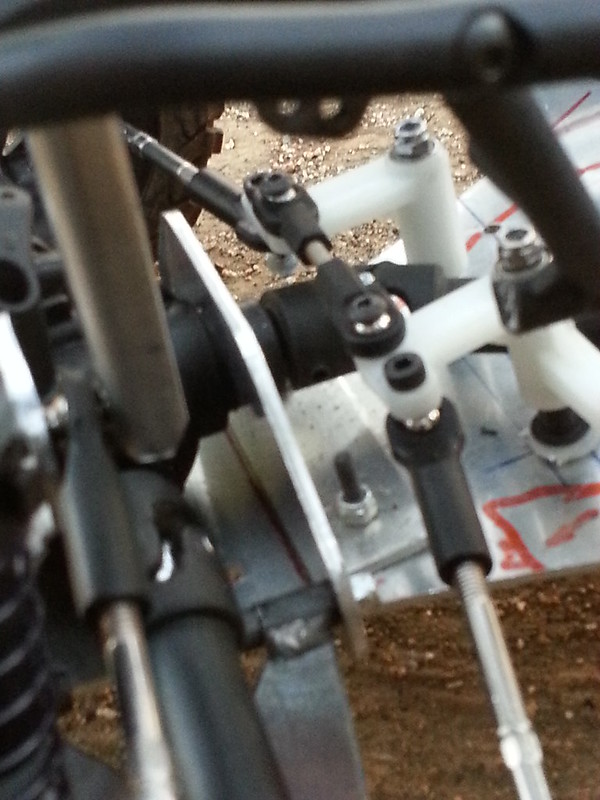
Modified Slash 2wd bell cranks, simply because I have some lying around. I think I now have it working, I just need to raise the bell cranks about 1/8" more, then I will lose the bump steer I now have at full droop and also clear the front drive shaft. Steering servo should tuck nicely into the drivers side of the cage, leaving plenty of room for everything else. Probably going to spool my extra 2wd Slash tranny so I can be test driving it before too long. I'll post a couple pics tomorrow so you can see. Then I need to figure out how I'm going to align the thing. Guess I should square the chassis up then align the cage afterwards. Ideas anyone?
|
|
| |
|
07-25-2018, 08:54 AM
| #71 |
| RCC Addict Join Date: Dec 2014 Location: So Cal
Posts: 1,005
| |
|
| |
|
07-25-2018, 09:13 AM
| #72 |
| Rock Crawler Join Date: Jul 2017 Location: BC, Canada
Posts: 742
|
That driveshaft doesn't look centered :p, and to increase clearance maybe instead of using plastic driveshafts you could find some smaller sized steel dog bones? technically those Bellcranks are upside down, though they probably wouldn't work properly right side up. You should also make a top plate to stop the screws from bending Sent from my A0001 using Tapatalk |
|
| |
|
07-25-2018, 10:32 AM
| #73 | |
| RCC Addict Join Date: Dec 2014 Location: So Cal
Posts: 1,005
| Quote:
Good eye and correct. Bell cranks will be double shear with a gusset leg to somewhere, I'm still working the geometry. Driveshaft is offset, have no choice there. All the metal axles available are huge on the flange, whopping 6mm output shaft. I could make dog bones I suppose, hadn't thought about that. With the bell crank upside down AND backwards, it eliminated the Ackermann altogether. Sadly, I can't run it that way and have it work. I have another idea for the spreader where the rod ends at the bell cranks are vertical instead of flat. Tie rods connect where they may, speaking of elevation, (upside down bell cranks with a lift kit) I really don't want bump steer. Just another day in the scratch build life......... | |
|
| |
|
08-08-2018, 08:13 PM
| #74 |
| RCC Addict Join Date: Dec 2014 Location: So Cal
Posts: 1,005
|
What is the secret to "un-glue" my RTR Bomber tires from their rims and not destroy the foams in the process? Those would look great with my RC4WD M/T aluminum beadlocks. This all comes about because of front suspension rethink 3.0. As it sits, I can bury the chassis by a good 1/2" with the SCORE tires, 2.2s may bottom with the chassis, its close. So to dismount them, what is involved? Thanks in advance for solutions!
|
|
| |
|
08-08-2018, 09:09 PM
| #75 | |
| Rock Crawler Join Date: Jul 2017 Location: BC, Canada
Posts: 742
| Quote:
Option 2, boil. This may destroy your foams. Smelly, potentially toxic fumes. Option 3, baking. This may destroy your foams. Smelly, potentially toxic fumes. Option 4, freezing and breaking the glue. This is the only one I've done, I wouldn't recommend it. It's a huge PITA and you almost certainly will damage the tires in the process. Sent from my A0001 using Tapatalk | |
|
| |
|
08-08-2018, 09:18 PM
| #76 |
| RCC Addict Join Date: Dec 2014 Location: So Cal
Posts: 1,005
|
I'll try acetone. Got one bead broken free by hand; now I don't leave thumbprints, they're worn off. Came close to getting a set of UDR takeoffs, but I have no desire to deal with the hubs. Could alway use them on my Summit project......
|
|
| |
|
08-10-2018, 11:03 AM
| #77 |
| RCC Addict Join Date: Dec 2014 Location: So Cal
Posts: 1,005
|
How about this????? Easily stretched onto the wheels with Axial foams. Yes MasteroFlego, I now see that they do suck!!! !/4" deep of acetone in a round crock the size of the tires and I was golden. Came off like butter, one side at a time. 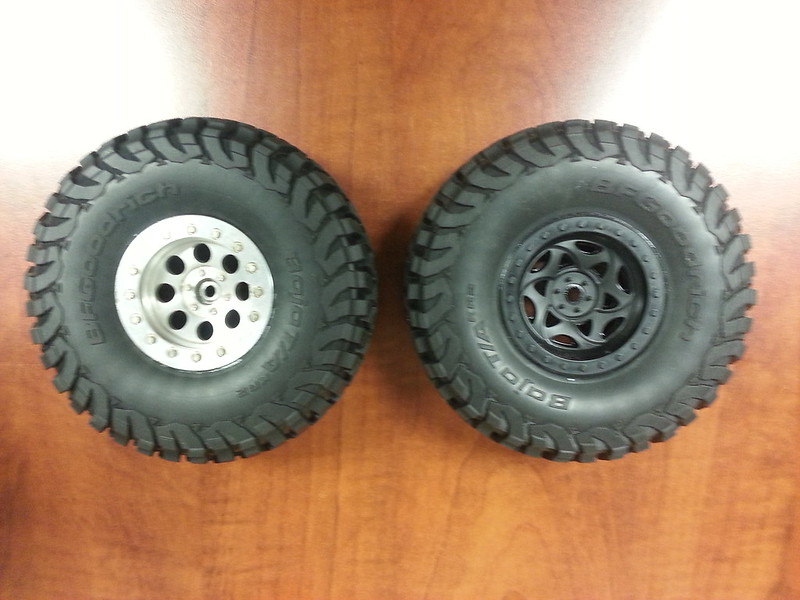 20180810_095422 by MAC FAB, on Flickr 20180810_095422 by MAC FAB, on Flickr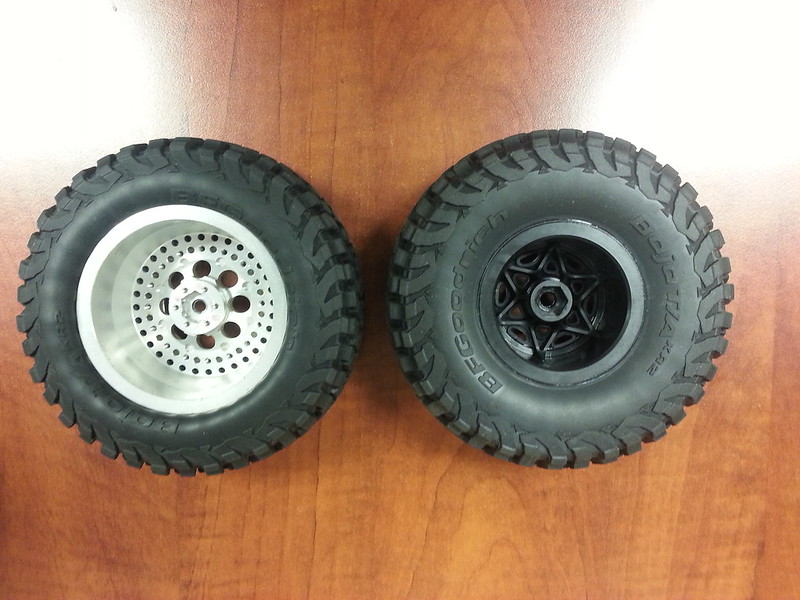 20180810_095449 by MAC FAB, on Flickr 20180810_095449 by MAC FAB, on Flickr
|
|
| |
|
08-10-2018, 01:51 PM
| #78 |
| Rock Crawler Join Date: Jul 2017 Location: BC, Canada
Posts: 742
|
Looks good, how did you get the rear bead in? Sent from my Nexus 5 using Tapatalk |
|
| |
|
08-10-2018, 03:41 PM
| #79 |
| RCC Addict Join Date: Dec 2014 Location: So Cal
Posts: 1,005
|
Simply pushed it onto the rim, fought the inner piece a bit, clamped the outer ring and added the 10k screws. These are the only beadlocks I've used, so I have nothing to compare them to. Funny thing was the outer bead on the RTRs came off pretty effortlessly, the inside was another story.
|
|
| |
|
08-11-2018, 04:03 PM
| #80 |
| RCC Addict Join Date: Dec 2014 Location: So Cal
Posts: 1,005
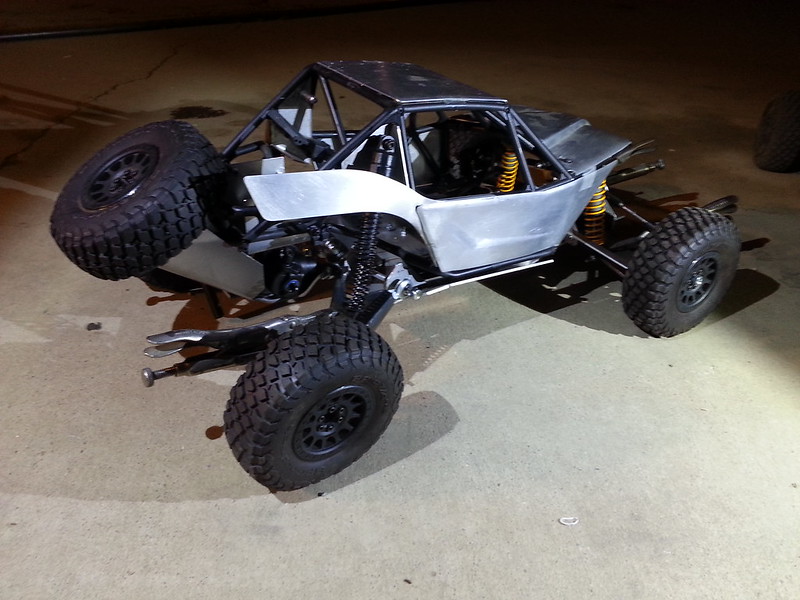
| 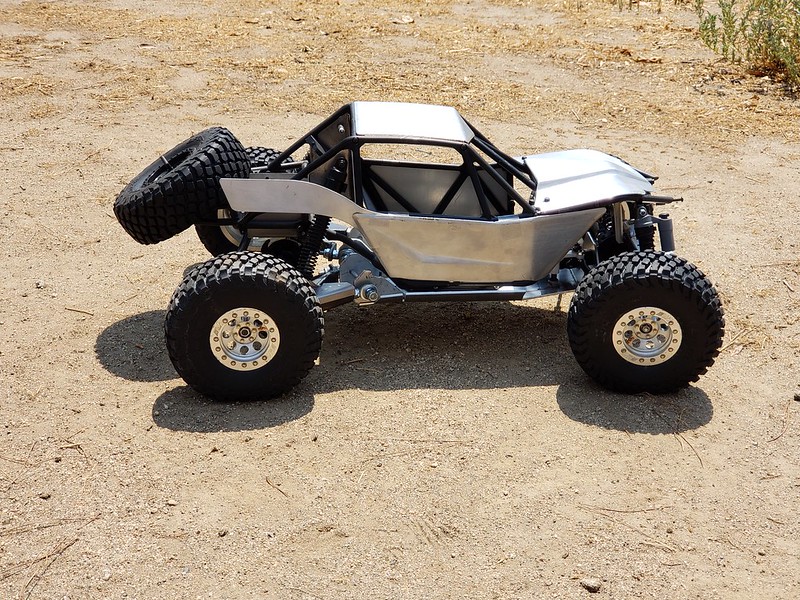 20180811_140026 by MAC FAB, on Flickr 20180811_140026 by MAC FAB, on Flickr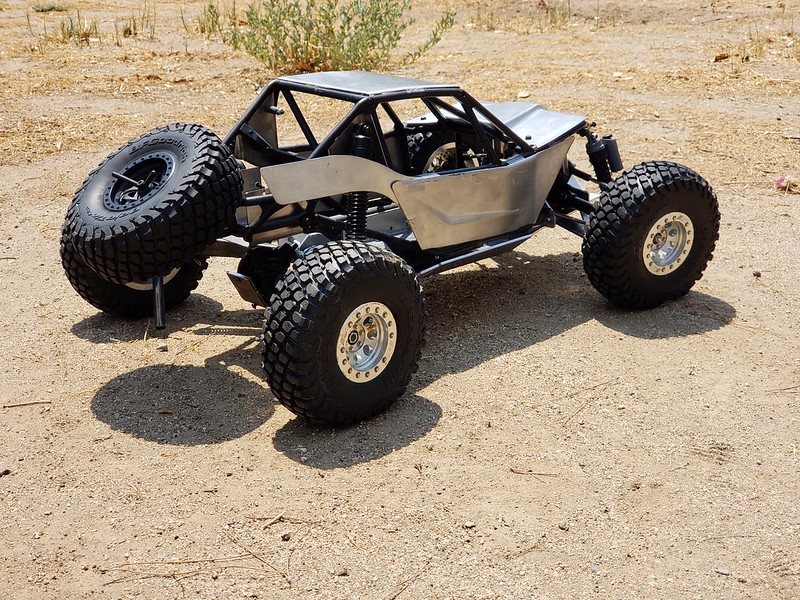 20180811_140043 by MAC FAB, on Flickr 20180811_140043 by MAC FAB, on Flickr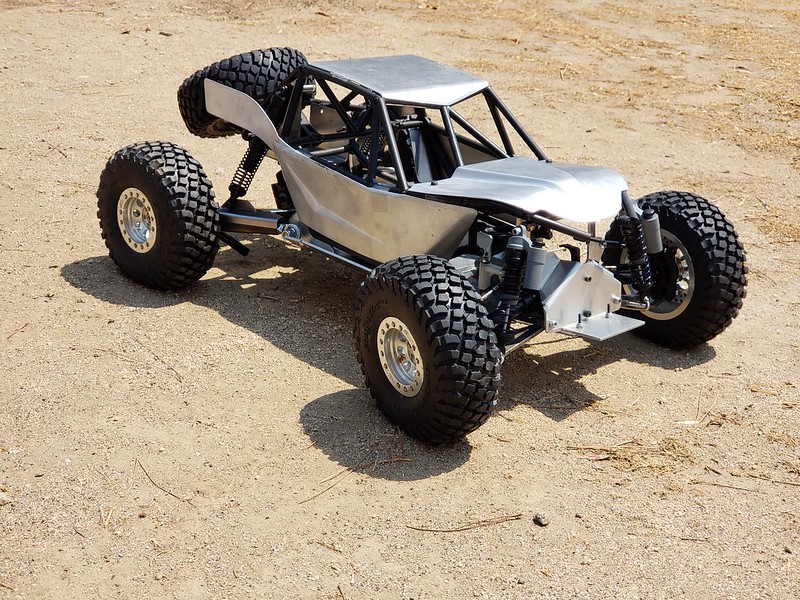 20180811_140105 by MAC FAB, on Flickr 20180811_140105 by MAC FAB, on FlickrIt is quite different looking with the gigantor tires on it, don't ya think? I'm really liking those M/T wheels as well, especially since nobody has them. As it sits, she weighs an even 8 lbs |
|
| |
 |
 MAC FAB Bomber build, TAKE 2 - Similar Threads
 | ||||
| Thread | Thread Starter | Forum | Replies | Last Post |
| CFM drops a Bomb: Bomber Fab build and upgrades | CarterFab | Axial RR10 Bomber | 132 | 01-24-2018 09:42 PM |
| Mac experts- Possible Mac firmware issues. Upgrading OS | gregrocks90046 | Chit Chat | 7 | 04-02-2013 08:13 PM |
| |


 Linear Mode


