| |
 01-06-2010, 01:25 AM
| #21 |
| Rock Stacker Join Date: Jan 2010 Location: Bend
Posts: 95
|
I'm lookin forward to where this thread goes. Looks like it's going to be a truly bitchin build. I'm doing the honcho/ax10 kit here pretty soon. You couldn't have chosen a better body, hope to see build pics when the plastic roll cage gets replaced with steel or alum?
|

|  |
| Sponsored Links | |
| | |
|
01-06-2010, 09:49 AM
| #22 |
| Quarry Creeper Join Date: Dec 2008 Location: Alliance
Posts: 236
|
im going to be watching this one  |
|
| |
|
01-06-2010, 01:58 PM
| #23 |
| Quarry Creeper Join Date: Sep 2008 Location: Petaluma
Posts: 282
|
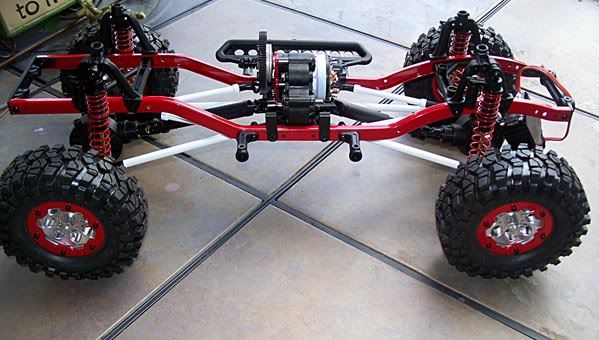
What RC builder doesn't want to totally different rig that stands out a bit from the others? So I went with something a little different. The theme for this rig is a Mountain Search and Rescue Fire Department rig. Sorry about keeping you in the dark for a little bit but the powdercoating took a little longer than expected and figured you'ld have guessed sooner or later. No worries tho - I got this build down already as a slow one. I picked up a few "new" parts the other day from RPP Hobbies. Aluminum C's and pairing control arm hub for the front axel. Pics to follow shortly. .Gheesh - those suckers are BEEFY. I only had my cell phone the last few days but did manage to slap a few pics of the powdercoating process. You can see the "powder" clinging to the freshly cleaned, glass bead blasted frame rails, springs, bead locks... Color is Safety Red so at night, it'll reflect light shined on it like a stop sign. 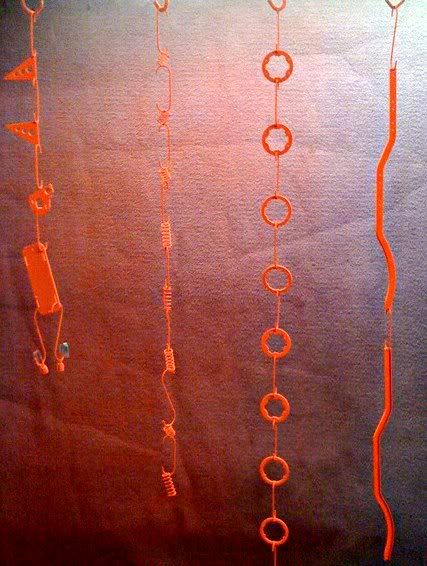 Here's other shots before baking it. I know - looks kinda "powdery" but once it gets baked in, it will have a high glass finish and be a little darker too. 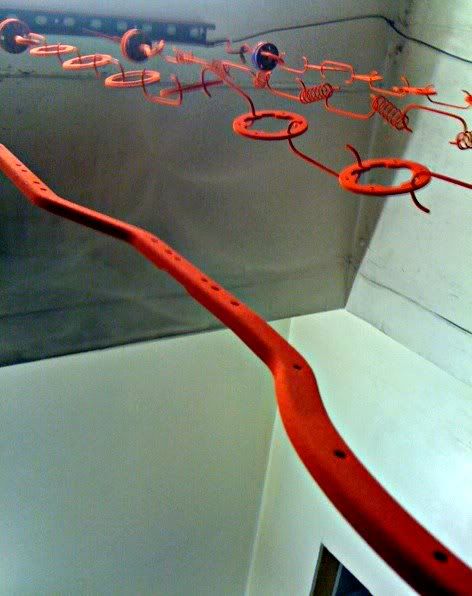 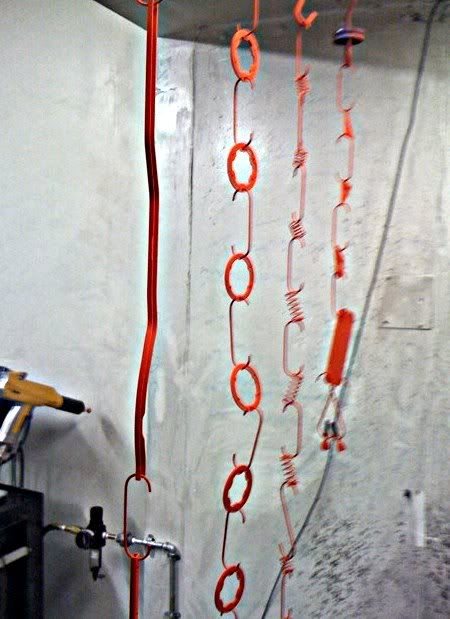 Baking the powder melts it to the metal for a firm sealed paint job. I baked the parts in this over at a toasty 400+ degrees for a little over 15 minutes. This is one hella big oven! 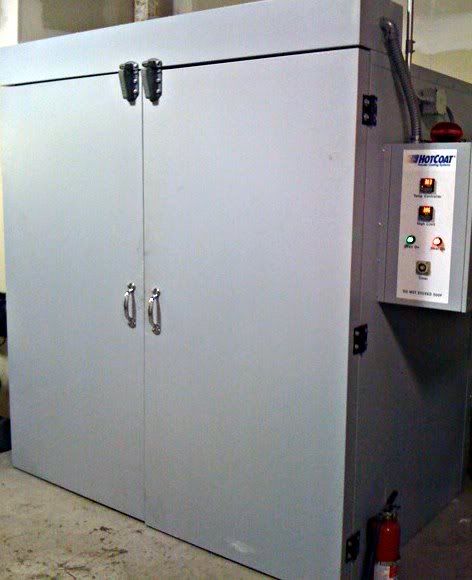 Here are the parts after the baking - Still hot. However, after a few minutes of cooling, it was immediately packaged for protection and safely transported to the build garage to ready for assembly. 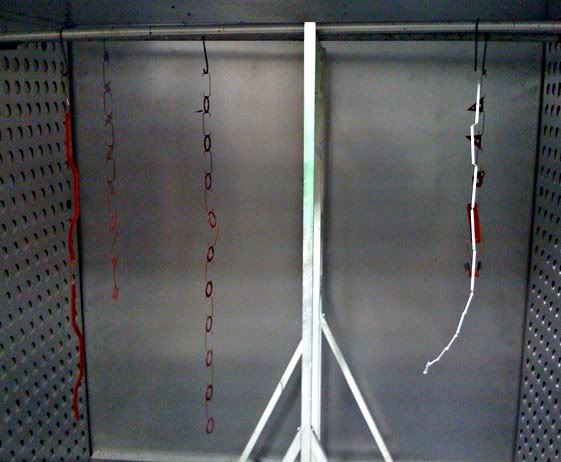 The white pieces are colored "brilliant" white with tiny red flakes. Barely noticable really unless your an inch or so away from the part. Just a scale detail I didn't want to miss out on. Those are the connecting rods for the multi-point suspension and drive train. 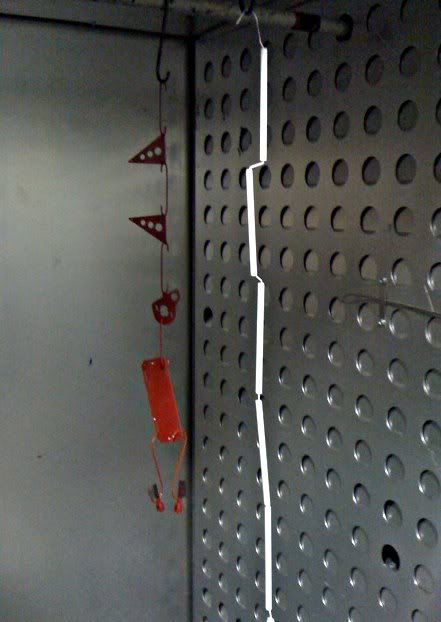 The transmission was a snap - about 5 minutes worth (excluding looking for a small allen wrench size) and ZING!, Its done. The engine mount was at the powdercoat shop so its not pictured. You'll see it later as you will also see the batt tray and a few other small details.  Heres the little sucker that took a while to find. A must "Harbour Freight Tool" that I couldn't live without. 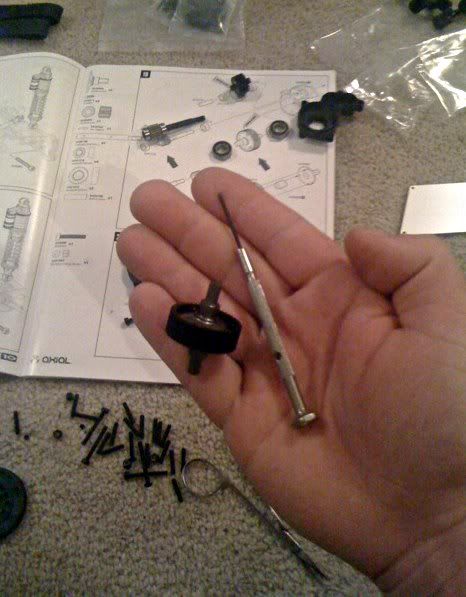 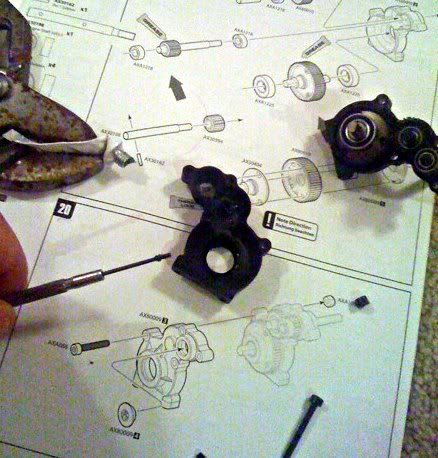 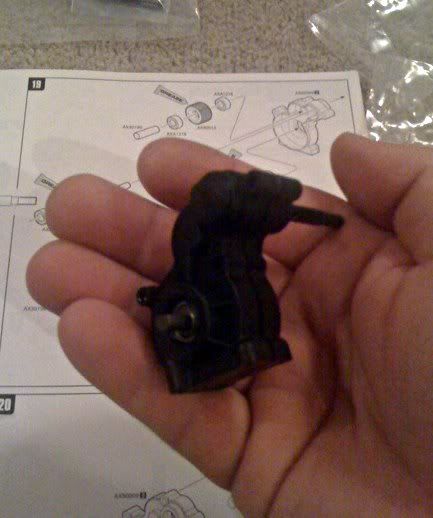 The stock rims are cool and I like them so for now - they stay. But - they are pretty darn light so I took some clues from other builds and tried the solder wrap in the rim's groove line.  It wasn't enough weight for my taste, I like a heavy wheel so got some lead weights from my local hobby shop and started to add some BLING BLING. The solder acted as another flat surface for the weights to stick to. 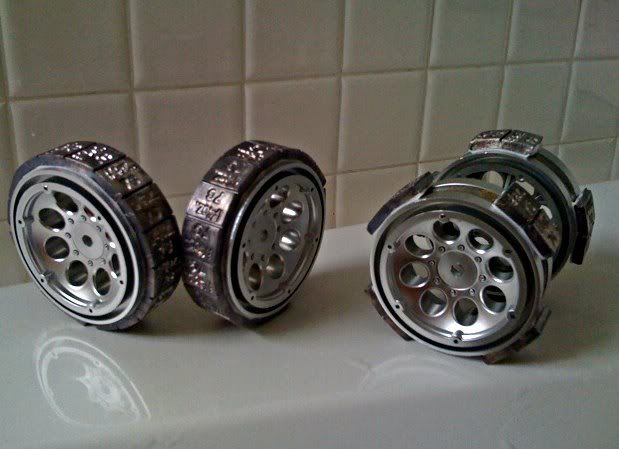 One pack will do 1 rim with a little left over. So I got two packs and used the remaining weight for the other tires. I'm thinking since I plan to forward mount the battery - I might use the heavier tires for the rear and the half weighted tires up front. Just pictured, the rear seems light weight. That's the plan at least - unless someone has tested that idea and it failed. In that case - lemme know 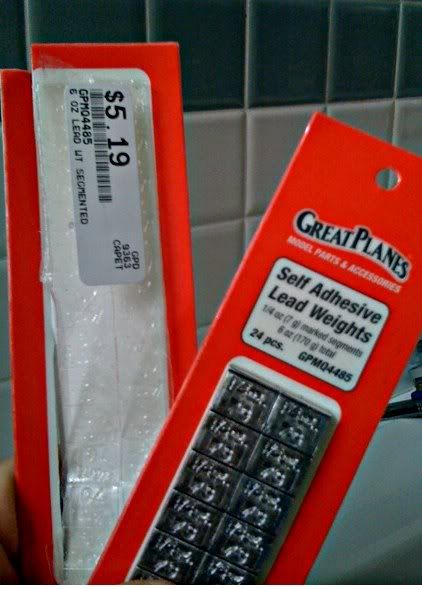 Last edited by FodigoDave; 01-06-2010 at 02:06 PM. |
|
| |
|
01-07-2010, 06:56 PM
| #24 |
| Quarry Creeper Join Date: Sep 2008 Location: Petaluma
Posts: 282
|
Few items from the parts list. Paint is luminessant red and white. 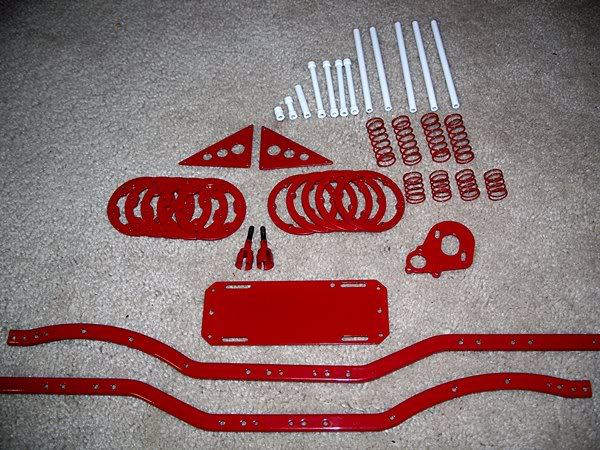 Here's the prelim assembly. Slider, front bumper, rear roll bar will be replaced as likely the shocks too but... needed to assemble for body work then strip it off and head to the fabrication shop. 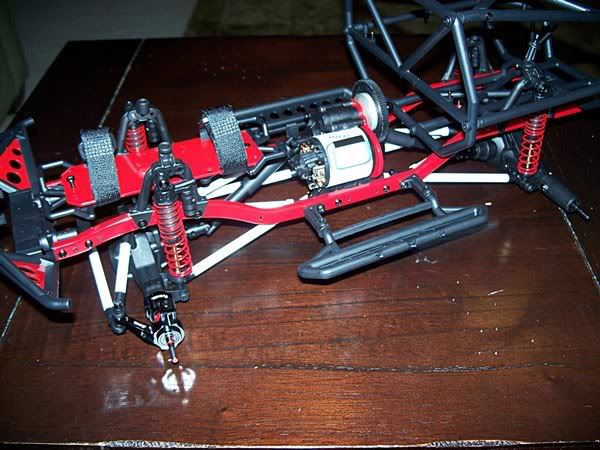 The brilliant white is really reflective to flash. The "safety red" color looks red but under flash has a metalic reflection (like a stop sign), here it looks like its changing color to orange.. Should be great for night driving at get togethers. 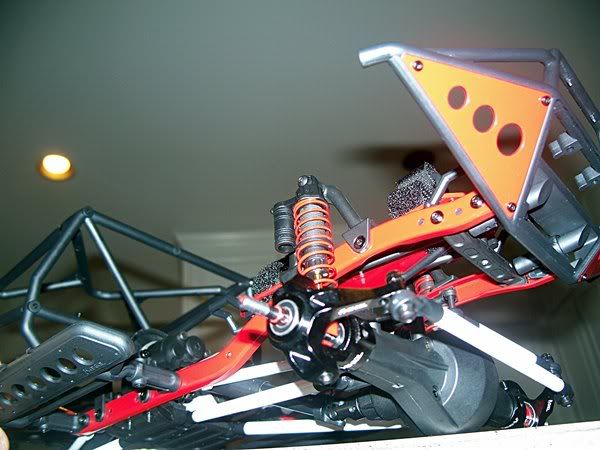 You can see the new controlling arms better here. They fit like a glove. Very sturdy - no play - I feel confident enough to drive it now with those turkeys on and it doesn't even have a steering wheel yet. Last edited by FodigoDave; 01-08-2010 at 04:50 AM. |
|
| |
|
01-08-2010, 07:30 AM
| #25 |
| I wanna be Dave Join Date: Oct 2006 Location: Centered
Posts: 2,082
|
Man, I'm really diggin' the white links...different |
|
| |
|
01-08-2010, 11:54 AM
| #26 |
| Rock Crawler Join Date: Aug 2009 Location: crawlerado springs
Posts: 859
|
the camera makes it look orange! |
|
| |
|
01-08-2010, 12:21 PM
| #27 |
| I wanna be Dave Join Date: Apr 2009 Location: Unnecessary Surgery Land
Posts: 3,406
|
Nice! This will surely stand out from the rest of the Honchos.
|
|
| |
|
01-08-2010, 12:53 PM
| #28 |
| Rock Stacker Join Date: Jan 2010 Location: podunk
Posts: 79
|
Looks sick can't wait to see it finished.
|
|
| |
|
01-08-2010, 02:29 PM
| #29 |
| Quarry Creeper Join Date: Jul 2008 Location: casa grande
Posts: 221
|
I like it is very different. What plans do you have for the body, or is that a surprise |
|
| |
|
01-10-2010, 02:01 AM
| #30 |
| Rock Stacker Join Date: Jan 2010 Location: Bend
Posts: 95
|
good choice on the colors, will match right up with any fire fighter/rescue tools ya go with. I also like the tiny detail where you put flakes in, only visible up close. Those are fun details to find.
|
|
| |
|
01-10-2010, 03:21 AM
| #31 | ||||||
| Quarry Creeper Join Date: Sep 2008 Location: Petaluma
Posts: 282
| Quote:
Quote:
Quote:
Quote:
Quote:
Quote:
its a very small scale detail that I just had to try. I also just picked up a set of proline tools and high lift jack. I've already pulled the handle off and replaced it with an aluminum handle. Then aged it with some Testers Bronze Metal paint (and a lot of thinner) to give it that hint of grease that looks like it was recently "attempted" to be cleaned off. O've got to keep my fire "work" truck looking tidy and duty ready, right?I'm currently painting up the rear diamondplate insert but that will wait for install until I can fabricate the metal roll bar assembly for the back. Last edited by FodigoDave; 01-10-2010 at 03:32 AM. | ||||||
|
| |
|
01-10-2010, 09:31 AM
| #32 |
| RCC Addict Join Date: Apr 2006 Location: Brighton
Posts: 1,015
|
Dave, those colors sure pop on the frame and links. It really sets things off and I'm sure it's even better in person. I'm looking forward to seeing your cage work...nice to see something different and not so "cookie cutter" of a build up. NICE WORK |
|
| |
|
01-13-2010, 01:58 PM
| #33 | ||
| Quarry Creeper Join Date: Sep 2008 Location: Petaluma
Posts: 282
| Quote:
Quote:
 ON a side note_ here's a little bit of the hi lift jack mod. 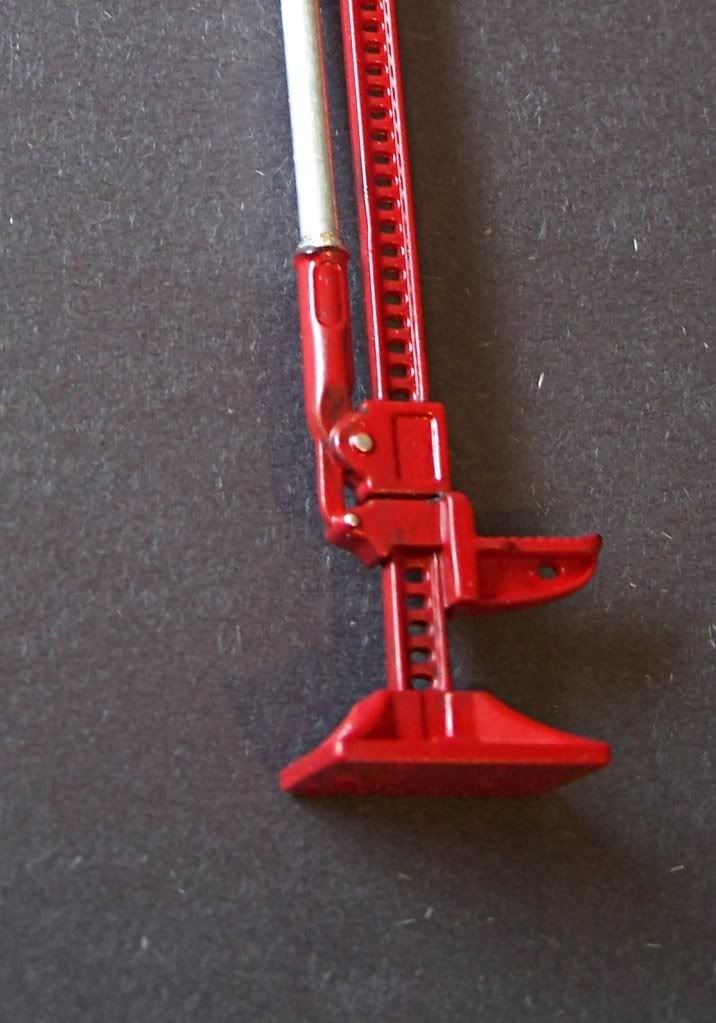 | ||
|
| |
|
01-13-2010, 04:06 PM
| #34 |
| Rock Crawler Join Date: Aug 2009 Location: crawlerado springs
Posts: 859
|
its lookin good! the pic on the tile makes it look good! thats what i meant by outside light! so is the body gonna be red and white two tone?
|
|
| |
|
01-13-2010, 04:34 PM
| #35 |
| Quarry Creeper Join Date: Oct 2009 Location: Hudson
Posts: 319
|
Looks nice? Are you gonna crawl it? RIZ |
|
| |
|
01-13-2010, 04:43 PM
| #36 |
| Pebble Pounder Join Date: Dec 2009 Location: Buffalo
Posts: 112
|
Killer build. Appreciate your taking the time to post progress. Looking forward to seeing more. |
|
| |
|
01-13-2010, 05:14 PM
| #37 |
| Rock Crawler Join Date: Mar 2007 Location: babylon, long island ny
Posts: 887
|
wow! cant wait to see how it trun out!
|
|
| |
|
01-13-2010, 06:14 PM
| #38 |
| I wanna be Dave Join Date: May 2007 Location: Taylors Falls just hanging with the MNRCRC crew.
Posts: 7,843
|
You got your individual look with your painted parts what's next?
|
|
| |
|
01-13-2010, 06:30 PM
| #39 |
| Rock Crawler Join Date: Mar 2009 Location: Frisco, Texas
Posts: 721
| Very nice build! the red is an awesome choice of color!! |
|
| |
|
01-13-2010, 11:05 PM
| #40 | |
| Newbie Join Date: Dec 2009 Location: Houston
Posts: 35
| Quote:
| |
|
| |
 |
| |


 Linear Mode


