| |
 01-14-2010, 02:55 PM
| #41 |
| Rock Stacker Join Date: Jan 2010 Location: Ohio
Posts: 79
|
looks amazing so far!
|

|  |
| Sponsored Links | |
| | |
|
01-14-2010, 06:51 PM
| #42 |
| Rock Crawler Join Date: Mar 2007 Location: babylon, long island ny
Posts: 887
|
I keep looking at the bead lock ring and it pushges em closer and closer to painting mine red on my honcho
|
|
| |
|
01-17-2010, 01:05 AM
| #43 | |
| Quarry Creeper Join Date: Sep 2008 Location: Petaluma
Posts: 282
| Quote:
HERES The update. New pics and a Question for all you Honcho guys. HELP! If anyone has an extra Honcho wire harness hook (bracker...holder), lemme know !!!. The instructions only showed two being used frame wise on the transmission side and the truck came with three, but I'm using the third (and hopefully one other if anyone has an extra laying around who would be kind enough to offer) for supports in building the interior. You can see the wire harness brackets here between the rock slider posts... being used to support this piece of polished aluminum. If you have an extra one, please let me know! ;) 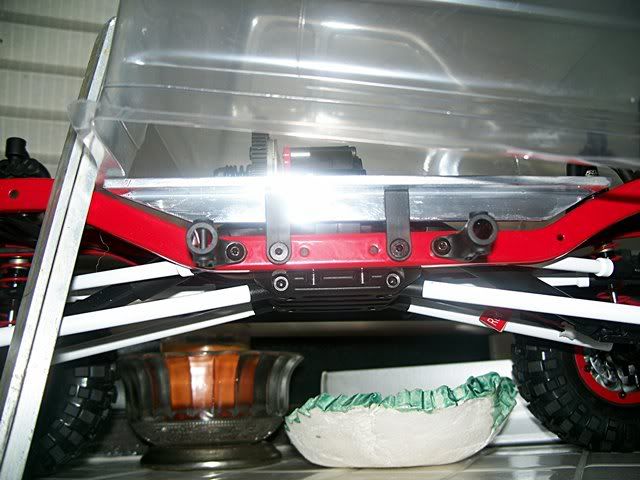 BRAKES!!! Just got in from my waiting list yesterday, a pair of disc rotors. These things are really cool. Made from aluminum, they are very detailed. They also replaced my metal hex nut hubs so those were moved to the rear as I only had one pair. 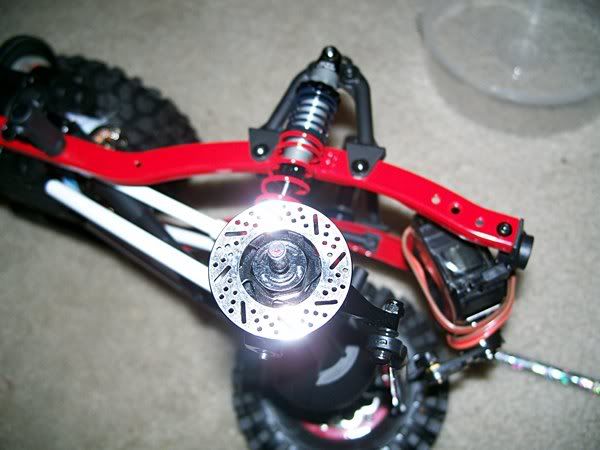 BUT WHY ANODIZE THE BACK RC4WD ??? At $10 bucks a pop, you want to see each one! 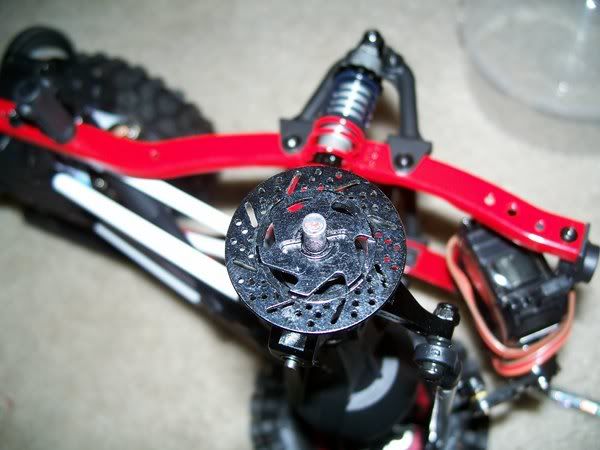 So back to the garage to fire up the polishing wheel. The anodizing put up a good fight but in the end, the results were amazing. 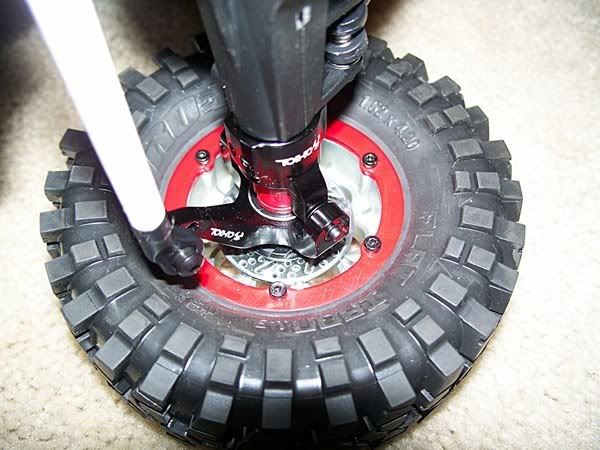 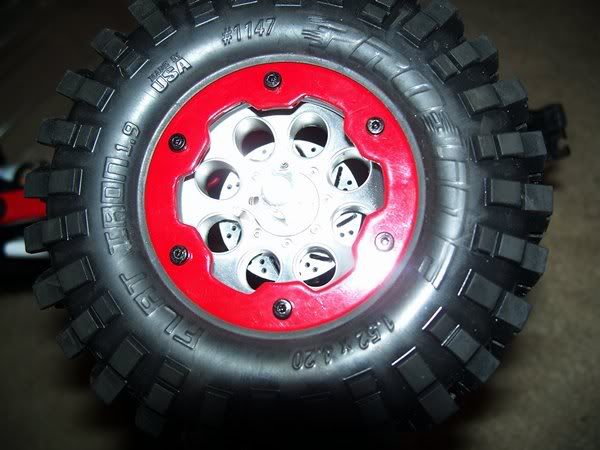 Yaye, a little bling bling to pimp out my ride. 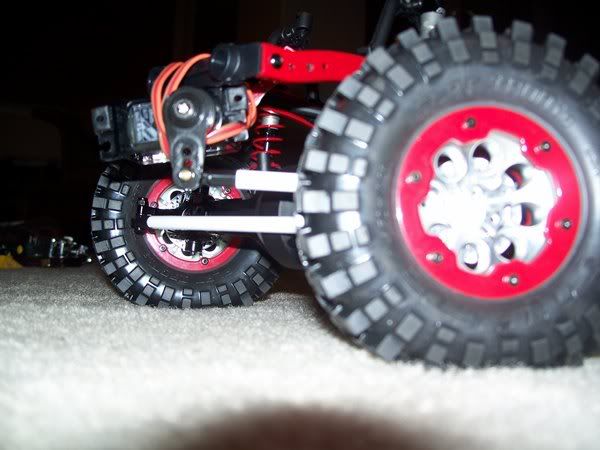 The rear tail lights were installed today and the wires were hidded in the frame rail. Going to try and shrink wrap some of the exposed portions later.  Last edited by FodigoDave; 01-18-2010 at 09:58 AM. | |
|
| |
|
01-18-2010, 09:44 AM
| #44 |
| Quarry Creeper Join Date: Sep 2008 Location: Petaluma
Posts: 282
|
For you guys wondering what the heck is in my mind After a few preliminary drawings, it was off to the paint program to try and color scheme it. Here's an idea of what I'm looking at building - ultimately. It should be pretty close to this when it's done but I've decided to start on the interior first, set the electronics next, then do the painting last...  Anyone have an extra wire holder (see below)??? I didn't get any takers from my last posting. Anyone have an extra wire holder (see below)??? I didn't get any takers from my last posting. Last edited by FodigoDave; 01-18-2010 at 09:57 AM. |
|
| |
|
01-29-2010, 10:15 AM
| #45 |
| Quarry Creeper Join Date: Sep 2008 Location: Petaluma
Posts: 282
|
Hi all, have been spuraticly working on the rear cage deck but wanted to give an update on the cab's interior. Took me about 2 weeks just to figure out "how" I was going to build it. On a side note: You can also see the "Memorex" case fender wells. Those covers will crack easily when scissor cutting so I started off but cutting a rough "area" out and trimmed with exacto knife to size. Regarding HELP!!! RCCrawler member "DrunkDriver" helped me out greatly by giving me one of his spare wire holders!! AWESOME GUY! He will be greatly thanked throughout this build. Project interior: here we go..  all those blue pieces of paper on the floor were the template pieces I cut from paper first before drawing it out on styrene. There's quite a few intricate cuts around the motor and gear housing. I wanted it to be as close of a tolerance as possible to help with water splash resistance into the cab. I plan to house all the electrical in there. This piece of white styrene gets mounted to the cab rails and frame joist later. 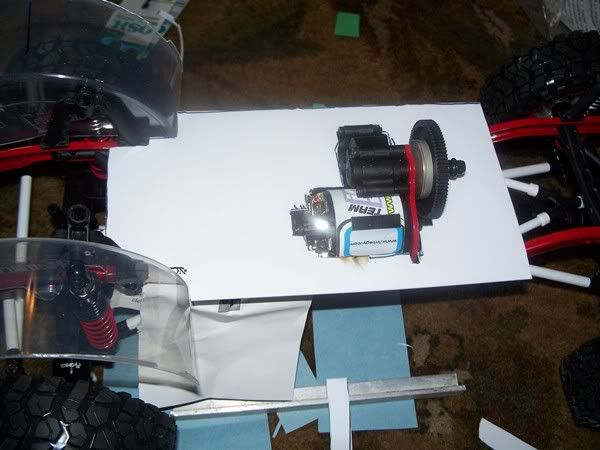  The cab's floor takes up a lot of truck realestate. 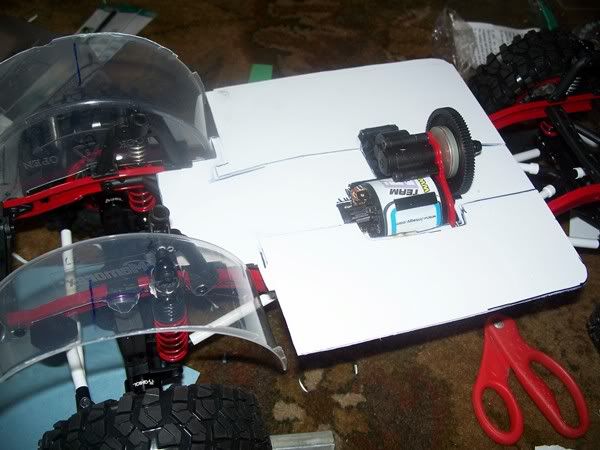 I mounted up the start of the dash in the lexan body, then test fitted the cab and measuered out a few reference points. 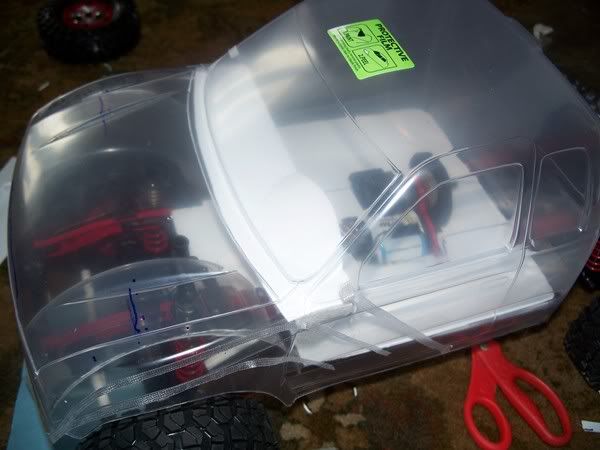 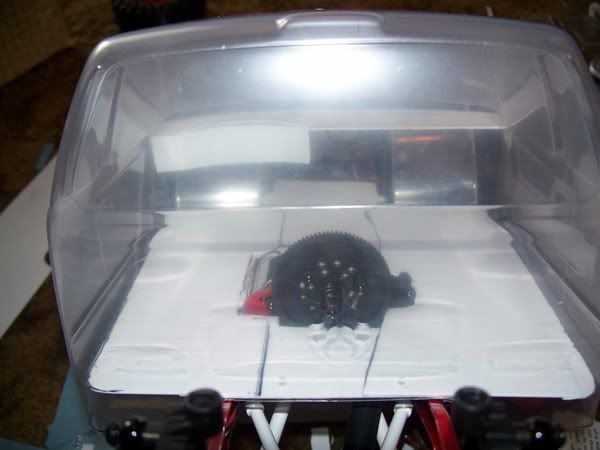 Then cut out a few interior panels. The idea is to affix the interior to the frame, slide on the cab over the interior, then bolt on the roll cage. The battery will be removed by a "special" means - later to be revealed. 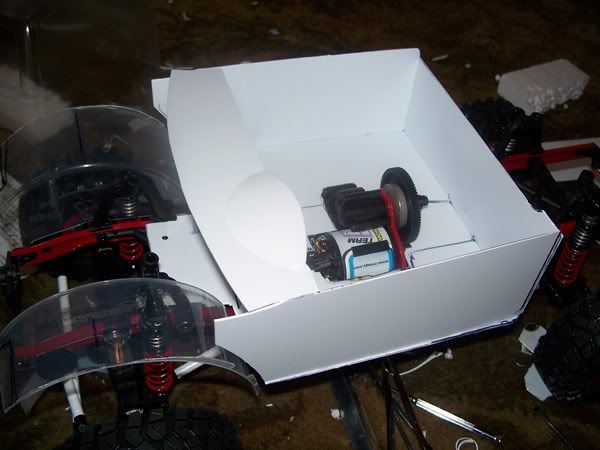 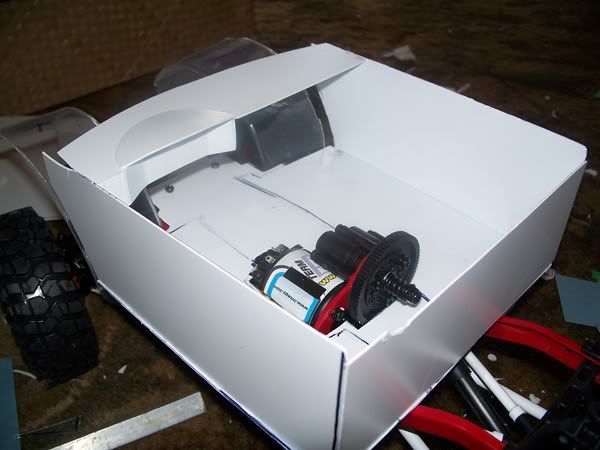 Took a while just to get to here - but now the rest will flow a bit easier. I'm stopping here to locate a driver, then I'll customize the seats to fit the driver and build the center console. Last edited by FodigoDave; 02-10-2010 at 11:04 AM. |
|
| |
|
02-01-2010, 11:43 AM
| #46 |
| Quarry Creeper Join Date: Sep 2008 Location: Petaluma
Posts: 282
|
I know! ... I know! I was away from the garage for two days and when I returned, I noticed someone had broken into the truck!!! The windows were all smashed 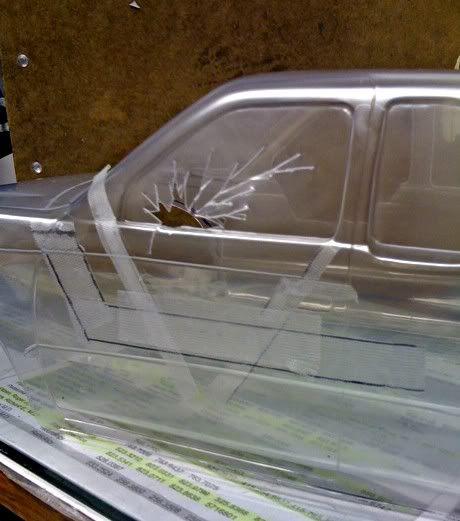 They even tore out part of the door to get in on this side! Sheesh!!!! 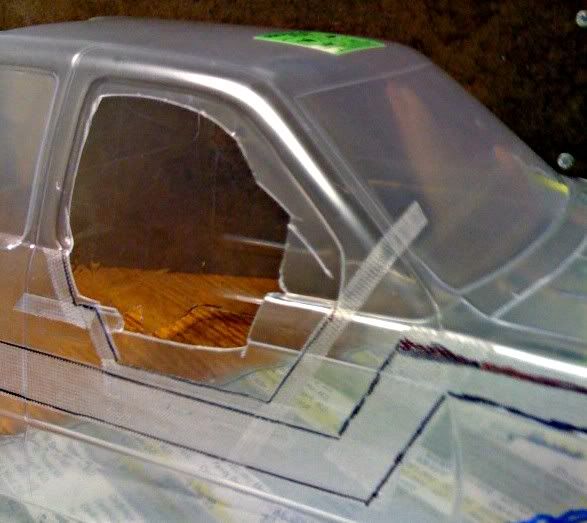 So after looking at my broken piece of build that was planned to be a killer truck, I came to the conclusion, failure was not an option! So I busted out the remaining pieces of window, grabbed the torch, cut the doors down even more and started working on the detail. The good news is there was no sterio in it yet!  Last edited by FodigoDave; 02-01-2010 at 11:48 AM. |
|
| |
|
02-01-2010, 12:04 PM
| #47 |
| Rock Crawler Join Date: May 2008 Location: Sumter, SC
Posts: 619
|
I hope your insurance covers glass breakage! LOL Looks really nice so far!! Subscribed! |
|
| |
|
02-02-2010, 09:15 PM
| #48 |
| Rock Stacker Join Date: Oct 2009 Location: Leduc, Alberta, Canada
Posts: 54
|
the thing i love most about your builds is how you take them on as a life of thier own for our enjoyment. Taking the extra time and effort with a pic to make the "break in" is just too classic. well done sir, well done. |
|
| |
|
02-03-2010, 01:16 PM
| #49 |
| Newbie Join Date: Jan 2009 Location: SLC
Posts: 29
|
It looks like they took your whole interior! Have you dusted for "prints". |
|
| |
|
02-03-2010, 03:47 PM
| #50 |
| Quarry Creeper Join Date: Jan 2009 Location: East Mids, UK
Posts: 362
|
Fantastic build so far. I've been away from crawling for months and wasn't even aware of the Honcho kit! I'm really liking the red a white theme. As for your second light kit, I think I know what's coming, but I can't wait to see what it is! |
|
| |
|
02-03-2010, 05:18 PM
| #51 | |
| RCC Addict Join Date: Dec 2007 Location: Moncton, NB, Canada
Posts: 1,962
| Quote:
| |
|
| |
|
02-11-2010, 03:52 AM
| #52 |
| Quarry Creeper Join Date: Sep 2008 Location: Petaluma
Posts: 282
|
Had a lot go on since my last update. 1st and foremost - THANK YOU rccrawler member DRUNKDRIVER who kindly sent me one of his spare wire holders. With that - I was able to finish the other rail to support the cabs interior. Now, I am starting to tweak the interior deck to tightly fit around the gear box and later - properly seat the "cab" to the "interior." Then I can start fabricating the exocage. THANKS AGAIN!!! New driver was selected for the truck. Her name, Lara! More to come regarding that later. New radio arrived - thought it was appropriate seeing this is "supposed" to be my crown jewel (well see...). This baby is nice. Futaba 3PM 2.4G "MX". Has capability of duel rate steering should I ever go that direction. I can also just grab a new receiver and run it with my boat which will be nice. No need to start grabbing a new radio for each build. Very confortable in the hand. Very well balanced. Paid 173 shipped from ebay. Was only wanting to go no more than 150 for a new radio seeing I saw a few crawler radios for 75-99, but the extra bucks was worth it in my opinion just for the comfort and ease of using it. I just need to figure out how I might be able to convert that channel 3 over to a winch servo. My plan is to hack an old servo for it's computer board and merge it with the 3racing winch. I picked up a winch for 12 bucks - but it didn't come with any extension wires or controller. 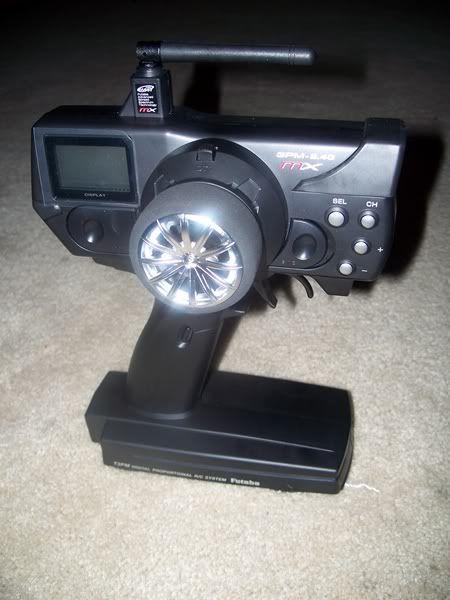 Next was to work on the hood. It wasn't easy cutting the lexan. I first tried an exacto knife. Darn thing has a mind of it's own so it was hard to slice straight lines. Next I tried a roto tool with a rotery saw blade. Started working ..so so, but felt it was too unstable and didn't want it catching an edge and make gouge marks run along the fenders or window. Lastly, I just started digging! and stayed away from the edges.  Once a caverness HOLE was made (where the hood used to be) I went to town with a magnifying glass and some small curved iris scissors. 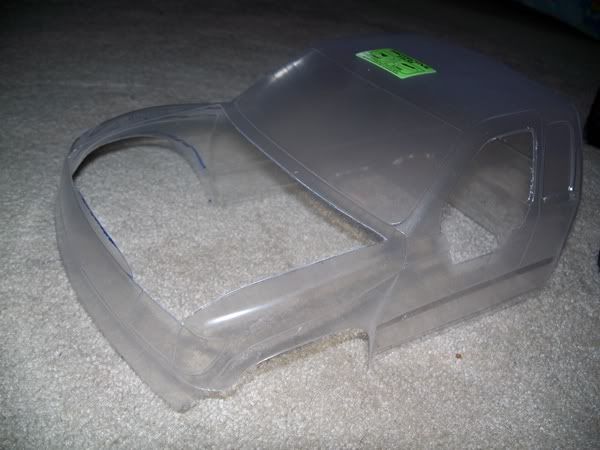 It worked great - next was to... uh whats that you said? Why the Heck did I cut out the hood? OK. Well the idea is to permently affix the cab with the roll cage and use the hood to access the battery. And I also wanted to dress up that hood. Didn't really like the stock grooves in it and it's such a focal point of the truck so... Off with the hood! Next was to say - "shoot" (not really in those kind words) and finish with, "well now your committed to make a new hood. I hope to heck you know what your doing... dummy!" So I set out to make a new hood. The primary idea was to do such an awesome exacto cutting job I wouldn't have to do anything but add to what was there but since I absolutely destroyed the hood in the removal process, I decided to fabricate a new hood using styrene. Just about 5 minutes in the oven at 300 degress and it should lay out like pizza dough. Right? Not quite. My first trial run was a disaster. Seems when you heat plastic - it want's to bend over on itself. 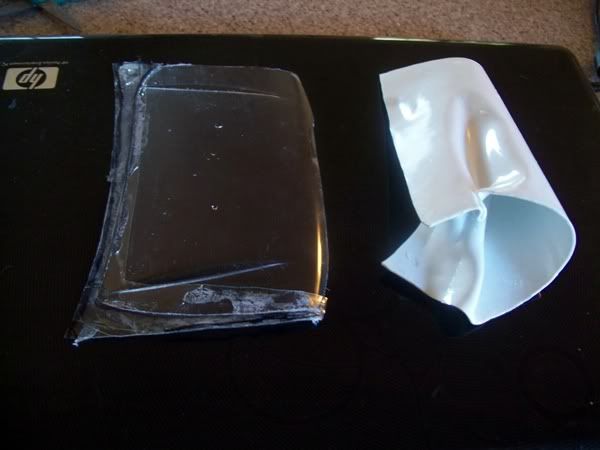 Next was to try it again using a thinner piece. That started to bend over too but I found styrene seems to have a grain to it. One side wants to fold over onto itself while the other, although under tension from it melting at different stages, will lay flat. After several attempts and 7 styrene pieces later (oh yea and some really burnt fingers after soaking them in ice water before handling 350 degrees) I was able to come up with a "semi-close" looking hood. It will need some work so I might just try to fibergalss one later if this doesn't work or bondo mold a hood and work off that.  Here you can see the extra layers of lexan I had to build up to make a "complete" hood. using the original as somewhat of a template. 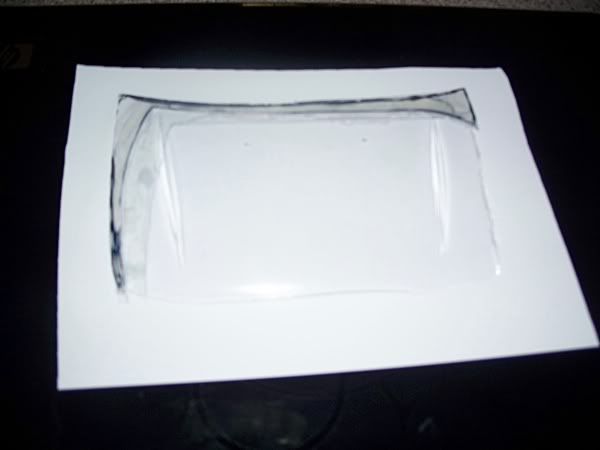 Worked on the light buckets. They turned out awesome I think. 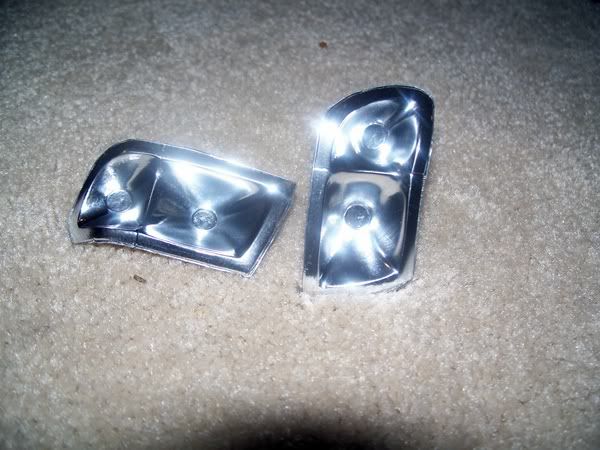 And here's a mock up with their location. I like the way it kinda sticks up over the front valance - it'll look cool if I ever run with the hood off and someday mockup an engine with a radiator in there. 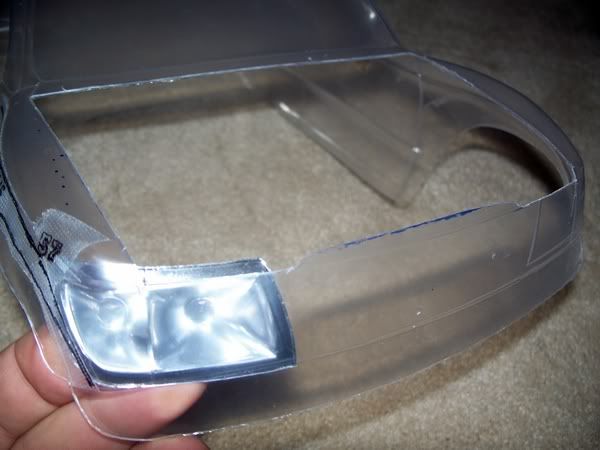 Next - Steering and radio hookup. Well, radio hook up came first just to make sure everything operated. Then I started working on the steering. I searched the forum extensively over how this was modified and altered. I didn't want to axle mount the servo - that would cost points in a scale comp - and the handsbro location seemed appropriate. I did pre try mounting the servo sideways in the front and the idea was to make it look like a radiator but the axle would hit it the servo at full compression and the body shape untimately wouldn't accept it. Instead of going "hand'sbro" I used the horizontal stabilizer piece as a starting ground and just filed down a groove on one side. The servo fit in there nicely. 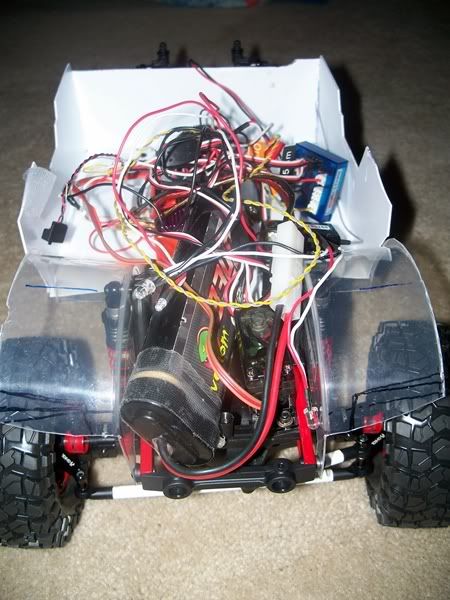 Here's a better shot so you can see it sitting in the piece. I went with some hex head bolts and bolted it from the bottom up to get more ground clearance. 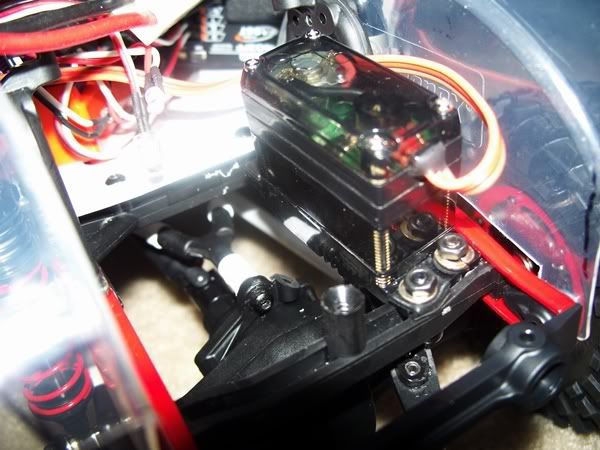 I built a longer servo arm which allowed an "over lapping" of the control arms and full compression. 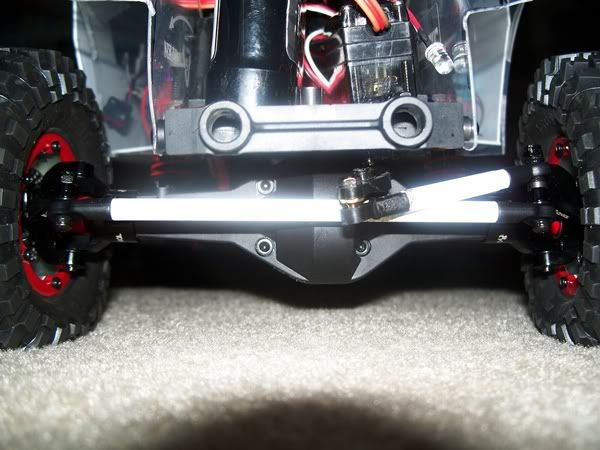 I did this by using two servo arms and affixing them together - paying close attention to no screw ends sticking out where it might rub or cause a binding effect. The angle of the servo to the control arm doesn't seem to change the steering properties and makes for more range of steering. 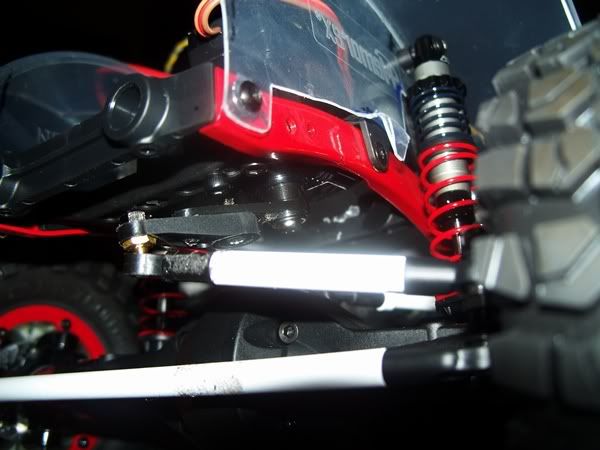 Next - Lighting it up. Looks like I might use three light sources on this build but I'm just not sure yet. I'm thinking I might want a seperate 9v for my fog and spot lights and that's where the 3rd system would come into play. The second system is emergency lighting. For now - this little system (mentioned earlier in the build) will do for basic running and driving lights. I also figured out that with a little minor electrical work, I can have turn signals with the running lights on. Doesn't seem like that's going to be too difficult to do and I already started working on the electronics part to make it happen. Here's the GLOBULE of wires I'll evenually hide (somewhere LOL) and a few of the lights turned on. However, this is nothing compared to the lights of my wilderness F350 truck. Sheesh - that was a nightmare. 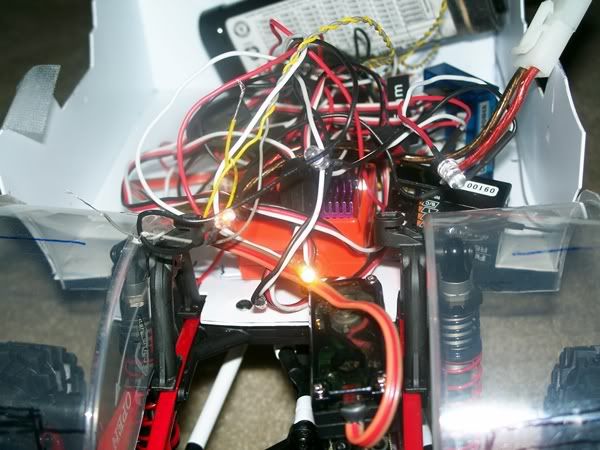 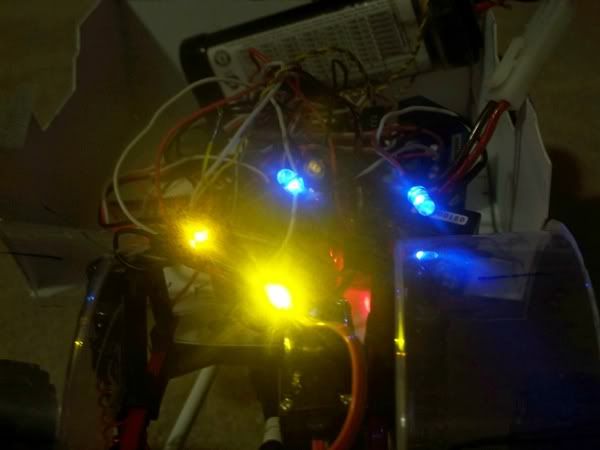 Rear lights: DARN IT! I lost one of my clear lenses! UGH!  I'm hoping to fabricate some reverse lights (darn you radio shack for not carrying enough supplies) and work on the brake lights some more. For now - the unit I purchased to operate brake lights works - but not that good. Only If I mash down on the controller reverse will they come on. It was a cheapo conversion I was hoping to make work but this is a work in progress. Oh - and of course - it's a hooptie right now but I had to drive it around the floor - climb the fireplace bricks, sofa, me! This little turkey has got some serious touque and articulated like crazy. I changed out the motor and went with a 45 turn instead of a 54. It's strong! Last edited by FodigoDave; 02-11-2010 at 05:24 AM. |
|
| |
|
02-11-2010, 11:10 AM
| #53 |
| Quarry Creeper Join Date: Aug 2009 Location: Fresno
Posts: 338
|
Your welcome! Nice update Drunk |
|
| |
|
02-11-2010, 11:41 AM
| #54 |
| Newbie Join Date: Feb 2010 Location: Murrieta
Posts: 47
|
wow that is a nice build i love the red frame and other parts should be solid |
|
| |
|
02-11-2010, 03:26 PM
| #55 | ||
| Quarry Creeper Join Date: Sep 2008 Location: Petaluma
Posts: 282
|
Just turned these out. 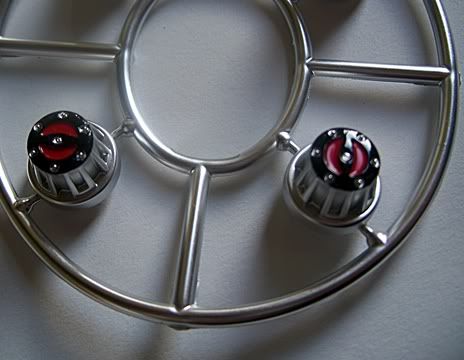 The real one. If I get confident enough - I might try my hand at lettering it.  Quote:
Last edited by FodigoDave; 02-11-2010 at 04:45 PM. | ||
|
| |
|
02-12-2010, 02:37 PM
| #56 |
| Quarry Creeper Join Date: Sep 2008 Location: Petaluma
Posts: 282
|
After 100's of applications passed my desk, I settled on this young lady to drive the truck. She came with high qualifications and dropped by the garage to see the progress today. 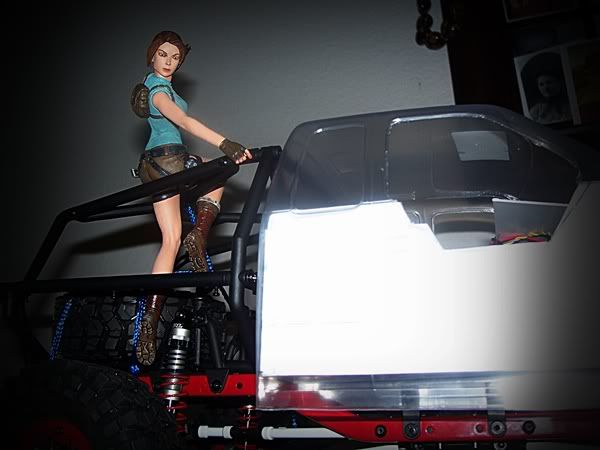 I sent the rear deck diamond plating to the polishing shop today. Should be back within the week. (LOL). Will have pics next week to update. |
|
| |
|
02-12-2010, 02:41 PM
| #57 |
| I wanna be Dave Join Date: Sep 2009 Location: Nor Cal
Posts: 2,213
| Hell Yeah! Lara Croft Rules |
|
| |
|
02-12-2010, 04:31 PM
| #58 | |
| Quarry Creeper Join Date: Sep 2008 Location: Petaluma
Posts: 282
| Quote:
Nice eye candy but nothing gets done around the shop when she's here. At least she's willing to help out from time to time. We just got the diamond plate bed liner back from the shop. It looks great. They polished it out nicely. Lara was here to help out while we installed the High Lift jack. 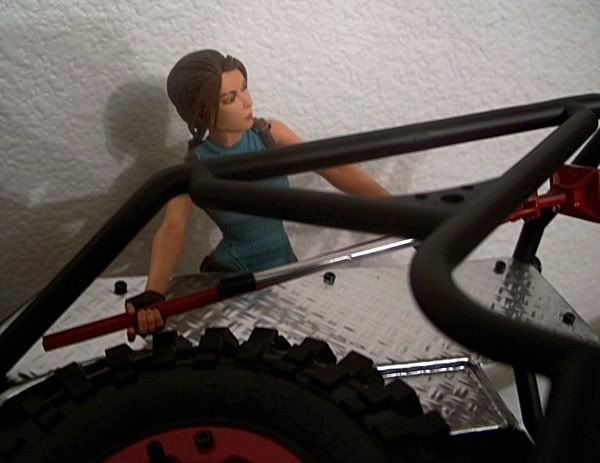 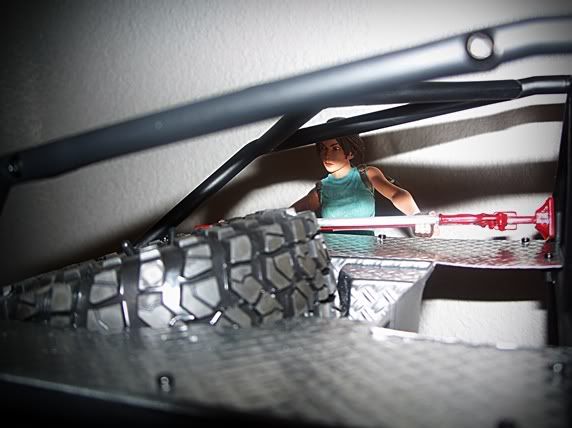 | |
|
| |
|
02-14-2010, 05:59 AM
| #59 |
| Quarry Creeper Join Date: Sep 2008 Location: Petaluma
Posts: 282
|
Still working on that hood but trying a new way - less hand burning by manually removing a 350 degree piece of styrene and trying to lay it on the old cutout like a sheet. Decided to try a die of a sort. I went with FIXALL (a wall filler) and molded a hood using the old hood as a template. I filled a small container with the plaster and set the hood in, then when it set - trimmed off the edges. 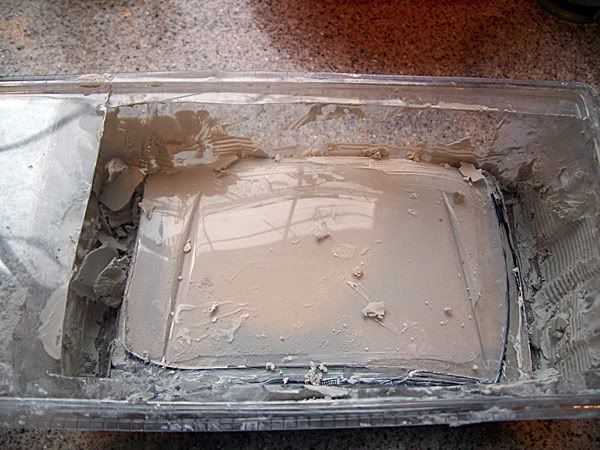 The test mold actually wasn't too bad for a first time try. Smooth but some of the extra plastic I added under the hood to take up the missing parts of the cut out caused a divit along the edges - and there were a few bubbles during the pour too. I also reinfored the mold using some hard wire mesh that I squeezed in the plaster for stability before it hardened.  Placing the mold in the oven and set the styrene on top - watched it and set the temp at 300. 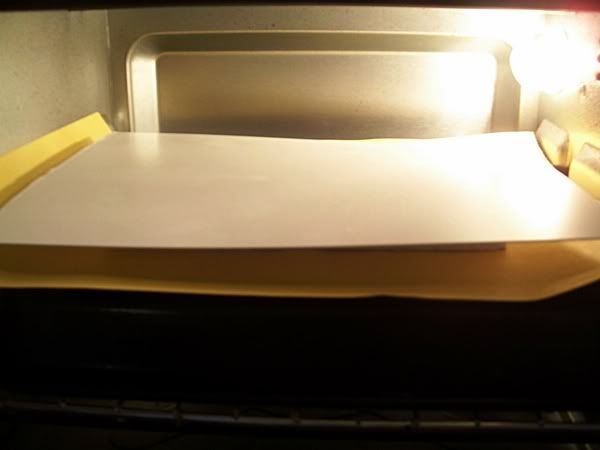 After a while, it started melting and formed around the mold. It worked a lot better than trying to hand form hot styrene on the hood. I didn't cut it as this was a test molding and had a lot of bumps - but it did work out better. There's something to be said in accounting for shrinkage - it's like placing a wool sweater in the dryer and setting it on HIGH! Sheesh....  The test hood mold was pretty good so I decided to keep it and filled in the low spots and holes. Its such an easy material to work with (well - kinda messy) but other than that - easy to work with. And I used a spare piece of styrene to level it out and scrape some high spots smooth. 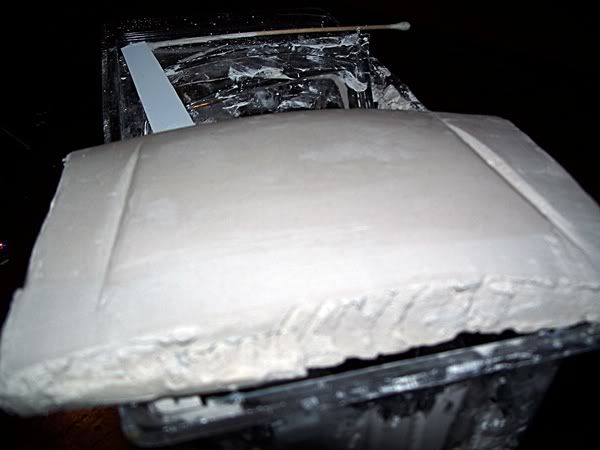 Stay tuned for the hood detail. Coming soon (muahahaha) Last edited by FodigoDave; 02-14-2010 at 03:11 PM. |
|
| |
|
02-14-2010, 04:30 PM
| #60 |
| Quarry Creeper Join Date: Jan 2009 Location: East Mids, UK
Posts: 362
|
This build is coming along really nicely! Interesting to see your experiments making a hood. Hope it works out for you.
|
|
| |
 |
| |


 Linear Mode


