| |
| |||||||
 |
| | LinkBack | Thread Tools | Display Modes |
 11-17-2010, 05:43 PM
| #61 |
| Pebble Pounder Join Date: Nov 2010 Location: hillsborough nc
Posts: 130
|
ok i did not know if they where bead locks thanks for the info
|

|  |
| Sponsored Links | |
| | |
|
11-17-2010, 05:56 PM
| #62 |
| RCC Addict Join Date: Sep 2009 Location: Bradenton
Posts: 1,299
|
well got my interior installed and i must say im happy sorry for crapy pics but here they go    now i need a driver. |
|
| |
|
06-20-2011, 11:23 PM
| #63 |
| SORRCA Committee Member   Join Date: Dec 2008 Location: Parkston, SD
Posts: 4,523
|
Here's an update for this rig. Chico sent it out to me so I could build a flat bed for it. Should have it finished up and on it's way home tomorrow. Also made some sliders and tweaked the bumper a bit. Enjoy!  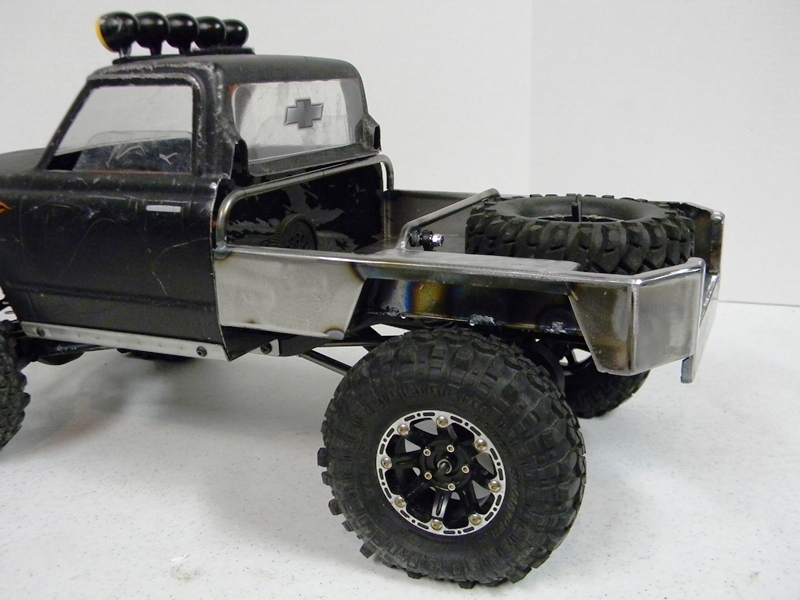   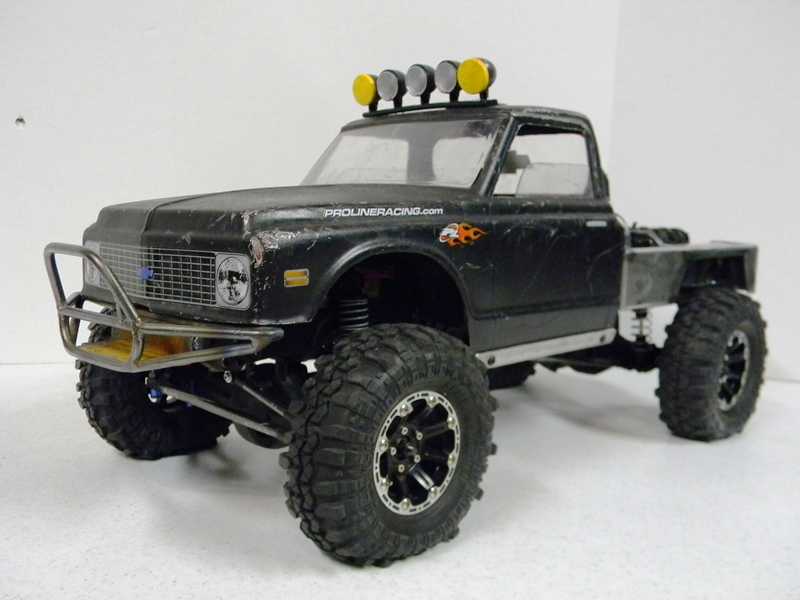 |
|
| |
|
06-21-2011, 07:50 AM
| #64 |
| RCC Addict Join Date: Sep 2009 Location: Bradenton
Posts: 1,299
|
lol i love it looks tough |
|
| |
|
06-21-2011, 08:06 AM
| #65 |
| RCC Addict Join Date: Sep 2009 Location: Bradenton
Posts: 1,299
|
know all i need to do is find away to mount interior and its time to rock |
|
| |
|
06-21-2011, 09:45 AM
| #66 |
| SORRCA Committee Member Join Date: Dec 2008 Location: Parkston, SD
Posts: 4,523
| Need to do some finish welding, add a couple of tubes to finish the look and make the tool box. Shouldn't be too hard the mount the interior back in. I left some of the cab where it was mounted before, or you could use some shoe goo between the door panels and body, maybe. I had to do the cap mod to the rear shocks since the shock hoop sits up a bit. It would of looked funny with them just barely sticking through the bed. Also, you might need a little stiffer spring or heavier oil since it added some weight back there. Toolbox will be made from aluminum so not to add too much more weight. It will basically be just a cover for the electronics box. How's the bumper look? I made new brackets to raise it and then pulled the ends in some. I think it looks much better. |
|
| |
|
06-21-2011, 10:18 AM
| #67 |
| RCC Addict Join Date: Sep 2009 Location: Bradenton
Posts: 1,299
|
oh hell yeah bumper looks alot better i'll make sure i get it painted this time |
|
| |
|
06-21-2011, 03:51 PM
| #68 |
| RCC Addict Join Date: Sep 2009 Location: Bradenton
Posts: 1,299
|
i cant wait untill its in my hands
|
|
| |
|
06-21-2011, 04:24 PM
| #69 |
| SORRCA Committee Member Join Date: Dec 2008 Location: Parkston, SD
Posts: 4,523
|
Finish welding is done and just finished the tailgate, that is operational. |
|
| |
|
06-21-2011, 07:11 PM
| #70 | |
| RCC Addict Join Date: Sep 2009 Location: Bradenton
Posts: 1,299
| Quote:
| |
|
| |
|
06-22-2011, 10:05 AM
| #71 |
| RCC Addict Join Date: Sep 2009 Location: Bradenton
Posts: 1,299
|
rc4wd king kong tow shackle,winch,winch decals just recived from rpp.just order on fathers day man thats fast for ground shipping |
|
| |
|
06-22-2011, 01:03 PM
| #72 | |
| RCC Addict Join Date: Sep 2009 Location: Bradenton
Posts: 1,299
| Quote:
| |
|
| |
|
06-22-2011, 09:58 PM
| #73 |
| Newbie Join Date: Jul 2008 Location: Eugene
Posts: 43
|
Great build, I love the 72 chev's. And not many people build scalded with that body.
|
|
| |
|
06-22-2011, 10:18 PM
| #74 | |
| RCC Addict Join Date: Sep 2009 Location: Bradenton
Posts: 1,299
| Quote:
| |
|
| |
|
06-29-2011, 09:21 AM
| #75 |
| RCC Addict Join Date: Sep 2009 Location: Bradenton
Posts: 1,299
|
just got this BAD BOY back and its sweet |
|
| |
|
06-29-2011, 01:03 PM
| #76 |
| RCC Addict Join Date: Sep 2009 Location: Bradenton
Posts: 1,299
|
here's a few pics of it done,there not the best pics http://i880.photobucket.com/albums/a...s007/023-4.jpg Last edited by chicostaxxs007; 06-30-2011 at 08:29 AM. |
|
| |
|
06-29-2011, 04:28 PM
| #77 |
| RCC Addict Join Date: Sep 2009 Location: Bradenton
Posts: 1,299
|
do to the weight of the flatbed i had to change shocks.I used 100mm rc4wd dual shocks in the rear n rc4wd dual 80mm in the front.few more pics of before i change shocks before http://i880.photobucket.com/albums/a...s007/019-1.jpg after http://i880.photobucket.com/albums/a...s007/026-1.jpg i think it sits perfect now |
|
| |
|
06-29-2011, 10:11 PM
| #78 |
| SORRCA Committee Member Join Date: Dec 2008 Location: Parkston, SD
Posts: 4,523
|
That's much better. Can't wait to see what else you do to it. |
|
| |
|
06-30-2011, 09:19 AM
| #79 |
| RCC Addict Join Date: Sep 2009 Location: Bradenton
Posts: 1,299
|
i made sure i painted the bumper this time |
|
| |
|
06-30-2011, 11:14 AM
| #80 | |
| Pebble Pounder Join Date: May 2011 Location: Bettendorf, IA
Posts: 199
| Quote:
| |
|
| |
|
| |


 Linear Mode


