| |
| |||||||
 |
| | LinkBack | Thread Tools | Display Modes |
 10-21-2010, 03:44 PM
| #1 |
| Newbie Join Date: Oct 2008 Location: Richmond, KY.
Posts: 32
|
Searched and didnt see a thread like this. No major modifications, just simple tweaks to get more flex/steering/etc.. that you used on your SCX.
|

|  |
| Sponsored Links | |
| | |
|
10-21-2010, 05:13 PM
| #2 |
| Quarry Creeper Join Date: Jul 2009 Location: Long Island
Posts: 347
|
Remove shock bump stops. Remove lower shock link ends and install tra2742 link ends, gives you alittle more height and articulation! Tra2742x links work well on the rest of the links except the off set ones. Get two 3x8mm counter sunk head screws, install them inplace of the front button heads on the c hubs. Should give you a couple more mm's of steering for the knuckle that hits it. Last edited by Cableman; 11-02-2010 at 06:41 AM. |
|
| |
|
10-21-2010, 05:50 PM
| #3 |
| RCC Addict Join Date: Dec 2009 Location: Rock Bouncin' with the Patented Technique
Posts: 1,374
|
Cut butter bowls in half, paint black, drill holes, mount to shock mounts. Then you have a set of inner fender wells.
|
|
| |
|
10-22-2010, 11:24 AM
| #4 |
| Pebble Pounder Join Date: Sep 2010 Location: Calgary
Posts: 193
|
I know I'm going to shoot myself for not knowing this but how do you get the ujoint pins into the yoke? even though they have notches its not even close to slipping in. 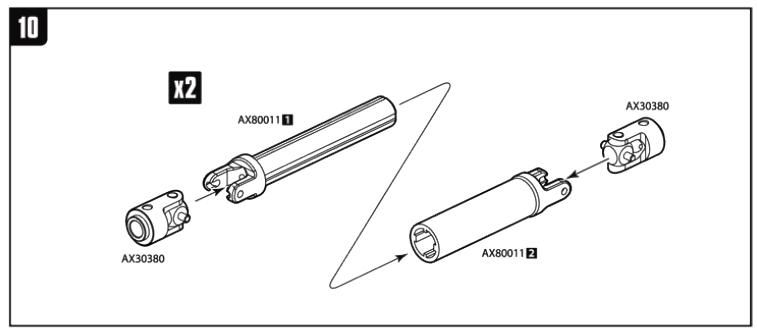 |
|
| |
|
10-22-2010, 11:32 AM
| #5 |
| Rock Crawler  Join Date: Apr 2006 Location: Hartland, MI
Posts: 788
|
I have a tool that came with an older kit, shaped kind of like a two-pronged fork. What I used to do back in the day was notch a slot into the end of an old screwdriver, then just push it in while flexing the ear out a little bit. It's a pain in the ass part of the build, for sure. |
|
| |
|
10-22-2010, 01:03 PM
| #6 |
| Pebble Pounder Join Date: Sep 2010 Location: Calgary
Posts: 193
|
I'm assuming the fork is for holding one end of the pin while widening the end yoke.
|
|
| |
|
10-22-2010, 01:05 PM
| #7 | |
| I wanna be Dave   Join Date: Apr 2005 Location: Eastern WA
Posts: 2,489
| Quote:
| |
|
| |
|
10-22-2010, 01:21 PM
| #8 | |
| Pebble Pounder Join Date: Aug 2010 Location: claremont... for now
Posts: 105
| Quote:
cableman sed it best!  | |
|
| |
|
10-23-2010, 11:29 AM
| #9 |
| Quarry Creeper Join Date: Oct 2006 Location: Greenwood
Posts: 318
|
I did my hi steer which seems to work pretty good... 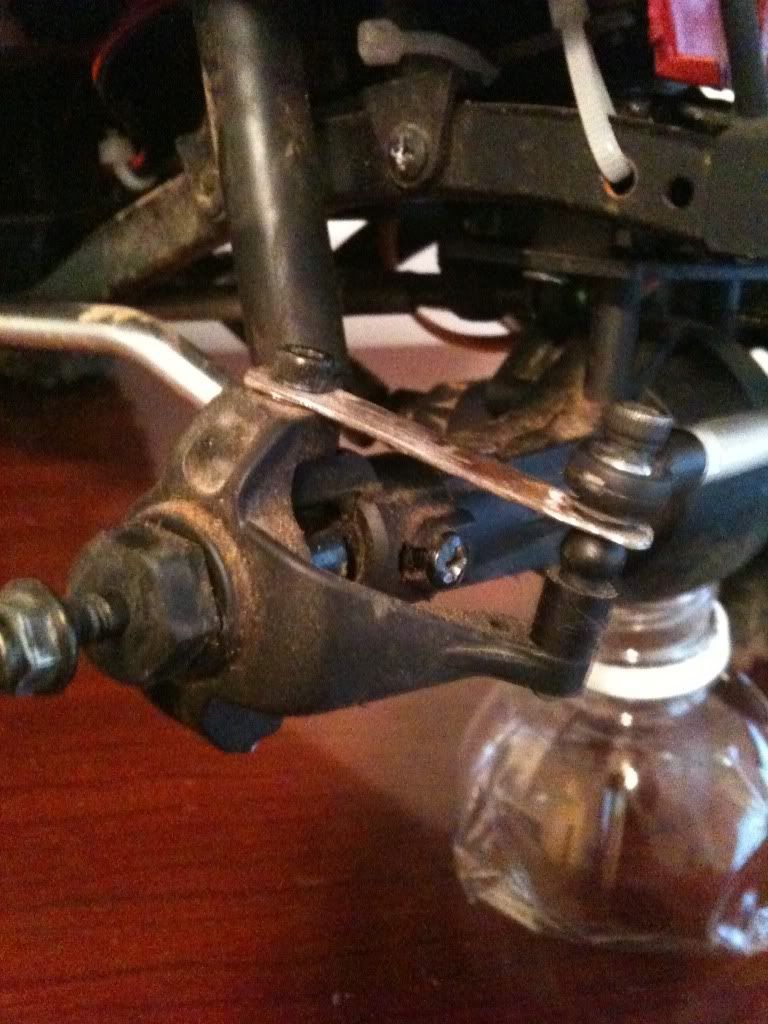 |
|
| |
|
10-24-2010, 11:25 AM
| #10 |
| I wanna be Dave Join Date: Mar 2009 Location: sittin in the sky
Posts: 4,630
|
remove the bump stops from the shocks 4-link the rear weight the wheels lower the battery tray by trimming the spacers (only if battey is munter in front) alum. C-hubs and kunckles MIP or Axial front cvd shafts for a little more steering |
|
| |
|
10-25-2010, 05:06 AM
| #11 | |
| Quarry Creeper Join Date: Jun 2010 Location: Canberra, Australia
Posts: 355
| Quote:
| |
|
| |
|
10-26-2010, 12:12 PM
| #12 | |
| Pebble Pounder Join Date: Sep 2010 Location: Calgary
Posts: 193
| Quote:
| |
|
| |
|
11-10-2010, 07:51 PM
| #13 | |
| Pebble Pounder Join Date: Dec 2007 Location: Cumming
Posts: 104
| Quote:
| |
|
| |
|
11-10-2010, 11:19 PM
| #14 |
| Newbie Join Date: Aug 2010 Location: HONOLULU
Posts: 14
|
i just grabbed it with a small needle nose and gave it a twist and it popped right in. but that screw driver idea sounds like a winner. just insert pin in one side of joint then push the other pin with screw driver till it snaps in hmmmm.... sounds easy.
|
|
| |
|
11-13-2010, 11:15 AM
| #15 |
| Newbie Join Date: Nov 2010 Location: Alliance
Posts: 19
|
here's a link to a video where the guy shows how to do the driveshafts http://www.youtube.com/watch?v=kcN50co4Apk its a pretty good step by step video |
|
| |
|
| |


 Linear Mode


