| |
 06-09-2011, 01:25 PM
| #1 |
| Rock Crawler Join Date: Dec 2009 Location: Chicago
Posts: 539
|
This is an upgraded Honcho... Rig's achievements:
Parts breakdown:
From the side.  From the rear [it's missing the tire, because I managed to lose the tire mount part and have to order it :(]  Another shot from the rear, you can sorta see the suspension limiting strap.  From the front. Thats a RC4WD bumper and winch.  Bit better shot of the bumper and winch.  Last edited by thzero; 11-01-2011 at 01:35 PM. |

|  |
| Sponsored Links | |
| | |
|
06-09-2011, 02:04 PM
| #2 |
| Newbie Join Date: Mar 2007 Location: Germany
Posts: 20
|
Really nice build!  |
|
| |
|
06-09-2011, 02:46 PM
| #3 |
| Quarry Creeper  Join Date: Feb 2006 Location: Sacramento
Posts: 402
| Looks great, nice write up. You can run the high clearance knuckles if you want with the CMS, just connect the drag link so it is attached to your knuckle arms like this:  It does mess up the geometry a bit, but I really don't notice any bump steer and I get a lot more steering now.  Also you can use the stock drag link you just have to shave the axle's pumpkin (there is quit a bit of material in that area). . |
|
| |
|
06-09-2011, 03:10 PM
| #4 |
| Scale Detail Engineering Join Date: Apr 2010 Location: Turtle Island
Posts: 5,573
|
Dang zero, it's looking sharp! You're ready for the comp, I still need to install my beef tubes and winch controller. |
|
| |
|
06-09-2011, 04:01 PM
| #5 |
| Quarry Creeper Join Date: Dec 2009 Location: Centertown,TN
Posts: 317
|
Looking good. Keep up the good work! |
|
| |
|
06-09-2011, 04:21 PM
| #6 |
| Rock Crawler Join Date: Dec 2009 Location: Chicago
Posts: 539
|
Cool, thanks for the tips jlsandkes... I'll give the shave option a try and see how it works. And yeah Johnny, I think other than finishing up a few electronics things, it should be ready for Sunday... thats the plan anyways! |
|
| |
|
06-09-2011, 05:03 PM
| #7 |
| Quarry Creeper Join Date: Feb 2006 Location: Sacramento
Posts: 402
| Also, it looks like you enjoy adding scale details to your truck (your bed looks great). You may want to pickup one of these and cut it to fit your truck: http://prolineracing.com/bodies/pl-c-interior/ It is really easy to do and clears the transmission without any modification. I dont want to post more pictures in your thread, but check my build if you want to see how it looks. . |
|
| |
|
06-23-2011, 06:48 AM
| #8 |
| Rock Crawler Join Date: Dec 2009 Location: Chicago
Posts: 539
|
To help get a bit more throw from the steering, since I'm running standard style knuckles ATM (mostly due to the CMS), I took some advice and ground down the areas of the pumpkin where the steering rod was binding. Here's a shot of where I ground it down; really need one without the rod in the way but I was lazy.  And another set showing the additional throw. Pretty much the knuckles come really close to hitting the c-hubs when at full extension.   |
|
| |
|
08-31-2011, 11:16 AM
| #9 |
| Rock Crawler Join Date: Dec 2009 Location: Chicago
Posts: 539
|
Some shots from the NIRC TTC comp in which the rig (more so than the driver) finished 3rd.    |
|
| |
|
08-31-2011, 02:25 PM
| #10 |
| Quarry Creeper Join Date: Nov 2010 Location: Canada
Posts: 223
|
Nice build. Cool colour.
|
|
| |
|
10-13-2011, 08:47 AM
| #11 |
| Newbie Join Date: Sep 2011 Location: douglasville
Posts: 39
|
Awesome rig! Hey the MIP driveshaft you got, I got a question. With the longer wheelbase on the scx10 honcho you have to go with the ax10 shafts? I want to get MIP but not sure which ones to get cause they don't say if its for the shorter wheelbase scx10 or the longer wheelbase MIP Spline Center CVD Kit (SCX10) [MIP10145] | RC Cars & Trucks - A Main Hobbies I think at least one of these will be to short. But I'm not sure.
|
|
| |
|
10-13-2011, 11:32 AM
| #12 |
| RCC Addict Join Date: Feb 2010 Location: a house
Posts: 1,986
|
nice rig zero, i like it better with the SAWS on there. if you need some extra room since you got the Wraith you can store your scx at my house |
|
| |
|
10-13-2011, 06:08 PM
| #13 |
| Quarry Creeper Join Date: Sep 2010 Location: Perth Australia
Posts: 322
|
Nice build i must say |
|
| |
|
10-14-2011, 10:55 AM
| #14 |
| Quarry Creeper Join Date: May 2011 Location: OC
Posts: 214
|
I love that color, it looks really nice on your rig! What kind of rod ends are you using on your drag link? Instead of using the straight ones, I used the ones with a slight angle that would go on the lower links connected to the chassis plate. I got a few more mm of clearence and even at full tilt, does not bind on the pumpkin. I used the ones on the upper left corner of this picture. 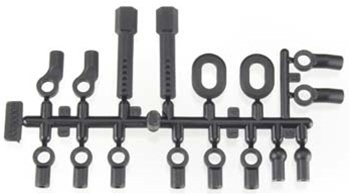 |
|
| |
|
02-16-2012, 10:24 AM
| #15 |
| Scale Detail Engineering Join Date: Apr 2010 Location: Turtle Island
Posts: 5,573
|
What ever happened to this? You need to get it out on the trail again! |
|
| |
|
02-16-2012, 11:21 AM
| #16 | |
| Rock Crawler Join Date: Dec 2009 Location: Chicago
Posts: 539
| Quote:
| |
|
| |
|
02-16-2012, 11:24 AM
| #17 | |
| Scale Detail Engineering Join Date: Apr 2010 Location: Turtle Island
Posts: 5,573
| Quote:
| |
|
| |
|
02-16-2012, 12:12 PM
| #18 | |
| Rock Crawler Join Date: Dec 2009 Location: Chicago
Posts: 539
| Quote:
| |
|
| |
 |
| Thread Tools | |
| Display Modes | |
| |


 Linear Mode


