| |
 12-02-2012, 04:44 PM
| #1 |
| Rock Stacker Join Date: Aug 2011 Location: Il/WI border
Posts: 60
|
Hello guys I am new to the forum and would like to introduce myself. I used to play around with a micro crawler but have since stepped up to a Honcho RTR. The bug has bitten and I am already doing some upgrades and adding some scale details. Ive since added the DinkyRC Interior Kit, Proline Roof rack with their detail parts. Ive upgraded the stock plastic steering arms and suspension links to the aluminum pieces. I recently came across a RC4WD Mojave Complete body (in Yellow) for sale in RPP's salvage yard for a price I couldnt pass up. After unboxing the body I noticed the wheelbases were off. Im kicking myself because I just upgraded the links and need to change them out again! I did a search and nothing in detail has been posted as to what length links and posts are needed. Im guessing this is where the trial and error part comes in and I keep adding to my spare parts bin. Once I get that sorted Ill post up some pics of how I got it lined up. However, thank you to all the other members who have posted up very usefuls tips, tricks, and pics for some inspiration and ideas. Ill do my best to contribute to the hobby as well. On to some pics of how she sits now... The day I unboxed it and got rid of some stickers.  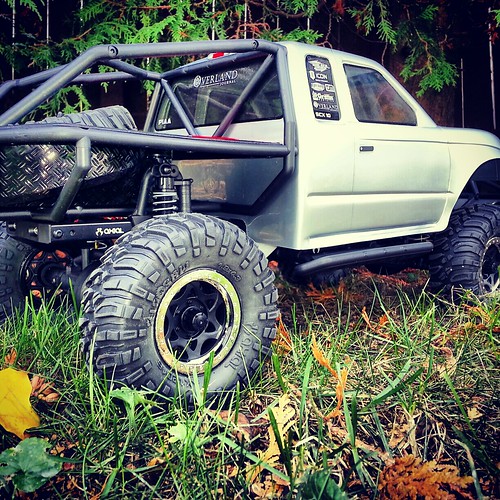 Picture of the Roof Rack. I made the bungees following a DIY I found on here and I made the sleeping bags out of an old beer coozie and zipties. All the tools have been weathered using the dry brush technique. 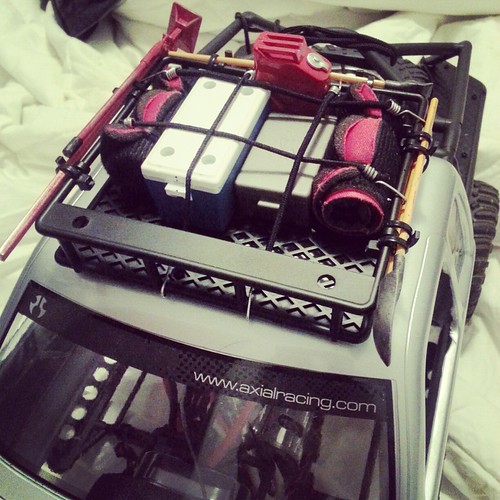 My latest shipment  Ill continue to use this thread as I upgrade this fun little rig. Stay tuned! |

|  |
| Sponsored Links | |
| | |
|
12-02-2012, 04:53 PM
| #2 |
| Quarry Creeper Join Date: Dec 2010 Location: orlando
Posts: 218
|
Welcome, gonna watch this build for sure.
|
|
| |
|
12-06-2012, 05:22 PM
| #3 |
| Rock Stacker Join Date: Aug 2011 Location: Il/WI border
Posts: 60
|
Update 12/6/12 Some parts I ordered from RPPHobby.com came in today. A pair of 73mm and 91mm threaded aluminum pipe as well as 10mm and 15mm posts. I ordered these variety of parts because I wasnt sure which ones were going to make the correct wheelbase but Ive got it figured out. Up front I ended up using 60mm and 15mm upper posts and 91mm threaded pipe for the lower. Out back I used the 60mm and 25mm upper posts and 98mm threaded pipe for the lower. All in all after lots of trial and error I moved the front and rear axles. On to the pictures!  Mocked up 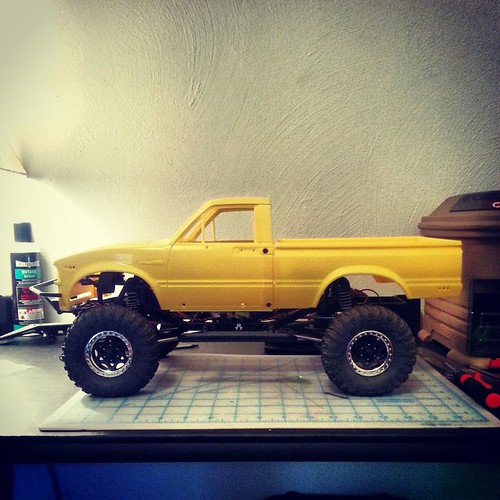 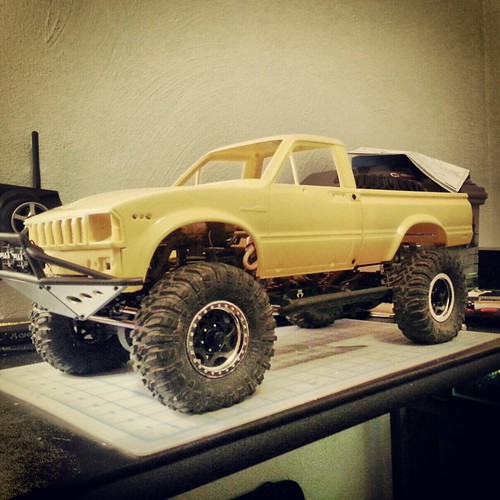 I got the spare tire mounted using the original piece from the Honcho. I need to mount the body where Im able to gain quick access with having body pins so I think Im going the magnet route. Ill have to fab up some tabs. More about this later. 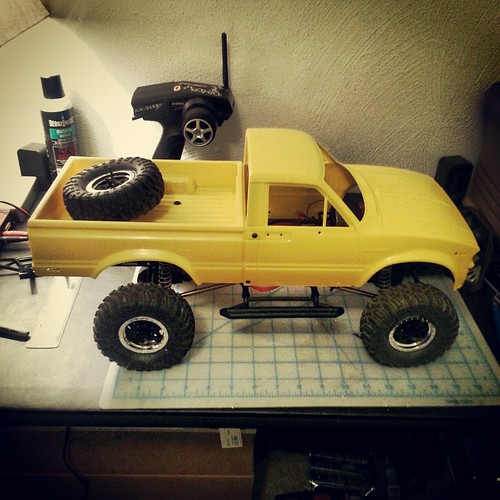 So now that Im satisfied with the wheelbase its time to focus on the body. I still have to glue in the cab back and trim the mounts off the bed (Im using the full cab back because I plan on making an interchangeable truggy bed.) Some filling, sanding, and most importantly, paint. I havent decided on a paint color yet but I do know it will definitely be a factory Toyota color. Ive been reading up on brass brazing/soldering and Im going to try my hand at that. Ive picked up most of the required tools but still waiting on some benders from Du-Bro. I also just checked my local hardware store and there is a surplus of various sized brass tubing and plate. I plan on making my own bumpers, sliders, and like I mentioned above a truggy bed. Stay tuned for more to come!  |
|
| |
|
12-06-2012, 06:11 PM
| #4 |
| RCC Addict  Join Date: Apr 2012 Location: Land of 10,000 Lakes
Posts: 1,460
|
Welcome to the addiction!
|
|
| |
|
12-06-2012, 09:09 PM
| #5 |
| Rock Stacker Join Date: Aug 2011 Location: Il/WI border
Posts: 60
|
Thanks!
|
|
| |
|
12-06-2012, 10:49 PM
| #6 |
| Rock Crawler Join Date: Apr 2011 Location: British Columbia
Posts: 525
|
Looks awesome,welcome to the hobby I also got started with a micro  |
|
| |
|
12-07-2012, 01:21 AM
| #7 | |
| Rock Stacker Join Date: Aug 2011 Location: Il/WI border
Posts: 60
| Quote:
Unfortunately it took a huge spill and broke into a bunch of bits and bends. RIP 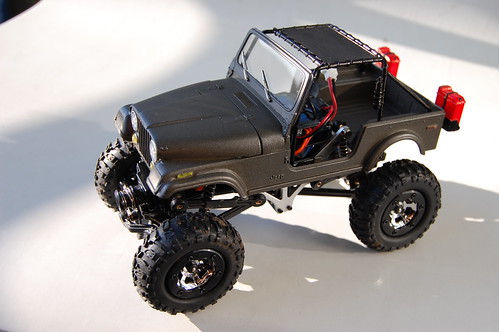 | |
|
| |
|
12-07-2012, 08:05 AM
| #8 |
| Newbie Join Date: Oct 2011 Location: Grande Prairie
Posts: 32
|
I am really liking that jeep body, where did you find that? and is that a losi micro?
|
|
| |
|
12-07-2012, 04:18 PM
| #9 | |
| Rock Stacker Join Date: Aug 2011 Location: Il/WI border
Posts: 60
| Quote:
| |
|
| |
|
12-07-2012, 05:19 PM
| #10 |
| Newbie Join Date: Feb 2010 Location: Spokane
Posts: 32
|
Diggin' the honch. Subscribed.
|
|
| |
|
12-07-2012, 07:44 PM
| #11 |
| Newbie Join Date: Nov 2012 Location: Arvada
Posts: 37
|
Nice start. I just got a Honcho as well and am really enjoying how much fun crawling is. Slow is FUN! |
|
| |
|
12-08-2012, 03:26 AM
| #12 | |
| Rock Stacker Join Date: Aug 2011 Location: Il/WI border
Posts: 60
| Quote:
| |
|
| |
|
12-08-2012, 03:27 AM
| #13 | |
| Rock Stacker Join Date: Aug 2011 Location: Il/WI border
Posts: 60
| Quote:
| |
|
| |
|
12-09-2012, 07:26 PM
| #14 |
| Rock Stacker Join Date: Aug 2011 Location: Il/WI border
Posts: 60
|
Update Since its still not running and a lot of tome to stare at it I didnt like that the chassis sat too far away from the body and I needed to get it closer. So back apart it came. I come to the conclusion that the rear shock hoops were the problem and I didnt want to have them coming thru the bed. Off they go. This allows the body to sit about half an inch from the chassis. Rear shocks will be relocated to the inside of the frame and rear of the axle. Kind of like the Gearheads kit. So now that this is proper Im going to have to put a lift kit on it to get back its full articulation without losing any travel. Its a bummer that the lift kits are out of stock at RPP so Im gonna have to fab that out of some aluminum plate. Gonna have to pay a little visit to Ace Hardware tomorrow to stock up on that and some tubing to start fabricating the bumpers and sliders. Im still waiting on my tube benders to come before I can start those. Anywho while it was apart I lengthened the upper links front and rear to change the pitch of the drive shafts to avoid any binding issues. In the midst of that I took the time to waterproof front and rear axles with some marine grease. I also waterproofed the steering servo with marine grease an o-ring and coat of Plasti-Dip. Might need to do another coat. Tomorrow Ill finish up waterproofing the electronics and what not by stuffing them in balloons. Maybe if I get that finished up Ill get started on the body work because it desperately needs some color. Maybe Almond maybe Olive Drab Metallic. Still up in the air with that... The only picture I managed to snap during the process... Looks much better! 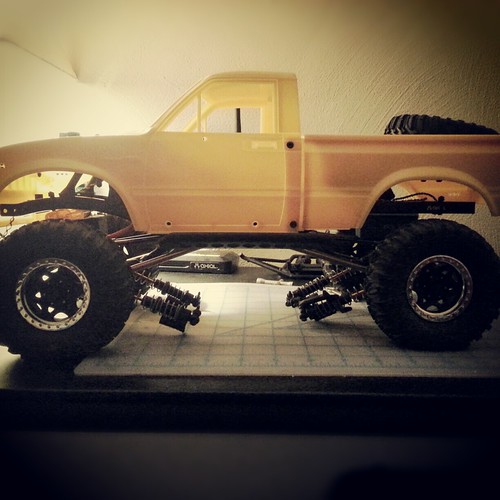 More to come stay tuned! |
|
| |
|
12-10-2012, 02:59 AM
| #15 |
| Newbie Join Date: Feb 2010 Location: Spokane
Posts: 32
|
What's the wheelbase on that body??
|
|
| |
|
12-10-2012, 04:36 PM
| #16 | |
| Rock Stacker Join Date: Aug 2011 Location: Il/WI border
Posts: 60
| Quote:
| |
|
| |
|
12-10-2012, 10:09 PM
| #17 |
| Rock Stacker Join Date: Aug 2011 Location: Il/WI border
Posts: 60
|
Update 12/10/12 Got some work done today. Picked up some aluminum stock some nuts and bolts to fab up the rear shock relocation/lift kit and front lift kit. As said in my previous update to get the body closer to the chassis I had to raise the suspension mostly because the rear shock hoops were in the way and I didnt want them coming thru the bed. What goes up, most come down. I dont have a big work area or a bunch of power tools with the exception of a drill. Everything was cut with a handsaw and filed to shape. After going thru all of that I think its time to invest in at least a Dremel! Everyone likes pictures so lets get to them... I started in the rear LOL. I fabbed up lower shock mounts out of L shaped aluminum stock, spare nuts and bolts and spacers from the spare parts bin.  For the upper shock mount I hacked up the rear chassis brace, flipped it, using the holes which look like they were made for this. 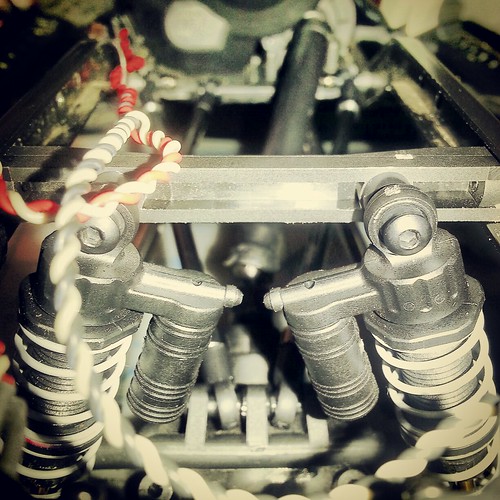 Where the shock used to mount I used spare bumpstops as the spacer. 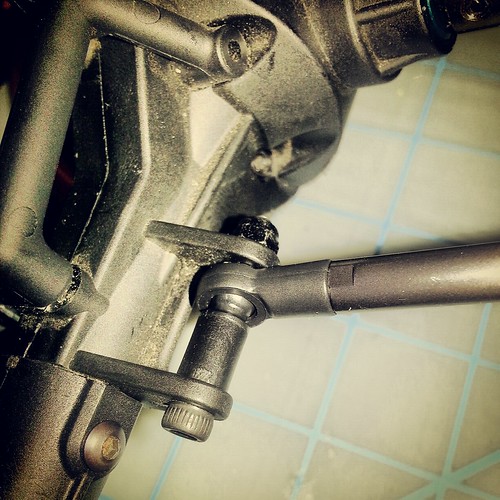 Out of some flat aluminum stock I cut, drilled, and filed my own "lift kit." It raised it up 1/2" to make up for the gap between the body and chassis. It doesnt show in this picture but Im going to hack off the tops of the body mounts and glue some industrial strength magnets to keep the body in place. 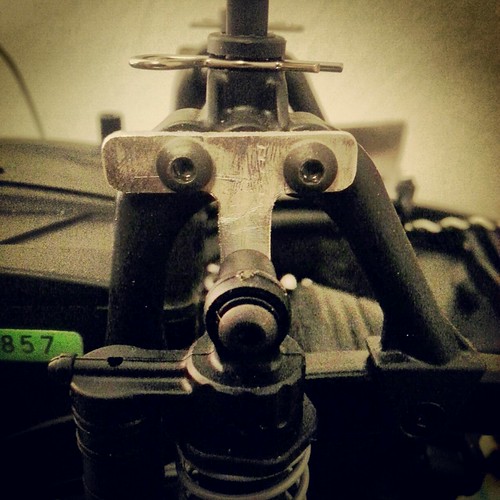 Here is what the rear end looks like with the shocks relocated. The aluminum channel will serve as a body mount and double as extra bracing. You can see here how the magnets are used. I think I may add another mount/brace at the front of the bed for added sturdiness. Rear lights are coming out and going in the tail lights. Ill fab up a bumper for that later. 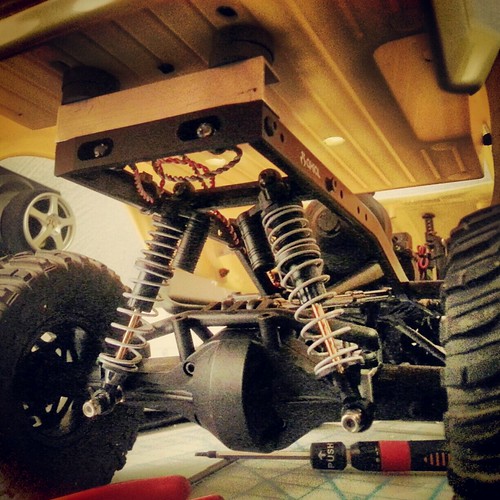 And heres how she sits now. Nice and stout with a little rake. Sliders are closer to the body like a 1:1 rig. This leaves me plenty of options for ride height. Right now in full articulation the tires sit flush with the tops of the wheel wells without rubbing. I may use a slightly shorter shock for more of that scale look. Before After 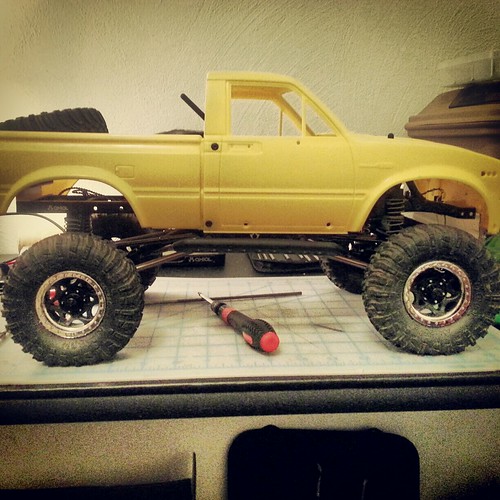 Now that thats out of the way I can focus on the body and fitting an interior with driver. More to come stay tuned! |
|
| |
|
12-13-2012, 01:40 AM
| #18 |
| Rock Stacker Join Date: Aug 2011 Location: Il/WI border
Posts: 60
|
Update 12/12 My benders finally came in so I hopped right on to fabbing up a can-back. This is my first time working with brass. I had troubles figuring out where and how to make my bends but 8 hours later and had something I was happy with. I'm gonna find some sort of material to make the canopy portion. I was thinking an old pair of black jeans? Or hockey tape, gaffer tape. After I got that primed up I knocked out the body work. Filled some holes and the gap from the cab back. Still have to skim another coat of putty and then another coat of primer, block it down then the final color phase. On to the pics... |
|
| |
|
12-15-2012, 03:31 PM
| #19 |
| Rock Stacker Join Date: Aug 2011 Location: Il/WI border
Posts: 60
|
Got a little update. Paint is cured. Sorting out my lights right now. I think I may need another set. Has anyone tried splicing in more strands to the axial simple controller? Still waiting on the lights lenses to dry before I get those put in. Its almost time to get this thing off the bench and get her dirty and abused! Poser shot 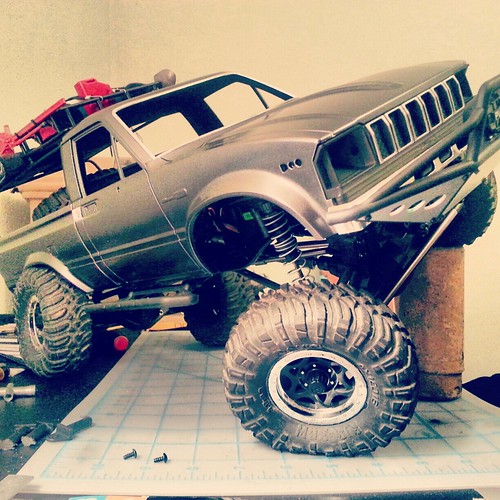 |
|
| |
|
12-22-2012, 07:17 PM
| #20 |
| Rock Stacker Join Date: Aug 2011 Location: Il/WI border
Posts: 60
|
Random pics I want to whore out... 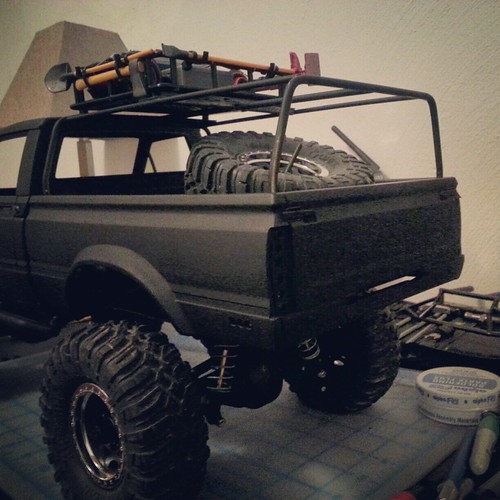 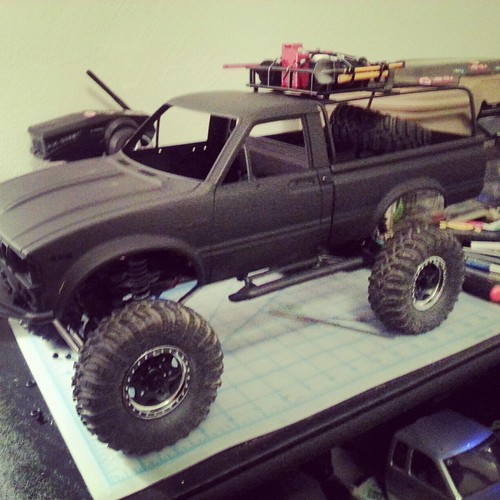 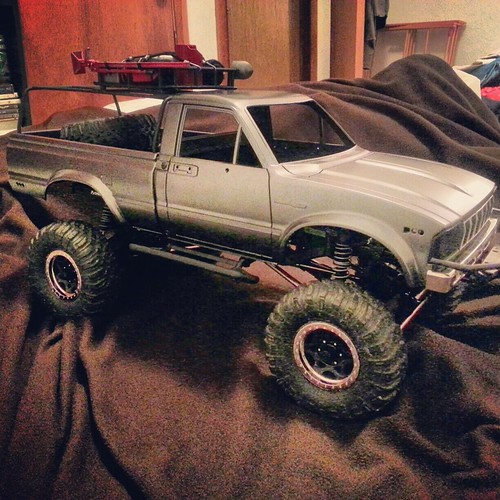 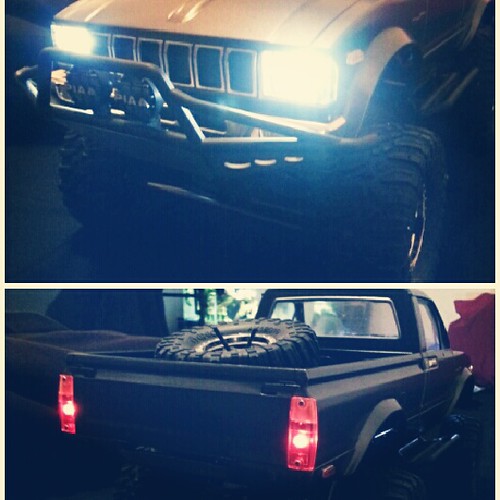 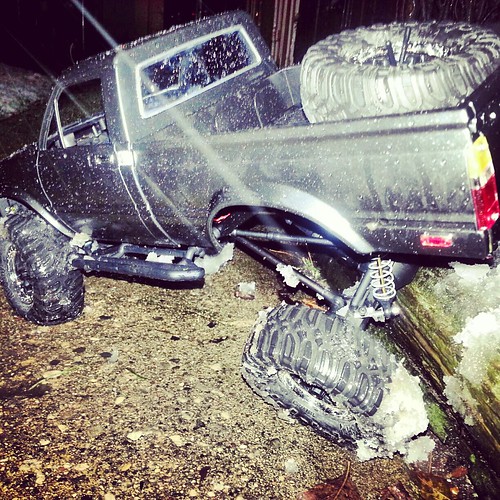 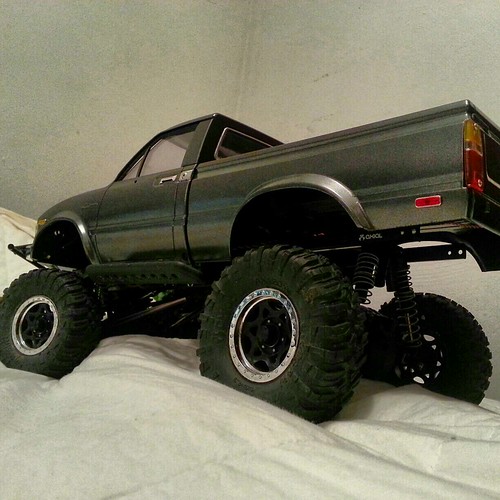 |
|
| |
 |
 New Member - Similar Threads
 | ||||
| Thread | Thread Starter | Forum | Replies | Last Post |
| still a member | Leprechaun | Chit Chat | 7 | 03-10-2012 08:48 AM |
| New Member | TheB1GDude | Newbie General | 2 | 02-11-2011 01:06 PM |
| New member | HotRod2507 | Newbie General | 5 | 01-13-2011 01:44 PM |
| new member | waterhose | Newbie General | 1 | 09-22-2009 02:48 PM |
| |


 Linear Mode


