| |
| |||||||
 |
| | LinkBack | Thread Tools | Display Modes |
 11-03-2016, 06:53 PM
| #1 |
| Newbie Join Date: Nov 2015 Location: Austria
Posts: 31
|
The other day I decided it was about time to start a new build. At first I wanted to get a Gelande II D110 however after a while (and seeing a video about the amazing off road capabilities of the Unimog) I started to research Unimog body options for my existing SCX10 JK Rubicon Chassis (see build thread here). After a bit of research I stumbled upon this ebay offer. It basically made for the wheelbase of the JK Rubicon Kit and it looks amazing aaaaaaaaand I ordered it I'll put a bill of materials at the end of this first post and update it along the build, just in case you're interested. The body is handmade (i think from laser cut PC) and takes about 7 days to produce. I asked the seller, Steve to customize two things for me (no light buckets on the roof, cause I want to add my own light bar and no BV letters on the side) and he was very helpful, removed the two things and 20 days later I had a package notification in my postbox While waiting for the body I set out to research some model after which I'd build the truck. I didn't find many U1250L fire truck configurations and so I decided to take a U5000 of a volunteer fire department in my home-country, Austria as a model. So it'll be a TLF-1000A (Tanklöschfahrzeug 1000 Liter Allrad = triple combination pumper 1000 litres all-wheel-drive). Find some photos of the original here Photo is copyright FF St. Ilgen:  A day or two later I wrote an email to this fire department in Styria (a state in Austria), told them about my idea and asked for some more photos, waited another couple of days and got a very nice reply and some great detail shots Meanwhile I found these amazing looking axles :O 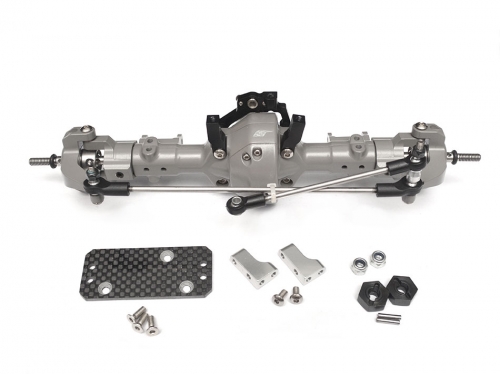 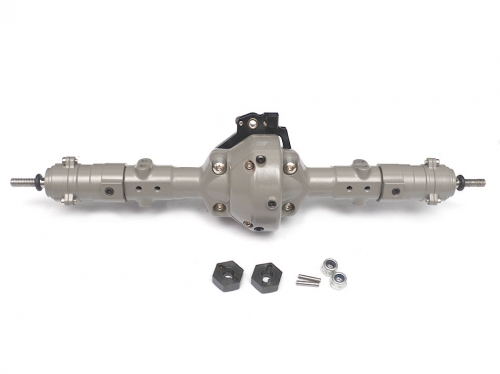 Although they might not be 100% scale to what is on a real Unimog (it has portal axles) the look struck me and so I got them too. When the axles arrived I couldn't wait to install them on my truck, so I took them apart completely, greased everything up with MST black metal grease and marine grease and reassembled them using thread lock for all the screws (don't want them to fall apart my offroading) Here some pics, so you can see what they look like in real life:       At the same time as the axles I also got the new shocks. Some TopCad internal spring shocks. At the moment they look like they're holding the oil better than the Boom Racing ones.   A day or two later the wheels arrived     Aaaaaaaaaaand then, just a day before I had to leave for Budapest for almost a week, the body arrived     The rear body mount:    One thing Steve couldn't fix was these light buckets which I didn't like, so I used modelling clay, filled it and I'm gonna sand it even once it's dry.  I've got lots of other parts already here, e.g. a custom welded winch bumper with white coating, license plates, Progress and next steps I created a trello board for myself to keep track of all the todos and I made it public for you, so you can follow along, if you want Sooooo! What do you think? Ideas? Suggestions? Thoughts? Bill of Materials Please see https://trello.com/b/ESzWZOZc/scx10-unimog-fire-truck Last edited by prymus; 11-05-2016 at 01:46 PM. |

|  |
| Sponsored Links | |
| | |
|
11-03-2016, 09:13 PM
| #2 |
| RCC Addict  Join Date: Jan 2016 Location: Kelowna, BC
Posts: 1,274
|
Love it, I'll be watching this develop!
|
|
| |
|
11-03-2016, 10:25 PM
| #3 |
| Rock Crawler Join Date: Nov 2012 Location: Charlotte
Posts: 931
|
Nice body. Can't wait to see this evolve.
|
|
| |
|
11-05-2016, 01:42 PM
| #4 |
| Newbie Join Date: Nov 2015 Location: Austria
Posts: 31
|
Alright, yesterday I had some time and I started working on reinforcing the body mount, removing the covers of the cargo area, cutting the cargo area and creating some interior to hold the tools, generators, hoses etc. But first things first! I found the body mount supplied with the body not sturdy enough to really carry the whole body, so I got some L-profiles made of plastic and added them to reinforce the body mount.  Feels strong enough now to carry this beautiful body. Then I started removing the covers of the cargo area using a box knife.   I only removed the rear covers because the front ones are blocked by the body mount and I'll need the space for electronics (custom light controller, battery etc.) Then I used my Dremel to make the opening bigger, so I can fit in some equipment   I sanded all the edges and then used my Dremel to cut out the holes for the rear light buckets.      Then I started building some interior for the cargo area, using 1mm PVC and some L-profiles.     Then I sanded the holes I filled the day before: And finally I started scratching my head over how I'll mount the custom welded powder coated winch bumper to the chassis... Currently there a 3 options: 1. Drill holes into the original bumper, build an extension for the chassis and mount it there. 2. Build a custom mount, that goes below the original bumper, that is fixed to the chassis. 3. Cut the original bumper into two parts, remove the middle section and mount the winch bumper there... 1. might work pretty well, however i might have troubles removing the body then. 2. is the most work of these 3 options and it'd reduce ground clearance, however It'd allow me to remove the body easily. 3. my concern here is, that the original bumper might be not stable enough anymore after this. What do you think?   One final image now, I got my license plates, MOT-sticker (i think that how you call it) and the Unimog sign the other day  That's it for today. Tomorrow I'm going to Portugal for a couple of days, so expect the next update next weekend |
|
| |
|
11-05-2016, 01:42 PM
| #5 |
| Newbie Join Date: Nov 2015 Location: Austria
Posts: 31
|
Btw, don't forget to check out the trello board with links to all suppliers and a complete bill of materials https://trello.com/b/ESzWZOZc/scx10-unimog-fire-truck |
|
| |
|
12-05-2016, 05:08 PM
| #6 |
| Newbie Join Date: Nov 2015 Location: Austria
Posts: 31
|
Alright, it's been a while since I last posted. That's mainly because I was traveling but also because I was working on my custom light and sound controller. In this update I'm gonna introduce you to this part of the project, which is technical, yes, but it's also an integral part of this project. When I started this project I thought I'd use the HeyOK light controller, some blue light bars and a simple sound controller all with a 4-channel remote... However soon I realised that this combination might work but it doesn't give me the flexibility and the customisation options I was looking for, so I decided I'd build my own sound and light controller using an Arduino. The Arduino in one sentence is an, "Open-source electronic prototyping platform enabling users to create interactive electronic objects.". I chose the Arduino Uno and started playing around with it. I had to learn how to use and program an Arduino first.  Then I defined which lights I wanted to connect and which operation modes I'd need:  For this project I used four 74HC595 shift registers connected to four ULN2803 Darlington arrays. If you want more information about what this means, see these two links: https://en.wikipedia.org/wiki/Shift_register Working of ULN2803 IC - Gadgetronicx So I two the Sparkfun Protoshield and soldered 2 shift registers & 2 Darlington arrays together and this is how it looks like now:  I'll publish all the source code, all wiring diagrams and everything you need to reproduce this yourself as soon as I'm finished. Overall I have to say: I've learned a lot about electronics with this project and it's great fun. Of course I can't wait until I finish this controller and use it Here's more information about the progress of the light controller and the project in general: https://trello.com/b/ESzWZOZc/scx10-unimog-fire-truck https://trello.com/b/IQbSI6wZ/rc-ard...ght-controller |
|
| |
|
 SCX10 Unimog Fire Truck with custom light controller and lots of details - Similar Threads
 | ||||
| Thread | Thread Starter | Forum | Replies | Last Post |
| H3 custom truck ~~fire/rescue~~ | TxFire976 | 1.9 Scale Rigs | 14 | 12-04-2010 08:02 PM |
| Anyone ever copied a brush fire truck on a SCX10 | Crawling Calvin | Axial SCX-10 | 11 | 06-06-2010 09:16 AM |
| |


 Linear Mode


