| |
 02-20-2019, 03:19 PM
| #41 |
| Quarry Creeper Join Date: Nov 2010 Location: land of no rocks
Posts: 438
|
Well I have a good and bad update. I was wanting to replace some of the broken parts on the hardbody. Lights and mirrors along with add some of the parts I didnt have yet. Overall I thought it would just be cheaper to buy another hardbody with everything with it. It was maybe a $15-20 difference. I would just build that body for this truck and move this one over to my scx-10 as a class 2 build that Im planning. Well the body showed up from a US seller that I have bought from many times before. All the cool extras I wanted was there. BUT. .   The cab was crushed. Unfortunately once I contacted him he said its going to be sometime before he gets another one. Has to come from China to him then to me. I am waiting for an adapter so I can try 3d scanning.!. If I can get that to work I can print my own cab and body they way I want it. Blister fenders. like this 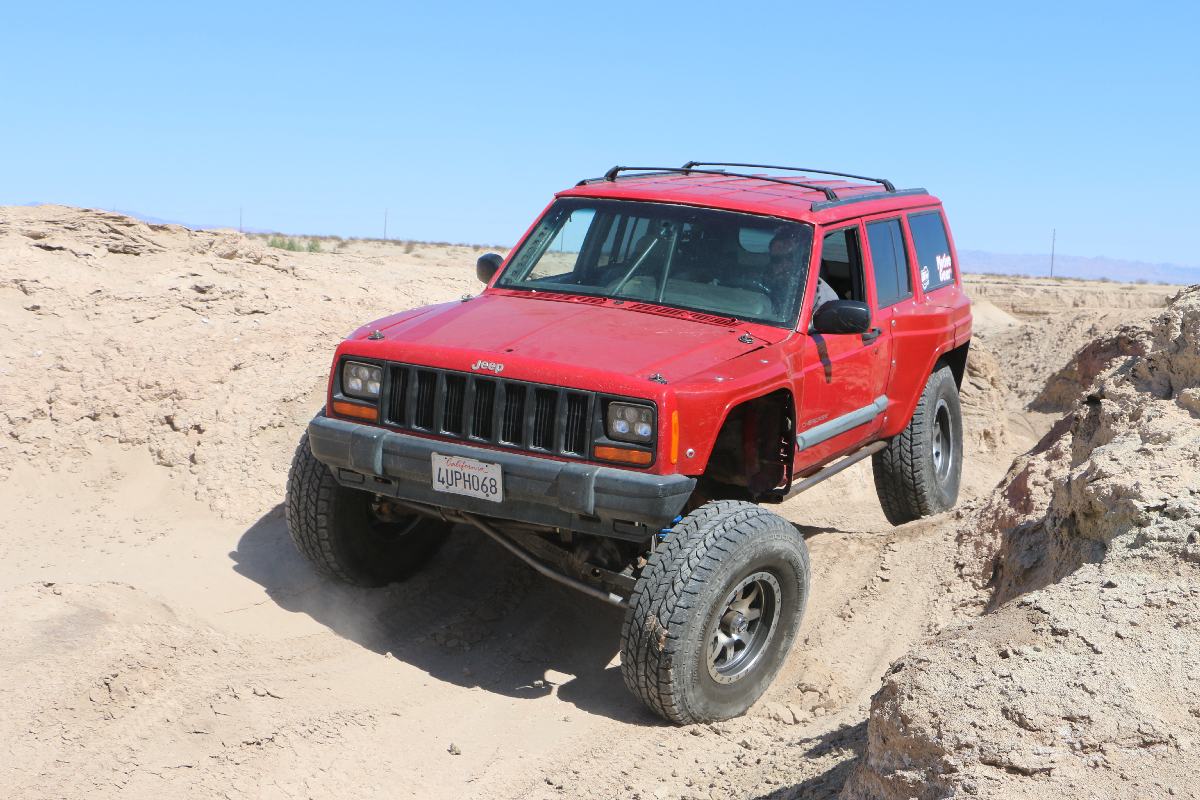 Sent from my iPhone X using Tapatalk Last edited by toka100; 02-20-2019 at 03:31 PM. |

|  |
| Sponsored Links | |
| | |
|
02-20-2019, 04:54 PM
| #42 |
| RCC Addict  Join Date: Nov 2017 Location: 3rd rock pile on the right
Posts: 1,799
|
Wat bout usin a heat gun to reform it a bit toka? Dang postal service is slackin worse n worse everyday smh. Takes twice as long to get your package, it goes to another city to be delivered, or u gotta go to the PO to pick it up cause they were to dang lazy to walk to the porch n drop it off... Sent from my SM-J327VPP using Tapatalk |
|
| |
|
02-20-2019, 05:17 PM
| #43 | |
| Quarry Creeper Join Date: Nov 2010 Location: land of no rocks
Posts: 438
| Quote:
| |
|
| |
|
02-22-2019, 11:29 PM
| #44 |
| Quarry Creeper Join Date: Nov 2010 Location: land of no rocks
Posts: 438
|
New wheels.   Just some cheap eBay ones I have been thinking about for a while. I really like the look of them in the pictures. Now that I have them Im a little divided. They are a skinny and lighter wheel compared to the gear head ones. They also have a very shallow offset. Maybe 0 or 3. The tires are definitely under the body.  I think if I can find some decent looking centers for them they will look better. They do have the standard 6 bolt pattern. The gear heads had their own pattern. Definitely makes the tires look taller. Sent from my iPhone X using Tapatalk |
|
| |
|
03-01-2019, 08:04 PM
| #45 |
| Quarry Creeper Join Date: Nov 2010 Location: land of no rocks
Posts: 438
|
Finally some interior parts. The basic layouts  The esc, reciver and winch controller are all located under the seats. The bec I can mount behind the dash.   Battery cover Here is how it is looking so far    The battery cover/back seat in back right now is a failed print. I tried printing both parts as one. 10 1/2 hours into the print the bottom seat cushion broke off. So now Im printing them in two sections then glue them together.  Rough center floor. Still some fit issues that Im working on. Sent from my iPhone X using Tapatalk |
|
| |
|
03-02-2019, 07:54 AM
| #46 |
| Rock Crawler Join Date: May 2009 Location: Texas
Posts: 720
|
This build is awesome!!!!!!
|
|
| |
|
03-02-2019, 08:19 AM
| #47 | |
| Quarry Creeper Join Date: Nov 2010 Location: land of no rocks
Posts: 438
| Quote:
 A huge problem I am having is the more I learn about the printing and design the more I redo parts that I have printed. So I have to print them again so my box of unusable prints has gotten a lot bigger | |
|
| |
|
03-08-2019, 04:07 PM
| #48 |
| Newbie Join Date: Jan 2018 Location: Wilkesboro
Posts: 5
|
Your prints are looking great. Since I bought my printer a few weeks ago, all I have done is print, reprint, repeat. All of my prints look bad as they get taller. I talked to you a few weeks ago and bought the ender 3 as well. Any suggestions on settings you are using?
|
|
| |
|
03-10-2019, 11:55 AM
| #49 |
| Quarry Creeper Join Date: Nov 2010 Location: land of no rocks
Posts: 438
|  New part. A knights customs roof tent. A little bit of money for the file but I have to admit the design is really good. I printed it in pet-g filament for it should take a beating with out breaking like pla. All my other parts will eventually be printed in this also. Just takes longer and needs a bit more fiddling with the printer. This one at 50% infil and 1.5mm layer height took a little over 26 hours. But dam it looks good. Some sanding and paint it will look even better    Sent from my iPhone X using Tapatalk |
|
| |
|
03-21-2019, 05:00 PM
| #50 |
| Quarry Creeper Join Date: Nov 2010 Location: land of no rocks
Posts: 438
|
I took the xj out to a little area today to really try out the front suspension. After all the crazy weather we have been having here it was finally nice out. Either it has been super cold or being hit by the "Bomb Cyclone" last week and flooding not far from here. It was nice to actually get this thing out again. I did slightly change the front end a bit. By moving the spring mounts forward 5mm I was able to get the springs to sit almost centered over the axle housing. If that makes a difference in how it handles I don't know but it looks better.   The only real issue I keep having was the front drive shaft center section kept falling out. Might need to look at upgrading to some better ones. I have been looking at the ssd scale shafts or the incision ones. The day was cut short by 5 lost screws.  The hex adaptor screws fell out. there was no point of even trying to look for those tiny things in all that dirt. I will just order some more I guess. I was only running on a 2s. I was going to try out a 3s that I brought along to see what the wheel speed would be like with the ssd scale transmission. I think the gear mesh might be a bit tight right now. It is so loud. quick video. I really need to get a good camera and work on taking videos Last edited by toka100; 03-21-2019 at 05:21 PM. |
|
| |
|
03-21-2019, 05:31 PM
| #51 |
| Rock Crawler Join Date: May 2009 Location: Texas
Posts: 720
|
Looks like suspension worked great. Great looking Rig.
|
|
| |
|
03-22-2019, 05:52 PM
| #52 | |
| RCC Addict Join Date: Jan 2010 Location: Barboursville, WV
Posts: 1,448
| Quote:
Sent from my Pixel 2 XL using Tapatalk | |
|
| |
|
03-22-2019, 06:31 PM
| #53 | |
| Quarry Creeper Join Date: Nov 2010 Location: land of no rocks
Posts: 438
| Quote:
| |
|
| |
|
03-22-2019, 06:42 PM
| #54 | |
| RCC Addict Join Date: Jan 2010 Location: Barboursville, WV
Posts: 1,448
| Quote:
Sent from my Pixel 2 XL using Tapatalk | |
|
| |
|
03-25-2019, 05:48 PM
| #55 | |
| Quarry Creeper Join Date: Nov 2010 Location: land of no rocks
Posts: 438
| Quote:
Hard to tell but thats a front clip.  With all the support removed.  The scanning didnt pan out too well. Especially since I found the guys at scale3drc.com They already had a file for my 79 Chevy luv. Now to buy a chassis to put it on. New thread elsewhere will soon follow. Sent from my iPhone X using Tapatalk | |
|
| |
|
04-04-2019, 12:15 PM
| #56 |
| Quarry Creeper Join Date: Nov 2010 Location: land of no rocks
Posts: 438
|
Kinda big yet small update. I installed the ssd hd titanium link set. They are really nice.  I do like that the lower links are thinker then the uppers. Didnt realize that when I ordered them. I do like that the lower links are thinker then the uppers. Didnt realize that when I ordered them.  They are a bit heavier then the stock steel ones but they will be stronger. the smoother transition between the link and the ball end will definitely be a plus. The rear links were a bit long for my wheelbase.  I thought it would be easy. Just cut 4.73mm off one end. My dremel cut through it nice and the bright white sparks were cool. Wasnt prepared for the bright flash when the rest of the dust sparked up.  . Needless to say I started looking into the right way to cut titanium after that. . Needless to say I started looking into the right way to cut titanium after that. Cut slow and keep it cool. Also got a bunch done on the interior. All the electronics are now on a complete floor tray for easy removal.  The dashboard recived some work also. The dashboard recived some work also.  I created some mounts for it and also a cut out to hold a micro Servo   So now the steering wheel turns with the wheels. Kinda a simple thing but it adds to the realism of the truck.   Working on a driver. His lower half got a lot of trimming to fit in place. His joint are really stiff right now but once they loosen up he should be able to drive.  More to come Sent from my iPhone X using Tapatalk Last edited by toka100; 04-04-2019 at 12:29 PM. |
|
| |
|
04-04-2019, 06:50 PM
| #57 |
| Rock Crawler Join Date: May 2009 Location: Texas
Posts: 720
|
This Rig is looking awesome bud keep up the great work!
|
|
| |
 |
 Toka's crazy plum build - Similar Threads
 | ||||
| Thread | Thread Starter | Forum | Replies | Last Post |
| Pajero Build aka - The Crazy Hampster | TwistedXT | 1.9 Scale Rigs | 22 | 03-01-2014 11:15 PM |
| Lazy & Crazy Build: Learning as "we" go. | Frankenwheely | Axial AX-10 Scorpion | 55 | 10-01-2013 07:43 PM |
| Am I crazy for not wanting to build a Jeep | camobob | Chit Chat | 33 | 02-11-2011 05:14 PM |
| crazy video and pictures of a slash vs airbag crazy | josh hayes | Non Crawler RC's | 8 | 07-01-2009 02:56 PM |
| |


 Linear Mode


