| |
| |||||||
 |
| | LinkBack | Thread Tools | Display Modes |
 01-27-2019, 10:18 AM
| #21 | |
| Quarry Creeper Join Date: Nov 2018 Location: Mexico, Guadalajara
Posts: 281
| Quote:
I don't have any ball end allen wrench but might be easy to find one, or I can use the dremel to make a very short wrench as you mentioned,  | |

|  |
| Sponsored Links | |
| | |
|
01-27-2019, 11:36 AM
| #22 | |
| Newbie Join Date: Jan 2019 Location: east
Posts: 16
| Quote:
| |
|
| |
|
01-27-2019, 08:57 PM
| #23 |
| I wanna be Dave Join Date: Jan 2016 Location: california under the rock im crawling on
Posts: 4,288
|
I only clicked to find out what a antigucho is and all i got was a bunch of eye candy lol Looks like a great start |
|
| |
|
02-03-2019, 11:29 PM
| #24 |
| Quarry Creeper Join Date: Nov 2018 Location: Mexico, Guadalajara
Posts: 281
|
Last week I found a car muffler workshop where they can help me to weld/solder some parts. I have this bumper: RC4WD Trail Finder 2 Tough Armor Front Tube Bumper. It can be mounted on SCX10 II but it was originally designed to fit on the TF2 so I have to use the RC4WD Axial SCX10 Universal Front Bumper Mounts  Those part doesn't fit together so I cut the original bumper mounts then the parts were welded together to be mounted directly on the chassis, this is the final result, I will fit a little bit higher covering the front lights but it is ok.  Now something really cool, some upgrades to my JR Fabworx truggy rear cage. I'm planning to mount the electronics on the back, the ESC will be inside a simulated plastic fuel cell, also the receiver will be located on the back inside a box and next to the Powershift RC Technologies Battery DMS Switch Unit.  I was look¡ing for a steel plate to make a platform for the rear cage, during a visit to home depot I notice this brick trowel, the steel material was just perfect for my needs, I also use an old cutting board to make the upper platform. Initially, I try to use a black and decker jig saw tool but it was useless to cut the steel plate, after breaking some jig saw Blades I realize that The Dremel tool and the cutting disc were perfect for my needs. I also use some styrene to make the molds for the platforms.  This work cost me hours of measuring, sanding and carving but I am really happy with the final result, I have to go back to the car muffler workshop to weld the platform, I also have to think how to mount the upper wood platform. I don t know if some kind of powerful glue will be enough or maybe weld some small steel plates to secure the wooden platform using screws.  Finally, an awesome upgrade on my workbench, a new Husky toolbox, I cost the equivalent to $200 USD, I think that the price was great for that product, I have spent more on some orders at amain hobbies, awesome cost-benefit relation. The best part. my wife suggest that purchase  As always still waiting for parts, that's all for now, bye Last edited by antigacho; 02-04-2019 at 07:59 AM. |
|
| |
|
02-09-2019, 10:32 AM
| #25 |
| Quarry Creeper Join Date: Nov 2018 Location: Mexico, Guadalajara
Posts: 281
|
The postman arrives this week so let's install some parts Boom Racing BADASS Rod Ends M4 Nylon w/ Stainless Steel Pivot Ball SSD RC Double Bent Titanium Steering/Panhard Links SSD RC SCX10 II Pro44 Titanium Steering Link Set Samix SCX10 II 313mm High Clearance Titanium Suspension Link Kit  I really like the quality of the Boom Racing BADASS Rod Ends, unfortunately, those are not compatible with the SSD links. To be honest, this time I'm disappointed about SSD Steering and Panhard Links Fortunately, I have longer M3 set screws on my o toolbox so I can solve that situation.  Next week I will work painting the body, I have two of them, on the first one I am going to use the darkly smoked windshield and I´m not going to install interiors, basically because I still waiting for parts like seats, driver, and receiver/ESC boxes for electronics, also the design and painting of that interior is going to take some time because I'm planning to use styrene, I have no experience working with that material so I have to watch some youtube videos and try to learn  I also Have two Front Grills, metal and plastic, I am going to use the plastic one on this 1.0 body version |
|
| |
|
02-18-2019, 10:33 AM
| #26 |
| Quarry Creeper Join Date: Nov 2018 Location: Mexico, Guadalajara
Posts: 281
|
no updates for this truggy project. I need the Battery Mounting Plate and the aluminum center skid plate to have some progress meanwhile, I have been working whit the raw builders kit, for my daughter, that project is ready and yesterday was the first run, later I'm planning to install some lights, simulated lexan interior, and metal bumpers  |
|
| |
|
03-01-2019, 11:34 PM
| #27 |
| Quarry Creeper Join Date: Nov 2018 Location: Mexico, Guadalajara
Posts: 281
|
Finally, I receive some parts to continue with this building, but before that a sad history I suffer the loss of one parcel from amain hobbies, that includes the vanquish shock hoops, so more delays for this building; that is sad, Another of my shipments is also delayed, this includes my new Futaba 4pv radio and the motor pinion, more than 50 days in transit now that's awkward. I was tired of waiting so I place another order just for the 32P (15T) pinion, axial Corbeau seats and some shims that I need for other RC cars, I receive that in two days I paid 56 USD for the products, but 65 USD for DHL, duties, and taxes, I promise I will never do that again the hole on my wallet still hurting. ok, that is enough rant, lets to continue with the building. I have enough parts to put together the chassis and transmission  I installed the battery plate, and aluminum braces, my intention was to make a color contrast between the transmission parts, now I am thinking to strip the hot racing transm¡ission spur gear cover, I don't know yet .. parts to be installed Axial 32P Pinion Gear w/3mm Bore (15T) Battery Mounting Plate servo relocation mount Aluminum Center Skid Plate Samix Rear Chassis H Brace Samix Aluminum Center Gear Box Mount Hot Racing aluminum Transmission Spur Gear Cover this is the transmission  this is how it looks mounted  I also try to install the Samix Brass Shock Spring Cups that that don't wit well on the Pro-Line PowerStroke Scaler Shock apparently the shock shaft is thicker than the includes on stock Ikon shocks, I think I can drill a bigger hole od install that on my daughter's scx10 Cherokee. by the way, I also notice that the new MIP ball end hex driver is perfect to take off the shocks from axles  next step is to figure out how to mount the electronics and make a floor for this 1.0 body version more updates soon Last edited by antigacho; 03-02-2019 at 08:46 AM. |
|
| |
|
03-03-2019, 10:18 PM
| #28 |
| Quarry Creeper Join Date: Nov 2018 Location: Mexico, Guadalajara
Posts: 281
|
the transmission is now complete and mounted so next step is to figure out how to mount the body and electronics, my plan is to install the ESC and receiver inside two different boxes or simulated fuel cells outside the cab, but I haven't that boxes yet, so for this 1.0 body I will try to build some kind of floor pan using styrene to cover the transmission and mount the electronics inside. Since I am using a custom rear cage that includes side sliders, the stock plastic side plates don't fit, so I cut some small steel plates to be welded to the cage, that will serve as mounts for the styrene floor pan, again I need the help of the man at the muffler workshop to weld that parts. I'm considering to get a Propane Torch and learn to weld using with silver solder but I am also afraid that if I do that I have to build another crawler so my wife will not be happy about that. This is my very first work with styrene, after watching some youtube tutorials I got the materials and take a lot of measures to design the floor pan, the big 3S battery that I have Is going to be a problem to install the seats and interior in the 2.0 body, but that will be a problem to solve later some materials  I found that work with styrene is easier than I thought, I am not a handy guy but I'm satisfied with the final result on this work, some sanding and painting is necessary to finish this. I'm also planning to add more glue inside to hardened the joints and beef up the general structure. I just use solvents to weld the styrene and Tamiya putty to fill the gaps  This small steps on the building take me several hours during this weekend, but that was fun Last edited by antigacho; 03-04-2019 at 08:16 AM. |
|
| |
|
03-07-2019, 11:33 PM
| #29 |
| Quarry Creeper Join Date: Nov 2018 Location: Mexico, Guadalajara
Posts: 281
|
This guy is going to be my driver  Some butt cutting is required to make it fit on the Axial AX80080 Corbeau seats  do you this it looks big on the seat?  |
|
| |
|
03-08-2019, 04:48 AM
| #30 |
| Rock Crawler Join Date: Jan 2019 Location: Calgary
Posts: 566
|
Driver looks like a good fit, what figure is that?
|
|
| |
|
03-15-2019, 09:32 AM
| #32 |
| Quarry Creeper Join Date: Nov 2018 Location: Mexico, Guadalajara
Posts: 281
|
During this week, the mailman knocks the door to deliver some important pieces for this puzzle, including the shock hoops/towers that I have been waiting for months. I have that parts back ordered at amain hobbies when they finally ship the parcel where lost in transit so I have to order the same shock hoops at another website meanwhile amain has been working to resolve and refund the money for the package lost, After a couple of months, I finally have these parts necessary to put together the rear cage, the chassis, and the transmission. so here we go, today we are going to install: Wooden rear cage floor/base Aluminum Lower Shock Mount lift Kit Vanquish Products SCX10 II Shock Hoops Samix SCX10 Front/Rear Body Mount Stiffener Post  First I have to mount the wooden base on the rear cage, I decided to dig /carve some wood material just to subtract some grams of the rear cage. I use the Dremel tool and router adapter for this, at the middle of this work I thought I should have carved the word "Antigacho" instead, just for personalization  I try to install some metal mounts on the rear cage to mount the wood plate but I couldn't find any welder who can help me with this delicate work. apparently, I have to get a brazing torch and learn about for the future projects that I have in mind, (Unimog) what do you think of this option : Bernzomatic TS8000 - High Intensity Trigger Start Torch In the end, I use epoxy cement to glue the wooden plate with the metal rear cage. Apparently, that will work I just need to sand the extra glue left in the sides this is the final result Upper view  Lower view  Side view  Next task is to figure out how to mount and Install the electronics also I have to paint the body and find a way to mount it, I will work on that the next weekend so expect some update on this thread next week Last edited by antigacho; 09-17-2019 at 12:36 PM. |
|
| |
|
03-16-2019, 06:23 PM
| #33 |
| Rock Crawler Join Date: Apr 2017 Location: US
Posts: 639
|
Good looking build antigacho. The cage is looking awesome. What a list of parts you have in your build too, wow. That's some crazy wait time for parts you have too. And I thought waiting for a two weeks was driving me nuts for a order coming from Hong Kong, lol.
|
|
| |
|
03-16-2019, 11:37 PM
| #34 | |
| Quarry Creeper Join Date: Nov 2018 Location: Mexico, Guadalajara
Posts: 281
| Quote:
parts from hong kong take 2 to 3 months to arrive Since this is the body V1.0 I will install just a basic interior, the V2.0 will be more scale oriented, that that will take some time meanwhile the V1.0 will be enough next week I will work on Electronics installation and painting. | |
|
| |
|
03-19-2019, 12:43 AM
| #35 |
| Quarry Creeper Join Date: Nov 2018 Location: Mexico, Guadalajara
Posts: 281
|
last weekend I worked with the interiors, I am working on body v1.0, considering that this is my first crawler build I want to have some practice with this body. I dedicate 2 whole days working on this but I just accomplish a couple of milestones I used a lot of CA glue an I made some mistakes. so the final details will not be smooth of realistic but will be good enough to complete this rig. I am happy with this first experience with scratch building, definitely a lot to learn for a future project Ok let's talk about the work that I did on my project First I finally figure out how to mount the rear tire, I use one of that elastic luggage nets available at eBay but I cut it a little make it fit to secure the spare tire, I like the red spots on my build.  I found laying around some hemp strings so I just roll it around the rear cage for ornament  Now the body. I fill all the holes with epoxy putty, on this body I'm not going to install wipers or rear view mirrors so I don't need that The Dremel tool was very helpful, also sandpaper and metal files, I sanded a lot. This building is going to have only the driver seat installed and I will use the darkly smoked windshield, so I cut only the left door to show the driver but not the rest of the lame interior  here is another view  Most of the time was invested in the transmission cover, Is my first time working with styrene so the building process was very slow. The initial transmission cover suffers several changes, first I work figuring out how to mount the seat, I have to cut a hole mount the seat next to the motor, I also have to trim some part of the seat to make it fit more centered I recover the receiver box from the stock kit, It requires a lot of cutting and sanding, but I am happy with the result, receiver and BEC will be inside that box, It was glued with CA gorilla glue The gear lever was made with styrene and a set screw  I have a red elastic band left from the luggage net, so I use that to build a seat belt, I Install a couple of screws attaches to the transmission cover to secure the belt, Also the length of the belt is adjustable for different size drivers, check the screw on the back of the seat  On the dashboard I installed a mini voltage meter, that will be connected to the balance port of the battery; I am using the Dinky RC Yota Interior Kit Still pending to be installed the door panels. also interior painting and glue the seat but that will be after the body painting. The lazy drivers didn't help they were just having fun drinking beers and testing the seat  In the other hand some bad news two missing packages from amain hobbies, one of them includes the HeyOK Performance Lighting Controller, so I can't install the lights, I have to wait two weeks to get the amain's resolution to the missing parcel complaint and then another month to place and receive a new order, more waiting, that sucks Next steps: Installing electronics and painting, I have zero experience painting, I hope not to ruin it with a bad paint job Last edited by antigacho; 03-19-2019 at 11:19 AM. |
|
| |
|
03-20-2019, 01:59 PM
| #36 |
| Gold Star Baby!  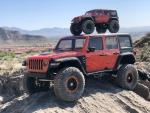 Join Date: Dec 2017 Location: Las Vegas
Posts: 2,554
|
Excellent build! Love the fab work with the shovel head and the other things you’ve come up with. Nicely done so far.
|
|
| |
|
03-21-2019, 10:05 AM
| #37 |
| Quarry Creeper Join Date: Nov 2018 Location: Mexico, Guadalajara
Posts: 281
|
I'm working with the interior painting I think I need to visit the hobby store for more colors, but not now maybe for the body V2.0  I also notice that for my needs acrylic paint is better than enamel Last edited by antigacho; 03-24-2019 at 10:48 PM. |
|
| |
|
03-23-2019, 01:08 AM
| #38 |
| Quarry Creeper Join Date: Nov 2018 Location: Mexico, Guadalajara
Posts: 281
|
I just finished the wiring connection, as I thought I wasn't clean that's why I will keep the right window dark and closed. I just packed the receiver and BEC inside the "antigacho" box a lot of wires and connectors will be just laying around inside the driver's cab, this is not going to be waterproof. Link the Futaba receiver was easy but I don't have a PC or iPhone to program the Holmes ESC or Castle BEC, I will try using my daughter's iPad later The amain parcel that contains the light controller was lost, meanwhile and tired of waiting I have no option than order it again; I notice that after my order the product is now out of stock, aparenteñy I ordered the last one. meanwhile, keep waiting for amain hobbies resolution to my case. anyway no lights for the next 40 days. this is the ugly wiring mess  and some pictures after body mounting   After mounting the rear tires I notice that the shock springs feels soft considering the weight of the truggy, Do you know if there are spring hardness options for this proline shocks? Finally, this is my basic interior build, and noob paintwork, I'm definitely not talented drawing or painting., body paint and weathering will be a hard job for my hobby skills  My other driver is taller than Han Solo so didn't fit inside the cab, for V2.0 body I have to find a way to lower the seat and hide all the cables  I'm happy after this post because my first crawler is alive; after months I can confirm that my electronics work well, except for programming issues. I want to paint the body this weekend, blue and black . Last edited by antigacho; 03-23-2019 at 09:17 AM. |
|
| |
|
03-24-2019, 10:44 PM
| #39 |
| Quarry Creeper Join Date: Nov 2018 Location: Mexico, Guadalajara
Posts: 281
|
Sabado this post is about body paint. I have no experience painting hard bodies but I found a lot of tutorials available on youtube, I don't want the basic single color body instead of that I will follow the popular black hood pattern. I also want to add some weathering details, I found some videos teaching amazing painting techniques, but some of them are too complicated for my skills, but I found one that apparently was easy to apply, and I can re-use the colors that I already have for interiors. this is the useful video from Tim Husley 1st step: Prepare the body sanding the irregularities, also wash and dry the body  2nd step: apply the primer, I sprayed 5 o 6 light hands to have an even surface for paint. after that Y cover the front hood for the black paint  3rd step: Apply the blue paint, again 5 or 6 light painting hands  4th step: Let the blue paint dry, unmask the hood, and cover the rest of the already painted body  5th step: this is where the weathering begins. Using isopropyl alcohol and a rag clothe, I run the areas where rust areas and damage paint supposed to be.  6th step: using Tamiya acrylic paints I apply the following layers with a make-up sponge, desert yellow, flat brown and clear red, maybe those colors are not ideal for weathering buy those are the same that I use for interiors this is the final result, not the best but good enough for my first try, tomorrow the first run    |
|
| |
|
03-25-2019, 10:14 AM
| #40 |
| Quarry Creeper Join Date: Nov 2018 Location: Mexico, Guadalajara
Posts: 281
|
Sunday Finally, first, run after months of building I am not sure of the total weight of this rig but it is heavy, so after some tumbles and rollovers, I realize that the body has some cracks scratches The front grill mounts are broken, also 2 of 3 lower windshield mounts are broken so I can't use screws to reinstall the windshield or the front grill. I think that epoxy glue will help to solve this Some pics that I took during the first run with the crawler community at Guadalajara  I have to learn how to deal with the heavyweight of this rig, tumbles and rollovers can really damage the body so I have to be very careful during driving. I also notice that my truggy is very fast compared with other trucks. I don't know if it is due to the gearing of due to the lack of ESC setup and programming. I have to check that later   I also notice oil leaking in the shocks. by the way, does anybody knows if there are stiffer or harder springs available for the Pro-Line PowerStroke Scaler Shocks? Last edited by antigacho; 09-18-2019 at 09:20 AM. |
|
| |
|
 Antigacho SCX10II Truggy MX - Similar Threads
 | ||||
| Thread | Thread Starter | Forum | Replies | Last Post |
| Buttery Smooth! Axial SCX10II Bleeded Shock Mod - A Must Do all SCX10II | joerc2013 | Axial SCX10 II | 58 | 07-13-2020 09:44 AM |
| |


 Linear Mode


