| |
| |||||||
 |
| | LinkBack | Thread Tools | Display Modes |
 03-25-2019, 10:33 AM
| #41 |
| I wanna be Dave Join Date: Oct 2010 Location: Caldwell ID.
Posts: 4,328
|
:Quote: I am not sure of the total weight of this rig but it is heavy, so after some tumbles and rollovers, I realize that the body has some cracks scratches the front grill mounts are broken, also 2 of 3 lower windshield mounts are broken so I can't use screws to reinstall the windshield of the front grill. I think that epoxy glue will help to solve this. :Quote: That is the problem with heavy hard body rigs! I feel your pain brother. |

|  |
| Sponsored Links | |
| | |
|
03-30-2019, 12:14 PM
| #42 |
| Quarry Creeper Join Date: Nov 2018 Location: Mexico, Guadalajara
Posts: 281
|
Somethig very sad and frustrating just the last weekend I have to opportunity to run this rig for the very first time, yesterday I was cleaning my ring in preparation for weekend action and I noticed that the samix, front lower titanium link was severely bended  Y try to carefully bend it back but the part just crack  I am so frustrated about this because it happens just after my first run so now my crawler is again stuck at the workbench I don't want to buy the complete set again (samix SCX10 II 313mm High Clearance Titianium Suspension Link SAMSCX2-5025HLS) so I suppose I have to go back to stock aluminum links, at least the two lower fronts or maybe all the 4 lower links, I hope they can match together to be able to use my truggy build Last edited by antigacho; 09-18-2019 at 08:37 AM. |
|
| |
|
03-30-2019, 02:52 PM
| #43 |
| I wanna be Dave Join Date: Oct 2010 Location: Caldwell ID.
Posts: 4,328
|
I just knocked out 4 custom links this morning in about an hour. 8/32 all thread and 1/4" stainless tube for the lower links, and same size for the uppers in aluminum. Revo rod ends for the ends and I have virtually indestructible links. You might be able to find some thing local and be on the trail again much sooner.
|
|
| |
|
03-30-2019, 03:07 PM
| #44 |
| Quarry Creeper Join Date: Jun 2015 Location: Lancaster, NY
Posts: 228
|
Contact samix. Their customer service is very good. They will replace that link for you. I had an issue with their lower brass link mounts. The coating they use gets into the threads and the little 2.6mm screw snapped off in the mount. I emailed them and I was sent a new mount and new screws along with it. Wasn’t impressed that I had to tap every hole to remove the coating, but they made it right by sending me a new part.
|
|
| |
|
04-01-2019, 10:45 AM
| #45 | |
| Quarry Creeper Join Date: Nov 2018 Location: Mexico, Guadalajara
Posts: 281
| Quote:
yesterday I broke the rear lower link definitely, I can´t recommend the samilx titanium links now I am considering stainless steel links, Hardcore-Rc offers some good options I just have to ask if they can sell only the 4 lower links | |
|
| |
|
04-01-2019, 03:03 PM
| #46 | |
| Rock Stacker Join Date: Jan 2009 Location: nor-cal
Posts: 73
| Quote:
I to have had issues with my Samix titanium links. It broke right where the threads end. They also told me the same thing. I can order the link separate and did not offer me a replacement.☹️ | |
|
| |
|
04-01-2019, 04:40 PM
| #47 |
| Quarry Creeper Join Date: Jun 2015 Location: Lancaster, NY
Posts: 228
|
Well that is very disappointing to hear. Guess I can cross them off the list for any future upgrades.
|
|
| |
|
04-01-2019, 04:46 PM
| #48 | |
| Rock Crawler Join Date: Jan 2019 Location: Calgary
Posts: 566
| Quote:
| |
|
| |
|
04-26-2019, 04:15 PM
| #49 |
| Quarry Creeper Join Date: Nov 2018 Location: Mexico, Guadalajara
Posts: 281
|
Time to install some upgrades: rear light front light bar aluminum scale fuel cell/receiver box new driver figure First thing I have to do is relocate the electronics and try to clean the wiring on my first try, I put the Holmes ESC is inside the plastic fuel cell  Now I want to move the ESC inside leaving the receiver outside to have just one routing guide from the fuel cell to the cab. I try to keep my tools organized but sometimes my bench is a mess  I think wiring looks a little bit cleaner now. I just dow know hot the scale master can hide all the electronics when they build the interior. definitely, I can't do that  My old interior configuration is not going to work with the new driver who is taller than Han Solo, so I have to build a new interior to make it fit inside I going to use styrene for this work, this time I need two parts: one to place the ESC, BEC and Lights controller and another for the driver seat and voltmeter  I have to cut the seat and shave the butt of the driver to make it fit in a center a lowered position  this is the result before paint, I am very bad with the details, maybe I have to include some cup holders or a Gear lever, anyway, this is not a scale interior  I just have to build some kind of seatbelt to secure the driver to the seat  Last edited by antigacho; 04-27-2019 at 08:37 AM. |
|
| |
|
04-26-2019, 04:47 PM
| #50 |
| Quarry Creeper Join Date: Nov 2018 Location: Mexico, Guadalajara
Posts: 281
|
Tires also deserve some pimp "Rock Ring Beadlock Rings" by BP Custom  96 little screws after  |
|
| |
|
04-29-2019, 03:02 PM
| #51 |
| Quarry Creeper Join Date: Nov 2018 Location: Mexico, Guadalajara
Posts: 281
|
oh no, the last weekend I during the crawling session I was distracted , I didn't pay attention to my truck so it falls approximately 4 meters into a gap between rocks, It was a huge crash the body was broken and the transmission sound strange, the bumper was a little bit bent too, I have to rebuild and carefully check if there is any further damage, the chassis looks a little bit untidy The body is an easy fix, In fact, I already have the replacement but I'm afraid to find more damaged parts. I will work on that tonight, fingers crossed |
|
| |
|
05-17-2019, 09:59 AM
| #52 |
| Quarry Creeper Join Date: Nov 2018 Location: Mexico, Guadalajara
Posts: 281
|
No photos but I installed the Vanquish SCX10 II Chromoly Top Shaft so I dismantle the whole transmission and axles for maintenance As I mentioned before this is my first RC crawler, so I wonder how often do you dismantle and clean your transmissions and axles for maintenance? Another little upgrade I like smoking weed, so my driver too. I was looking for a 1/10 scale smoking pipe or bong, and yeah I found some options available at eBay, not too expensive but the international shipping cost is ridiculously expensive, $25usd shipping for a $3usd scale part.  So I try to model one using styrene Materials: Dremel and cutting disc, some styrene, super glue, steel files, sanding paper, and a little m2 hex screw as a bowl After a lot of sanding, this is the result  I´m going to glue the bong to the drivers left hand. I am now sure If I need to paint the bong or not |
|
| |
|
05-28-2019, 09:54 PM
| #53 |
| Quarry Creeper Join Date: Nov 2018 Location: Mexico, Guadalajara
Posts: 281
| |
|
| |
|
06-01-2019, 05:24 AM
| #54 |
| Newbie Join Date: Oct 2017 Location: spain
Posts: 47
|
hola , saludos desde España, me gusta mucho como te ha quedado la pintura y el interior. En cuanto a los amortiguadores pro line es bastante comun tener fugas.Un saludo "Pulgares hacia arriba""Pulgares hacia arriba"
|
|
| |
|
06-01-2019, 09:06 AM
| #55 | |
| Quarry Creeper Join Date: Nov 2018 Location: Mexico, Guadalajara
Posts: 281
| Quote:
Pintar ese body fue mi primer intento de weatherig, actualmente y debido a mi mala conducción ese body ya esta bastante rayado y algo roto. Ya tengo body igual pero esta vez lo pintare de otro color, talves haga alguna otra modificación en interiores. | |
|
| |
|
07-27-2019, 12:13 PM
| #56 |
| Quarry Creeper Join Date: Nov 2018 Location: Mexico, Guadalajara
Posts: 281
|
After a muddy adventure with some friends, I realize that I need to improve the waterproofing for my receiver  materials: rubber ballon foamy sheet for cushion black insulating tape   |
|
| |
|
09-04-2019, 10:46 AM
| #57 |
| Quarry Creeper Join Date: Nov 2018 Location: Mexico, Guadalajara
Posts: 281
|
after several crashes, fallings, and rollovers the current body is pretty beaten up, so its time to build a replacement parts list: Tamiya Toyota Hilux Front Truck Body TAM9335487 RC4WD Mojave II Cab Back Panels & Grill Parts Tree RC4ZB0074 Clear Plastic Window Windshield for Tamiya Hilux Loops RC Interior Set for Toyota Hilux First step, design half doof for driver´s side  The second step, correct the previous half doof design and glue the back panel and rear window  Third steep, build the door interiors and dashboard, also cut the back panel to fit over the transmission  The fourth step, paint the body  Weathering and final assembly is pending, some Vallejo paints are on the way photos of the final work, soon... Last edited by antigacho; 09-05-2019 at 09:57 AM. |
|
| |
|
09-05-2019, 10:00 AM
| #58 |
| Quarry Creeper Join Date: Nov 2018 Location: Mexico, Guadalajara
Posts: 281
|
some mods to dashboard  paint and weathering  |
|
| |
|
09-05-2019, 10:38 PM
| #59 |
| Quarry Creeper Join Date: Nov 2018 Location: Mexico, Guadalajara
Posts: 281
|
I finished the weathering ising the wash technique I followed the tips from this thread: 3 Stages of Hardbody Paint Weathering of course, it is not the best work but not so bad for my first try using this washing technique some pics  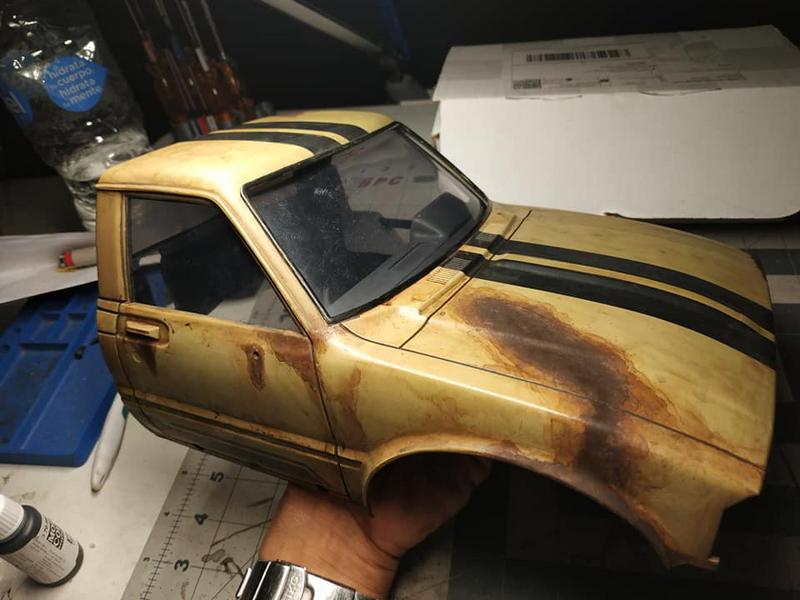   colors used vallejo model color 70865 oil y steel 70946 dark red 70855 black glaze 70887 olive green game effects 72136 dry rust |
|
| |
|
09-17-2019, 11:42 AM
| #60 |
| Quarry Creeper Join Date: Nov 2018 Location: Mexico, Guadalajara
Posts: 281
|
After some ESC failures on wet terrain, I decided to open it up to check what happened, surprised I found that my Holmes Hobbies ESC (TrailMaster BLE Pro) IS NOT waterproof so I ordered a bottle of conformal coating to solve this issue  My Battery D.M.S UNIT also fails, this is because the magnets don't make good contact and two of the magnets suddenly broke I ordered the DMS-X BATTERY as a replacement but I noticed that this model is a little bit taller than the original, I didn't want to get rid of the broken DMS so this is how I repair I improve my battery DMS 1. Take out the broken magnets 2. carefully carve enough space for soldering and installation of the XT60 contact 3. modify the xt60 plug to make it fit 4. soldering the bullet conectors to xt60, and soldering a little cable to the connector to bridge the circuit 5. conformal coating to soldering joints 6. mount the xt60 plug and fill the gap with epoxy resin  final result   |
|
| |
|
 Antigacho SCX10II Truggy MX - Similar Threads
 | ||||
| Thread | Thread Starter | Forum | Replies | Last Post |
| Buttery Smooth! Axial SCX10II Bleeded Shock Mod - A Must Do all SCX10II | joerc2013 | Axial SCX10 II | 58 | 07-13-2020 09:44 AM |
| |


 Linear Mode


