| |
| |||||||
 |
| | LinkBack | Thread Tools | Display Modes |
 03-28-2020, 12:17 PM
| #1 |
| I wanna be Dave  Join Date: Apr 2014 Location: North Carolina
Posts: 2,254
|
Well, lookie here...  Oops...wrong picture. I meant this:  Could it be a coincidence that just a few months after I got my first legit off-roader Axial releases their SCX10 III in kit form with a JLUR body? Maybe, but regardless, I couldn't resist the urge to pick one up. And much as I wanted to resist the temptation to build a mini-me, my willpower is somewhat diminished these days what with all of this extra garage time we're going to have over the next few months. Before you hit the snooze butting, first have a look at how my 1:1 now looks:  And in case you were wondering, my mantra of #noshelfqueenshere applies equally to my 1:1:   Looks I have my work cut out for me... |

|  |
| Sponsored Links | |
| | |
|
03-28-2020, 12:23 PM
| #2 |
| Gold Star Baby!  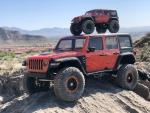 Join Date: Dec 2017 Location: Las Vegas
Posts: 2,554
|
Nice! The 1:1 looks fun. Looking forward to seeing this one come along. |
|
| |
|
03-28-2020, 01:05 PM
| #3 |
| I wanna be Dave Join Date: Sep 2019 Location: US
Posts: 2,408
|
Looks like a fun "challenge". Gonna have to pay attention to this one...subscribed. ~ More peace, love, laughter & kindness would make the world a MUCH better place  |
|
| |
|
03-28-2020, 01:18 PM
| #4 |
| RCC Addict Join Date: Feb 2016 Location: Princeton, North Carolina, USA
Posts: 1,499
|
Going to be looking for a perfectly scale recreation of your CertaPro markings, David...then you can shamelessly plug your business every time you go trailing!  |
|
| |
|
03-30-2020, 10:34 AM
| #5 |
| Pebble Pounder Join Date: May 2016 Location: East Indiana
Posts: 137
|
This ought to be good!! But I'm wondering which will perform better in the wild?? Mini me or the 1:1??
|
|
| |
|
03-30-2020, 10:42 AM
| #6 | |
| I wanna be Dave Join Date: Sep 2019 Location: US
Posts: 2,408
| Quote:
 ~ More peace, love, laughter & kindness would make the world a MUCH better place | |
|
| |
|
03-30-2020, 10:52 AM
| #7 |
| Rock Crawler Join Date: Dec 2018 Location: Ontario, Canada
Posts: 697
|
I've seen some people whine about "another Jeep" body, but you are a perfect example of one of the many guys who will be totally on board with a nicely detailed JL body.
|
|
| |
|
03-30-2020, 11:08 AM
| #8 |
| Moderator   Join Date: Sep 2008 Location: PA
Posts: 13,935
|
Sweet 1:1! So you took an Alien Snot Green Jeep and made it white and yellow? LOL I see the remnants of the green on the hinges, etc though. Those Bully wheels look sick 1:1! Even better than scale Bully wheels IMO. It's also awesome to see you use your Jeep as intended! Looking forward to your build. |
|
| |
|
03-30-2020, 11:20 AM
| #9 | |
| I wanna be Dave Join Date: Jan 2005 Location: Raleigh-ish vicinity
Posts: 3,846
| Quote:
| |
|
| |
|
03-30-2020, 11:28 AM
| #10 | |
| I wanna be Dave Join Date: Sep 2019 Location: US
Posts: 2,408
| Quote:
~ More peace, love, laughter & kindness would make the world a MUCH better place | |
|
| |
|
03-30-2020, 01:17 PM
| #11 | |
| RCC Addict Join Date: Feb 2016 Location: Princeton, North Carolina, USA
Posts: 1,499
| Quote:
| |
|
| |
|
03-30-2020, 01:31 PM
| #12 |
| I wanna be Dave Join Date: Aug 2016 Location: Orange County, CA
Posts: 3,643
|
Nice!
|
|
| |
|
03-31-2020, 09:52 PM
| #13 | ||||||||||
| I wanna be Dave Join Date: Apr 2014 Location: North Carolina
Posts: 2,254
| Quote:
Quote:
Quote:
Quote:
Quote:
Quote:
Quote:
Agreed on the Bully wheels...they look even better in person than in the pix, and much better on the full size than the RC version. At 1/10th scale, they lose the subtlety of the curves and blends. Quote:
Quote:
Quote:
Now that we've exchanged pleasantries, let's get down to business. I put together a review video with initial impressions covering lots of details about the 10.3: https://youtu.be/jUhLiOEtg84 If you get tired of hearing me talk (understandable, since I talk a lot), fast forward to the end. I found some long lost footage of Nick that captures his memory so well. Since I've already driven a dealer demo and gotten my kit running, I'm going to do this thread a little differently. Let's start with the list of what I like best so far:
Lest you think I may have been drinking Kool Aid, here's the list of things I don't like so far:
It should go without saying that the likes far (far, far, far) outweigh the don't likes. So with that out of the way, let's shift gears (sorry) and dig (sorry) a little deeper. Let's start with a closer look at the axles:  Here are the six-bolt lockers carried over from the Capra:  These are much stronger than the original, 3-bolt lockers found in the 10.2. Gear reduction at the pumpkin is the same 3.75:1 we've come to know in the 10.2, and aftermarket AR44 overdrive options will work in these new axles. Portal covers and gears are borrowed from the Capra and provide an additional 1.9:1 reduction:  So if you are the type that likes hardened gears (me) or brass (not me), you can get straight on the upgrades without waiting. How much of a difference does the width make? Here they are compared to Capra axles:  Okay...so maybe that's not a great comparison (though it does underscore how ridiculously wide the Capra axles are). How about compared to TRX-4 axles:  If you're the comping type, that 1/3 of a tire width can make the difference between clearing a gate and taking a penalty. For the rest of us, the skinnier axle gives us that much more flexibility to get the stance right under the body of your choice (though why you'd want anything other than a JLU is beyond my comprehension). And last, but not least, if you're not the portal type, Axial tells us they plan to release a non-portal 10.3, along with optional gears for the tranny to adjust the final drive ratio accordingly. Speaking of the tranny, let's shift (sorry again) our attention to the drivetrain. Kit versions come with all the hardware you need to build the tranny with a 2-speed and/or a dig, or neither. You read that correctly...you can choose to run this as a single speed or a two-speed, and you can set it up either with or without the dig capability. Not surprisingly, that means the transmission bag has lots (LOTS!!!) of gears:  Note that although these are all metal gears (good), they are of the sintered variety (not great) as opposed to hardened steel (would have been great). So if you are the type that enjoys big power (usually me), it's best to be gentle until the aftermarket comes out with hardened gear sets. If you don't want to wait (me), try a more moderate powertrain. Some of the gears look very similar to each other:  So take your time and read through all of the tranny assembly steps before you start putting it together. Axial has included a metal motor plate with discrete holes corresponding to pinion sizes that make it very easy to set mesh properly.  I'm an "and" guy, not an "or" guy, so you can guess how I chose to build my tranny:  The 10.3 kit includes most of the parts needed to assemble servo savers for the 2-speed and dig shifters. The setup is similar to the Capra, even down to Axial choosing not to include the base pieces that slide over the servo pinion. Those pieces are included with Axial's recommended Spektrum sub-micro servos, so working with aftermarket servos might require a bit of improvisation. I didn't want to stretch my brain on such trivialities, so I opted for the Spektrum shift servos. Here's how they look after installation:   I'm starting to fall asleep at the keyboard, so this seems to be a good place to call it a night. Ciao for now. Last edited by new2rocks; 04-01-2020 at 06:09 AM. | ||||||||||
|
| |
|
03-31-2020, 11:50 PM
| #14 |
| Rock Crawler Join Date: Nov 2014 Location: North to Alaska - go north, the rush is on....
Posts: 999
|
Awesome build so far. Your documentary skills make it a great read as well. Keep it up |
|
| |
|
04-05-2020, 08:14 AM
| #15 | |
| I wanna be Dave Join Date: Apr 2014 Location: North Carolina
Posts: 2,254
| Quote:
Let's continue with a few more thoughts on the transmission. The spur/slipper assembly does not use a spring (it uses a hard plastic spacer):  Make sure to give the locknut a (really) good tightening. This setup isn't as forgiving as having a spring, and mine loosened up on my first run in the driveway. Here's an overhead view showing the front motor layout:  And this view gives you an idea of how the motor height looks relative to the shock towers:  Compared to the SSD Trail King, the 10.3 tranny places the motor a little higher and further forward than the Trail King. Strictly from a performance perspective, I like the Trail King's layout because of the overall balance and lower CG. But the 10.3 layout is still very good and puts the motor right where you'd want a 3D engine to sit. Speaking of 3D engines, Axial has included some nice injection molded 3D engine bits for a V8 (or at least a V8 with cylinder deactivation):  As you can see, they've left out the valve cover on the driver's side, presumably to make room for taller servos. That might have an impact on the performance of that bank of cylinders The belt and pulley piece is terrific:  My only real gripe with the setup is that they didn't base the engine cover off the only real Jeep powertrain:  If your Jeep isn't an Alfa-powered hybrid that sounds like a cross between a blender and a leaf blower, you're just pretendin'... Back to the #tinytruck. Let's have a look at the shocks. For the 10.3, Axial has carried over the shock design first introduced on the Capra. Is it just me, or does this sight send chills up your spine:  The irony of shock assembly is that I always dread that part of building a kit, yet I always feel good once I have an assembled set of nice, smooth shocks. These shocks are emulsion style (no bladder on top) but include a bleeder valve on the shock cap to make it easier to get rid of unnecessary air:  You may have noticed the bottle of 60 weight oil in the first shock pic. I used the 60 instead of the 35 weight included with the kit, because I tend to like thicker oils for more damping to slow the suspension cycling down. 60 weight felt pretty good on the bench. Axial says the new design cuts down on leaking, but one of the 4 shocks on the demo truck already had a small leak straight out of the box. Let's just say the jury is still out, so I used Green Slime on the o-rings to try to keep the oil where it belongs. We'll see how they hold up. Here's what they look like assembled:  One final note on the shocks. The kit includes 2 soft (red) springs and 2 firm (green) springs. Though you'll be hard pressed to find this in the instructions, Axial intends for you to put the soft springs in front and the firm springs in the back. The only issue I have is that, even without any pre-load, the rear shocks sit at full extension, which is a bit high for my liking. But I have an idea for that (more on that later). Speaking of borrowing from the Capra bag of tricks, the 10.3 also adopts the Capra's link design (with one notable exception to be discussed in a bit).  The beefy metal links have a nice heft to them, and Axial finally got the memo about plastic pivot balls (quoth the Raven, "Nevermore"). Interestingly, the drag link is the only one where the rod ends don't get screwed all the way on to achieve the specified link length:  That anomaly explains the toe-in on the demo truck that our LHS received from Horizon. I guess their assemblers in the factory didn't read follow the instructions any better than I usually do. One last note about the links...the center holes make installation a breeze. Just stick a hex driver through the hole to hold the link in place while you screw on the rod ends (using a second hex driver through the pivot balls speeds the process up considerably). As a bonus, because the links are reverse-threaded on one side, the center holes can be used to adjust link length on the fly turnbuckle-style:  More updates coming after I finish some more video editing... | |
|
| |
|
04-05-2020, 01:27 PM
| #16 |
| Gold Star Baby! Join Date: Dec 2017 Location: Las Vegas
Posts: 2,554
|
Excellent write up so far. enjoyable read. |
|
| |
|
04-10-2020, 08:02 PM
| #17 | |
| I wanna be Dave Join Date: Apr 2014 Location: North Carolina
Posts: 2,254
| Quote:
Now that we've gone through the major components, let's talk about how it all goes together. Most of the news is good (as you'd expect, given how much thought obviously went into this new platform), but there are a few head-scratchers. The biggest one is the steering servo mount, which is partly disguised as an oil pan. Apparently, in their zeal to add scale details, the folks over at Axial seem to have forgotten that most servos (at least ones that don't have Spektrum labels on them) have rectangular tops:  It's easy enough to fix with a utility knife in a couple of minutes, and the fix doesn't affect the structural integrity of the mount:  But still...it's not unreasonable to expect more, especially from a kit. While we're on the topic of the steering servo mount, the front suspension geometry is very (very) tight, especially around the panhard:  When the passenger's side is fully compressed, the already skinny panhard link has just enough room to fit into the recessed grove molded into the servo mount/oil pan piece:  That leaves very little room for a beefier panhard, axles with slightly different panhard mounting locations, or running shorter shocks, unless you're willing to do some cutting or make your own servo mount. Also don't be surprised if your favorite clamping servo horn doesn't fit (some will, some won't):  Some of this clearly has to do with the decision to go with portal axles, which put real estate at a premium. But other portal-based platforms (like the TRX-4 and Gen On the plus side, it's very nice to have two different options out of the box for battery mounting:  The side plate location is perfect for a shorty pack like our Helios RC 3S 3700 or 2S 5000 packs, both of which offer tons of run time:  If you prefer running even bigger packs, the rearward location will fit batteries like our Helios RC 3S 5200 pack, the trade-off being more weight over the rear axle:  You can probably guess my preference...I'm going to stick with the side plate location and run mid-sized 3S packs. A good 3S 3500-3700 mAh pack will deliver 4+ hours of trail time, which is plenty, and the performance benefits are well worth it. This truck benefits from moving as much weight forward as you can (within limits, of course), especially compared to the 10.2, which starts out with the battery already over the front of the truck. As nice as the shocks are, I'm not thrilled with the choice of stock spring rates. If you place the green (firm) springs in the front and the red (soft) springs in the rear, you seem to get a pretty noticeable case of Carolina squat:  Flip the shocks around, and the stance starts to look more like a top-fuel dragster even with no pre-load in the rear shocks:  I came up with a solution that worked quite well. I started with inner springs taken out of RC4WD 70mm Ultimate Scale Shocks (the stock front shocks from the TF2), which up to this point had served no useful purpose in the universe (or at least in my garage):  I placed one of the RC4WD springs around the shock shaft inside each of the green-sprung shocks, below the piston. After adding some pre-load to the external springs, the resulting semi-droop effect created the perfect stance:  As an added bonus, the internal springs act much like a sway bar and help increase stability on sidehills. I will offer the disclaimer that a certain somebody that I know and whose opinions I (mostly) respect was highly skeptical, having tried similar setups "back in the day." Perhaps I happened to stumble upon just the right blend of external spring rate, internal spring rate and length, and shock oil weight, and perhaps other combinations might not work as well. Regardless, this setup did great when I took it out for testing, so I'm going to stick with it. If you don't happen to have a pair of the 70mm internal spring take-offs, fear not. Anywhere you can find a TF2 owner (which is just about anywhere), you're likely to find a spare pair. That seems like a good place to call it a night. Thanks for following along! Last edited by new2rocks; 04-10-2020 at 08:51 PM. | |
|
| |
|
04-11-2020, 10:19 AM
| #18 |
| RCC Addict Join Date: Feb 2016 Location: Princeton, North Carolina, USA
Posts: 1,499
|
Nice! I got my stance reasonably acceptable with judiciously applied pre-load, but the first run will tell if that carries over to performance.
|
|
| |
|
04-13-2020, 04:51 PM
| #19 |
| Rock Crawler Join Date: Mar 2008 Location: Plainfield
Posts: 669
|
Sweet action bro. I really like your solution to the rear suspension. So youre using 60wt all around? Lou |
|
| |
|
 Hooray for the trey! New2rocks builds a mini-me SCX10 III - Similar Threads
 | ||||
| Thread | Thread Starter | Forum | Replies | Last Post |
| New2rocks builds a Blazer (kind of) | new2rocks | RC4WD Trail Finder 2 | 8 | 10-06-2017 02:36 PM |
| Mini monster builds? | CM9000 | Mega/Monster Trucks | 6 | 10-03-2017 07:13 AM |
| DELUX builds a Jerp Cherokee Mini-me! | delux | 1.9 Scale Rigs | 18 | 03-17-2016 06:19 AM |
| Shock info for mini builds of ALL types... | 89redranger | Losi Mini-Rock Crawler | 0 | 04-27-2015 06:17 PM |
| where are the Chaotic Pro mini builds? | bikerj08 | Losi Mini-Rock Crawler | 9 | 12-05-2011 08:41 PM |
| |


 Linear Mode


