| |
| |||||||
 |
| | LinkBack | Thread Tools | Display Modes |
 10-16-2011, 11:40 PM
| #1 |
| Pebble Pounder  Join Date: Sep 2011 Location: Bend
Posts: 152
|
This is my first build thread, and first scale / crawler build. I started with an Axial Wraith RTR in August of 2011. My current build consists of: Electronics Battery: a 3s 2300 mah battery from the LHS (don't recall brand) or a 2s 5000 mah battery from Racer's Edge ESC: Holmes Hobbies BR-XL ESC w a 10amp Castle Creations BEC Motor: Holmes Hobbies Torquemaster 55T motor Front-Servo: HiTec 7955 GH Racing Servo Horn II Rear-Servo: Futuba BLS452 Racer's Edge Aluminum Servo Horn Radio: Spektrum DX6i How I configured the DX6i Front Axle: Internals: Stock Externals: Vanquish Steering knuckles, C Hubs, Lockouts, and RC4WD ARB Transmission Cover Steering Linkage: Level 3 Racing Steering Link Traxxas aluminum toe link for the drag link ST Racing Concepts Aluminum Front Servo Mount Block w Upper Link ST Racing Concepts bottom shock mounts. Rear Axle: Internals: Stock Externals: Stock knuckles, C Hubs, Lockouts, and RC4WD ARB Transmission Cover Steering Linkage: Stock ST Racing Concepts Aluminum Rear Mount Block w Upper Link * ST Racing Concepts bottom shock mounts. Transmission: Internals: Stock top and main gear, Robinson Racing Idler gear Spur and Pinion: 11t pinion / 80t spur Driveshafts: stock with aluminum rod inserts I removed the aluminum rod, decided I'd rather twist a drive shaft than smoke my motors. Suspension: Links: Vanquish Titanium Upper & Lower in the Front & Rear Shocks: G-Transitions from RC4WD Level 3 RC droop kit on rear Wheels & Tires: Wheels: Axial 22 8-Hole Beadlock Black (AX8097) Tires: Losi Comp Claws 2.2 Tires w/Foam (Blue) Body: Hood by Dinky RC Traxxas battery mount pins for the hood to hold it in place, wire ties as hinges in the front Side, rear, and roof panels - self made sheet metal Battery holder under the hood - self made sheet metal Windshield from RC Bros Custom Wraith Bumper from MG200 here on RCC including d-rings Custom Wraith rear stinger bumper Accesories & Misc 3Racing crawler winch RC Screwz stainless steel screw kit Tow chain Custom plate for passenger side to mount Go Pro HD (used occasionally) Go Pro HD for first person view filming (used occasionally) RC4WD King Kong Tow Shackles Rear mounted spare tire (used occasionally) Snow Chains (used occasionally) Modification Notes: Receiver box and ESC have been moved back up front, crammed under the hood along with battery 2S 1000 mah for winch and room for up-to Venom 3s 2300mah for primary power Updated: 03/13/2012  Current Photo (Not Current no ones soon...) 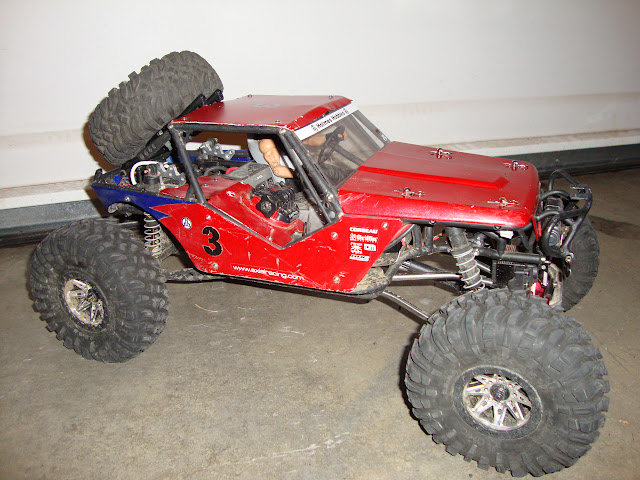 This is my custom passenger cover and first person view camera mount and spare tire attached. 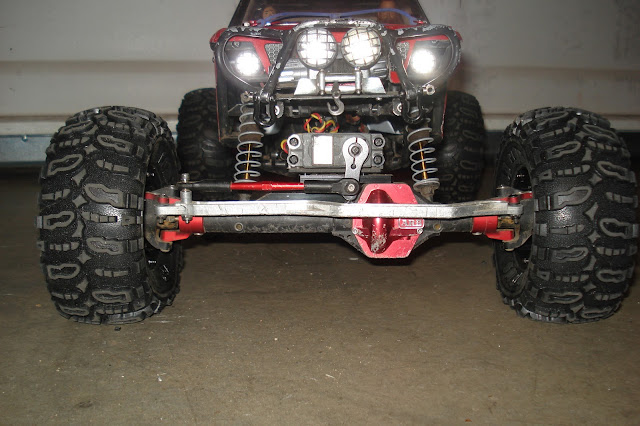 Hitec 7955tg servo, Racer's Edge Server Arm, and a Traxxas toe link as my drive link, you can see the RC4WD Transmission Cover, new C Hubs, and MG200's beautiful bumper.  A look under the hood. A 3s lipo for running, and a 2s 1000 mah for my winch. Full Photo Album: https://picasaweb.google.com/randqui...eat=directlink You can see all of my Axial Wraith related RC videos here. Last edited by Kobier; 03-13-2012 at 10:38 PM. Reason: Latest upgrades - new radio and 4WS |

|  |
| Sponsored Links | |
| | |
|
10-16-2011, 11:42 PM
| #2 |
| Quarry Creeper Join Date: Mar 2010 Location: murrieta
Posts: 390
|
Love the red  |
|
| |
|
10-16-2011, 11:53 PM
| #3 |
| Pebble Pounder Join Date: Sep 2011 Location: Bend
Posts: 152
| |
|
| |
|
10-18-2011, 08:30 PM
| #4 |
| Pebble Pounder Join Date: Sep 2011 Location: Bend
Posts: 152
|
Video's from Sunday's drive: Sunday splash at Sawyer Park - YouTube Sunday Drive - Part 2 - First Person View with an Axial Wraith - YouTube |
|
| |
|
10-23-2011, 11:03 PM
| #5 |
| Pebble Pounder Join Date: Sep 2011 Location: Bend
Posts: 152
|
So this weekend I moved my receiver and ESC to the back of the vehicle, made a sheet metal platform and attached it to the frame in place of the battery tray. Extended wiring for the things that needed it. Created a battery holder up front that holds up to a full-size battery pack, another experiment with bending sheet metal (I'm new at this, but having fun fabricating). Moved my rear tail lights from hanging down below (factory position) to being embedded in the rear of the side panels. Replaced my tow bar with a solid panel. Then I decided to up the ante on my paint scheme and go for two colors, so the blue is a new addition. Waiting on a new sticker sheet to arrive, to finish up the details. On the front end I replaced the stock Axial Servo with a 9KG B7018 from Redcat Racing (stock in my Redcat Racing Earthquake 8E), replaced the plastic drive link with a Traxxas aluminum toe link, and upgraded the server arm to a futuba clamp on style. I also picked up a new 3S 2300 mah lipo battery, adds a nice dash of speed, gotta be careful letting off the throttle though or it just end over ends... Next - figuring out how to create a custom transparent logo for the hood.  This is the logo I'd like to put on the hood of the vehicle. (Cleaned up of course) |
|
| |
|
10-28-2011, 03:06 AM
| #6 |
| Pebble Pounder Join Date: Sep 2011 Location: Bend
Posts: 152
|
Yesterday I got my windshield from RCBros, put it in place and put a nice Holmes Hobbies banner across the top.  New windshield from RCBros Today I was out driving at Sawyer park for a little bit, and got in a bind. Noticed my front wheels didn't seem to be spinning... I snapped a driveshaft... The LHS had nothing in stock, so I swapped it out with on of the extras from the kit.  My snapped driveshaft and a warped on from the back end. Trying to decide between the MIP and Crawler Innovations Maxx upgrade kit. Any opinions on one versus the other? C.I. Maxx Drive Shaft Upgrade Kit and MIP C-Drive Spline Set for Axial AX10 Scorpion (2 each) #08101*-*Driveline Parts: Driveshafts and driveshaft parts*-*-By Truck: Axial AX10 Scorpion, SCX10, Honcho*-*The Crawlers Store LLC The crawler innovations solution gives the option of running a larger spur gear. |
|
| |
|
10-28-2011, 06:36 AM
| #7 |
| RCC Addict Join Date: Feb 2005 Location: Minneapolis
Posts: 1,496
|
I just put the Maxx shafts on, with no adapters. About 10-15 minutes of dremel time total. Haven't got a chance to run it yet, but will this weekend. Running a 3300 Kv 4 pole short course motor.
|
|
| |
|
10-28-2011, 07:29 PM
| #8 |
| Quarry Creeper Join Date: Feb 2008 Location: Montreal, Canada
Posts: 265
|
do you have the part number for the traxxas link? very nice rig!!! i thought that it would be faster than that with the 13t on 3s with stock gearing, but from the pictures of the drive shafts, it looks like you have a ton of tork |
|
| |
|
10-31-2011, 02:45 AM
| #9 | ||
| Pebble Pounder Join Date: Sep 2011 Location: Bend
Posts: 152
| Quote:
Quote:
| ||
|
| |
|
10-31-2011, 02:47 AM
| #10 |
| Pebble Pounder Join Date: Sep 2011 Location: Bend
Posts: 152
|
Today I went out to Sawyer Park with k_goodrich - we had a good time, link to video will be available tomorrow. I did however manage to bust my Redcat Servo, so I stopped by the LHS(D's Hobbies in Bend, OR) and picked up a HiTec-7955, one less item on my upgrade list Also based on my conversation with k_goodrich I have taken a piece of aluminum tubing and put inside my driveshafts to eliminate their ability to collapse, I wonder what will break instead...  The aluminum shafts.  Inserted into one end of the drive shaft. You can ignore the blue steering knuckles, those belong to my Redcat Racing Earthquake 8E. Last edited by Kobier; 11-16-2011 at 07:15 AM. |
|
| |
|
10-31-2011, 02:00 PM
| #11 |
| Pebble Pounder Join Date: Sep 2011 Location: Bend
Posts: 152
| Last edited by Kobier; 03-21-2012 at 11:04 PM. Reason: fixed video link |
|
| |
|
10-31-2011, 04:22 PM
| #12 |
| Quarry Creeper Join Date: Feb 2008 Location: Montreal, Canada
Posts: 265
|
nice spot!
|
|
| |
|
11-02-2011, 03:09 PM
| #13 |
| Pebble Pounder Join Date: Sep 2011 Location: Bend
Posts: 152
|
My latest accessory for my Axial Wraith:  I won't be able to put them into place for another two weeks (out of town), but excited to have my own pile to play on in my back yard.  Trial run prior to putting things into place. More pictures latter this month. |
|
| |
|
11-02-2011, 03:36 PM
| #14 |
| RCC Addict Join Date: Sep 2011 Location: Peoria, AZ
Posts: 1,168
|
Pretty cool video and thats a sweet spot to crawl.
|
|
| |
|
11-03-2011, 12:52 PM
| #15 | |
| RCC Addict Join Date: Mar 2009 Location: Chilton
Posts: 1,622
| Quote:
I did the shaft through my shafts also but put a female on each end with the male in the middle of them and ca glued the metal rod inside the male. So far they are doing pretty good they have twisted a little on me but seem to be alot stronger than before. I tried just putting the rod in the male and running it with one female and the male but it still twisted enough to break. It has been through several weekends of torture with the 2 females and the male in the middle and barely has a twist in the male now. Last edited by craddock35; 11-03-2011 at 12:58 PM. | |
|
| |
|
11-18-2011, 12:06 AM
| #16 |
| Pebble Pounder Join Date: Sep 2011 Location: Bend
Posts: 152
|
So I got a my custom bumper from MG200  Before mounting  After mounting, still needs paint, but I'm holding off on that until this weekend. Last edited by Kobier; 11-18-2011 at 12:29 AM. |
|
| |
|
11-21-2011, 03:15 AM
| #17 |
| Pebble Pounder Join Date: Sep 2011 Location: Bend
Posts: 152
|
No photos yet, but I got the bumper painted, hacked off the back of the cage and am working on the spare tire mount, or just scale accessories haven't decided yet. I also went to an aluminum roof, and am swapping out drivers, more pictures soon. In the mean time here are two videos from Thursday and Friday: Last edited by Kobier; 03-21-2012 at 11:06 PM. Reason: fixed video links |
|
| |
|
11-22-2011, 02:25 AM
| #18 |
| Pebble Pounder Join Date: Sep 2011 Location: Bend
Posts: 152
|
So I took the Wraith to the chop shop and hacked off the backend of the tube frame and added a spare tire mount.  Added my RC4wd Tow Shackes  In the process of installing the new bumper, I broke one of the LED wires on the front lighting system, so it's pulled off at the moment. I also installed my Castle Creations 10 amp BEC, put it inside a baloon, sealed with wire ties and dielectric grease, and then slide into a large piece of heat shrink and sealed up, I believe it's good for getting wet.  Upcoming projects for my Wraith include:
Last edited by Kobier; 11-26-2011 at 12:33 PM. Reason: fixed link to photo of my BEC |
|
| |
|
11-22-2011, 02:34 AM
| #19 |
| Pebble Pounder Join Date: Sep 2011 Location: Bend
Posts: 152
|
Oh and here's a quick action shot from one of my videos:  |
|
| |
|
11-23-2011, 01:50 AM
| #20 |
| Pebble Pounder Join Date: Sep 2011 Location: Bend
Posts: 152
|
One of the joys of having a first person view camera. I love the shadow in this, almost looks like the RCC logo.  |
|
| |
|
| Tags |
| axial wraith |
| |


 Linear Mode


