| |
 11-09-2011, 12:53 PM
| #1 |
| Im Brandon  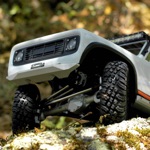 Join Date: Feb 2005 Location: Colfax, CA
Posts: 8,156
|
Figured I better share my Wraith. Starting a rebuild for the first time to utilize all the cool options that are now available. Originally built this for the 2011 AWCC G6 event that was in June. It started out looking like the pics below. Axial Aluminum machined links shortened 10mm with XR10 rod ends Axial 7mm upper links that I bent to work with the Wraith Axial Comp shocks - Black springs 4WS - 2 Futaba S9157 Axial Wraith Universal Axle shafts Axial Aluminum C's and Knuckles Tekin FXR 35T Holmes Motor Axial XR10 VWS Beadlocks Axial R35 Ripsaws Chino Lightbar Custom steering links (Before all this cool Ti stuff was available, time to switch) Axial Overdrive gears in the front Modified Driveshafts to keep the male spline from being exposed. This also strengthened them. Haven't had a single problem. Custom spare tire mount for proper G6 approval. Last edited by Brandon; 11-09-2011 at 01:14 PM. |

|  |
| Sponsored Links | |
| | |
|
11-09-2011, 12:56 PM
| #2 |
| Im Brandon Join Date: Feb 2005 Location: Colfax, CA
Posts: 8,156
|
When I arrived to cisco grove for the 2011 AWCC I put my Wraith through its first shakedown run. Found out a single Castle BEC wasnt up to the task of the dual Futaba S9157 servos. Had to remove the rear steer for the weekend The Wraith still ran great though. Probably worked out for the best as the 4WS may have gotten me into more trouble without the practice using it. Action shots from AWCC G6 Event. |
|
| |
|
11-09-2011, 01:05 PM
| #3 |
| Im Brandon Join Date: Feb 2005 Location: Colfax, CA
Posts: 8,156
|
Two more pics from AWCC  |
|
| |
|
11-09-2011, 01:06 PM
| #4 |
| Im Brandon Join Date: Feb 2005 Location: Colfax, CA
Posts: 8,156
|
Some pics of the crude spare tire mount. I used a body clip to hold it on for quick tire changes when on the clock in a G6 challenge. I used a plastic wheel to keep the weight down. |
|
| |
|
11-09-2011, 01:13 PM
| #5 |
| Im Brandon Join Date: Feb 2005 Location: Colfax, CA
Posts: 8,156
|
The most recent update was a prototype VP Chassis Mount Servo and Panhard kit to test out. Everything fit great, I was able to give VP some feedback on the axle mount for the panhard link, Jim did an amazing job on this product. Only issue I had Jim found a solution for. Updated pics with the new mount shortly.
|
|
| |
|
11-09-2011, 01:15 PM
| #6 |
| RCC Addict Join Date: Mar 2007 Location: Penngrove
Posts: 1,809
|
Looks sweet B!
|
|
| |
|
11-09-2011, 01:17 PM
| #7 |
| Im Brandon Join Date: Feb 2005 Location: Colfax, CA
Posts: 8,156
|
Time for a tear down, this rig still had mud/grime on it from its first run at AWCC Also going to install some new soon to be release Axial goodies! |
|
| |
|
11-09-2011, 01:51 PM
| #8 |
| Rock Crawler Join Date: Jan 2011 Location: Groningen, The Netherlands
Posts: 528
|
Oh dear.. My Pay-Pal is already crying-out in abject horror and fear for the coming mptying..  Say..how about those anti-sway bars Axial promised on the bottom of the RTR's box? I made my own out of circuit-board and messing collars, since I cannot braze, and am not very good at working with aluminium... Yet.. I would prefer to aquire Axial-branded ones. |
|
| |
|
11-09-2011, 02:14 PM
| #9 |
| Im Brandon Join Date: Feb 2005 Location: Colfax, CA
Posts: 8,156
|
Axles cleaned up enough to work on and fresh parts installed. The Axial link mounts and VP panhard mount fit together perfectly. The VP mount does limit you from flipping the link mounts or using the other holes for the shock, small price to pay for such a cool piece The Hard anodized diff covers and link mounts totally changed the look of the axles. Love the color! |
|
| |
|
11-09-2011, 05:26 PM
| #10 |
| I wanna be Dave Join Date: Aug 2011 Location: Burque
Posts: 3,805
|
That looks real good bro, I love that color combo of the aluminum. |
|
| |
|
11-09-2011, 05:40 PM
| #11 |
| DOOH!!! Join Date: Feb 2007 Location: AZ
Posts: 2,105
|
Is it done yet.. I need those link/shock mounts!! |
|
| |
|
11-09-2011, 05:46 PM
| #12 |
| I wanna be Dave Join Date: Feb 2007 Location: BFE, NV
Posts: 2,324
|
So with that vp panhard mount you are forced to use the middle shock position on the axle huh?
|
|
| |
|
11-09-2011, 05:49 PM
| #13 |
| 20K Club   Join Date: Jul 2004 Location: Sending illegals home one Hayabusa at a time.
Posts: 22,981
|
Finally! You're way behind! I stripped a Robotronics arm this weekend testing out the new CMS kit (karma from saying I have never stripped one). Know anywhere I can get some fancy new upgrades? |
|
| |
|
11-09-2011, 05:50 PM
| #14 | |
| 20K Club Join Date: Jul 2004 Location: Sending illegals home one Hayabusa at a time.
Posts: 22,981
| Quote:
| |
|
| |
|
11-09-2011, 06:03 PM
| #15 | |
| I wanna be Dave Join Date: Feb 2007 Location: BFE, NV
Posts: 2,324
| Quote:
| |
|
| |
|
11-10-2011, 07:16 AM
| #16 |
| Newbie Join Date: Sep 2011 Location: Ft. Wainwright, AK
Posts: 32
|
Holy crap, I love your Wraith build. Lots of good ideas for when I get home!
|
|
| |
|
11-10-2011, 01:28 PM
| #17 | ||||||
| Im Brandon Join Date: Feb 2005 Location: Colfax, CA
Posts: 8,156
| Quote:
Quote:
Quote:
Quote:
Quote:
Quote:
| ||||||
|
| |
|
11-10-2011, 01:29 PM
| #18 | |
| Im Brandon Join Date: Feb 2005 Location: Colfax, CA
Posts: 8,156
| Quote:
I got this servo horn from Axial. You should PM him | |
|
| |
|
11-10-2011, 01:33 PM
| #19 | |
| DOOH!!! Join Date: Feb 2007 Location: AZ
Posts: 2,105
| Quote:
They aren't are they, mines patiently waiting it's turn for the second go around.. We need to get back to not sleeping!! | |
|
| |
|
11-10-2011, 01:54 PM
| #20 |
| Rock Crawler Join Date: Jan 2010 Location: In the lair editing video
Posts: 660
|
Were the link mounts on the axle found to be a weak spot? Other than the plastic links taking a beating the rest of the rig seems quite durable.
|
|
| |
 |
| |


 Linear Mode


