| |
| |||||||
 |
| | LinkBack | Thread Tools | Display Modes |
 06-10-2016, 09:05 PM
| #1 |
| Quarry Creeper  Join Date: Apr 2016 Location: Canada, Ottawa/Gatineau
Posts: 290
|
Owning, bashing and happily upgrading a Traxxas E-Revo VXL 1/16 since 2009, my best friend had to go out and buy himself in January 2016 a 1/10 Ruckus AND then a 1/8 Kraton 6S within a month of the first one (bastard   Not that I have an inferiority complex with my old reliable 1/16 Revo, especially when compared to the Kraton 6S, but high speed bashing alone gets kinda old after a while. After countless hours of web surfing, Youtubing till my eyes bleed in the wee hours of the morning I was decided to try out or progress to a crawler/rock racer type of rig. Therefore, mid-March 2016, I walked in my LHS here in Ottawa and left with a hole in my wallet of nearly $900 CDN, a box containing a Wraith RTR, aluminium parts, BIG LiPo batteries (compared to the 1/16 Revo that is) and a feeling of what the f... did I just get myself into again!!! Having studied in mechanical engineering and worked in the industry of design, prototyping, fabrication, and mass production. Including as a hobby 7 years of autocross and track racing a daily driven 2005 Subaru 2.5RS, building 3 versions of normally aspirated race engines top to bottom, designing and fabricating on and off-road and race components.  And because I am a bit OCD, I tend to try my hand at building my own stuff and testing most concepts/theories myself. Which in the RC world is a good thing since the liability and risk factors are almost nil compared to 1:1 vehicles.  Without further ado, here is my project Northern Progression, from the world of high speed bashing and into the realm of low speed crawling. After reading Harley's multiple guides that are stickied (big props to Harley for the time and effort he spent on those ), I proceeded over the last few months to read a couple hours almost every day on crawlers in general, setups and the Wraith.Project Northern Progression now had an objective, something to aspire to! But first things first, and just like my 2.5RS, the following required some immediate attention on the RTR: - Lights baby!!! - Lower the COG; and - A power plant upgrade. After playing on my CAD for an hour or two, I was satisfied with my version of a lowering kit that did not require any holes in the hood. Then into the garage to replicate using the crudest of tools I have left since I am now a government employee and no longer have access to machine tools   In the lights department, my LHS had in stock a nice roof rack that included a 4 LED light bar that is an almost exact match to the Axial ones found on the RTR, and to increase the light output of all the LED pods on the Northern Progression I painted the reflector bowls with gloss silver paint.  Next up was a Traxxas Titan 550 21T motor with a change of pinion/spur, from the stock 20/80 to 15/87 as a starting point. By early April 2016, my STRC C-hubs that were backorder finally arrived and I was ready to install all those nice aluminium bits I had picked up when I bought the RTR back in March: - RC4WD inner fenders; - STRC knuckles, C-hubs and lock-outs; - Axial universals; - STRC steering links; Mid-April and I quickly realized that my roof mounted light bar tends to be one of the first thing to make contact with the ground when project Northern Progression rolls over... Back to the garage to design and fabricate my own roll over protection system (ROPS) as known in the ATV/UTV industry. A length of a 1/8" cold drawn steel rod, a quick and dirty 2 dowel bender, my MIG, some rod ends from the plastic tree supplied with the RTR, a bit a silver paint and voila! Also added to the build, a bit of scale and recycling ingenuity: an exhaust stack to fill the hole in the stock hood where the antenna would normally go; I used some steel fuel lines that I found on an old 2001 Subaru 2.5RS intake manifold I had lying around in my scrap pile. Once sanded to remove the rust and clear coated, it has just enough patina to look legit!      Finally I had my first real run with project Northern Progression other than inside the house or in my backyard covered in 5 feet of snow. Spring is in the air, its about 5 degrees Celcius, there is a bit of mud where the sun has full exposure and about a foot of snow left every where else. Me and my 8 y.o. daughter went out for some bashing and mudding with both my RCs. Good times followed by a 2 hour clean up!    Last edited by valheru; 04-24-2017 at 06:37 PM. |

|  |
| Sponsored Links | |
| | |
|
06-10-2016, 10:19 PM
| #2 |
| Newbie Join Date: May 2016 Location: 209, CA
Posts: 33
|
Any plans with tires, wheels, weight? How do you like that motor?
|
|
| |
|
06-10-2016, 10:23 PM
| #3 |
| Quarry Creeper Join Date: Apr 2016 Location: Canada, Ottawa/Gatineau
Posts: 290
|
I've owned my Wraith for only 3 months now and still can't believe the amount I've spent and the quantity of mods I did to it so far, tire/wheels included, but summer camp fees for my kids is slowing me down! I run the Titan 21T on 2S and love it so far, my current gearing is 13/87, it has enough wheel speed for me to do a light jog behind it and I can almost make it move to the millimetre. More to follow. |
|
| |
|
06-10-2016, 10:30 PM
| #4 |
| Newbie Join Date: May 2016 Location: 209, CA
Posts: 33
|
I have seen a lot of people use it, just don't know anyone personally.
|
|
| |
|
06-10-2016, 10:49 PM
| #5 | |
| Quarry Creeper Join Date: Apr 2016 Location: Canada, Ottawa/Gatineau
Posts: 290
|
Post "first real run", a few thing became apparent this thing likes to flip over easily with the battery in the back and with the Axial black springs (1.04 lbs) installed at every corner it rolls over when cornering at any speed higher than a walk. Guess I will do the battery forward modification and the Axial rear sway bar kit. Also on the list and not planned for, is a replacement servo; the stock servo I had waterproofed gave out the magic smoke 3 days after my last run, and this when I powered project Northern Progression while working on it on the bench! Bloody hell, that f... factory servo! When it died, it damaged the receiver, which in turn damaged the stock ESC... Time for some more upgrades on top of the battery/electronic relocation: - Hitec HS-7955TG - Internally waterproofed with MG silicone conformal coating (part# 422B) and externally waterproofed with Plastidip spray; - Tekin FX-R ESC - Internally waterproofed with MG silicone conformal coating and externally waterproofed with Plastidip spray; - Castle 10A BEC - Internally waterproofed with MG silicone conformal coating and externally waterproofed with liquid tape.   I also relocated the stock LED controller and the splitter that brings the power from the receiver to both the roof mounted light bar and the stock LED controller into a Pelican case look-a-like at the foot of the passenger side, all sealed with RTV and silicone grommets for waterproof automotive connectors.   Quote:
Check out his build thread, page 2, post # 22 and up. bilinvic's Wraith Rock Crawler Question, how do you transform and dead bread machine pan and a piece of sheet metal into something useful for your Wraith?!?  You turn it into a front and rear differential pumpkin skid plates!        Also, my Axial rear sway bar set came in and I did a scale aluminium diamond plate tailgate.  After installing the Axial rear sway bar (RSB) with the softest of the bars supplied in the kit and having a test run, it solved 2 problems; the first being my frequent roll overs when cornering a medium and above speed and it got rid of 90% of the torque twist / front driver wheel lifting off the ground when crawling. All of this without impeding much on the rear suspension movement/travel when combined with the Axial black springs and 30wt oil. But to future proof myself and cause you never know once you're out on the trails, I decided to KISS (keep it simple stupid) and make a RSB quick disconnect and stowage clamp. Works awesome!    And if there is one thing that I learned while racing my 2.5RS, you can never have too many tires; there is a thread pattern and compound for every condition and application. Let the tire hording begin! To start, some Axial beadlocks and Proline TSL XL with those wayyyyy too big and hard marshmallow memory foams. Time for a bit of creative trimming. It happens that the 2.2 foams fit tight on the outside of my press drill chuck, set it to the lowest speed and use what ever cutting tool you feel like. In this case a Olfa snap-off blade utility knife. Much better, now the tires actually flex.   I also got myself the STRC aluminium lower shock mounts, I got tired of having to pry open the stock plastic ones everytime I wanted to remove the links and shocks. Stiff is good (that what's she said!). Last edited by valheru; 04-24-2017 at 06:43 PM. | |
|
| |
|
06-11-2016, 09:12 AM
| #6 |
| Rock Stacker Join Date: Mar 2015 Location: NC
Posts: 97
|
Nice work on the build so far. Bread machine skid! That's awesome. I put my receiver box where you put your light controller. Then everything else is under the hood. It looks like you are going to put your battery up front- that will certainly help with crawler type situations.
|
|
| |
|
06-11-2016, 09:30 AM
| #7 | |
| Quarry Creeper Join Date: Apr 2016 Location: Canada, Ottawa/Gatineau
Posts: 290
|
I just realized I have no good photos of my exhaust stack showing off that awesome patina. You can't fake that stuff!   Well my OCD is acting up again... I am getting tired of the slop in the factory lockers and having to tighten the C-hubs and rear lockouts after 1 hours of running. Red Loctite is not helping to counter act this... Time for some brass Beef Tubes and Locked Up RC FI spools for both axles and some oversize flange pipe bushings for the front steering. Awesome product both (sorry no photos), but I did spend 3 hours lapping the flats on the inner axle shafts to get .0005 - .0008" of press fit with the FI spools slots, now they "snap" like Lego blocks do together. One more thing that annoyed me was the play between the C-hubs / lockouts and the splined section of the AR60 housing they slide onto. To act as a shim that can conform to the contour of the splines, I applied some HVAC aluminium tape to the spline section only; a single layer is all it took to have a nice snug fit.  Also, the factory installed stickers on the supposedly Corbeau seats are too big for the pads, not even put on straight and are starting to peel off. Time for a bit of scale painting to match what the actual Corbeau LG1 race seats look like.   Quote:
While I like the extra clearance that the Proline TSL XL provide, I am not entirely satisfied with their level of grip, even with my "W" trimmed stock foams and 2oz in each tires. When compared to online videos, my foams seem to act like the DD medium. Time to keep fueling my tire addiction. Most of them are mounted on 2.2 Axial beadlocks which are vented, 2oz stick-on weights in the fronts only and with either custom or the factory foams: - Proline TSL XL (5.75") - custom foams; - RC4WD Mud Slingers 2 XL (5.5") - factory foams; - Hot Bodies Rover White Dot (5.5") - custom foams; - Axial Ripsaws R35 (5.5") - factory foams; - Proline Dirt Paw studded for ice/snow - no foams, but they remove skin the prickly bastards, 72 #4 wood screws in each tire!  For the Rovers, I ended up keeping the stock foams as is, but since I felt they didn't fill the tire properly, I added a strip of AC weatherseal from the hardware store that I cut to half it's thickness (1-1/8 x 2-1/4"). Worked awesome, filled the Rovers nicely, side hills good and flexes plenty for crawling.   With a bit of experimenting, I ended up doing a variation of my custom Rover foams for the Proline TSL XL. Using my band saw, I cut down the outside diameter of the stock Proline memory foams to 4" before installing the same thickness of AC weatherseal as I put in the Rovers. For those wondering on the conformal coating I used to waterproof all my electronics (servo, ESC, receiver, BEC, etc.); its the brush-on MG silicone conformal coating, part# 422B.  Next item on my things to improve on: the suspension links. Now don't get me wrong, the VP, Incision, BMR and others are really nice and look well made, but being in Canada I can't justify paying 50 $US of shipping on a 100 $US item. So for less than 55 $CDN tax-in, I made myself everything listed below: first some high clearance lowers out of 1/4" round 6061-T6 aluminium and a XR10 linkage set (part# AX80057), these turned out beautiful.   After running the aluminium lower links for a bit I soon realized that they were getting hung-up everywhere on the rocks when compared to the stock plastic ones. Since I was going for less drag when sliding on rocks with the links, may as well try and improve on my "bread pan" axle pumpkin steel skid plate. Say hello to: - 1/4" round cold drawn steel high clearance lower links; - Ultra high molecular weight (UHMW) polyethylene - Drive shaft CV boots made out of RC4WD Super scale shock boot (part# Z-S0891); and - 3oz of lead under the front steering servo.       Currently I'm running about 50/50 travel on my stock shocks with still on the Axial black springs (1.04 lbs) and the soft RSB. She weighs 9.5 lbs, my skid plate height is 2-3/8" with the Proline TSL XL, I don't feel the need for more. Next project / subject of study: anti-squat. Bloody anti-squat... I've been reading on the subject for the last 7 weeks; done some tests, made some links, took measurements, transferred to my CAD, started over, and over, and over...  Thru my testing of different lengths of links, mounting points, spring rates, with and without the RSB, so far project Northern Progression can do 55 degrees on a plywood plank covered with recycled rubber subflooring on it (Dura-Son). This has similar grip/slip to the rock we have here in Ottawa when I compared them during incline tests. What saddens me, is that this 55 degrees is achieved with the following setup, which as per my measurements and CAD is a squat setup: - Stock length links upper and lower; - Stock mounting points in front, with the lower link mount pointing up; - Stock mounting points in back, with the lower link mount pointing down; - Axial black springs (1.04 lbs) all corners with 35wt oil; and - RSB set to soft. The first is a screen shot from my CAD and the other one is the same setup with strings going from the links mounting screws to compare the real world to the virtual one, they match pretty good.   I tried higher chassis mounting points for the rear upper links, similar to what msrace did ( MS Racing's UnWraithed Wraith ), but that didn't work, it pushed my IC about 47 inches behind the rear of the truck!?!  Now I have plans to make my own raised upper link axle mounting bracket, similar to the one below, to go with the raised chassis upper link mounts, either machined aluminium or welded steel tube and plate. I might also design my own 4 link skid risers.  Last edited by valheru; 04-24-2017 at 06:50 PM. | |
|
| |
|
06-11-2016, 12:57 PM
| #8 |
| Quarry Creeper Join Date: Apr 2016 Location: Canada, Ottawa/Gatineau
Posts: 290
|
On April 21st there was a fire in the building where I work, as a result the roof is partially collapse and all 1,800 of us federal government employees were sent home for a week minimum until the organization figured out what to do with us! Well, I ended up staying home for 2 weeks before we got relocated and started working part-time, and under really screwed up conditions (5 to a computer, winner! ) .During that 2 weeks "vacation" I was getting beyond obsessive on the subject of anti-squat (damn OCD). So I decided that a bit of scale work to change my mind from anti-squat and to go OCD on instead was in order. Ever since I did the battery/electronic relocation mod, it always annoyed me that where the battery used to be in the back was left barren and without a purpose. Now I decided to stick with my theme of the NATO green Pelican case and make a filler for that slot:     The box has the same dimension as my hard case 2S 6500 mAh battery, is made of RC plane plywood and SIG basswood scale 2x4 and houses a multi-bit screwdriver and a 4-way wrench. It's also painted NATO green outside and gloss white inside. 3 weeks ago while trying to push my way up and over a rock with the front axle against it, the stock plastic idler gear in my transmission stripped. I guess the 550 Titan 21T on 2S has more oomph than I thought. Upon tear down, I noticed that the bores in both transmission housing halves where the shaft for the idler gear go were worn out, no wonder we strip gear so easily, its not just the plastic gears that are weak. What is interesting is the following, as per the Axial design and layout, that shaft is supposed to be static (not turning) since the gear it supports has 2 bearing that are riding on it. This tells me that there is less or equivalent friction between the shaft and the housing, than inside the idler gear bearings when under load (failure analysis is part of my current job)! This leads to the shaft spinning, even partially instead of the bearings, wearing out the housing and forcing the gears out of alignment, thus causing catastrophic failures. So now I need a new housing and an idler gear. One more trip to my LHS, all they have in stock is the Axial hardened gear set (part# AX30708 ), no stock plastic transmission housing or aluminium hop-up. So I order the Hot Racing aluminium transmission case and few other bits to get me rolling and test out one more theory. Since I want to play with my toy truck and don't want to wait 2-3 weeks for the HR trans case to come in, I will try and save my now worn out plastic housings by making bushings for them. Material required: - 7/32" O.D. brass tube (5.55 mm); - Zero-it; - .0005" dial gauge; - Cross-vise; - Press drill; - Every drill bit under the sun; - Digital caliper; - Digital micrometer; - Files; and - Magnetic base. Using a hand drill and every drill bit under the sun, I progressively oversized the inside diameter of the brass tube until I had about .0005 - .0008" of press fit with the idler shaft and I cut 2 bushings that are about 75% the depth of the bores of the plastic housings. Using the rest of the equipment; center the head of the press drill in the bore of the first housing half with the zero-it, use the bottom portion of the bore, that is where mine was the least worn out and average out your center. Don't forget to lock the cross-vise. Drill out the bore to a diameter that will give you a press-fit of about .0007 - .0012" (notice the step in the bore). Press your bushing in the bore using the idler shaft mounted in the press drill and the gear as an pushing/depth setting tool. Repeat on the other housing half. Assemble the bottom gear on the output shafts and center both the gear and the second shaft to zero compared to the first, for a total indicator run out (TIR) of .001" or less. You want the assembly to be concentric that is. Finally, re-assemble your transmission like you normally would and enjoy your toy truck again. The main idea behind my repair, is by using light press fits between the housing halves and the bushings, and between the bushings and the shaft, the later will remain static, thus forcing the bearing to turn under all conditions and take all radial loads applied as per the design of the gear box. As of today (June 11th) I've put 5 packs thru my rebuilt transmission housings, it runs cooler and quieter than in stock form. My HR case did arrived last week, but I first want to see how long my "improved" plastic case will last before installing it. Last edited by valheru; 04-24-2017 at 06:54 PM. |
|
| |
|
06-11-2016, 01:33 PM
| #9 |
| Quarry Creeper Join Date: Mar 2015 Location: Woodland
Posts: 279
|
that box is dope, nice work
|
|
| |
|
06-11-2016, 05:13 PM
| #10 |
| Quarry Creeper Join Date: Dec 2015 Location: United States
Posts: 447
|
If you're bearings were not seized, that shaft wasn't doing much, if any spinning. The slop in your housing was either there from the start due to loose tolerances and/or a result of broken teeth getting stuck in the good teeth on the gears. Probably a combination of both depending on how far out of round the holes were. Axial trans cases are not exactly know for their precision, they have slop at that shaft when new and could benefit from the truing-up and support you've done before being put into service. I've got several transmission with the same idler gear/shaft design, some dating back to '97 and they don't suffer from the excessive slop or wear, but they're molded more precisely and made from better, or at least more rigid material. It's a sound design if executed properly with decent material. |
|
| |
|
06-11-2016, 05:43 PM
| #11 |
| Pebble Pounder Join Date: May 2013 Location: kinzers
Posts: 180
|
awesome job
|
|
| |
|
06-12-2016, 12:00 AM
| #12 | |
| Quarry Creeper Join Date: Apr 2016 Location: Canada, Ottawa/Gatineau
Posts: 290
| Quote:
The bearings were still good, its the same ones that are still in it and they are smooth and quiet. When I first bought the RTR and took the transmission apart in the first week of ownership to grease it (something I always do), the fit between the bore and the shaft wasn't the greatest, not a press fit, but there was no play either. Its kinda weak that something like a transmission housing is worn out after 3 months of use in a location where there should be no rotational movement, and on a 2S brushed system. Its not like a Wraith is an industrial continuous service gear box to have seen 4,500+ hours of service in 3 months, I run my Wraith an hour every week on average, that's roughly 12 hours of service since l bought it. But for having owned a Traxxas product since 2009, Axial could learn a thing or two from them on quality and tolerances. Heck, my brushed LiPo powered E-Revo 1/16 is still running the same axles, differentials, transmission case and gears since I bought it. Other than replacing suspension arms, knuckles and one front differential housing from doing cartwheels at 50 km/h, everything else is still pretty much stock. So far the ESC and micro servos tend to last 2 years max, but that might be because I run 2.2 stadium truck tires on it (4.1" instead of the stock 3.3"). Just like the 1:1 world, every company has its pros and cons, guess I'll just call this one the Axial curve; pay 600 $CDN for a RTR, but expect to spend as much in hop-ups to make it reliable! Last edited by valheru; 06-12-2016 at 05:14 PM. | |
|
| |
|
06-12-2016, 04:54 PM
| #13 |
| I wanna be Dave  Join Date: May 2015 Location: Moving
Posts: 2,580
|
Very cool build |
|
| |
|
06-12-2016, 05:13 PM
| #14 |
| Quarry Creeper Join Date: Apr 2016 Location: Canada, Ottawa/Gatineau
Posts: 290
|
Thank you sir. Since I bought my Wraith I almost never touch my E-Revo anymore, and this to the great happiness of my kids! Last edited by valheru; 06-12-2016 at 05:17 PM. |
|
| |
|
06-13-2016, 01:03 AM
| #15 |
| Pebble Pounder Join Date: Jun 2015 Location: Netherlands
Posts: 114
|
Good looking build! Hear that from more people, buy a Wraith, never touch the other rc's again :P |
|
| |
|
06-13-2016, 06:19 AM
| #16 | |
| Quarry Creeper Join Date: Apr 2016 Location: Canada, Ottawa/Gatineau
Posts: 290
| Quote:
I just realized I forgot one of the first mods I did to project Northern Progression, its a variation of what can be found in the Axial blog to beef up the WB8 drive shafts, but with (or to prevent) a twist. Axial Racing - WB8 Driveshaft Upgrade Instead of just pressing an aluminium dowel or as I've seen done elsewhere, glue a length of piano wire inside the bore of the male half of the WB8 drive shaft, I threaded mine for 5/16 UNC and blue Loctited a length of treaded rod (imagine a giant set screw) to reinforce it instead. This has a lot more surface area due to the thread profile, therefore should be a lot harder to deform/twist under application of torque than just a plain dowel, either pressed or glued, and mine is removable for service (in theory) since I cut slot in the exposed end of the threaded rod with a hacksaw. After 3 months of use with a brushed 550 21T motor, no sign of deformation., but the plastic splines are starting to show some wear where the 2 halves slide past each other.   Next project, a bit of electrical clean-up and I will make my own compact receiver bypass harness to power my steering servo directly off the Castle 10A BEC.  My current mod list: 1. General: - Battery forward mod; - 3oz of stick-on lead under the front steering servo; - RC4WD inner fenders; - All electronics relocated to the front; - DIY scale tool crate - Fits in the stock battery location. 2. Axles: - DIY UHMW polyethylene front/rear axle pumpkin skid plates; - STRC aluminium: knuckles, C-hubs, lower shock mounts and lock-outs; - Locked Up RC FI spools; - Brass Beef Tubes; - Axial universals. 3. Steering: - Hitec HS-7955TG - Internally and externally waterproofed; - DIY servo mount plate to clear the chassis under full suspension compression; - STRC steering links; - Oversize Flange Pipe Bushings. 4. Suspension: - DIY lowering kit similar to the Level 3 one; - RTR shocks - Cap sealed with black RTV, O-rings replaced with Traxxas X-rings from GTR rebuild kit #5462. - 30 or 35 weight oil (can't remember); - Axial black springs (1.04 lbs) all around; - Axial rear sway bar set to soft; - DIY bent high clearance 1/4" cold drawn steel lower links; - Skid height at curb weight is 2-3/8" using the Proline TSL XL tires. 5. Wheels and tires: 2oz stick-on weights in the fronts only and with either custom or the factory foam, all vented: - Axial Ripsaws R35 (5.5"); - Proline TSL XL (5.75"); - RC4WD Mud Slingers 2 XL (5.5"); - Hot Bodies Rover White Dot (5.5"); - Proline Dirt Paw studded for ice. 6. Electronics: - Tekin FX-R ESC - Internally and externally waterproofed; - Traxxas brushed Titan 550 21T motor for the E-Maxx; - Castle 10A BEC - Internally and externally waterproofed; - 2S 6500mAh batteries. 7. Powertrain: - Internally beefed-up WB8 drive shafts with 5/16 UNC threaded rod; - DIY CV boots for the drive shafts universal joints; - Improved factory plastic transmission housing; - 87T/48P spur gear; - 13T/48P pinion.  Local classified FTW! I picked up last night from a fellow ex-SCX10 owner the following for 1/5 of the normal price: - GMade XD piggy-back 103mm; and - 2 set of Axial HD under drive bevel gears.  The GMade shocks need some new shafts since they are a bit too scored to my liking and one of them is leaking from the fake reservoir, but other wise they look almost new. I guess a rebuild is in order. Is there any merit to keeping the fake reservoir that only tunes the hydro-lock characteristics of the shock as the shock compresses, vise converting them to an emulsion or diaphragm type? Also, other than the Proline Power-Stroke springs (if you buy their rebuild kit to get the dual spring adapter), what other springs are worth looking at? Last edited by valheru; 04-24-2017 at 06:57 PM. | |
|
| |
|
06-27-2016, 03:46 PM
| #17 |
| Quarry Creeper Join Date: Apr 2016 Location: Canada, Ottawa/Gatineau
Posts: 290
|
Small update, I took my lunch hour to fab my compact receiver bypass harness and reprogram my Castle 10A BEC to 7.4V, big difference from the 6.5V I was running previously! As you can see compared to a HH scale print-out, mine is about half the size and fits within the factory electronics box just like I wanted with some room to spare for some more wire.  Also, the first portion of my shock rebuild parts bin inventory came in the mail today; various sizes, types, shapes and material o-rings that all work with GMade XD and some like the 006 sized o-rings that will work with the stock Axial shocks for the shaft. All quantity 300 o-rings for less than 20 $US shipped to Canada compared to quantity 10 for 3 $US +SH.   3 weeks after ordering, I am still waiting on my LHS for 2 more different O-rings to add to the inventory, and my pistons and shaft kits for the GMade to rebuild them anew. Last edited by valheru; 04-24-2017 at 06:58 PM. |
|
| |
|
04-24-2017, 08:14 PM
| #18 |
| Quarry Creeper Join Date: Apr 2016 Location: Canada, Ottawa/Gatineau
Posts: 290
|
Damn, 6 months since I last updated the progress of my Wraith! Much has happened since then; from fabrication techniques I hadn’t touched in 15 years to major configuration changes to the base vehicle. Post re-building the GMade XD piggy-back 103mm shocks using the O-rings I ordered from oringsandmore, which still haven’t leaked after more than 20 packs of use, I performed the following: - Shorten the wheel base so that the rear tire is flush with the rear of the truck - Did the “tummy tuck” modification; - Did the fast back modification with an DIY aluminium roof panel; and - Painted and installed a Spawn interior.  Modifying the cage:    Making some custom 304SS side covers:     Fitting and installing the side covers to the modified cage:    Skid plate re-installed:  1/4” steel rod brazed rear brace for the fast back mod:  Fitting the ESC to the side cover:  Spawn interior painted up:    All done and on the rocks:   Last edited by valheru; 04-24-2017 at 08:19 PM. |
|
| |
|
04-29-2017, 07:45 AM
| #19 |
| Quarry Creeper Join Date: Apr 2016 Location: Canada, Ottawa/Gatineau
Posts: 290
|
After 15 years of not using it (no not that... But first lets fuel my tire addiction with some JConcepts 2.2 Scorpios, green compound (super soft), mounted on some Axial plastic bead locks with 2oz of lead in the front assemblies.  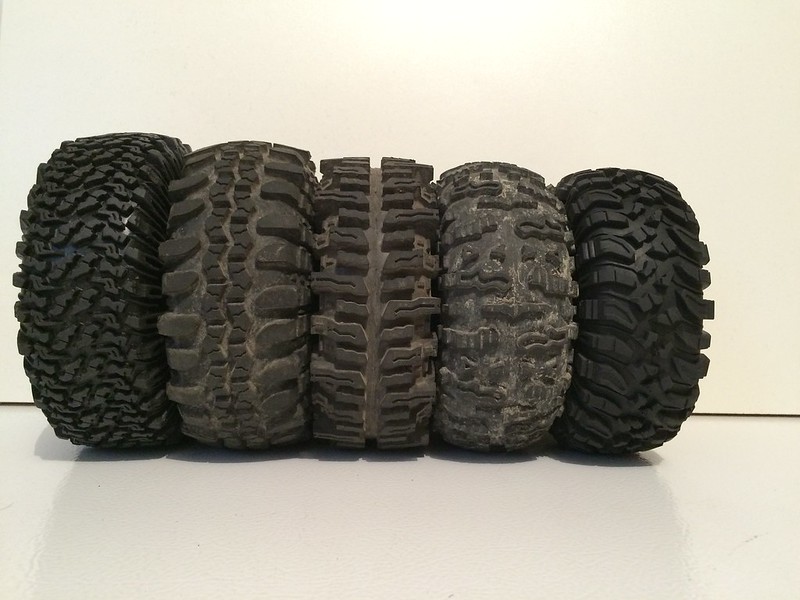 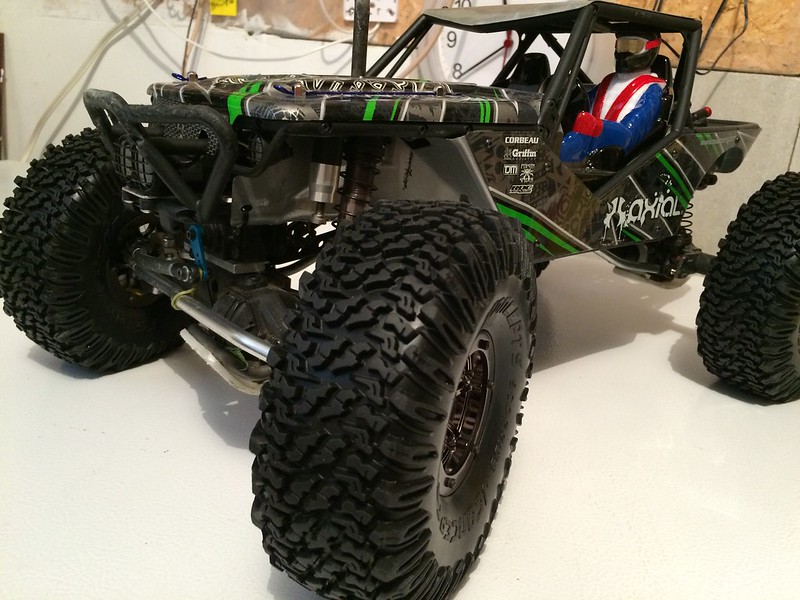 The grip on dry rocks of the Scorpios is better than the Pro-Line Interco TSL SX Super Swamper XL 2.2" G8 compound, except when the tire is packed with mud. In the muddy conditions, the TSL, with their open lug design are better, if not, the Scorpios seem to act like competition pin-like tires on the rocks. Using the JConcepts supplied foams and with my Wraith weighting in at 9.5lbs, the side hilling was great, the photo is of my Wraith driving down a 45 degree rock face. 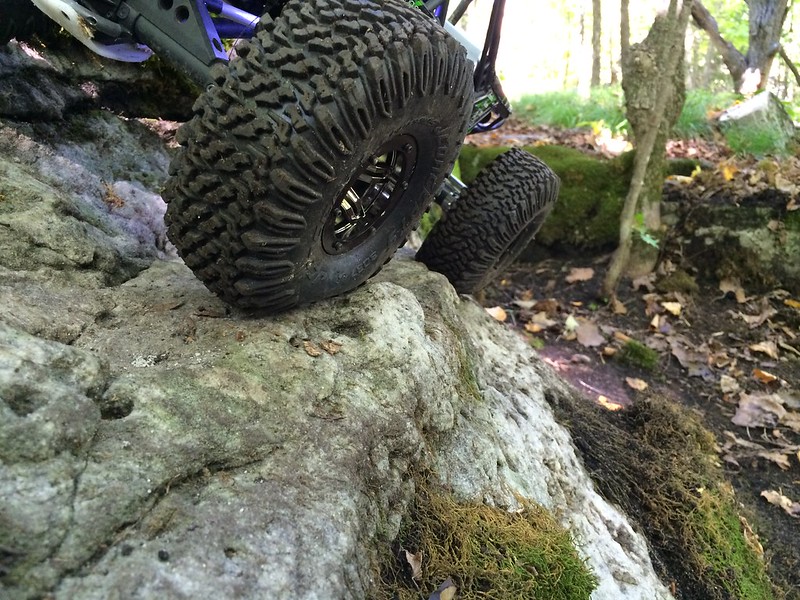 This single photo of a roof rack / light bar was driving me nuts and got me back into brazing. 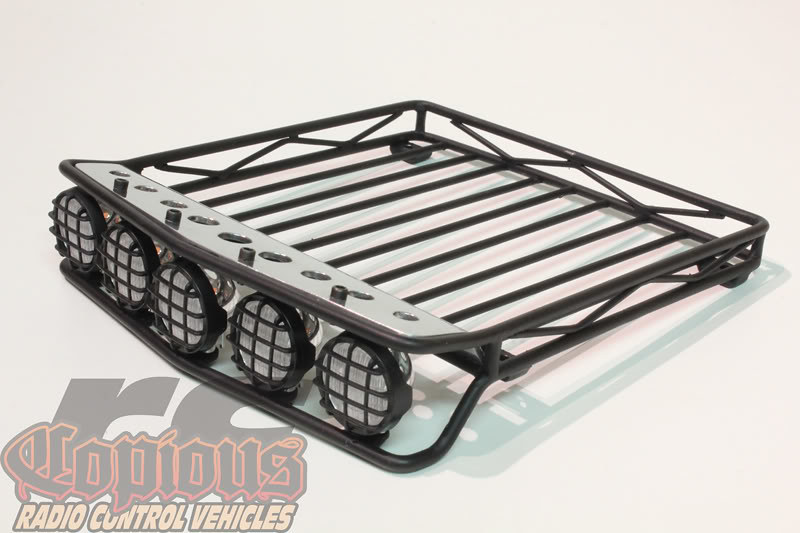 I had to, no needed something similar on my Wraith, so I got myself a bender; the K&S "Mighty Wire Bender & Coiler" (part# 326) and borrowed "long term" my dad's oxy-acetylene torch and got a tip #0 for it. 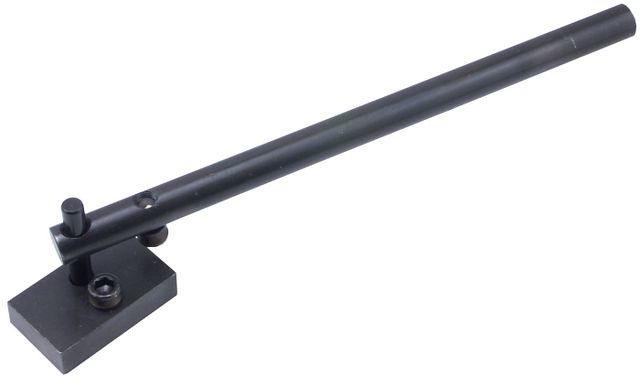 Got a bunch if different sizes of steel rods, from 1/8" to 1/4" and started playing around with both the bender and the oxy-acetylene torch and this is the result. Not too shabby for my first time if 15+ years. 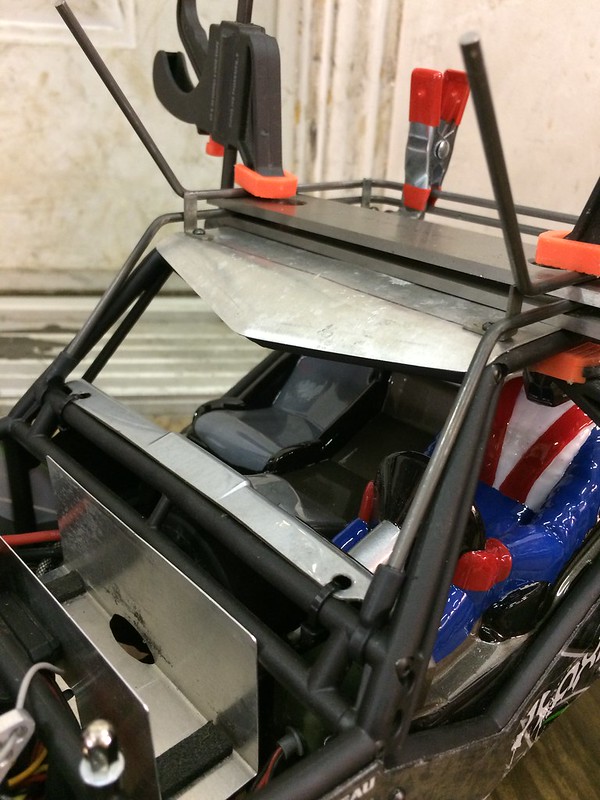 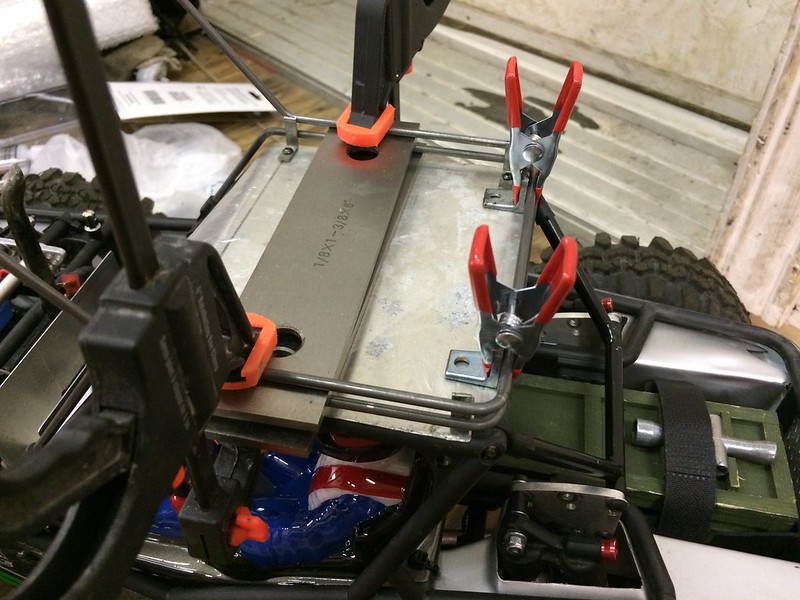 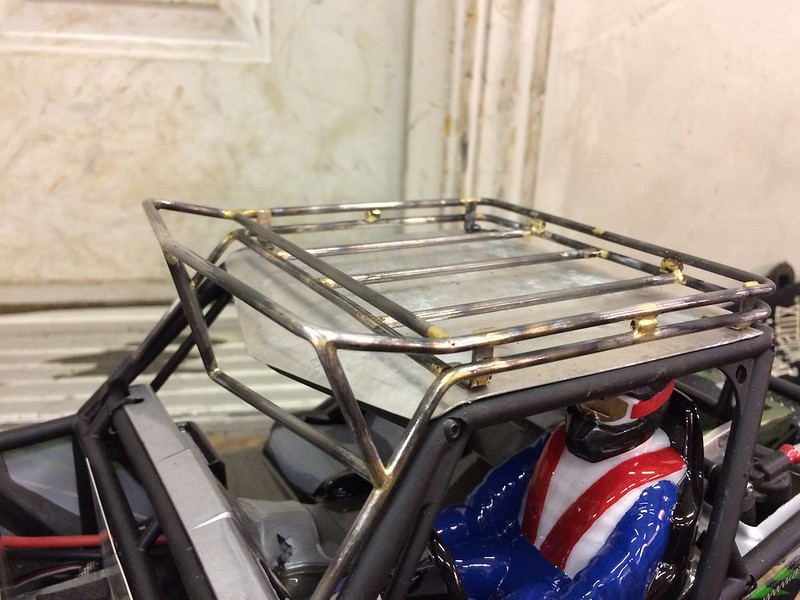 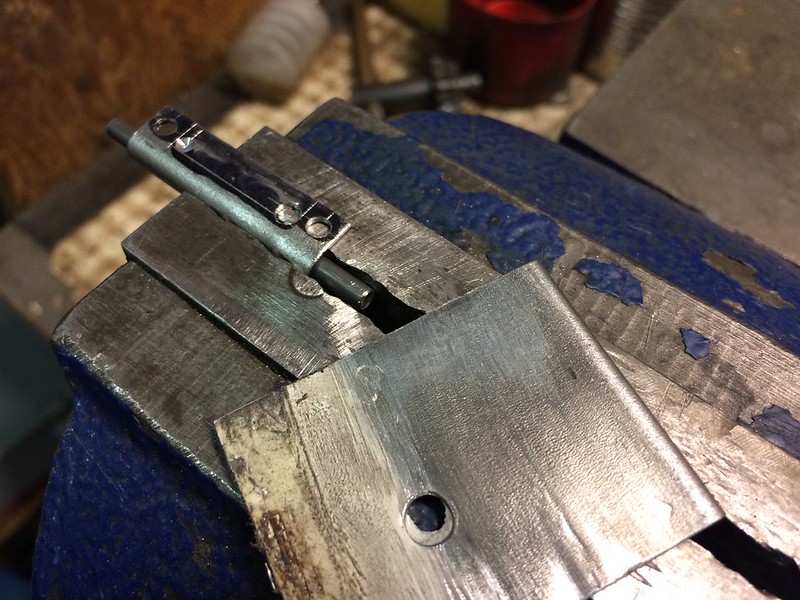 Clear coating the final product and adding some visual depth to the aluminium panel. [img] https://c1.staticflickr.com/3/2828/34298155906_6dfd44fc4f_c.jpg[/img] 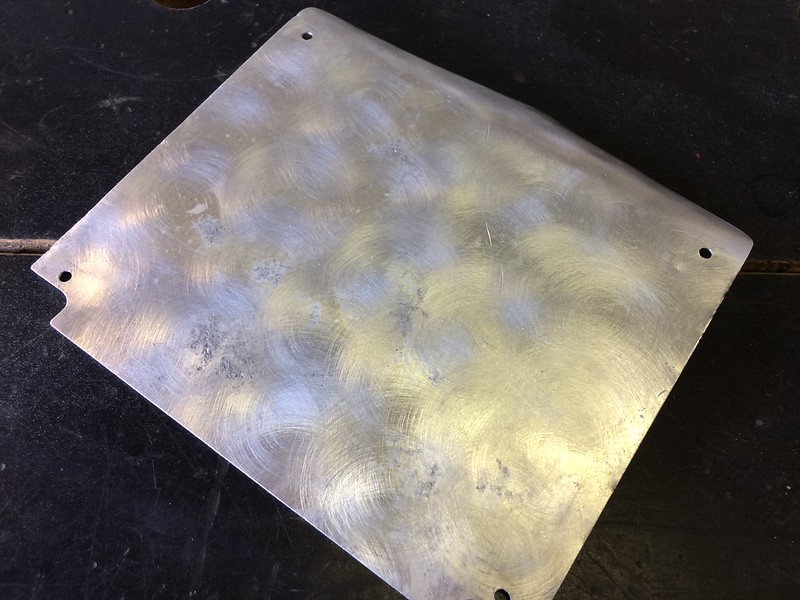 Final product ready for lights. 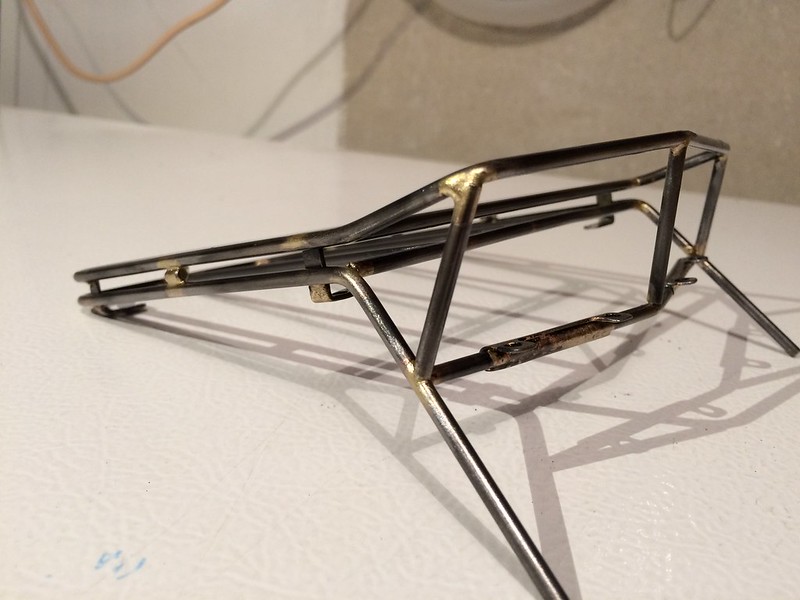 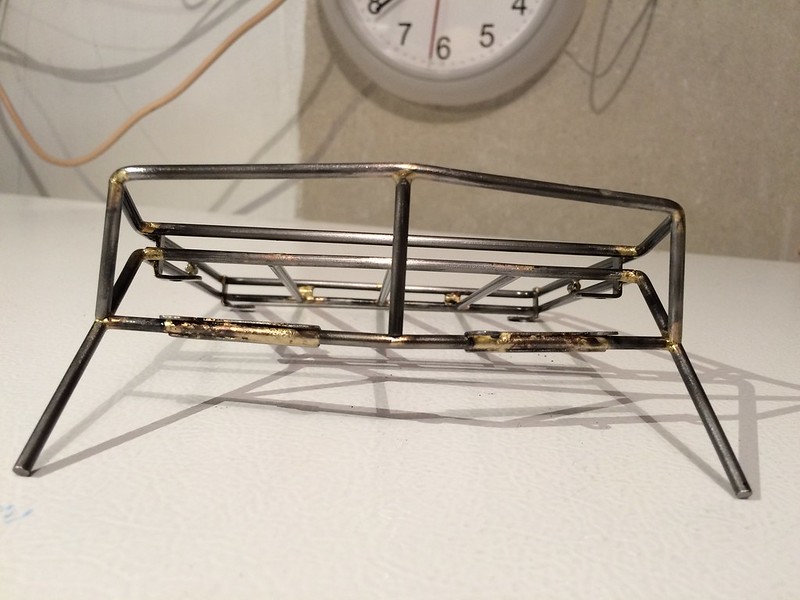 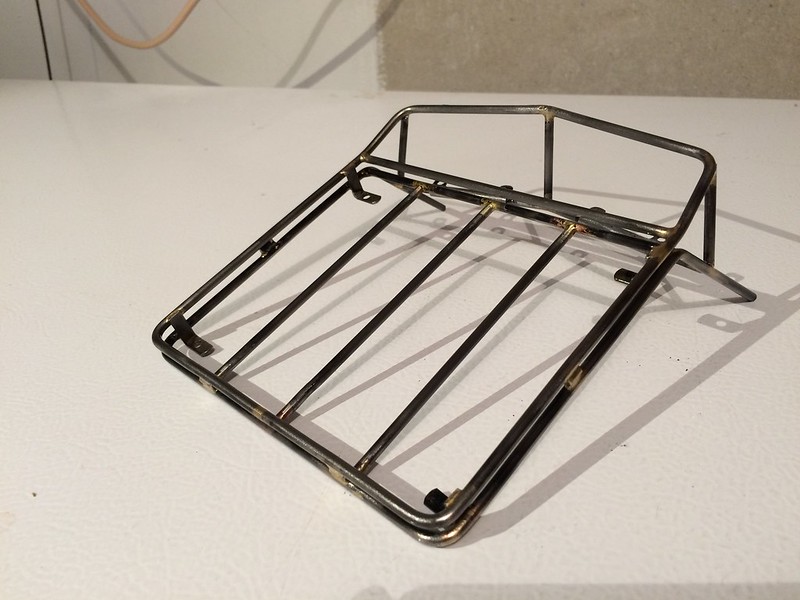 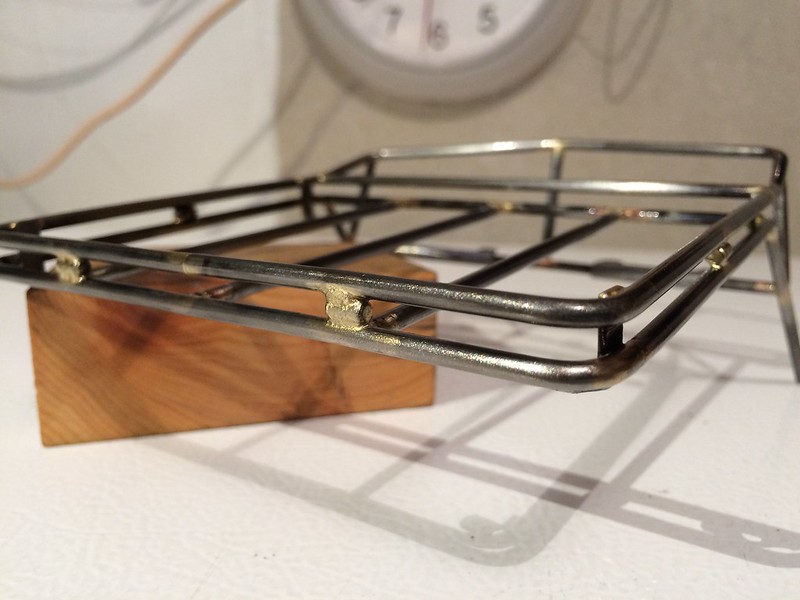 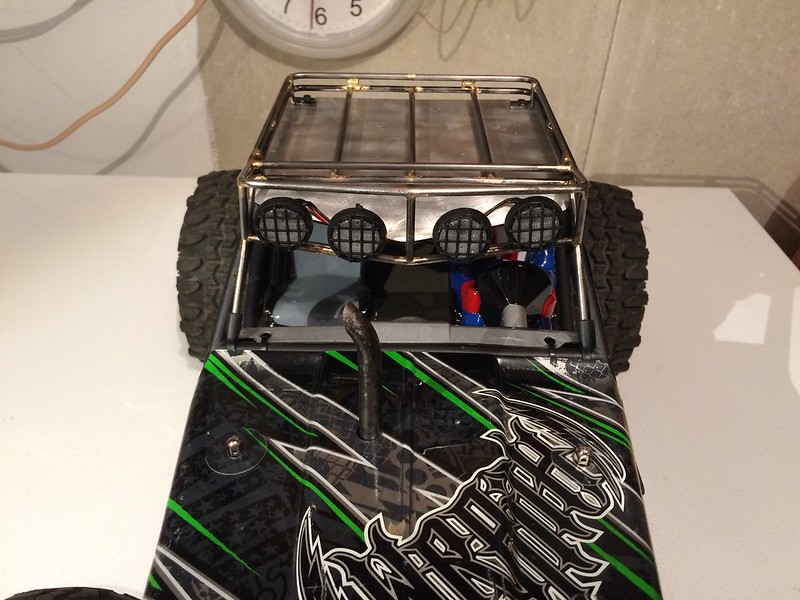 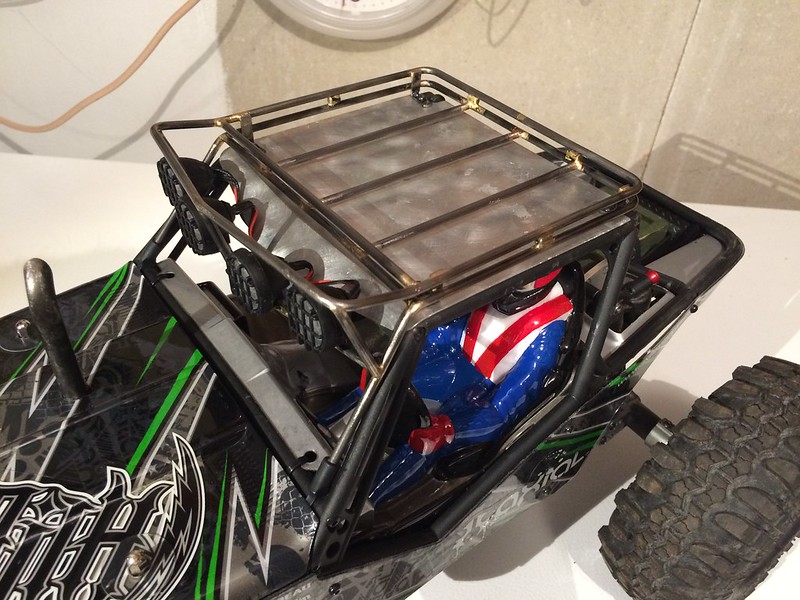     And a last one in it's natural habitat.  D |
|
| |
|
06-17-2017, 10:56 PM
| #20 |
| RCC Addict Join Date: Oct 2006 Location: crawlifornia
Posts: 1,612
|
Nice rack !!! You did a great job on that. The whole rig looks good.
|
|
| |
|
 Project Northern Progression - Another RTR Wraith - Similar Threads
 | ||||
| Thread | Thread Starter | Forum | Replies | Last Post |
| my new wraith (progression) | crawler nut | Axial Wraith | 285 | 06-24-2019 10:25 PM |
| British Wraith Progression thread | Andyking | Axial Wraith | 7 | 02-18-2014 02:33 AM |
| The progression of my XR10 into a Berg. | 95geo | EnRoute Berg | 222 | 02-26-2013 01:00 AM |
| My AX 10 progression | MaD222 | Axial AX-10 Scorpion | 5 | 04-24-2012 07:06 PM |
| Gate Progression Question | Cruzin Illusion | WRCCA Rules | 9 | 03-05-2010 05:05 PM |
| |


 Linear Mode


