| |
 07-16-2014, 12:00 PM
| #1 |
| Metal shaper Join Date: Dec 2008 Location: Hog Eye, Texas
Posts: 3,519
|  We have been busy beating the snot out of this rig and really happy with the truck. Some have already done intensive reviews on the new rig and some of started upgrading without any good test time on the Yeti as an RTR. This thread will begin as a review from our take on it, abuse testing it in stock form and feedback on the pros and cons of the new drivetrain as well as cool features we feel deserve a spotlight. We will also be using this rig as a test mule and display rig for the Yeti CFM line of aftermarket panels and accessories. |

|  |
| Sponsored Links | |
| | |
|
07-16-2014, 12:17 PM
| #2 |
| Metal shaper Join Date: Dec 2008 Location: Hog Eye, Texas
Posts: 3,519
|
We started with upgrades that come in the spare parts bag. First up, head light buckets.  Simply cut away the body where the headlight decal is, drill two holes behind the grill and bolt on. It requires the additional 2 holes and 2- 2.5 or 2.6mm screws. Same as what holds the body panels on a Wraith, Exo, or the Yeti. These will allow one additional led bulb per side to be installed. |
|
| |
|
07-16-2014, 12:21 PM
| #3 |
| Metal shaper Join Date: Dec 2008 Location: Hog Eye, Texas
Posts: 3,519
|
Spare parts option 2. Spare tire mount!!  This option really excited me for two reasons. 1: Scale cool factor 2: Design!! The mount attaches with 2 3mm screws and nuts(not supplied) onto the rear of the chassis. It does not hinder rear away bar function not the hinge feature that allows under body access. The coolest part is the hold down design. Instead of the traditional screw on mount, this is designed like a key. Insert the hold down through the slot, press down and rotate 90* degrees and release. It's now locked and loaded securely.   Wheel must be SLW compatible to fit the key through.  |
|
| |
|
07-16-2014, 12:30 PM
| #4 |
| Metal shaper Join Date: Dec 2008 Location: Hog Eye, Texas
Posts: 3,519
|
How about the transmission? Totally new design, 2 speed optional, all metal gear, and the new 32p dual slipper spur setup.  This new slipper should be renamed the holder! It's far superior to its predecessor in its functionality. The inside is a welcome sight of 32p gears in the transfer case portion and steel 48p I'm the transmission portion.   First thing you may notice, it's a little dry in there, welcome to the world of RTR. Before we reassembled, we applied our new grease that we've been testing for transmissions and differentials. It will be the last and only grease you'll ever need.....more on that at a later date.   The transmission does come locked out with the high speed gear set installed. The grease should keep things happy until we install the 2speed option when it's released. |
|
| |
|
07-16-2014, 12:40 PM
| #5 |
| Metal shaper Join Date: Dec 2008 Location: Hog Eye, Texas
Posts: 3,519
|
The receiver box and electrical placement is laid out very well and it seems Axial has thought this rig out for future upgrades. As you know by now, the receiver is placed in from the underside in a waterproof compartment.  The wiring is then passed through silicone blocks into the top side of the chassis. You'll notice a small "track" running along the floor of the chassis.  And it runs to the opposite side of the chassis beside the trans into another compartment.   We are using this for our light controller storage. |
|
| |
|
07-16-2014, 12:42 PM
| #6 |
| I wanna be Dave Join Date: Dec 2009 Location: .
Posts: 7,967
|
Side profile pic of rig with spare tire mounted please? My new favorite Yeti thread, nice attention to detail.  Last edited by ROWDY RACING; 07-16-2014 at 12:45 PM. |
|
| |
|
07-16-2014, 12:43 PM
| #7 |
| Metal shaper Join Date: Dec 2008 Location: Hog Eye, Texas
Posts: 3,519
|
Speaking of storage!! How about the killer, Huge scale fuel cell. This is another one of those parts we feel they were planning ahead on. The fuel filler is pre drilled to allow wiring to pass through, top is removable and has a large storage capacity. We are planning a nice sized battery pack and a switch for extra lighting and accessories.  |
|
| |
|
07-16-2014, 12:44 PM
| #8 |
| RCC Addict Join Date: Jun 2013 Location: Port Saint Lucie, Florida
Posts: 1,050
|
Last sub'd post since i'm not the combo breaker anymore lol SUB'D! |
|
| |
|
07-16-2014, 12:47 PM
| #9 |
| Metal shaper Join Date: Dec 2008 Location: Hog Eye, Texas
Posts: 3,519
|
Droop  Static  Bump  Compared to the Campbell 5az clone buggy   Compared to our shop Wraith with the Wide XOR RockBeast(so take that into consideration) it's also 14"wb    |
|
| |
|
07-16-2014, 12:52 PM
| #10 |
| Metal shaper Join Date: Dec 2008 Location: Hog Eye, Texas
Posts: 3,519
|
Now the nitty gritty and the question we've been getting asked a lot over the last 24 hours. "Is this just an RTR Wrexo from Axial?" No!!! Besides the ifs/live rear axle it's completely different and much improved. The layout is awesome on this chassis and the rear suspension travel is incredible. "Isn't that just an Exo front end?" No!! The differential, caster blocks, axle shafts, and lower control arms are the only "Exo" components recycled. Now you can use the the EXO knuckles no problem. The difference is the added wheel clearance that the Yeti knuckles offer allowing for a narrower track width.  The steering rack is also new in the sense that it's a double shear design.  |
|
| |
|
07-16-2014, 01:04 PM
| #11 |
| Metal shaper Join Date: Dec 2008 Location: Hog Eye, Texas
Posts: 3,519
|
Next on the agenda, one of the most hotly debated parts on any rig and always seems to be the Fuse in the system.....driveshafts!!  Introducing(released already under SCX kits) the Wildboar HD driveshafts. It's no secret we here at CFM are Maxx shaft fan boys. We use them on nearly every custom build and have huge success with them as far as durability. In the plastic driveshaft market, they are King.........stop the press......Were King!! We intentionally decided to stress test these two shafts head to head. We decided an asphalt surface, R35 tires, and 3s lipo was necessary to provide a high power, high traction stress test. We also put a tune in the ESC making sure there was zero lunch control and no power restrictions. We installed the Maxx Shaft first. Not even half a pack in and we broke a yoke. Installed another Maxx Shaft(completely new, not just replacing the broke part) and within about the same time we had twisted a male spline half and egged one of the yokes to the point it would not stay together. At this point I'm worried that we're gonna have problems. We installed the RTR Wildboar HD driveshaft and proceeded under the exact same circumstances. We made it through nearly 3 full 5000mah packs before we had failure. We ended up splitting the joint at the yoke in one end. No signs of stress anywhere else on the shaft.  Spare parts are included with the truck. Now this was a severe stress test and unless you're running on parking lots, I believe these driveshafts are gonna shine.....and we've got a simple fix that will prevent this type of failure from happening either way....more on that later. |
|
| |
|
07-16-2014, 01:07 PM
| #12 |
| Metal shaper Join Date: Dec 2008 Location: Hog Eye, Texas
Posts: 3,519
|
Here are just a few shots of it in the shop in stock form with exception to the spare wheel/tire, option head light buckets, debaged, some detail paint applied to 3d body features, and the Rigid lights.   |
|
| |
|
07-16-2014, 01:10 PM
| #13 |
| Metal shaper Join Date: Dec 2008 Location: Hog Eye, Texas
Posts: 3,519
|
If you want more info or pics in this form, speak up before Friday. Things are gonna start changing every Friday and Monday starting this week through August 11. So keep an eye out, follow us on Facebook and Instagram, and our website. |
|
| |
|
07-16-2014, 01:26 PM
| #14 |
| I wanna be Dave Join Date: Dec 2009 Location: .
Posts: 7,967
|
When testing the maxx shafts did you use 2 female ends with the male floateing inbetween like the WB HD's?
|
|
| |
|
07-16-2014, 01:28 PM
| #15 |
| I wanna be Dave Join Date: Dec 2009 Location: .
Posts: 7,967
|
I spy your WB HD fix here, I think I have some of those.  |
|
| |
|
07-16-2014, 01:35 PM
| #16 |
| Metal shaper Join Date: Dec 2008 Location: Hog Eye, Texas
Posts: 3,519
|
they dont fit out of the package though
|
|
| |
|
07-16-2014, 01:43 PM
| #17 | |
| Metal shaper Join Date: Dec 2008 Location: Hog Eye, Texas
Posts: 3,519
| Quote:
No and we never run them that way now. We were very surprised they failed so quick. And the failure was at the yoke both times. I think they will hang out in its normal environment of loose dirt and such though. | |
|
| |
|
07-16-2014, 02:12 PM
| #18 | |
| I wanna be Dave Join Date: Dec 2009 Location: .
Posts: 7,967
| Quote:
| |
|
| |
|
07-16-2014, 02:31 PM
| #19 |
| Metal shaper Join Date: Dec 2008 Location: Hog Eye, Texas
Posts: 3,519
|
Yeah I've seen a lot of people run them that way. Was surprised how quick the yokes deteriorated.
|
|
| |
|
07-16-2014, 03:03 PM
| #20 |
| Im Brandon  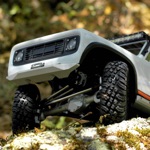 Join Date: Feb 2005 Location: Colfax, CA
Posts: 8,156
|
Nice job with it so far! Thanks for doing some stress testing on the new drive shafts, we worked hard on those |
|
| |
 |
 Messing with Sasquatch: CFM's Yeti - Similar Threads
 | ||||
| Thread | Thread Starter | Forum | Replies | Last Post |
| Courier Sasquatch | 66sprint6 | Axial SCX-10 | 13 | 03-17-2011 08:20 PM |
| Sasquatch sited on RCC Live! | badger | Chit Chat | 4 | 03-01-2009 07:05 AM |
| Super Sasquatch | Terminator13 | Tamiya Clod Buster | 23 | 12-04-2008 06:26 PM |
| just messing around | ToTheMAXXcrawler | Newbie General | 7 | 03-09-2006 06:22 AM |
| |


 Linear Mode


