| |
 11-17-2013, 07:19 AM
| #1881 | |
| I wanna be Dave Join Date: Nov 2010 Location: 07456 N. NJ USofA
Posts: 8,314
| Quote:
Bits, since we're cutting copper, the bits last "forever" unless you drop them basically. Most lathes can do a decent job cutting, making sure the lathe is square (the comm ends up the same diameter from one end to another) is among the biggest things to check. Cutting speed, there is an RPM on the comm to be cut you want, the voltage required to get that RPM is based on the motor turns driving the lathe. I believe a 27T wants ~3 volts, a higher wind motor wants more voltage to get a higher RPM. Both should end up at about the same speed at the armature you're cutting. Hope that makes sense. Cutting, I line the bit up with the comm near the "free end" (away from the windings) and slowly bring the bit in until it contacts the arm in a spot where the brushes DON'T ride. Move the cutter off the end of the arm, dial it in a couple notches on the feed wheel and start the 1st cut. This goes from the free end towards the windings. It takes ~15 seconds to make one pass, then move the bit back to your starting point taking another ~15 seconds. Move the bit in a couple of notches on the feed wheel and repeat. Keep going until you have a clean comm. | |

|  |
| Sponsored Links | |
| | |
|
11-17-2013, 08:57 AM
| #1882 |
| MODERATOR   Join Date: Jul 2004 Location: Ohio
Posts: 18,928
|
Direction in which you cut is based on angle of the bit. The Cobra I've used has the point on the left and I cut to the left (despite what some really early pictures posted in this thread show). I use a 27 turn motor and 3 cell NiMH battery. Seems about perfect, so use the 3.5 volt output with the Axial motor. My understanding is that Integy came out with the 55 turn "lathe" motor to be used in conjunction with 12 volts out from a power supply or 12v battery to make it easy for people. Doesn't mean it's right, but it's not wrong either, just different. I love this thread. |
|
| |
|
11-17-2013, 09:31 AM
| #1883 | |
| RCC Addict  Join Date: Oct 2009 Location: Nanaimo, BC (Vancouver Island)
Posts: 1,153
| Quote:
 . One more question though, what is the best way to measure for squareness and ensuring the bit is at center or a hair above? I have a digital caliper but not sure where to measure. Might come to me when it arrives though what to do there. . One more question though, what is the best way to measure for squareness and ensuring the bit is at center or a hair above? I have a digital caliper but not sure where to measure. Might come to me when it arrives though what to do there.
| |
|
| |
|
11-17-2013, 09:54 AM
| #1884 |
| MODERATOR Join Date: Jul 2004 Location: Ohio
Posts: 18,928
|
I eyeballed the centerline. Paper shims. Squareness I don't get really. If it's not way out (and how could it be) why would it matter? A fully seated brush is a fully seated brush. Maybe some weird rotational force deflecting the brush up or down, but it's still fully seated. But to measure for squareness check the left and right side of the comm. |
|
| |
|
11-17-2013, 09:56 AM
| #1885 | |
| RCC Addict Join Date: Oct 2009 Location: Nanaimo, BC (Vancouver Island)
Posts: 1,153
| Quote:
These are the bits I bought on amazon to use as practice bits, they are ar4 c2 bits.  Does this get installed so that the flattest unpainted part faces down and the point would be down to the right? Start at the end work my way to the right towards the windings then back to the end again in a 30 second time frame. Thanks for the confirmation to the axial motor and voltage, Eddie said this is best also so I will listen to the motor gods and do as I'm told I love this thread u created to, it is just chalked full of valuable information so thanks to you and all its contributors. Now if I can get ahold of the pdf file for jims black book I'll be set but I did find some good info on another site referencing a ton of what was in Jims book. Looking online the paper back version runs $150+, I'm sure there is valuable info ther but damn thats too rich for my blood Last edited by kurtus; 11-17-2013 at 10:00 AM. | |
|
| |
|
11-17-2013, 10:03 AM
| #1886 | |
| RCC Addict Join Date: Oct 2009 Location: Nanaimo, BC (Vancouver Island)
Posts: 1,153
| Quote:
| |
|
| |
|
11-17-2013, 10:07 AM
| #1887 |
| RCC Addict Join Date: Oct 2009 Location: Nanaimo, BC (Vancouver Island)
Posts: 1,153
|
I thought I would post this since I just found it, the motor repair tray he uses in this is bada$$!! I emailed the company to see if they are available but they run 29.99 so no that cheap. Love the idea of keeping everything organized so the springs/brushes dont get mixed up. Also this is the same lathe I just bought so it was helpful for me to see. I think this is a very decent video for an introduction to the world of rebuilding for newbs lol. |
|
| |
|
11-17-2013, 10:23 AM
| #1888 |
| MODERATOR Join Date: Jul 2004 Location: Ohio
Posts: 18,928
|
I'm not smart enough to answer about the bit direction. I have a 27 turn in my brush cutter powered by the same 3 cell NiMH pack. I use it to serrate brushes for faster break in. Here's a Big Jim thread: RC Motor Black Book - HobbyTalk If it's out and cutting cones it's in the parts that hold the bit and gets cranked, or the part that it rides on. Looks like my Cobra has set screws to adjust both pieces. I don't recall ever adjusting them. |
|
| |
|
11-17-2013, 10:27 AM
| #1889 | |
| I wanna be Dave Join Date: Nov 2010 Location: 07456 N. NJ USofA
Posts: 8,314
| Quote:
Some lathes have the carbide/diamond on the bottom of the tool, some have it on top, your directions should direct you. Like EeePee, I eyeballed the up/down setting. As to having it square, if the comm has a taper, yes, the brush will wear into it (puts a bigger premium on installing the brush the correct direction though....) but can also sideload the brush to the brushhood which may overpower the brush springreducing it's tension against the brush over time. To check, just do a few cuts on the comm (so you have a good fresh surface at each end of the comm) and measure the diameter at each end. If they are the same diameter, you should be good to go. If one end is a different size than the other, you may need to loosen mounts on the lathe and slide bits a little so the guides on the tool post are parallel to the armature. I think mine is at ~0.0003" end to end on the comm diameter. | |
|
| |
|
11-17-2013, 10:33 AM
| #1890 |
| RCC Addict Join Date: Oct 2009 Location: Nanaimo, BC (Vancouver Island)
Posts: 1,153
|
I'm probably worried about nothing with the alignment seeing how this lathe is basically new, I'll mic the come after my first run......pics to follow cause I know we all like that Maybe I'll just use the 45t on 5v then, think that would be good enough to get the job done on the brushes. Anyone else know about the bit. looks like there are 2 ways this could be installed, either that large flat surface facing down or on the side so the smaller edge faces down and the large flat would face towards the windings if that makes sense? Great info guys, keep it coming Last edited by kurtus; 11-17-2013 at 10:36 AM. |
|
| |
|
11-17-2013, 10:39 AM
| #1891 |
| I wanna be Dave Join Date: Jan 2008 Location: Arat Alabama
Posts: 2,678
|
Your bit for that lathe will install like this...  This it on a Twister lathe which is the same motion as the Trinity. |
|
| |
|
11-17-2013, 10:40 AM
| #1892 | |
| RCC Addict Join Date: Oct 2009 Location: Nanaimo, BC (Vancouver Island)
Posts: 1,153
| Quote:
Thx buddy
| |
|
| |
|
11-18-2013, 07:39 PM
| #1893 |
| RCC Addict Join Date: Oct 2009 Location: Nanaimo, BC (Vancouver Island)
Posts: 1,153
|
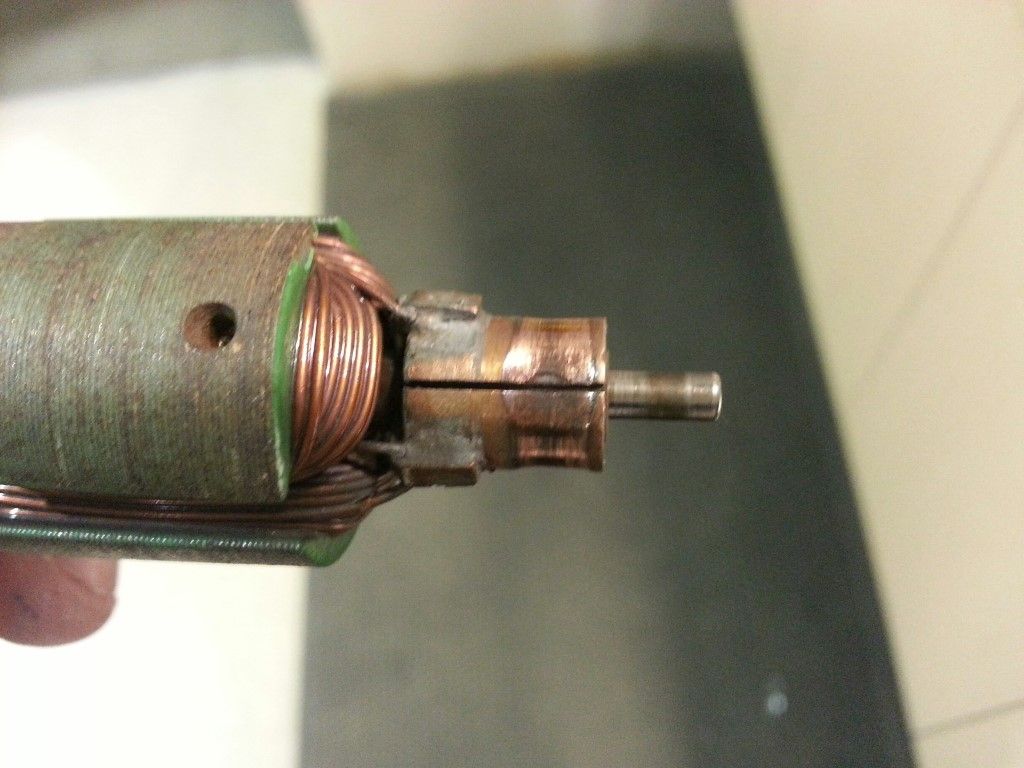
I about $hit when I saw this.........    This is a 35t torquemaster pro I sold a buddy a few years ago that he brought into work today to show me. It was ran in his ax10 with stk gearing on 3s, I have never seen one this bad. Sorry John, this sucker is garbage now.....all that hard work the more I look at this I'm starting to wonder if he reverse wired it and had it at -9 degrees timing, how the hell else could this happen?? Last edited by kurtus; 11-18-2013 at 07:41 PM. |
|
| |
|
11-18-2013, 11:15 PM
| #1894 |
| RCC Addict Join Date: Dec 2006 Location: Oak Ridge, TN
Posts: 1,141
|
I've cut worse looking coms. He can always use it as a backup or basher motor if you end up having to take to much off.
|
|
| |
|
11-18-2013, 11:30 PM
| #1895 | |
| RCC Addict Join Date: Jan 2005 Location: Germany north
Posts: 1,669
| Quote:
great fun | |
|
| |
|
11-18-2013, 11:55 PM
| #1896 | |
| RCC Addict Join Date: Oct 2009 Location: Nanaimo, BC (Vancouver Island)
Posts: 1,153
| Quote:
. Clever
| |
|
| |
|
11-19-2013, 12:06 AM
| #1897 | |
| Rock Crawler Join Date: Aug 2011 Location: south shore Ma
Posts: 803
| Quote:
Sent from my iPhone using Tapatalk | |
|
| |
|
11-19-2013, 12:15 AM
| #1898 | |
| RCC Addict Join Date: Oct 2009 Location: Nanaimo, BC (Vancouver Island)
Posts: 1,153
| Quote:
| |
|
| |
|
11-19-2013, 12:20 AM
| #1899 |
| RCC Addict Join Date: Oct 2009 Location: Nanaimo, BC (Vancouver Island)
Posts: 1,153
|
EGRESSor, would I need it to have those segments on the comm or is a solid copper ring ok?
|
|
| |
|
11-19-2013, 12:36 AM
| #1900 | |
| I wanna be Dave Join Date: Nov 2010 Location: 07456 N. NJ USofA
Posts: 8,314
| Quote:
| |
|
| |
 |
 LinkBacks (?)
LinkBack to this Thread: http://www.rccrawler.com/forum/electronics/223989-cutting-motor-commutator-motor-tweaks.html | ||||
| Posted By | For | Type | Date | |
| Hiilimoottorin kunnostaminen | This thread | Refback | 10-04-2011 03:19 PM | |
| |


 [/URL]
 Linear Mode


