| |
| |||||||
 |
| | LinkBack | Thread Tools | Display Modes |
 02-03-2012, 07:03 PM
| #1 |
| PapaGriz Yo   Join Date: Apr 2004 Location: In the garage building the wife a crawler
Posts: 13,137
|  With Neil selling the QS8274 winch directly now I felt it was time to start a thread on how to wire and work this bad boy. I've been meaning to do this for a while, sorry it took so long. First you have to decide if you want to run it from a servo control board, an ESC, or an aftermarket winch controller. Any of these methods work well, some are more work and some are more money. The internals of the winch are just a servo and even more basic, the motor is just like any other DC motor. Using a servo control board: First off, the board I am showing is one I had laying around, it is for demonstration purposes only. The input wires have been cut off because this board is dead, DO NOT cut off your wires. Included with your winch is the servo control board from the Hitec servo that donated it's guts to a greater cause. With a few extras and some soldering skill you can use this board to control your winch from the radio. Your board should look similar to the picture below.  In order to keep things in a smaller package I remove the pot and replace it with resistors. If this really scares you, the pot can be left on there and after you have everything working and neutral set, you can put a dab of super glue on the end of the pot to keep the adjustment from changing. If you are following along with me, first thing to do is remove the pot by cutting the red, green, and yellow wires going to the resistor pot. It is much easier to cut these wires and solder your resistors to the wires than trying to solder them directly to the board. I've cut the green wire to about 1/4" long, the yellow wire is 1/2" long, and the red wire is about 1" long. Tin the ends of the wire with solder.  I use 4.7k ohm resistors to replace the pot. These ones came from Radio Shack.   Twist the ends of two resistors together and then snip off the excess. Then bend the other leads around as shown. Those of you who are paying attention will notice one resistor has the wrong color bands. I only had one of the correct resistors left and didn't want to go buy more so I just grabbed a different one. Remember this board doesn't work anyway and I am just showing the technique. Use the 4.7K ohm resistors.  Solder the yellow wire to the resistor leads you twisted together.  Now lay the resistors flat on the board. Figure out how much to trim the resistor lead and then trim it. Solder the green wire to this lead.  Lay the resistors on the board again. Route the red wire to the far side and figure out how much to trim the resistor lead. Solder the red wire to this lead.  Now you will need to get some wire. I just use servo lead wire from my burned up or cheap servos. I like to use the large wire because these motors can pull some amps. You can get a long servo extension and cut it up if you want. You will want this wire to be long enough to run from the winch to wherever you are going to mount the servo control board in the chassis. This will vary depending on your application. I am using the standard Hitec wire which is yellow, black, and red. Others may have different colors. black = brown = ground red = power yellow = orange = white = signal  You don't have to run all three wires to the motor. The black wire can be eliminated to make the wiring a little more compact. I did some testing and did not notice any difference between the 2-wire or 3-wire setup. If you decide to run two wires to the motor solder them as illustrated below.  You need to insulate the resistors you added from shorting out to anything on the board. I have found that hot glue works great for this. Just lay down some hot glue on the board and press the resistors into it. Here you can see the servo control board in Guido. This board has been in use for 3 years now and has given me zero problems. I covered the entire board in hot glue and that waterproofed it. You will notice that this board looks different from yours. That's because this board is from a Hitec 645MG. I used it because it was smaller and it has worked fine even though the 645 is not a digital servo.  After about a year I noticed that one of the chips on the board had melted away a small hole in the hot glue. I then covered the board with a piece of heat shrink and then sealed the ends with black rtv silicone. This has worked well for the last couple years.  Motor Wiring: Now you need to decide how you want your wires to go into the motor cover. I like my wires to come out of the end of the cover. There is a channel in the cover to allow clearance for the black wire soldered to the motor can. I drill a hole in the end of the motor cover here so the wires can go straight out. Others have the wires follow the channel and come out where the cover meets the winch housing. For a 3 wire setup I think you have to run the wires out the end of the motor cover because of room. Personally I think it looks better when they come out the end of the cover. It's your choice though. rcscaler posted some nice info on how he wired up his winch motor with the wires coming out the other way. 3-Wire Motor Wiring: A 3-wire setup will work for the servo control board and is what I have used for years. As I stated before though, I don't think it is necessary. After drilling the hole in the motor cover route the wires from the servo control board through the cover. I drill a 9/64" hole.   Now solder the wires to the motor. The ground wire goes to the can where there is a small piece of metal already soldered. You don't need to remove this metal, just solder to it. Then solder the power and signal wires to the motor tabs on the endbell.  2-Wire Motor Wiring: A 2-wire setup will work for the servo control board, an ESC, or an aftermarket controller like the Heyok or Tzi. After drilling the hole in the motor cover route the wires from the servo control board through the cover. I drill a 9/64" hole even for a 2 wire setup.  Now solder the wires to the motor. In the pictures my motor wires are red and black but I am calling out yellow for consistency of the article. Solder the wires to the motor tabs on the endbell.  Notice the orientation of the wires, solder them at an angle to the motor endbell.  I like to add a connector between the motor and controller so that I can remove the winch without having to remove the wiring and controller. Just cut the wires going to the motor wherever you think works best in your application, then solder in the connector. Deans 3 pin micro connector (part number 1003).  Deans 2 pin micro connector (part number 1225).  Up next I will show how to run the winch with an ESC. Winch Line:  I have seen many types of winch line used. War Pig uses 130 lb white TUF-Line XP dyed black. Feel free to post up what you use to help others decide. I have always used Mason Twine. I get it from Ace Hardware and it's reasonably priced. I have never broken the line, even while trying to stall out the winch. It is fairly big but if you spool it carefully you can get 10 feet on the drum. It also comes in colors. I have seen white, yellow, pink, and green.  Getting it to fit through the hole in the Quicksand hook is an exercise in patience. It takes some work and a small tip scribe to force it through, but once it's in it works great. In the picture below I tied a Bowline knot so that I can use a shackle if I don't want to use the hook. Just tie the knot tight and put a dab of CA (superglue) on it to keep the knot from coming loose.  For the drum I tie a slipknot and then pull the loop tight against the drum. a dab of CA (superglue) on the knot keep it from coming loose. I don't glue the line to the drum, I just make sure I always leave at least two wraps around the drum when winching. You can certainly put a dab of glue to secure the line to the drum though.  I hope this helps get you going. To order a Quicksand QS8274 contact Neil at Quicksandcustoms@comcast.net Now go put your winch on and feel the power of this monster.  Last edited by Grizzly4x4; 02-05-2012 at 10:43 PM. |

|  |
| Sponsored Links | |
| | |
|
02-03-2012, 07:42 PM
| #2 |
| I wanna be Dave Join Date: Nov 2010 Location: 07456 N. NJ USofA
Posts: 8,314
|
Nice write-up Griz. For threading the line through the hook eye, did you "burn" the thread and twist while pulling it apart so the ends are sealed and small in diameter?? |
|
| |
|
02-03-2012, 07:55 PM
| #3 |
| Rock Crawler Join Date: Jan 2006 Location: coventry, ct
Posts: 772
|
Awesome Chris! I might go this route if the esc install looks tougher to me. I have my servo board or a b1r waiting....
|
|
| |
|
02-03-2012, 08:00 PM
| #4 | ||
| PapaGriz Yo Join Date: Apr 2004 Location: In the garage building the wife a crawler
Posts: 13,137
| Quote:
 Quote:
I'm going to wire up Guido with a Mamba25 ESC this weekend and see how I like it. I'll post up about that when I'm done.
| ||
|
| |
|
02-03-2012, 08:14 PM
| #5 | |
| I wanna be Dave Join Date: Nov 2010 Location: 07456 N. NJ USofA
Posts: 8,314
| Quote:
Either way, post back with your impressions (either/both methods) for the next guy. Your comments seem to carry a bit more weight here. | |
|
| |
|
02-03-2012, 08:31 PM
| #6 |
| I wanna be Dave Join Date: Jan 2008 Location: Arat Alabama
Posts: 2,678
|
I am on the list for the next run of 8274s. I have been debating on trying this little controller. It has more than enough voltage capabilities and is made by a RCC vendor. What you think Griz? http://www.rccrawler.com/forum/vendo...ml#post3461993 |
|
| |
|
02-03-2012, 08:41 PM
| #7 |
| RCC Addict Join Date: Oct 2009 Location: west coast..
Posts: 1,522
|
Thanks for the write up chris as I am also waiting for the next batch of quicksands.
|
|
| |
|
02-03-2012, 09:26 PM
| #8 | |||
| PapaGriz Yo Join Date: Apr 2004 Location: In the garage building the wife a crawler
Posts: 13,137
| Quote:
Will do, thanks Charlie. Quote:
New beefy winch controller I've been testing Quote:
| |||
|
| |
|
02-03-2012, 09:37 PM
| #9 | |
| I wanna be Dave Join Date: Jan 2008 Location: Arat Alabama
Posts: 2,678
| Quote:
| |
|
| |
|
02-03-2012, 09:40 PM
| #10 | |
| PapaGriz Yo Join Date: Apr 2004 Location: In the garage building the wife a crawler
Posts: 13,137
| Quote:
| |
|
| |
|
02-04-2012, 10:35 AM
| #11 |
| I wanna be Dave Join Date: Aug 2008 Location: cape crud... will you be my friend
Posts: 2,102
|
wow man nice tech article. i don't have one of these winches nor will i save enough to spend on just that, but it was very informative to read and nice to day dream. |
|
| |
|
02-04-2012, 11:14 AM
| #12 |
| www.team3sixrc.com Join Date: Mar 2008 Location: Scalerville
Posts: 4,506
|
Thanks for that article Chris, Ill be sure to look into this when I get it back and see how it was done up by Aaron.
|
|
| |
|
02-04-2012, 07:09 PM
| #13 | ||
| PapaGriz Yo Join Date: Apr 2004 Location: In the garage building the wife a crawler
Posts: 13,137
| Quote:
Quote:
If I have time tomorrow I'm going to try and figure that out. One less wire to run and solder. | ||
|
| |
|
02-04-2012, 08:34 PM
| #14 |
| Rock Stacker  Join Date: Jul 2008 Location: way behind
Posts: 94
|
Holy cow Chris... Nice write up... I think I can even do it now. I'm pretty sure I can come up with a winch, just need a truck to put one on. Seriously, thanks so much for doing this... It's a huge help to me and others! And I like your hot glue trick.P.S. I need to get you one of the new spools with the anchor screw and see how you like it. I hope it will work well for everyone.... I just made about 50 of them. Last edited by QUICKSAND; 02-04-2012 at 08:38 PM. |
|
| |
|
02-04-2012, 10:05 PM
| #15 | |
| PapaGriz Yo Join Date: Apr 2004 Location: In the garage building the wife a crawler
Posts: 13,137
| Quote:
When you get a chance I will need a new motor cover too. The prototype cover had a step in it to fit the old motor. The new motor doesn't have the step in it. When I tried to put the new motor in last night I broke the motor cover. Also, I figured out how to wire the motor to use just the two wires instead of three. I'll post that up tomorrow. | |
|
| |
|
02-04-2012, 10:30 PM
| #16 | |
| Rock Stacker Join Date: Jul 2008 Location: way behind
Posts: 94
| Quote:
I totally forgot the motors back then had that step... I've got a bunch of new covers, I'll get one to you. That's great you figured out how to use only two wires, not so much to jam into the cover. | |
|
| |
|
02-04-2012, 11:15 PM
| #17 |
| I wanna be Dave Join Date: Jul 2006 Location: The beautiful Pacific Northwest
Posts: 6,923
|
Great winch, great write up, and yes the Tzi beefy winch controller works great! I'd like to get on the list for a spool with the anchor screw as well. Also Neal, is there a chance of modifying the carrier on the freewheel side of the spool and machining a boss for the fairlead to bolt to? Like this: 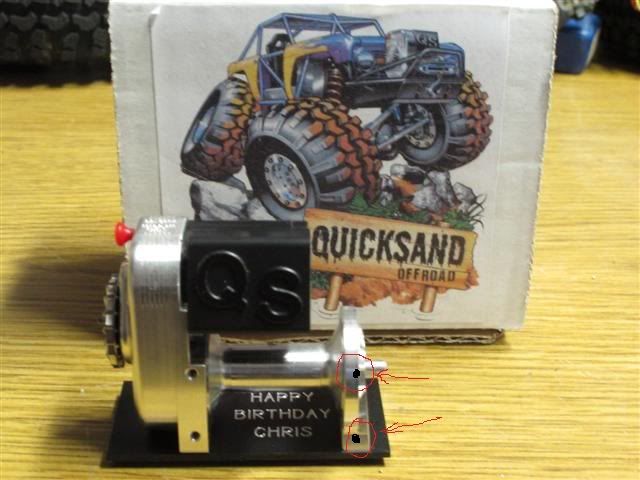 The way my winch is mounted I'd like to bolt the fairlead directly to the winch. 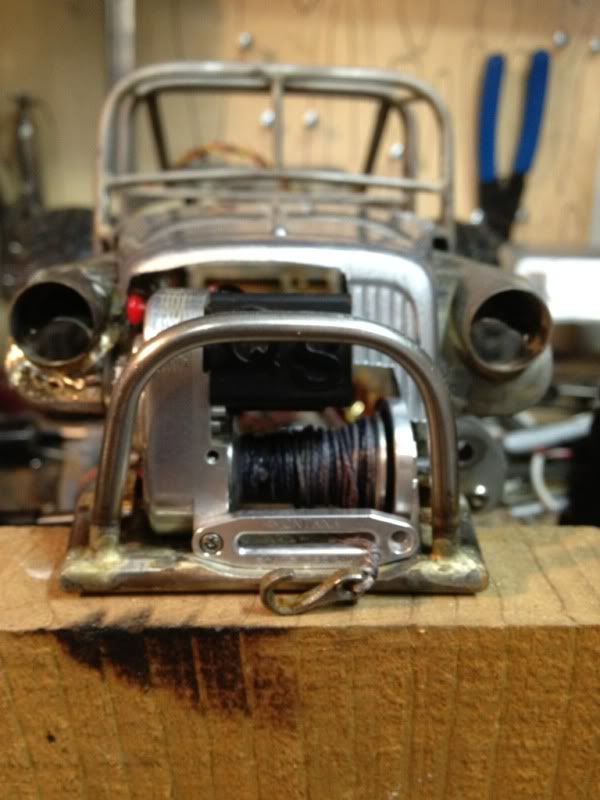 a |
|
| |
|
02-05-2012, 01:26 AM
| #18 | |
| Rock Stacker Join Date: Jul 2008 Location: way behind
Posts: 94
| Quote:
Thanks War Pig, for the winch portion of your compliment. I'm glad to hear the Tzi beefy winch controller works so good. I'll be stocking Jyi's store in Australia with about 10 winches from this next run, and have been thinking about ordering some of his controllers to stock here and offer with the winch. I'll have to shoot him an email tonight. As for a spool with an anchor screw, like I mentioned I just made a bunch... send me an email or PM with your address and I can send you one anytime. I haven't thought much about parts pricing, how does $15 shipped sound? It's funny you ask about a mounting boss for the fairlead on the drum support. I've never had anyone ask that 'till today, and now you're the second person.... I guess that means I better do that, especially since nobody seams to be rotating the support and mounting the winch from the front. That is one of the next parts I have to make, so I'll make that modification and get one sent off to you ass soon as I can. | |
|
| |
|
02-05-2012, 10:48 AM
| #19 |
| MODERHATER  Join Date: Nov 2005 Location: Colorado
Posts: 10,939
|
I'm the second person to ask! Love the winch Neil! Last edited by 666; 02-05-2012 at 10:54 AM. |
|
| |
|
02-05-2012, 11:21 AM
| #20 |
| I wanna be Dave Join Date: Aug 2006 Location: under a rock and a hard place
Posts: 5,443
|
I also would love to have the mounting boss change Sending a PM for a spool also. |
|
| |
|
 Quicksand 8274 Tech Thread - Similar Threads
 | ||||
| Thread | Thread Starter | Forum | Replies | Last Post |
| TorqueMaster BR-XL tech thread | JohnRobHolmes | Electronics | 424 | 02-24-2015 12:45 PM |
| New Quicksand 8274 Winches | SDS Customz | Scale parts | 335 | 06-21-2014 06:35 PM |
| |


 Linear Mode


