| |
| |||||||
 |
| | LinkBack | Thread Tools | Display Modes |
 09-29-2013, 09:49 PM
| #1 |
| RcBros Hobbies   Join Date: Nov 2005 Location: Oregon
Posts: 4,646
|
It's always nice to see some examples of how one does their electronics. I haven't seen to much on the BR Mini's so figured I'd help some of you guys out. This setup is used for competition MOA crawling where shorter run times are used. It is important you test your setup prior to running multiple packs for any heat issues that may arise. It is recommend you keep your electronics below 170* F. Stacking your electronics can result in higher heat and small wire increases the heat build up close to each ESC. This is by no means a way to scare you from running this setup, it is simply meant to say; Pay Attention!  Soldering is not an art form. However it is something that takes some skills to master. It is EXTREMELY important to have a quality iron that melts the solder and finishes the joint quickly. If you are having to rest your iron on the ESC for any amount of time, you are heating the board and risking damage. What I used: (2) Holmes Torquemaster BR Mini's (1) Castle Creations BEC (2) Female .8mm Golden Plated Connectors 18G Wire I first took a un modified BR Mini and tinned the backside of the battery side connections. Using a solder sucker, I then heat the board and suck the solder out of the center hole. Insert a Female Connector into each hole, then resolder the back side of the board.  Once this step is done, solder on two wires for one of your motors. Then stack your next BR Mini inserting the gold connectors through the appropriate battery leads. Then solder. (It is recommend to install a piece of Foam in between the two ESC's to keep them seperated) What you do with your wires is completely up to you. I like to pull the RX wire back through the center of the two Mini's. For those constantly servicing your rig or electronics, I highly recommend adding some 5 minute quick epoxy over the solder joints on the RX wires. This ensures they do not get damaged from use over time. 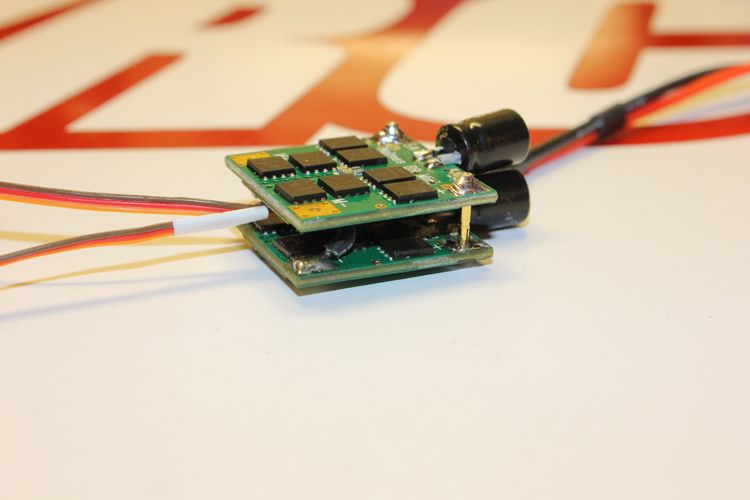 Next add your two motor wires. Now its time for your BEC. Depending on your setup, this location may not work best for you. However, I stacked mine on the top. I added a small dab of CA to hold the BEC in place while soldering. (don't forget to program!) 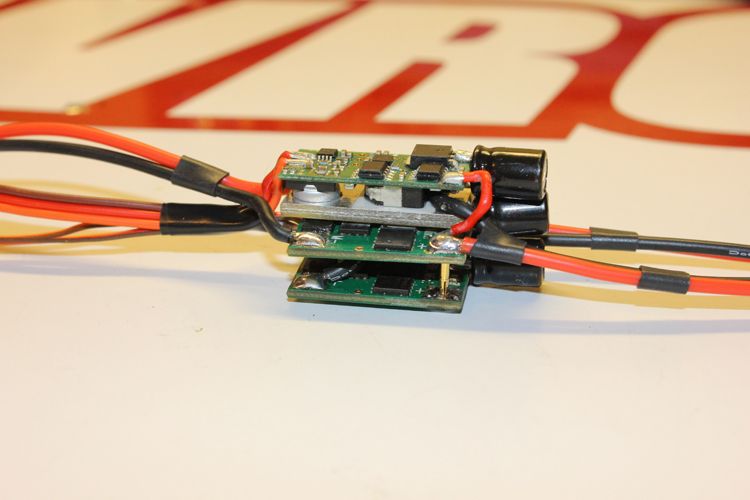 You'll notice I ran the RX wires down to the BR Mini's wires and wrapped them together. This will keep them from getting beat up. The neater your wiring, the longer it will last! I then routed the negative side for the main battery lead through the cap in the BEC. The capacitors are close, but they fit 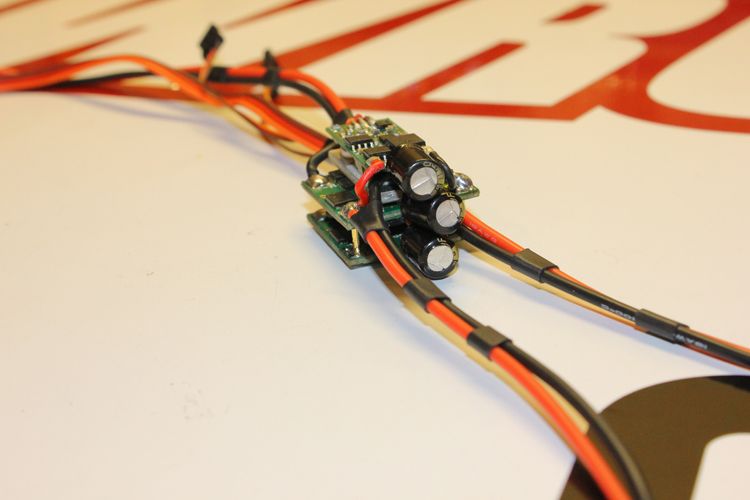 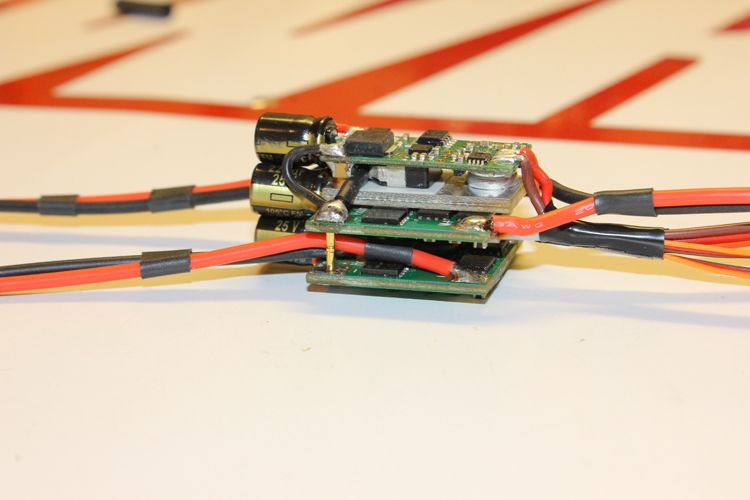 At this time, if you have conformal coating or liquid electrical tape. Coat away! For those not familiar with either. Here's some info. Conformal Coating: This is a clear drying protection used on electronic equipment. It is available in both spray and brush on. I myself prefer brush on as you can ensure it gets in every spot possible by hand, or you can simply dip the entire item if purchased in a large container. I tend to do 3-5 coats. The only issue I have ever come across is when it comes to warranty issues. Some manufacturers don't like it. Liquid Electrical Tape Comes in a brush style can and is cheap and readily available at most hardware stores. Nice part about this stuff is you can ensure everything is covered due to it being black in color. Issues I have with it is I can't see my electronics LED's, its thick and can hold heat in. However, the neat thing about liquid electrical tape is after its applied, you can easily pull it off and send it in for repair if needed. I prefer the liquid electrical tape on my highly abused scalers, and the conformal on my comp rigs. Once you have done your protection coating of choice, its time to heat shrink the package. (heat shrinking is optional) I prefer heat shrinking as it keeps the package together and makes mounting easy. I like to leave the ends open as it lets some air through, and if moisture enters, it can still leave. 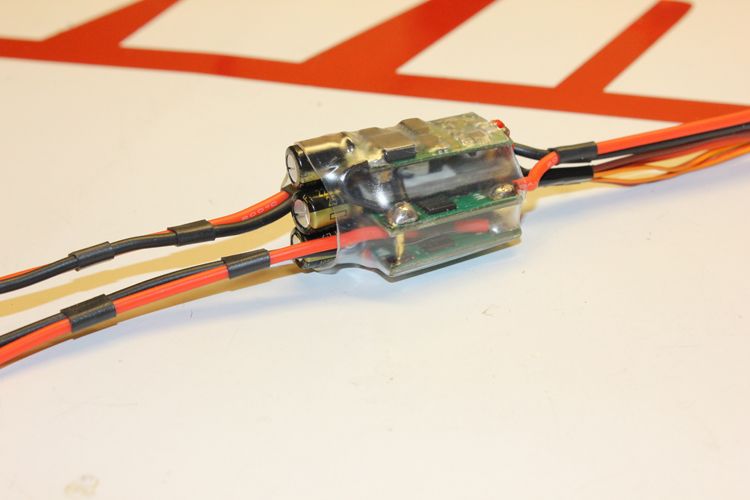 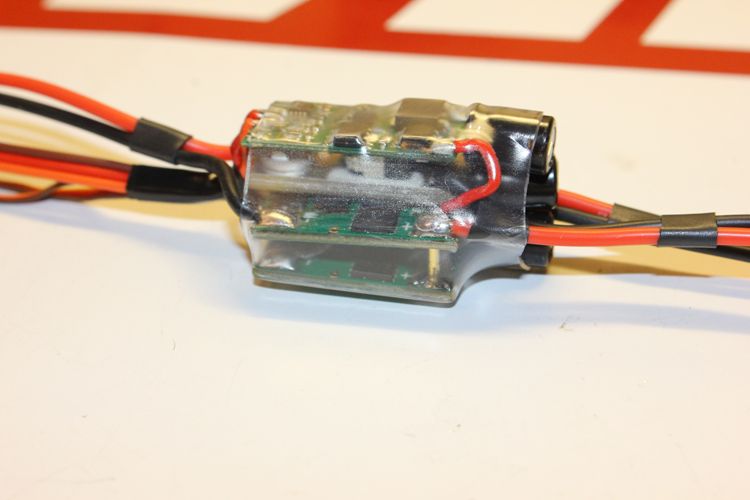 Hopefully this encourages some to try it themselves! Last edited by RcBro; 10-04-2013 at 08:16 AM. |

|  |
| Sponsored Links | |
| | |
|
09-30-2013, 02:35 AM
| #2 |
| Shelf queen   Join Date: Aug 2008 Location: Internet
Posts: 5,857
|
Great write up. Where did you find such small diameter gold pin connectors?
|
|
| |
|
09-30-2013, 04:59 AM
| #3 |
| Quarry Creeper Join Date: Dec 2009 Location: aurora
Posts: 344
|
If you cannot find them, I have in the past used wire and completely fill it with solder and kinda make your own pin so to speak. Works great. If I can, I will post a pic from a pair of mmp 1 cell esc's I shrunk a while ago. Sent from my DROID RAZR HD using Tapatalk 2 |
|
| |
|
09-30-2013, 05:06 AM
| #4 |
| Rock Crawler Join Date: Jul 2012 Location: Long Island, NY
Posts: 563
|
That's a great write up. Thank you.
|
|
| |
|
09-30-2013, 06:20 AM
| #5 |
| I wanna be Dave Join Date: Dec 2006 Location: here
Posts: 3,042
|
Conformal Coating: What will happen to electronics if this part is skipped? |
|
| |
|
09-30-2013, 06:22 AM
| #6 | |
| I wanna be Dave Join Date: Dec 2008 Location: ?
Posts: 5,055
| Quote:
Conformal coating is water proofing. | |
|
| |
|
09-30-2013, 08:17 AM
| #7 | |
| RcBros Hobbies Join Date: Nov 2005 Location: Oregon
Posts: 4,646
| Quote:
| |
|
| |
|
09-30-2013, 08:28 AM
| #8 |
| I wanna be Dave Join Date: Sep 2009 Location: Eastcoast CANADA
Posts: 4,395
|
Awesome work! This info will be a helpful to any and all that want a super clean fit'n finish to their rig(s). Thanks Rob |
|
| |
|
09-30-2013, 09:16 AM
| #9 | |
| I wanna be Dave Join Date: Dec 2006 Location: here
Posts: 3,042
| Quote:
(Conformal coating). Thanks for the how to stack br mini thread.. Are you going to run the Zener Diode mod? | |
|
| |
|
09-30-2013, 05:40 PM
| #10 |
| RcBros Hobbies Join Date: Nov 2005 Location: Oregon
Posts: 4,646
|
I may try to diode mod down the road if heat is higher then I anticipate. However, if it stays below 170* comfortably I probably won't.
|
|
| |
|
10-01-2013, 03:02 AM
| #11 | |
| Shelf queen Join Date: Aug 2008 Location: Internet
Posts: 5,857
| Quote:
| |
|
| |
|
10-01-2013, 03:26 AM
| #12 | |
| I've got a STUBBY!  Join Date: Apr 2011 Location: Newcastle Australia
Posts: 159
| Quote:
if you search .8mm bullets they come up.Josh | |
|
| |
|
10-01-2013, 07:17 AM
| #13 | |
| RcBros Hobbies Join Date: Nov 2005 Location: Oregon
Posts: 4,646
| Quote:
| |
|
| |
|
10-01-2013, 07:33 AM
| #14 | |
| I wanna be Dave Join Date: Dec 2008 Location: ?
Posts: 5,055
| Quote:
| |
|
| |
|
10-01-2013, 07:54 AM
| #15 |
| RcBros Hobbies Join Date: Nov 2005 Location: Oregon
Posts: 4,646
|
This combo hasn't been ran so hear numbers are unknown
|
|
| |
|
10-02-2013, 09:28 PM
| #16 |
| Quarry Creeper Join Date: Jul 2008 Location: Reno
Posts: 388
|
I am having a hard time finding the .8mm connectors. Do you have a link? Thanks
|
|
| |
|
10-02-2013, 10:54 PM
| #17 |
| RcBros Hobbies Join Date: Nov 2005 Location: Oregon
Posts: 4,646
| |
|
| |
|
10-02-2013, 11:06 PM
| #18 |
| RCC Addict Join Date: Jul 2009 Location: AT THE DRAGON'S LAIR
Posts: 1,319
|
Great job on the write up William! I feel inspired and motivated to do mine like this in the very near future. |
|
| |
|
10-03-2013, 08:35 AM
| #19 |
| Quarry Creeper Join Date: Jul 2008 Location: Reno
Posts: 388
| |
|
| |
|
10-03-2013, 11:11 AM
| #20 |
| Rock Crawler Join Date: Jan 2011 Location: At home
Posts: 535
|
Looks great William What are the dimensions of the package, particular the height ?
|
|
| |
|
 Holmes BR Mini Stacking How-To - Similar Threads
 | ||||
| Thread | Thread Starter | Forum | Replies | Last Post |
| Stacking batteries in series for multiple cell counts | The Violator | Electronics | 14 | 05-13-2011 08:37 AM |
| Holmes' Losi Mini | JohnRobHolmes | Losi Mini-Rock Crawler | 43 | 12-02-2008 06:56 PM |
| Dice stacking | 01XJ | Chit Chat | 13 | 11-15-2006 09:22 PM |
| stacking trannies? | gooba | Newbie General | 3 | 09-04-2006 02:37 PM |
| |


 Linear Mode


