| |
 10-17-2022, 09:20 AM
| #221 | ||
| Go Buckeyes!   Join Date: Jun 2017 Location: Mid-Ohio
Posts: 4,134
| Quote:
 No worries on the derail! I usually derail my own threads! No worries on the derail! I usually derail my own threads! Quote:
| ||

|  |
| Sponsored Links | |
| | |
|
10-17-2022, 02:35 PM
| #222 |
| Rock Crawler Join Date: May 2021 Location: NorCal
Posts: 806
|
Missed a few of your updates. The FJ came out awesome and then you share the Tundra Slash! That body looks nice now that I see your own pics of it. I had an idea of getting a Losi LMT and slapping the Tundra body on it, to add to my Toyota-only fleet. Too bad I had this idea AFTER it became discontinued and pricing wasn't $350 anymore lol. |
|
| |
|
10-20-2022, 09:31 AM
| #223 | |
| Go Buckeyes! Join Date: Jun 2017 Location: Mid-Ohio
Posts: 4,134
| Quote:
I didn't realize the Tundra body was discontinued! I guess I'm luckier than I thought for getting it on clearance for the low, low price of $30 bucks! | |
|
| |
|
10-20-2022, 12:04 PM
| #224 | |
| Rock Crawler Join Date: May 2021 Location: NorCal
Posts: 806
| Quote:
| |
|
| |
|
10-23-2022, 11:27 AM
| #225 | |
| Go Buckeyes! Join Date: Jun 2017 Location: Mid-Ohio
Posts: 4,134
| Quote:
Oh, gotch ya! I was hoping Pro-Line didnt end the Tundra production, but then again they have discontinued a few good ones in the past. Sent from my iPad using Tapatalk | |
|
| |
|
10-24-2022, 09:23 AM
| #226 |
| Go Buckeyes! Join Date: Jun 2017 Location: Mid-Ohio
Posts: 4,134
|
Hello RCC. New week, new updates! Installed the Club5 Racing 3D printed fuel cap and door handles. Just like my Jeep Gladiator hinges that I installed on my SCX10.3 JT (B-MOW's SCX10 III JT Gladiator Trail Warrior), these come with microscopic screws to attach these to the body. I had to use a tiny-micro drill bit to make pilot holes for the screws. Also, before I installed the mirrors, I sprayed them with Rubbermaid Truck Bed Liner to give them a rugged powder coated look.      Like with many of my scale builds, I cut and installed a piece of black vinyl wrap to the hood. I like using the vinyl to help hide the body clips. IMO the vinyl also gives the rig a meaner look and breaks up some of the main body color. The nice thing about adding the vinyl wrap is if it get damaged or scratched, I can replace it with a new piece. Or if I get tired of the look, I can just remove it completely. 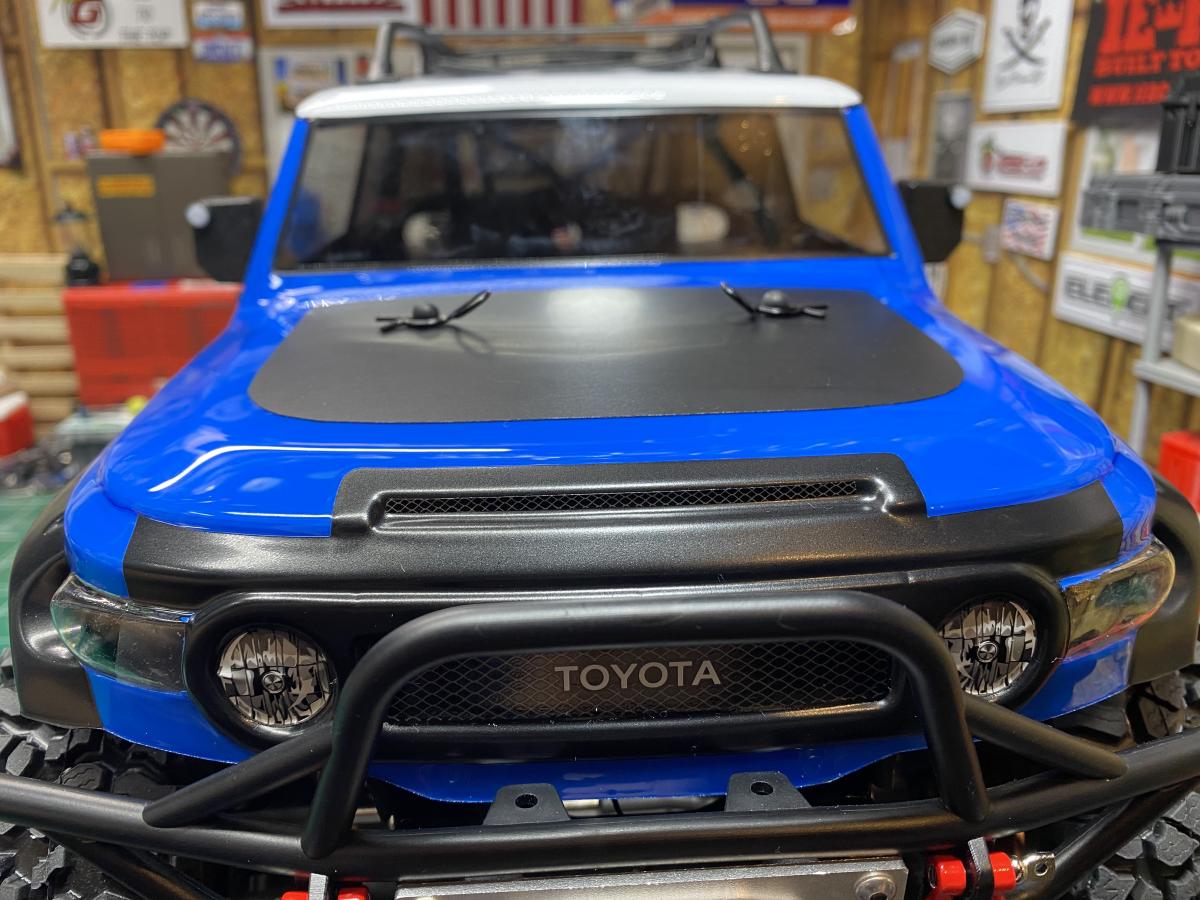  Also, sprayed the Element rock sliders with a coat of Rubbermaid Truck Bed Liner to give these a powder coated rugged look as well.  I'll have more to updates to post sometime later today! |
|
| |
|
10-24-2022, 10:09 AM
| #227 |
| RCC Addict Join Date: Jan 2019 Location: Corvallis, OR
Posts: 1,561
|
Excellent touches Brian  Sent from my iPhone using Tapatalk |
|
| |
|
10-25-2022, 09:07 AM
| #228 | |
| Go Buckeyes! Join Date: Jun 2017 Location: Mid-Ohio
Posts: 4,134
| Quote:
| |
|
| |
|
10-25-2022, 09:33 AM
| #229 |
| Go Buckeyes! Join Date: Jun 2017 Location: Mid-Ohio
Posts: 4,134
|
Now that the drama with Tiffany.boy First, big thanks to @Goro Majima for the idea and inspiration for these couple of additions and mods. You can see more of his build thread here:Late start to the hobby, here is my HPI Venture FJ Cruiser I picked up a tire carrier off of eBay and a spare tire cover from Club5 Racing. The tire carrier is designed to bolt onto the outside of the body, but to get the spare tire carrier in closer to the body, @Goro Majima turned the mount around and "sunk" it into the body. I'll have to get better pics of the spare tire carrier and how close it is to the body later.       The bumper I found on Thingiverse. I forget who the designer is, but it is designed to match the body lines and gives a good departure angle. I lightly sanded and sprayed it with Rubbermaid Truck Bed Liner to give it a powder coated rugged look like I did with the rock sliders. Also attached the RC Plate Shop license plate to the rear with a couple of M2 scale hardware screws left over from the beadlock wheels.   I'm hoping this week I can finish up installing the light buckets and LED lights. More later! |
|
| |
|
10-25-2022, 12:10 PM
| #230 |
| Rock Crawler Join Date: May 2021 Location: NorCal
Posts: 806
|
Love it!! Glad I could inspire people with stuff like this. I shout-out others also whenever I can (I gotta shout out Tigris in my GK KR thread whenever I update it). And that's a clean functional rear bumper. Flows well.
|
|
| |
|
10-26-2022, 09:32 AM
| #231 |
| Go Buckeyes! Join Date: Jun 2017 Location: Mid-Ohio
Posts: 4,134
|
Thanks! I got lucky finding this bumper! I was struggling to come up with something. Hopefully it doesn't get ripped off on the first rock it sees! |
|
| |
|
10-26-2022, 12:34 PM
| #232 |
| I wanna be Dave Join Date: Sep 2011 Location: Douglassville, PA
Posts: 4,224
|
That is a great looking FJ - nice work! Stance is spot on.
|
|
| |
|
10-27-2022, 09:27 AM
| #233 | |
| Go Buckeyes! Join Date: Jun 2017 Location: Mid-Ohio
Posts: 4,134
| Quote:
| |
|
| |
|
11-06-2022, 06:22 PM
| #234 |
| Go Buckeyes! Join Date: Jun 2017 Location: Mid-Ohio
Posts: 4,134
|
Another great weekend, weather wise, here in Ohio. Unfortunately I didn't get out to wheel the rigs, but I did get some more details finished up on the FJ. I haven't finished the LED lighting yet, but hoping to get it wrapped up soon. I did get some work done on the rear end. I picked up a ladder off of eBay and modified the Club5 Racing spare tire carrier. Also ordered another Twisted Tree RC antenna from @bad andy.   I used a another idea from @Goro Majima and used my Dremel to recess the area where the ladder makes contact with the spare tire cover so that I could get the cover as close to the body as possible. I also had to notch out the bottom of the cover to clear the bumper. I used a couple small pieces of styrene to close off the area that I cut out. Sprayed it with flat black paint and covered it with a couple coats of matte clear. I painted the "FJ" letters on the cover white. At some point I managed to F-up the white paint on the "F".    Mounted up the Twisted Tree Rc antenna. With this one, I decided to go with a 5" whip and a tennis ball. I'm lovin' these little whip antenna'!   |
|
| |
|
11-06-2022, 07:22 PM
| #235 |
| Rock Crawler Join Date: May 2021 Location: NorCal
Posts: 806
|
Love it. That antenna is a nice addition!
|
|
| |
|
11-06-2022, 08:51 PM
| #236 |
| Rock Crawler Join Date: Jan 2022 Location: st louis
Posts: 574
|
She's coming along beautifully Sent from my SM-S906U using Tapatalk |
|
| |
|
11-06-2022, 09:11 PM
| #237 |
| RCC Addict Join Date: Nov 2017 Location: Austin Texas
Posts: 1,615
|
Could always use some very fine grit sandpaper on the tire cover logo... maybe make it look a little worn/ faded. Looks awesome, man.. Great detailing as usual.
|
|
| |
|
11-07-2022, 05:48 PM
| #238 | |||
| Go Buckeyes! Join Date: Jun 2017 Location: Mid-Ohio
Posts: 4,134
| Quote:
They look cool wobbling around when the rig is in motion. I'll probably have to get one for each of my rigs!Quote:
Quote:
Thanks drifter! | |||
|
| |
|
07-03-2023, 01:52 PM
| #239 |
| Go Buckeyes! Join Date: Jun 2017 Location: Mid-Ohio
Posts: 4,134
|
It's been awhile! That seems to be a common theme with all of my threads! Anyways, have the day off and figured I'd spend some time in the garage. On and off rain showers and higher than I like humidity has kept me indoors, so perfect time to get some much needed work done on the rigs. The FJ Cruiser has been waiting patiently for me to finish up installing the lights. So that is what I did. Started off by use the hot glue gun to install the light buckets that came with the wiring kit that I purchased months ago. The brand slips my mind right now, but I'm sure I listed it previously in this thread. The light buckets that were supplied were a little smaller than the clear light openings on the body. I had to center them the best that I could and use the black hot glue to hold them in and cover up any unpainted sections. On the front turn signals, I used some "Jack-o-lantern" orange paint to add some color to the buckets. Similar to the 1:1 FJ that I am basing this rig off of. (Picture of 1:1 is posted earlier in this thread) The rear light buckets were even smaller than the front. I had to center them as well and glue them in. Luckily the black glue sticks hide and cover up the area around the buckets. Also, the glue helps to seal out water and dirt so that the inside of the lens stays clean. Or at least that is what I'm hoping for!        I've been meaning to add the Element MagnaFlow exhaust for awhile now. Got it installed. Made a 3D printed piece to mount the front of the exhaust and mounted the rear into the rear bumper bracket. Also cut a piece of aluminum tube and cut it at an angle to make and exhaust tip. Held it on with a dab of E6000.   Also forgot the I purchased these. Tiny vent shades that I found on eBay. They are design for a different rig with 4 doors. I had to cut down the front and rears to make one single piece for the front doors. Tried my best to make it look like one piece. It'll do!    |
|
| |
|
07-11-2023, 08:15 AM
| #240 |
| Quarry Creeper Join Date: Jul 2020 Location: Lincoln
Posts: 334
|
Glad you figured out a way to install the lights. I gave up on them almost right away, lol. Those buckets are absolutely tiny. Makes me wonder if they were actually for the Tamiaya FJ instead. Sent from my iPhone using Tapatalk |
|
| |
 |
 B-MOW's Enduro Journey! - Similar Threads
 | ||||
| Thread | Thread Starter | Forum | Replies | Last Post |
| Journey of SMP | TAT76 | Axial SCX10 II | 57 | 03-08-2021 06:08 AM |
| My trx-4 journey | dittohead | Traxxas TRX-4 | 6 | 08-05-2017 10:42 PM |
| Mammoth's journey to the berg | mammoth | EnRoute Berg | 42 | 04-23-2015 07:51 AM |
| I seen Journey last night... | Kamikaze | Chit Chat | 8 | 08-09-2008 01:47 AM |
| |


 Linear Mode


