| |
| |||||||
 |
| | LinkBack | Thread Tools | Display Modes |
 10-23-2019, 10:21 AM
| #1 |
| Quarry Creeper Join Date: Nov 2018 Location: Mexico, Guadalajara
Posts: 281
|
I have to admit that this was an impulse purchase high on hype, back on August 21st, I place my order at amain hobbies for this new rig and yesterday I finally received it  I know that the delivery of this package would take several days so meanwhile, I ordered some upgrades Club 5 racing Aluminum Servo / Bumper Mount For Element Enduro ( Black ) $34.99 IR RC SCALER, SCX10II rear shock towers $22.00 IR RC SCALER, element enduro sliders $25.00 CSE010-0004-00 Castle Creations CC Bec 10A 6S Switching Regulator $22.83 SEHREEFS03 Reefs RC Triple5 High Torque Titanium Gear Digital Servo (High Voltage) $119.99 HEYSVWN3 HeyOK Servo Winch $52.99 HEY3PWJST HeyOK Winch Controller for Radio with Three Position Channel $27.99 ASC42032 Element RC Factory Team Stealth X Machined Drive Gear Set $28.49 (in transit) ASC42072 Element RC Enduro Axle Housings (Hard) $16.99 (in transit) SAMEND-6023-GM Samix Element Enduro Front Shock Plate (Grey) $28.99 (in transit) Generic Aluminium Alloy Frame Brace Set SCX10 $5.68 (in transit) I feel like a child on Christmas morning opening my presents, unfortunately, the first thing that I notice was a broken rear shock tower out of the box  fortunately, I already have the IE RC rear shock towers but I can´t use the back Lexan cage because the new shock towers don't have body mounts, so now I am forced to build a couple of body mounts or build a rear rolling cage to make a Sendero Truggy.  I also have the aluminum servo mount from club 5 racing, so lets install the Reefs servo and Heyok winch  I dont like the Hey OK Winch Wheel (spool) it is a sewing machine bobbing mounted on a plastic round servo arm, I think it will require some mods to be installed, I also have the sliders from IE RC, this parts are made of steel so them offer a good protection but incresase the weight so I dow know If this will affect the performance or not 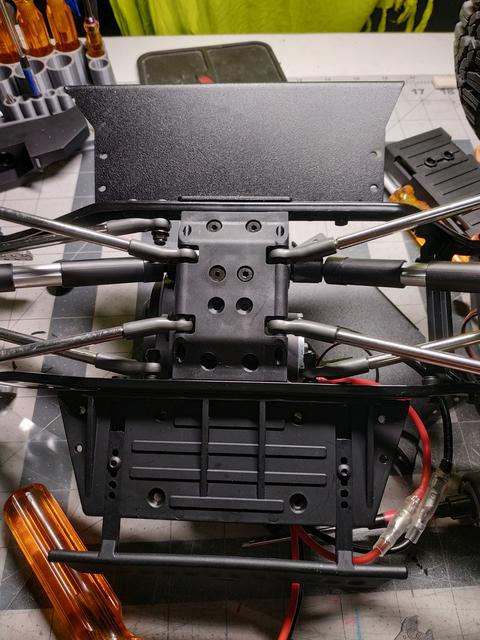 next steps: waterproof the BEC install the electronics reinforce and trim the body cab build a front bumper buils a rear bumper, flat bed or rolling cage this is the firts element rc enduro sendero in my city no one else in the local crawling community have one. Last edited by antigacho; 10-23-2019 at 11:33 AM. |

|  |
| Sponsored Links | |
| | |
|
10-23-2019, 05:59 PM
| #2 |
| I wanna be Dave Join Date: Jun 2016 Location: Austin
Posts: 6,011
|
Nice! Keep us posted on your progress... Looks like your build will be a bit different than all the others, always of interest to see.  |
|
| |
|
10-24-2019, 04:22 AM
| #3 |
| Pebble Pounder  Join Date: Aug 2019 Location: Redlands, CA
Posts: 194
|
Im interested to hear about the bumper servo mount, if you have a chance to drive it before and after. Mines pretty flexy up front. Or maybe it isnt and I just want to try new things : )
|
|
| |
|
10-25-2019, 10:44 AM
| #4 |
| Quarry Creeper Join Date: Nov 2018 Location: Mexico, Guadalajara
Posts: 281
|
I forgot to mention that some trimming/sanding is necessary to make the reefs servo fit on the aluminum mount, the mounting ears on this servo are a little bit wider/thicker than standard servo, this is an easy fix 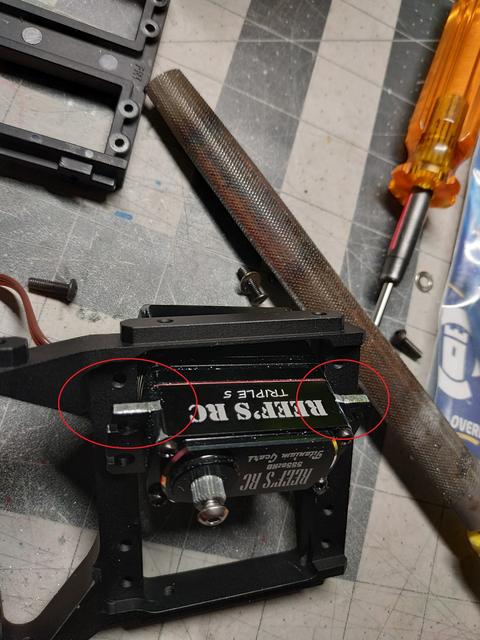 I also worked on electronics waterproofing applying an extra coat of silicones conformal coating picture in my opinion, the body also needs some reinforcement I glued a piece of styrene to the back of the cab using transparent silicone, I also glued some glass fiber tape to the sides for reinforcement this kind of reinforcement worked well on my arrma Kraton body, it should work well for "Sendero" too  working on the front bumper Last edited by antigacho; 10-26-2019 at 10:48 AM. |
|
| |
|
10-25-2019, 07:34 PM
| #5 |
| Pebble Pounder Join Date: Aug 2019 Location: Redlands, CA
Posts: 194
|
Is there a glue you like for bonding that glass tape? And can you cut it with, say, lexan scissors once its cured up? The gorilla tape I used in the same area is okay but it wont last forever.
|
|
| |
|
10-26-2019, 10:46 AM
| #6 | |
| Quarry Creeper Join Date: Nov 2018 Location: Mexico, Guadalajara
Posts: 281
| Quote:
I prefer to use sharp x-acto knife to cut Lexan, Dremel tool also works | |
|
| |
|
10-27-2019, 04:46 PM
| #7 |
| Pebble Pounder Join Date: Aug 2019 Location: Redlands, CA
Posts: 194
|
Excellent, Ill try that next with the bathroom adhesive. Also, Viva Checo!!!...encantamos mas el Gran Prix de Mexico, y saludarnos al Guadalajara y su hijo buena onda . (Roughly, we love this race and Mexicos awesome young Sergio Perez racing in the Distrito Federal today.)
|
|
| |
|
10-28-2019, 12:34 PM
| #8 |
| Quarry Creeper Join Date: Nov 2018 Location: Mexico, Guadalajara
Posts: 281
|
bumper building This was my first time building a bumper, good practice for my Unimog project After some searching online looking for inspiration, I finally figure out the design of my custom bumper I live in a small apartment so I don´t have a proper workshop or workbench. I just have a plastic table so I have to use small tools and use the torch outside I'm using and small portable vice and the BAC industries Shop Tuff MR-01 Mighty Rod Bender  I am also using a stainless steel rod and some scrap metal that I found in the factory where I work After taking some measures I cut and bent the metal rod to get these parts  This is the layout of the bumper, but during the building, I decide to modify the design to include a fairlead for the servo winch line, 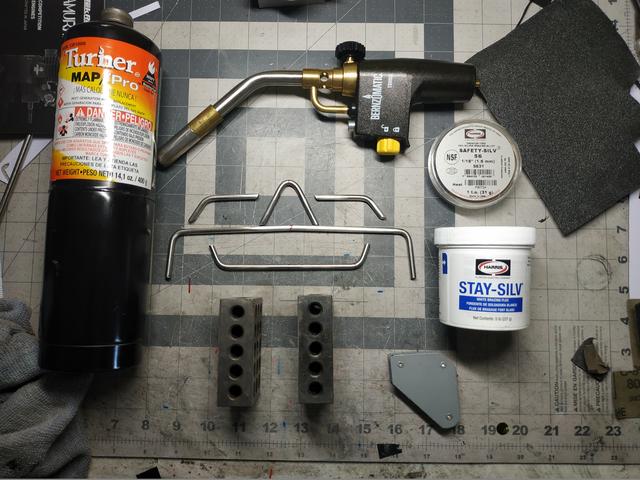 brazing tools Harris SSWF 1/2 Stay Silv Brazing Flux Harris Safety-Silv 56% 1/16 Silver Solder Brazing Alloy Bernzomatic TS8000 - High-Intensity Trigger Start Torch I take me the whole Saturday afternoon but I'm happy with the final result, it needs a lot of sanding but not bat in my opinion some pics    next step build a rear roll finally some bad news I have the basic CCBEC 10A installed on this rig but I noticed that this is not compatible with The Castle BLINK Bluetooth adapter so now I have to find the Castle Link USB programming kit to properly set the voltage for my servo |
|
| |
|
10-28-2019, 06:36 PM
| #9 |
| I wanna be Dave Join Date: Jul 2014 Location: Deep South
Posts: 3,444
|
Looking good.
|

| |
|
11-01-2019, 12:53 PM
| #10 | |
| Quarry Creeper Join Date: Nov 2018 Location: Mexico, Guadalajara
Posts: 281
| Quote:
| |
|
| |
|
11-05-2019, 05:23 PM
| #11 |
| Quarry Creeper Join Date: Nov 2018 Location: Mexico, Guadalajara
Posts: 281
|
I still thinking about the rear roll cage design, meanwhile, I installed the electronics and completed 3 easy mods to this rig 1. Servo winch installed, connected to 3rd channel  2. Cut the Lexan fenders flares / install new rubber fenders. I am using rubber edge trim found at an auto parts store   3. Paste a lot of decals 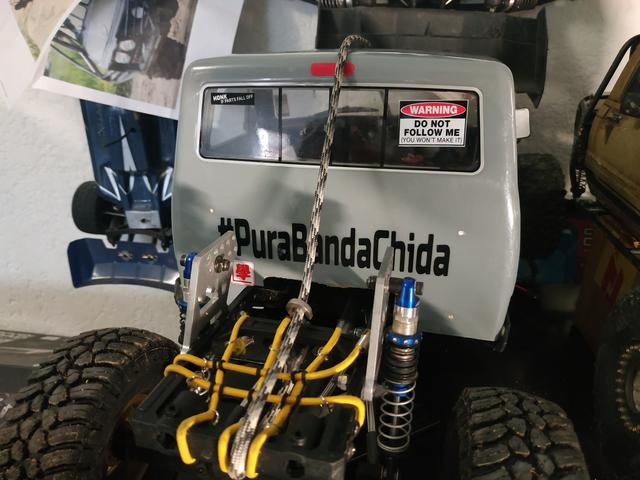 Last edited by antigacho; 11-15-2019 at 09:33 AM. |
|
| |
|
11-13-2019, 11:00 AM
| #12 |
| Quarry Creeper Join Date: Nov 2018 Location: Mexico, Guadalajara
Posts: 281
|
This is going to be about how I build my first rear roll cage I am using a stainless steel rod and some scrap metal that I found in the factory where I work I spend several hours staring at my rig, trying to figure how to build this, I also watched some youtube brazing tutorials and checked the work of the masters for inspiration kudos to: Trojen RC fab White Trash Fabrication WTF Bentmetal Johnson Fabco UCFab - Ultra Custom Fab, LLC Wertymade Scale Built RC Pimpin Crawlers BGR Fabrications & Welding JR Fabworx Smf Rc Works Sinizter RC fab and customs MattZilla RC Works Northern Truggy rc MS MetalWorx First I build the rear support, I used a couple of steel blocks and a piece of wood to replicate the width of the chassis, then I fix the support plates using a clamp to braze all together   In my opinion, the hardest part is making the parts fit together before brazing, a lot is sanding and trimming is necessary before using the mapp gas torch 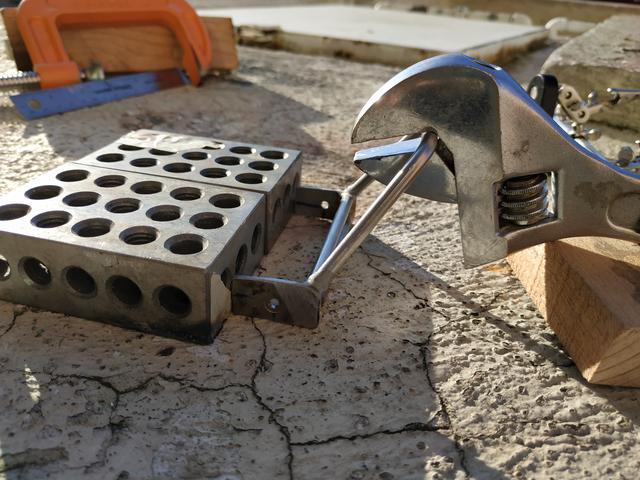 I tried to be careful during the steel rod cutting and bending trying to make symmetric parts, the parts are not perfect but fit well enough.  The upper lateral bars were difficult to make because of 3 the different bending angles, the top bar is just a reinforcement  Finally a couple a lower lateral post for support  I had an aluminum Taillight that I didn't installed on my scx10, this is a good opportunity to use it. First I thought to make a custom metal mount but then I realize that I can use the stock plastic bumper mount instead, after some modifications it works well to mount the taillight avoiding the metal cutting and brazing mess  Modify the plastic part was easy but mount it was very dificul., I think it takes me at least an hour to screw that little nut to secure the back of the roll cage   After a lot of sanding and mounting tabs trimming this is the final result 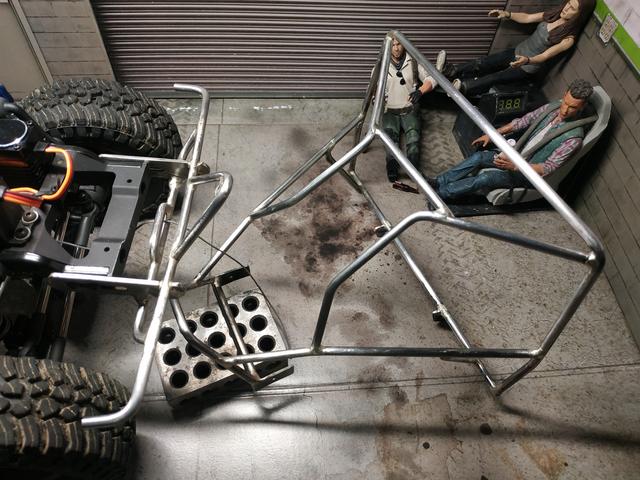 And this is how the bumper and roll cage looks mounted   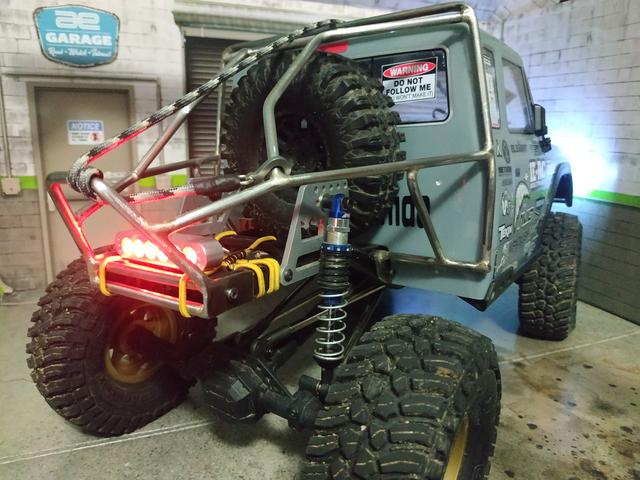 Next step is to build some kind of body mounts to secure the back of the Lexan cab, maybe using magnets but I am not sure yet  I also have a power shift RC D.M.S unit pending to be installed Two final pictures This is how I reinforce the Lexan body, I also cut the original fenders and installed rubber fenders   Last edited by antigacho; 11-13-2019 at 05:33 PM. |
|
| |
|
11-15-2019, 10:38 AM
| #13 |
| Quarry Creeper Join Date: Nov 2018 Location: Mexico, Guadalajara
Posts: 281
|
I have been working on the work table on this rig more time than driving it on trails, but that is part of the fun on this hobby After these mods, my Enduro will be ready for some crawling fun  I had to find a way to secure the back of the Lexan cab to the chassis or to the roll cage, I was thinking in brazing a couple of steel tabs so secure it but I found some magnet body mounts laying around. A couple of them can be used to secure the back of the cab in position. also, less work involved with this solution 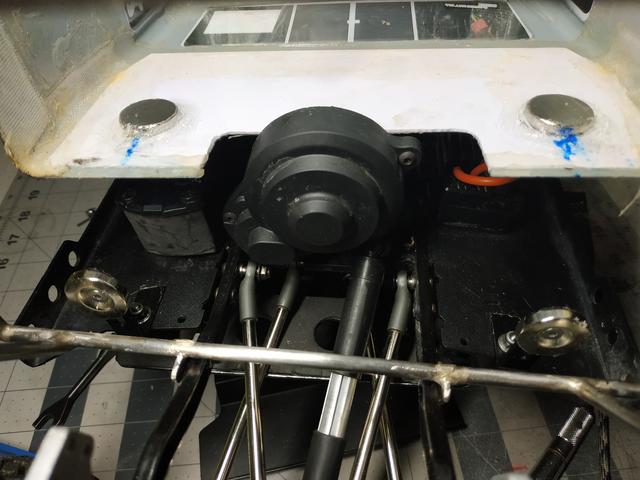 It was easy to secure one part of the body mounts to the metal sliders. I decide to use silicone to hold the magnets attached to the cab, I hope it holds well After silicone curing, this is how it looks mounted  Finally let's change those plastic ball links using metal instead  According to the tracking report of my orders in transit, the postman will arrive today with some more upgrades ST Racing Concepts Enduro Aluminum Rear Chassis Brace ST Racing Concepts Enduro Aluminum Hex Adapters SSD RC Element Enduro Aluminum Link Mounts Installation of that parts will be the next post |
|
| |
|
11-21-2019, 10:03 AM
| #14 |
| Quarry Creeper Join Date: Nov 2018 Location: Mexico, Guadalajara
Posts: 281
|
quick update some upgrades to install aluminum instead of plastic   |
|
| |
|
11-21-2019, 11:47 AM
| #15 |
| Slow is the new Fast  Join Date: Nov 2013 Location: Winterpeg
Posts: 2,906
|
Enjoyable build thread Antigacho thanks for posting it up.
|
|
| |
|
11-23-2019, 09:18 AM
| #16 | |
| Quarry Creeper Join Date: Nov 2018 Location: Mexico, Guadalajara
Posts: 281
| Quote:
| |
|
| |
|
11-23-2019, 10:12 AM
| #17 |
| Quarry Creeper Join Date: Nov 2018 Location: Mexico, Guadalajara
Posts: 281
|
I confess I'm addicted to upgrades Despite the Element Enduro is a great rig out of the box, in my opinion, part of this hobby is about customization, So is time for another accessory Powershift RC DMS-X BATTERY I recommend this model because it includes an xt60 plug instead of magnets who tend to fail or broke as I confirmed on my Truggy build On my last post, I installed the ST Racing Concepts Enduro Aluminum Rear Chassis Brace but I notice that the shape of that brace hinder the installation of a plate to mount the scale battery 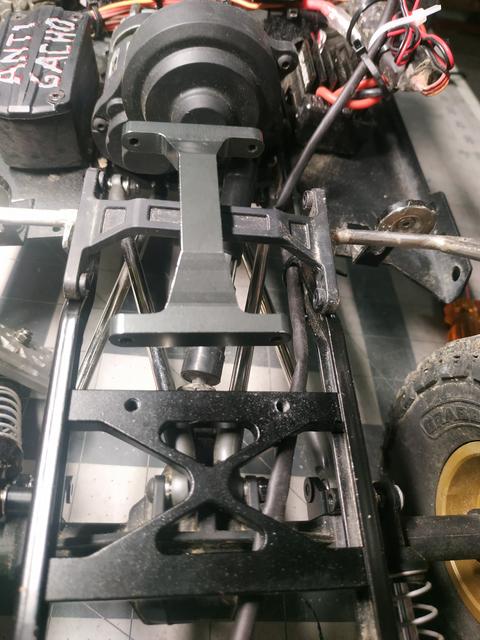 So I will use a generic Aluminium Alloy Frame Brace for Axial SCX10 instead It fit perfect and cost considerably less, so I recommend this option is you want to upgrade the plastic stock rear chassis brace This generic part will be perfect for my needs because it is plain and it includes a couple of holes where I can screw and secure the plate for my battery, so let's do it First, apply some spray primer to the 3d printed part and the paint it  Second, build the steel plate to mount the battery 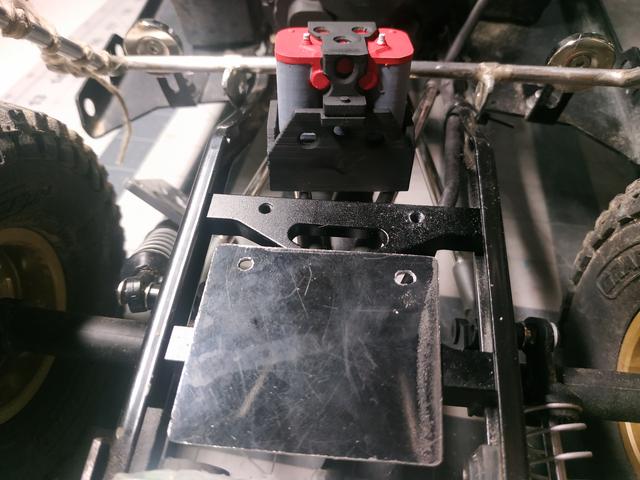 Third weathering the paint and solder the connections  I am using Gorilla Super Glue Gel to secure the plastic battery to the metal plate Next post will be the axles driveshaft upgrade I already ordered some parts SSD RC Element Enduro Brass Rear Axle Weights SSD RC Element Enduro Brass Knuckles Treal Brass Diff Cover 84g Heavy Differential Cover for Element RC Enduro MIP X-Duty Center Drive Kit For Element Enduro SSD Pro Aluminum C Hubs for Enduro Element RC Factory Team Stealth X Machined Drive Gear Set Element RC Enduro Axle Housings (Hard) But they are in different orders so I will wait to have it all together for installation Last edited by antigacho; 11-23-2019 at 10:14 AM. |
|
| |
|
12-10-2019, 10:58 AM
| #18 |
| Quarry Creeper Join Date: Nov 2018 Location: Mexico, Guadalajara
Posts: 281
|
I just received a couple of upgrades for my element enduro SSD00354 SSD RC Element Enduro Brass Rear Axle Weights SSD00357 SSD RC Element Enduro Brass Knuckles YEAHRUN 4pcs 1.9inch Metal Beadlock Wheel Rims Hubs  let´s install it first the SSD brass knuckles I just have to interchange the parts, the larger bearing can be used again but the SSD brass knuckles include a couple of bearings to use instead of the stock size, I would have liked sealed bearings for this use  this is how it looks mounted  The Brass Rear Axle Weights are super easy to mount, flat hex screws are included for this  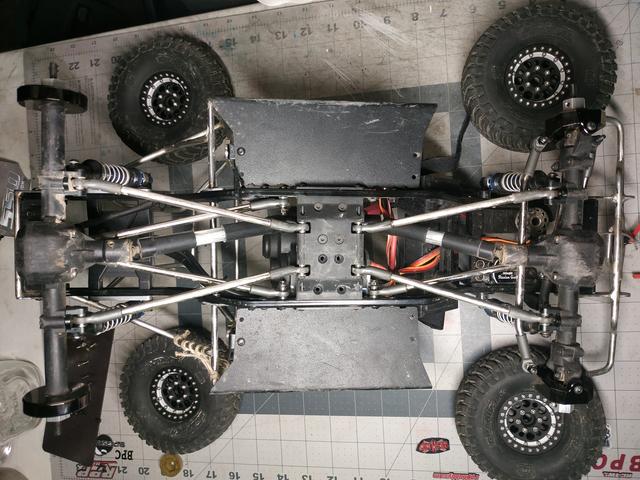 Now lest change that ugly plastic rims. I got the aluminum Beadlocks fort $35 USD at aliexpress, I have to wait 81 days to receive but that is the fault of the inefficient Mexican postal service  several little screws later this is how it looks mounted, I like it  The total weight of my rig is 3.6 kilos 7.93 lbs so far (without battery) |
|
| |
|
12-12-2019, 12:28 PM
| #19 |
| Quarry Creeper Join Date: Nov 2018 Location: Mexico, Guadalajara
Posts: 281
|
In my opinion, this upgrade is a must Samix Aluminum Rear Shock Plate Set Gun Metal For Element Enduro #END-6024GM I got it at RCMart in this case, aluminum is better than plastic, nothing much to explain 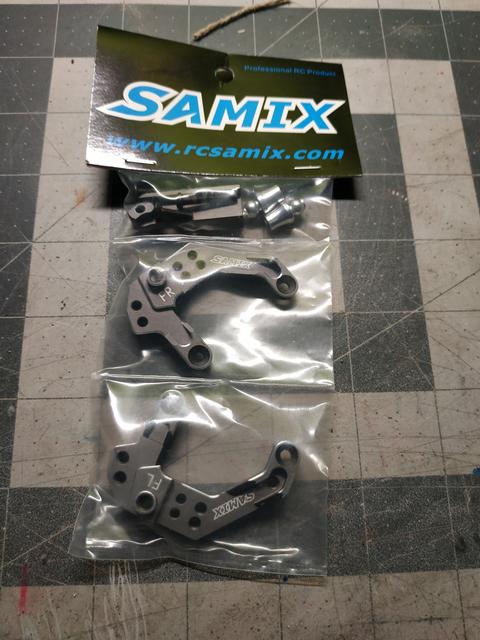  finally, this is how it looks mounted 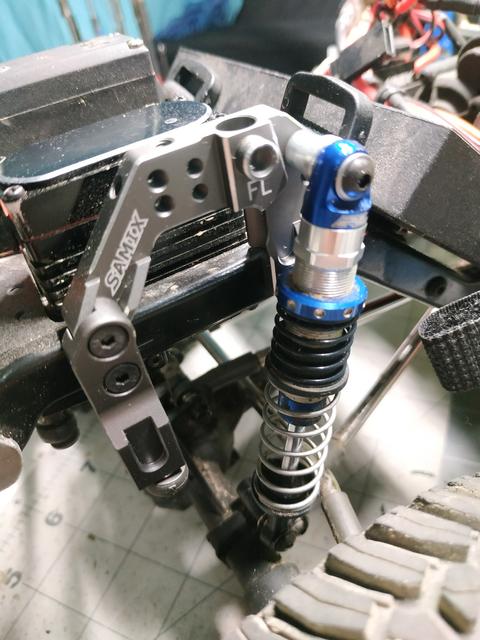 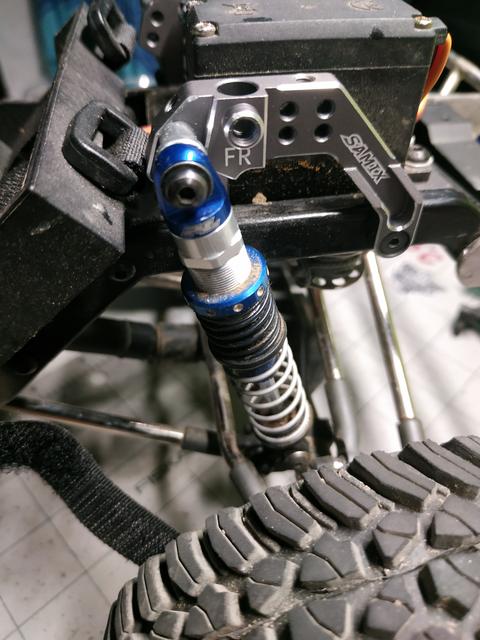  Last edited by antigacho; 05-28-2020 at 03:35 PM. |
|
| |
|
12-12-2019, 09:56 PM
| #20 |
| I wanna be Dave Join Date: Jun 2016 Location: Austin
Posts: 6,011
|
Looking really good! I'll bet the truck is nearly indestructible with these mods... |
|
| |
|
 ANTIGACHO following the sendero - Similar Threads
 | ||||
| Thread | Thread Starter | Forum | Replies | Last Post |
| Antigacho SCX10II Truggy MX | antigacho | Axial SCX10 II | 75 | 05-11-2022 07:40 PM |
| ANTIGACHO BP Custom GenX/SCX10 UNIMOG | antigacho | 1.9 Scale Rigs | 105 | 07-29-2020 08:31 AM |
| Element RC Enduro Sendero Jeep Wrangler Unlimited Rubicon kit build | Jim85IROC | Element RC 1/10 Enduro Trail Truck Sendero | 9 | 02-16-2020 10:06 AM |
| OTR sendero build -/ why are the ad ft foams so stiff? | OTRocks | Element RC 1/10 Enduro Trail Truck Sendero | 6 | 09-11-2019 06:42 PM |
| |


 Linear Mode


