| |
 09-08-2020, 08:29 PM
| #81 | |
| Go Buckeyes!   Join Date: Jun 2017 Location: Mid-Ohio
Posts: 4,135
| Quote:
Yeah my shocks are in the stock position and since I put the fuel tubing on the shock shafts, the bend works out great at the skid. Now on my Sendero, Ill probably install the high clearance links with the bend at the axle. It has more flex and will more than likely get bound up at full compression. Sent from my iPad using Tapatalk | |

|  |
| Sponsored Links | |
| | |
|
09-08-2020, 08:38 PM
| #82 | |
| Go Buckeyes! Join Date: Jun 2017 Location: Mid-Ohio
Posts: 4,135
| Quote:
Thanks dez!  Its amazing what a little paint will do!  Sent from my iPad using Tapatalk | |
|
| |
|
09-09-2020, 08:09 AM
| #83 |
| Rock Stacker Join Date: Feb 2020 Location: Columbus
Posts: 73
|
That's a sharp looking Trailwalker. You do good work!
|
|
| |
|
09-09-2020, 05:54 PM
| #84 | |
| Go Buckeyes! Join Date: Jun 2017 Location: Mid-Ohio
Posts: 4,135
| Quote:
 | |
|
| |
|
09-10-2020, 07:36 PM
| #85 |
| Go Buckeyes! Join Date: Jun 2017 Location: Mid-Ohio
Posts: 4,135
|
I got the REVolutionX Element Enduro High Clearance Mid-Chassis Brace printed and installed. Big shout out and thanks to soze for sharing the file! The brace printed very nice and turned out great! Here is a look at it installed. It fits great and leaves plenty of room for the high clearance links!    |
|
| |
|
09-13-2020, 10:09 AM
| #86 | |
| I wanna be Dave Join Date: Dec 2016 Location: san diego
Posts: 2,723
| Quote:
That's exactly how I painted my sons rc4wd blazer bowtie. I mean its not a blazer anymore but yeah. So great how you made this trailwalker look nearly licensed! High clearence links and compatible soze brace look awesome too. I gotta get mine out for some wheelin! Just been too dang hot. | |
|
| |
|
09-14-2020, 06:15 AM
| #87 | |
| Go Buckeyes! Join Date: Jun 2017 Location: Mid-Ohio
Posts: 4,135
| Quote:
Yeah, I really like how the bowtie turned out! Luckily I had some of that clear yellow in my paint supplies. I really wasn't sure how to make it look real! Hi-clearance inks and the "soze" brace fit great and I can't wait to get it out for a test run! I hear ya on the heat! It has been hot and wet hear for the last week. This week is supposed to be cooler and no rain in sight. Hoping to get some trigger time sometime soon! | |
|
| |
|
09-14-2020, 09:14 AM
| #88 |
| I wanna be Dave Join Date: Aug 2016 Location: Orange County, CA
Posts: 3,643
|
Body definitely looks great. Glad to see the print came out good and fits well for you!
|
|
| |
|
09-14-2020, 09:53 AM
| #89 |
| Gold Star Baby! 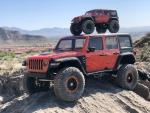 Join Date: Dec 2017 Location: Las Vegas
Posts: 2,554
|
Nice print and cool part! Love seeing that type of thing going on. Cheers gents. |
|
| |
|
10-02-2020, 08:37 PM
| #90 |
| Pebble Pounder Join Date: Dec 2005 Location: lawrenceburg
Posts: 126
|
What material did you print the two mounts in?
|
|
| |
|
10-08-2020, 09:27 AM
| #91 | |
| Go Buckeyes! Join Date: Jun 2017 Location: Mid-Ohio
Posts: 4,135
| Quote:
| |
|
| |
|
10-13-2020, 01:06 PM
| #92 |
| Pebble Pounder Join Date: Dec 2005 Location: lawrenceburg
Posts: 126
|
PLA, cool. Looks nice. Any info on where to turn for the 62mm link inbetween towers? Ive found 60 and 65mm
|
|
| |
|
10-13-2020, 02:17 PM
| #93 | |
| Go Buckeyes! Join Date: Jun 2017 Location: Mid-Ohio
Posts: 4,135
| Quote:
Well I guess I false advertised the 62mm link! If you look close in the pic you can see the washers on both sides of the link.  | |
|
| |
|
10-15-2020, 07:57 AM
| #94 |
| Pebble Pounder Join Date: Dec 2005 Location: lawrenceburg
Posts: 126
|
Lol. Ok, ive been searching for 62 with no luck
|
|
| |
|
10-27-2020, 07:37 AM
| #95 |
| I wanna be Dave Join Date: Feb 2007 Location: South FL
Posts: 3,349
|
S99 Sent from my Pixel 3 XL using Tapatalk |
|
| |
|
10-27-2020, 09:38 AM
| #96 | ||
| Go Buckeyes! Join Date: Jun 2017 Location: Mid-Ohio
Posts: 4,135
| Quote:
Quote:
| ||
|
| |
|
10-27-2020, 10:33 AM
| #97 |
| Slow is the new Fast   Join Date: Nov 2013 Location: Winterpeg
Posts: 2,906
|
Your mid-chassis brace printed up really clean. Did it require much sanding? May I ask which 3D printer you use?
|
|
| |
|
10-27-2020, 01:12 PM
| #98 | |
| I wanna be Dave Join Date: Feb 2007 Location: South FL
Posts: 3,349
| Quote:
Sent from my Pixel 3 XL using Tapatalk | |
|
| |
|
10-27-2020, 03:27 PM
| #99 | ||
| Go Buckeyes! Join Date: Jun 2017 Location: Mid-Ohio
Posts: 4,135
| Quote:
I have the Ender 3 PRO and it has been a great printer so far! It is my very first printer and it has been very easy to use and it produces great prints. I've been lucky, it has been basically been "plug and play"! I haven't had to really adjust any settings to get great prints. Downside is if something does go wrong with a print, I'll probably struggle to figure out how to fix it! Quote:
 No worries! No worries!I thought maybe I was missing something! | ||
|
| |
|
01-23-2021, 08:36 PM
| #100 |
| Go Buckeyes! Join Date: Jun 2017 Location: Mid-Ohio
Posts: 4,135
|
It's been awhile since I've had the Trailwalker in the garage! Ever since I installed the IFS kit, I've been wanting to do something about the slop in the steering. The stock plastic bell cranks would flex under load causing the unwanted flex and sloppy, unpredictable steering. Luckily Bowhouse RC came up with a solution! I ordered their new steering rack and bell crank aluminum upgrades. Both items installed easily and look great! All of the slop in the steering is now gone. The only play that I have now is in my cheap servo and a little play in the upper a-arm mounting pins. I'll be upgrading to a better servo in the future to reduce the slop and add more torque to help turn these fat wide tires a little better. Also going to take a look at the upper a-arms to see if I can fix the slop in them too. The N2R Steering Bell Cranks are made out of aluminum and eliminate the flex and slop and add strength to the steering system. They are designed to reuse the stock bearings and bolt into the original location.  The N2R Steering Rack, which was first released last year, is CNC machined and eliminates the bump steer that the stock configuration was causing. It relocates and shortens the tie rods to put them in line with the upper a-arms to give it the proper geometry.  Here is a before and after look at how the new steering rack keeps the linkages in line with the a-arms. Suspension cycles smooth while keeping everything in-line.   And for anyone interested, here is a look at the weight distribution of how the IFS Trailwalker currently sits loaded with battery and ready to run. It is right around 6.29 lbs. I'm still wanting to install an interior, so that will add a little more weight to it.  |
|
| |
 |
 B-MOW's IFS Trailwalker - Similar Threads
 | ||||
| Thread | Thread Starter | Forum | Replies | Last Post |
| B-MOW's Enduro Journey! | B-MOW71 | Element RC 1/10 Enduro Trail Truck Sendero | 243 | 04-08-2024 08:22 AM |
| B-MOW's VS4-10 Origin Limited | B-MOW71 | Vanquish Products VS4-10 Origin | 40 | 09-15-2023 06:18 AM |
| Ebbet's Trailwalker | ebbet | Element RC 1/10 Enduro Trail Truck Sendero | 27 | 09-16-2020 10:13 AM |
| Element Trailwalker | jeeptec | General Crawlers | 7 | 12-26-2019 07:00 AM |
| |


 Linear Mode


