| |
 05-10-2020, 06:42 PM
| #1 |
| Go Buckeyes!   Join Date: Jun 2017 Location: Mid-Ohio
Posts: 4,135
|
Hello RCC! I like most all of us here have been locked up in our houses for over a month now. Since I missed out on the first round of the Axial SCX10.3 pre-orders and shipments and am really needing something to work on, I figured I would build me an IFS Trailwalker. I purchased the IFS kit when they were first released and had plans on eventually picking up the Trailwalker for a future build. Recently Element RC advertised an "2 for" deal which is a buy 2 Element Trailwalkers for $499. This seemed like a great deal and one I shouldn't pass up, but since I have been off work for over a month and funds are limited, I decided to just pickup one of the Trailwalkers for now. At $299 shipped to my door, it is still a pretty good deal. When the Trailwalker was first released I thought the body looked too generic and very fugly! As I started to see more pics of these with special paint schemes and modifications, I really started to like the body. I thought the same thing about the Enduro Sendero body when it first was released. But the more I saw them the more I started to like them. So my plan for the TW body is to transform it into an early 80's Chevy pickup truck. It has some similar body lines as the 1981-87 Chevy trucks so I'm hoping that I can replicate one of my Chevy trucks that I owned back in the day. Here is a list of parts that I recently received to start the build: - Element RC Enduro Trailwalker RTR - Element RC IFS Kit - Hobbywing 1080 ESC - Cheap 20kg DS3218MG Servo - Team KNK Enduro Stainless Hardware Kit - FT Enduro Steel Pivot Balls #42054 - FT Shock Bushing - Short #1781 - FT Bleeder Shock Caps #6443 On order as of today: - FT Enduro Wheel Hexes, 6mm Steel #42076 - Sendero Chrome Grill #42124 - Sendero Inner Fenders #42132 - Trailwalker Body Decals #42142 - Trailwalker Body, Rear Shell #42147 Here are the "fresh out of the box" pics:       More on the way shortly! Last edited by B-MOW71; 05-10-2020 at 06:52 PM. |

|  |
| Sponsored Links | |
| | |
|
05-10-2020, 08:10 PM
| #2 |
| Go Buckeyes! Join Date: Jun 2017 Location: Mid-Ohio
Posts: 4,135
|
First off was building the IFS Kit. This kit went together fairly easy. Instructions were easy to understand and the molded parts seemed to be made well. I like how Element added everything needed to complete this kit in the box. I was expecting to have to reuse the ring and pinion gear out of the straight axle, but these were included too. That makes it nice as now i have a complete front axle that I can use in another build in the future. All of the steering links come with steel ball studs except for the servo link. It uses plastic pivot balls. WHY??? It would have been nice if Element would have included these two steel pivot balls for this link in the kit. Since I purchased two bags of steel pivot balls for the links, I ended up replacing the plastic balls with steel balls. The only problem that I ran into building this kit was when I got to Gate 4 which uses Bag 3. In Gate 4, it calls for building the gearbox and ring and pinion gears. It also call for installing the outdrives. My bag did not have the outdrives and thought that maybe they got left out. I instantly got pissed and thought I was shorted the outdrives. After looking thru the other bags in the box, I found the outdrives in Bag 6 with the steering blocks and universals. I was relieved that I found them, but it would have been nice if it was stated in the instructions that the outdrives were in Bag 6. Here is the finished kit with servo installed:  I purchased these bleeder caps for my Enduro Sendero a few months back with the plan on swapping out the caps on those shocks. I've had such great luck with those shocks that I never had to remove them to rebuild them. So I decided to use these bleeder caps on the Trailwalker. These caps are a direct replacement for the stock caps and make bleeding the shocks extremely easy. If anyone has ever built the Axial Capra shocks, then you will know how nice it is to have the bleeder caps.  I decided to use 30w fluid for the front shocks and 40w for the rear. This is just a starting point and will have to get a few test runs in to see if I will need to adjust the fluids later on. While I had the shocks apart, I added Noleen SF-3 suspension grease to all of the shock shaft seals to help make them smooth and leak free. The kit comes with a heavier front spring (black 4.75lbs/in) to replace the stock springs (gray 1.49lbs/in) that come with the Enduro. These springs feel really stiff to me and thought I would try a softer spring. I had an extra set of springs that came with my Axial Capra, so I decided to use the red springs (1.72lbs/in) that came with it. These springs are a bit softer, but slightly longer than the black Enduro springs. The IFS kit also comes with shock bumpstops that are recommended to add to the front shock shafts to limit the upstroke of the shock so that the suspension does not compress and damage the outdrives. I decided to go ahead and add these when I had the shocks disassembled.  Front shocks on left and rear shocks on right. 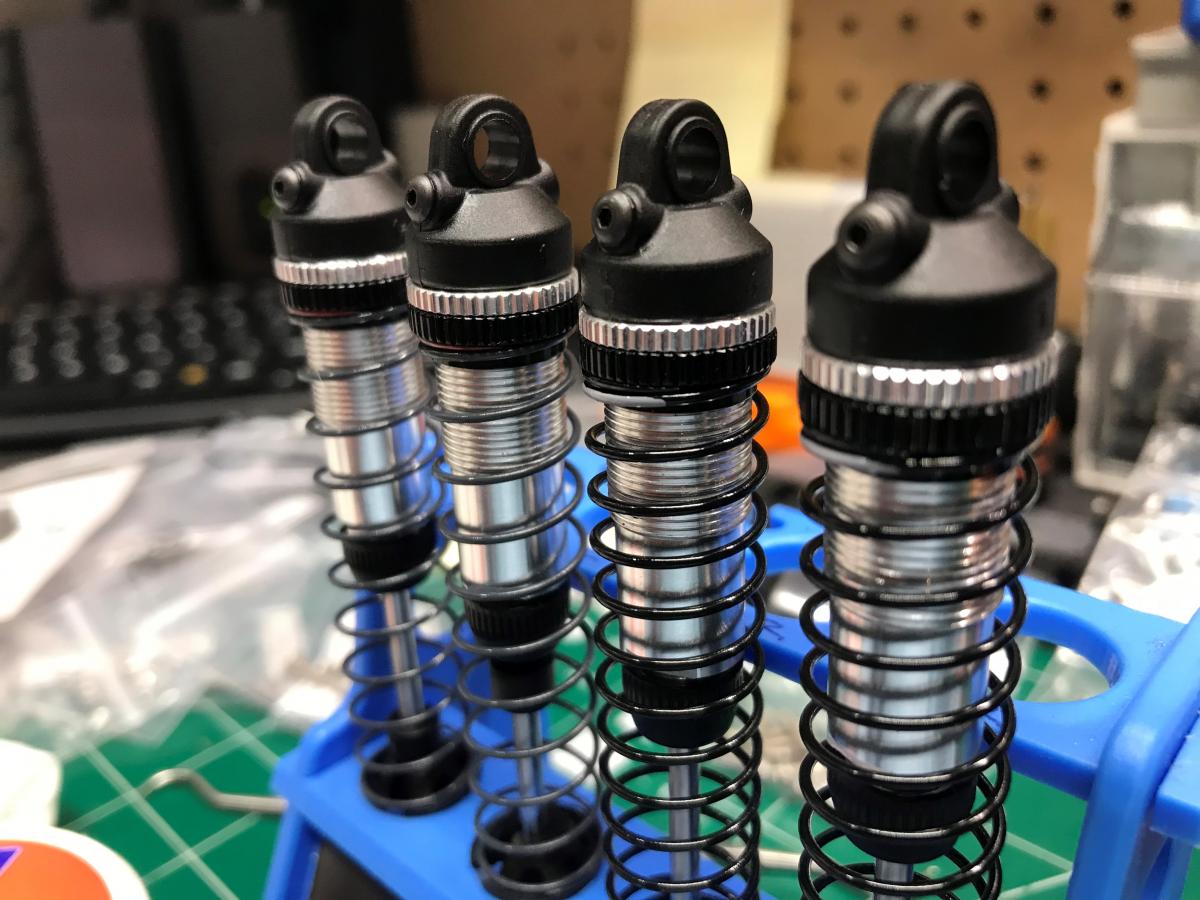 |
|
| |
|
05-10-2020, 08:56 PM
| #3 |
| Go Buckeyes! Join Date: Jun 2017 Location: Mid-Ohio
Posts: 4,135
|
Tore the Trailwalker down and replaced all of the black hardware with Team KNK stainless steel screws. I don't like rusty hardware and rust stains, so I use Team KNK in all of my rigs. Also disassembled the rear axle and added marine grease to the gears. Front shocks mounted. The FT shock bushings that are made for the bleeder caps are threaded for a 4-40 screw. Luckily I still have a supply of 4-40 stainless steel screws that I purchased for my AE RC-10 years ago. I used a 4-40x3/4 threaded thru the top shock mount and secured with a 4-40 nut on the outside.   On the rear, I used the same 4-40x3/4 screw and threaded it into the rear shock mount. I had to use a 3mm spacer on the top shock mount so that the shock cap would clear the chassis rails. I installed the remaining two supplied shock bumpstop to the bottom shock mount to space out the shock. The shock bottom is to be installed in the same hole as the bottom rear link mount. Installing the shock to the link mount will level out the chassis and match the ride height of the front suspension.  After installing the body, I noticed that the front bumper stuck out to far away from the front of the body. Not so good approach angle!  As you can see in the next two pics, I cut a notch in the top of the bumper to slide it in as far as it would go. I also had to cut the bumper mount post off so that they would not interfere with the steering bell crank. Before: 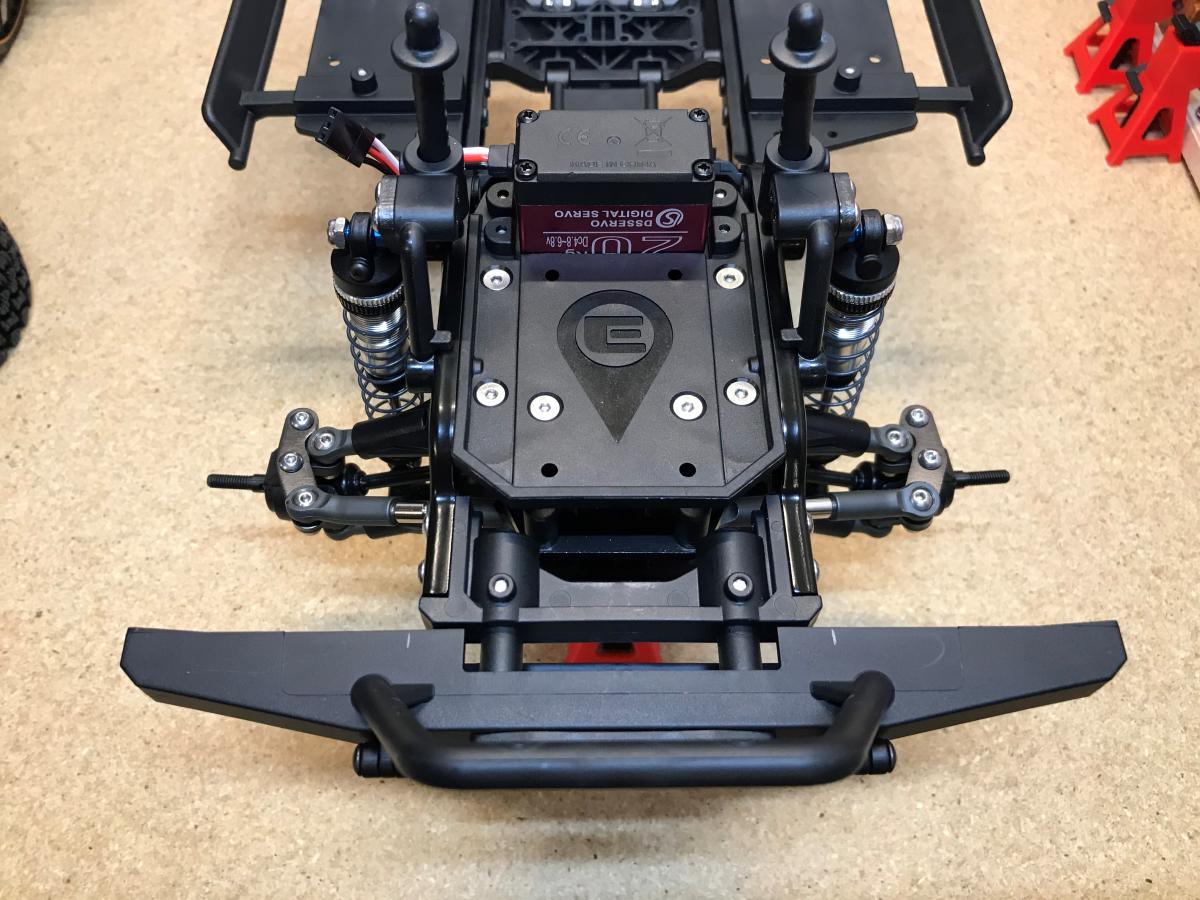 After:  On the bottom of the bumper, I used my Dremel to make notches so that I could reinstall the bumper mount screws. Sorry, the pic came out blurry!  And now with the bumper tucked in as far as it will go. Much better approach angle! Once I get to working on the body, I will problably cut part of the body away so that it does not rub on the bumper.  More to come tomorrow! |
|
| |
|
05-10-2020, 10:50 PM
| #4 |
| I wanna be Dave Join Date: Aug 2016 Location: Orange County, CA
Posts: 3,643
|
Nice! I can't wait to see where you go with this rig as well. I can't wait to run mine!
|
|
| |
|
05-11-2020, 12:23 PM
| #5 | |
| Go Buckeyes! Join Date: Jun 2017 Location: Mid-Ohio
Posts: 4,135
| Quote:
 Since I'm about 2 steps behind your build, I looking forward to hearing and seeing how your TW does! | |
|
| |
|
05-11-2020, 12:53 PM
| #6 |
| RCC Addict   Join Date: Sep 2010 Location: Apollo Pa
Posts: 1,650
|
Good start man! Your builds always turn out sweet |
|
| |
|
05-11-2020, 12:57 PM
| #7 |
| I wanna be Dave Join Date: Aug 2016 Location: Orange County, CA
Posts: 3,643
|
Looking from your pictures... it looks like you have the default toe-out when fully extended that Mine did. I used bent rod-ends on both sides of the steering links, and the toe seems to be a tad more consistent on suspension travel... I think?
|
|
| |
|
05-11-2020, 04:47 PM
| #8 | ||
| Go Buckeyes! Join Date: Jun 2017 Location: Mid-Ohio
Posts: 4,135
| Quote:
I'm hoping it turns out as nice as the vision I have in my head! Quote:
At full compression it doesn't look to bad. I'll have to dig into it and readjust the link lengths. I may try the bent rod ends like you did. Thanks for the tip! | ||
|
| |
|
05-11-2020, 05:28 PM
| #9 | |
| I wanna be Dave Join Date: Jun 2017 Location: Humboldt county
Posts: 4,482
| Quote:
Mine also toes out then toes in and finally gains negative camber (as the suspension compresses). I feel like thats just the way a long travel IFS is going to be. Last edited by HumboldtEF; 05-11-2020 at 05:32 PM. | |
|
| |
|
05-11-2020, 05:44 PM
| #10 |
| Rock Crawler Join Date: Jan 2005 Location: The Hills
Posts: 630
|
Where did the little shock mount tabs on your front shock towers come from? Is that part of the IFS kit? I'd like to have them and flip them over for a lower height. Found them! https://www.associatedelectrics.com/..._shock_mounts/ Last edited by terrible; 05-11-2020 at 05:48 PM. |
|
| |
|
05-11-2020, 06:17 PM
| #11 | ||
| Go Buckeyes! Join Date: Jun 2017 Location: Mid-Ohio
Posts: 4,135
| Quote:
I'm not exactly sure how this IFS ride height is supposed to be setup, but back in my buggy racing days, it was important to keep the dog bones/axle shafts level/parallel to the ground. I know that these trucks for the most part will not reach the speeds as an off-road racing buggy and having the axle shafts level may not be that important, but I'm wondering what the correct ride height should really be. I'll have to do some research on this! Quote:
| ||
|
| |
|
05-11-2020, 06:25 PM
| #12 | ||
| I wanna be Dave Join Date: Aug 2016 Location: Orange County, CA
Posts: 3,643
| Quote:
Quote:
I was getting way more toe out than I wanted for some reason. | ||
|
| |
|
05-13-2020, 05:38 PM
| #13 |
| Go Buckeyes! Join Date: Jun 2017 Location: Mid-Ohio
Posts: 4,135
|
My shipment from Element came today! Quicker than I expected!   |
|
| |
|
05-13-2020, 06:03 PM
| #14 |
| I wanna be Dave Join Date: Aug 2016 Location: Orange County, CA
Posts: 3,643
|
Man, looking at your pics, I really need to start building out my garage!
|
|
| |
|
05-13-2020, 06:35 PM
| #15 | |
| Go Buckeyes! Join Date: Jun 2017 Location: Mid-Ohio
Posts: 4,135
| Quote:
I just got my Trailwalker garage setup. I decided to lay it out longways. I used the garage floor from my Sendero garage to extend the floor. I pulled my SR5 into the garage for a test pic! Now I need to make a workbench and add some accessories to this garage!  | |
|
| |
|
05-17-2020, 08:01 PM
| #16 |
| Gold Star Baby!  Join Date: Dec 2017 Location: Las Vegas
Posts: 2,554
|
Happy to see another BMow build in progress. Looks like another fun one. I want one of those trailwalker boxes so bad! Haha |
|
| |
|
05-18-2020, 05:24 PM
| #17 | |
| Go Buckeyes! Join Date: Jun 2017 Location: Mid-Ohio
Posts: 4,135
| Quote:
Yeah, I needed something to keep me busy while I wait for the next shipments of the SCX10.3! I should have pre-ordered one of them in the first round. Oh well! These Trailwalker boxes are cool! I'm amazed at how well they created the details on it! | |
|
| |
|
05-18-2020, 06:48 PM
| #18 |
| Go Buckeyes! Join Date: Jun 2017 Location: Mid-Ohio
Posts: 4,135
|
Update time! But first I need to correct what I said about the front springs that come with the IFS kit. I initially thought that the black springs were going to be too stiff, so I installed the Capra red springs in their place. Bad move! Once I had it all built and put the electronics, battery, body and tires on, the front suspension bottomed out all the way and was sitting on the floor. So I went ahead and put the stock black springs back on for now until I come up with a better spring. Ok, now on to the build. Nothing to radical or interesting, but I did get the stock trans gears swapped out for the OD gears and get the electronics installed.   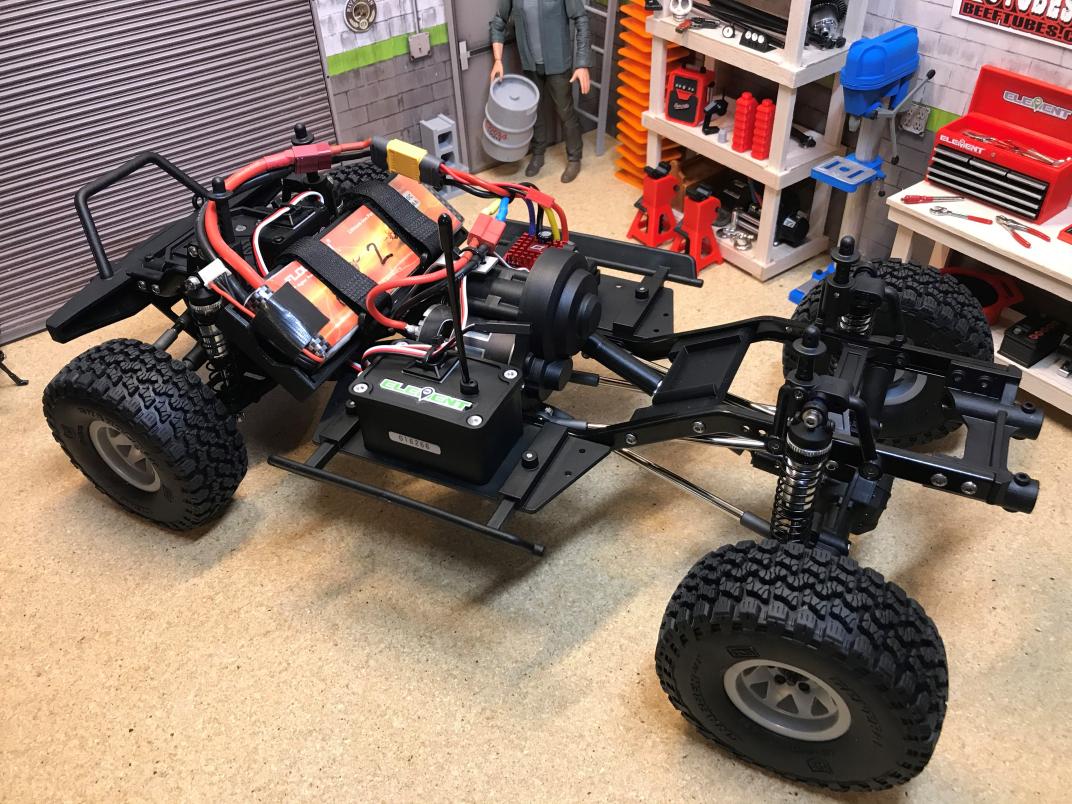 I made an alum bracket to tie up the wiring so that they won't get wrapped up in the driveshaft. It is identical to the bracket that I made for my Enduro Sendero. That build has a better pic of it can be found here: B-MOW's Enduro Journey!  I found this HW 1080 ESC mount on Thingiverse by user @OUTLAW_NL and printed it. It prints very nice and holds the ESC and switch well. I like the idea of it being held in with screws in case I ever want to remove it I won't have to deal with the servo tape.  This slick chassis brace was designed by @3DtoRC on Thingiverse. It is designed to hold a HW 1060 ESC. I decided to use it just in case I wanted to add the 1060 ESC for a servo winch controller. Thanks for sharing the file @Greatscott!  I added a cut out in the battery tray so that the battery would sit flat and not smash the battery wires. I did the same cutout on my Sendero and it works out well.  Here is a look at the front end with the chassis loaded with battery. Back in my buggy racing days some 30 years ago, we racers always wanted the dogbones to parallel to the ground. I'm not sure if the same rule applies to these tiny trucks!  And a look with the body on. To achieve the same chassis ride height as my other rigs, I may have to do a bit of body trimming! Looks like I've got some work to do!  Up next will be the body mods and then I'll get it sent out to the body shop for a color change! |
|
| |
|
05-19-2020, 07:43 AM
| #19 |
| Rock Stacker Join Date: Apr 2020 Location: NC
Posts: 70
|
I like the bracket for the battery wires and I need to do that as well on mine. I must have my rear shocks setup different as yours sets lower in the rear. I have upgraded a bunch of the items on mine but work schedule is keeping me tied up. Your build is looking great and the Trailwalker is a good little truck in my opinion.
|
|
| |
|
05-20-2020, 06:29 AM
| #20 | |
| Go Buckeyes! Join Date: Jun 2017 Location: Mid-Ohio
Posts: 4,135
| Quote:
The bracket is a nice addition. I didn't like how close the wires were to the driveshaft. I have very little preload on the rear shocks in the pic. I like to run my rigs with some droop. Though with this body I may have to stiffen up the suspension a little. | |
|
| |
 |
 B-MOW's IFS Trailwalker - Similar Threads
 | ||||
| Thread | Thread Starter | Forum | Replies | Last Post |
| B-MOW's Enduro Journey! | B-MOW71 | Element RC 1/10 Enduro Trail Truck Sendero | 243 | 04-08-2024 08:22 AM |
| B-MOW's VS4-10 Origin Limited | B-MOW71 | Vanquish Products VS4-10 Origin | 40 | 09-15-2023 06:18 AM |
| Ebbet's Trailwalker | ebbet | Element RC 1/10 Enduro Trail Truck Sendero | 27 | 09-16-2020 10:13 AM |
| Element Trailwalker | jeeptec | General Crawlers | 7 | 12-26-2019 07:00 AM |
| |


 Linear Mode


