| |
| |||||||
 |
| | LinkBack | Thread Tools | Display Modes |
 11-21-2020, 11:34 PM
| #1 |
| I wanna be Dave Join Date: Aug 2016 Location: Orange County, CA
Posts: 3,643
|
No fancy title, but yet another Enduro build! This time it's the Gatekeeper. I started this build immediately after the builder's kit build-up to slider status. I will get back to that build later, but this build will be finished first. Follow this build on YouTube Most of the links below are to eBay. As an eBay Partner, I may be compensated if you make a purchase. Kit: Element Gatekeeper Builder's Kit - https://ebay.to/378kqAf (eBay) Parts: SSD Brass Knuckles for Element Enduro - https://ebay.to/3acSL3e (eBay) SSD Aluminum C-Hubs for Element Enduro -https://ebay.to/2Zc6QHE (eBay) Pro-Line 1.9 BFG Krawlers G8 Compound -https://ebay.to/3pe9qrt Crawler Innovations Lil Nova Comp Cut /Medium Foam - https://ebay.to/2Z6lBfj 1.9 Beadlock wheels - https://ebay.to/2MVpocE Samix 8mm Wheel Hexes - https://ebay.us/t5JGqL Club5 Racing +3mm Brass Rhinohub - https://ebay.us/lFYuKe Electronics: Hobbywing Axe 2300kv Esc/Motor - https://ebay.to/2LJFRjN (eBay) FlySky GT5 Radio - https://ebay.to/2Z7FSRx (eBay) Armory RC Katana 500 Servo - Tools/Supplies: Versachem Brake Caliper Grease - https://ebay.to/3p8bIZ7 Noleen SF3 Grease (available on eBay) - https://ebay.to/3jN9vB9 Permatex Anti Seize Lubricant (ebay) - https://ebay.to/3qpTbsN Associated 1656 FT 1/4 in Driver Handle - https://ebay.to/3d31t5O Tamiya Side Cutter - https://ebay.to/371SAWb DEWALT DCF610S2R 12V MAX Cordless Lithium-Ion 1/4 in. Hex Chuck Screwdriver Kit - https://ebay.to/3tQqXcr MIP Metric Speed Tip Set MIP9512 - https://ebay.to/3qdBMTU Bob Smith Industries Blue Thread Locker - https://ebay.to/3jDR8i9 ProTek RC Shock Pliers (available on eBay) - https://ebay.to/372Lscs Duratrax Shock stand - https://ebay.to/2MOyJ6l Hakko FX-888D Soldering Station - https://ebay.to/3aXFmLj Multistar Rubber R/C Work mat - https://bit.ly/2T3F4Zo IWISS Crimping Tool - https://ebay.to/3jGKZll Universal Servo Cable Wire Connector Crimp Pin Kit - https://ebay.to/3tSAAaW E6000 Adhesive - https://ebay.to/2MZwtZV Paint: Tamiya PS-58 Pearl Clear - https://ebay.to/2MYkdc3 (eBay) Tamiya PS-30 Brilliant Blue - https://ebay.to/2MWGYgx (eBay) Tamiya PS-12 Silver - https://ebay.to/2Z6SDfh (eBay) Tamiya PS-5 Black - https://ebay.to/2Zbup3i (eBay) Duratrax Metallic Black - https://ebay.to/3rKRrdQ (eBay) Duratrax Base Cover Black - https://ebay.to/2Z9hW05 (eBay) Tamiya TS-7 Aluminum Silver - https://ebay.to/2NnVT31 (eBay) Tamiya TS-33 Dull Red - https://ebay.to/3pkglPW (eBay)  Last edited by soze; 04-18-2024 at 11:39 PM. |

|  |
| Sponsored Links | |
| | |
|
11-21-2020, 11:43 PM
| #2 |
| I wanna be Dave Join Date: Aug 2016 Location: Orange County, CA
Posts: 3,643
|
Part 1: Chassis & Electronics Mounts For this part, you'll need Bags 1 & 2  Chassis Section Gate 1: For gate 1, you'll need these parts.  Now there is a particular part that is used for the new panhard mount. A metal AND plastic one is provided. I've been told that the Gatekeeper is considered a "Factory Team" kit. So stuff like the metal part is included. The plastic one is what will be used on the RTRs. You can use either one, but I highly recommend you use the metal one.   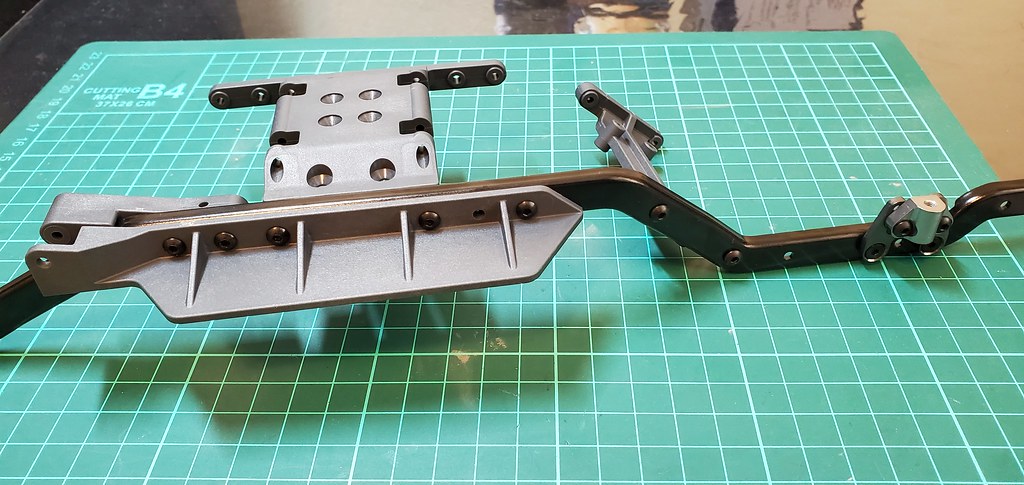 Gate 2:   Gate 3:  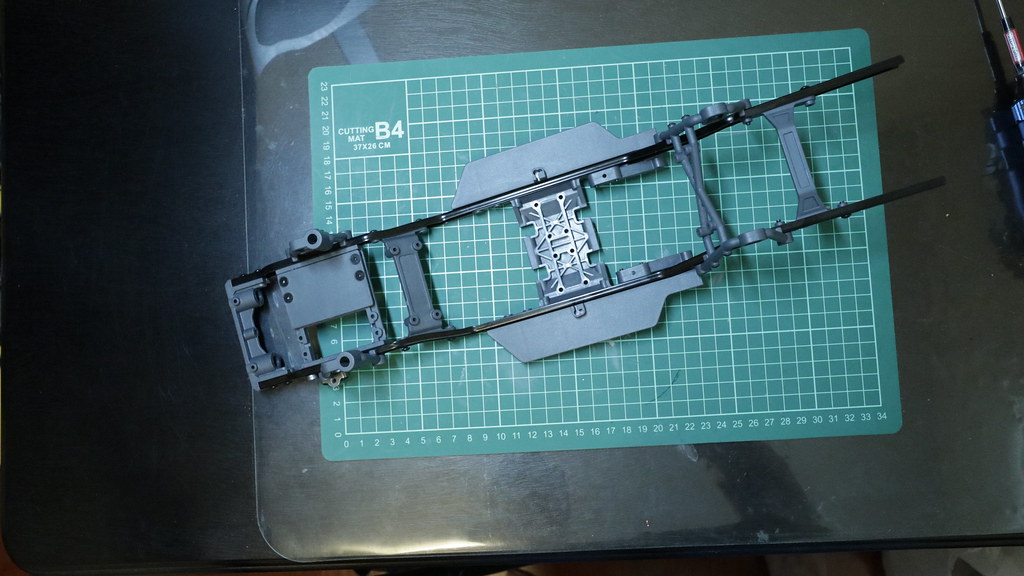 Electronics Mounts Section For the electronics mounts, you'll need bag 3  You'll also need some of your electronics. I'm going with the following for electronics. Hobbywing AXE 2300kv FlySky FS-BS6 Receiver Armory RC Katana 500 Servo  Gate 1:   Flickr FlickrGate 2: Gate 2 is basically mounting up some of the electronics. There's a real bonus with this Gatekeeper kit in that it gives you a metal servo horn! It's not clamping, but it's more than good enough!  Last edited by soze; 11-22-2020 at 12:03 AM. |
|
| |
|
11-21-2020, 11:43 PM
| #3 |
| I wanna be Dave Join Date: Aug 2016 Location: Orange County, CA
Posts: 3,643
|
Part 2: Transmission/Gearbox By now we all know the Stealth X transmission of the Element Enduro line. It's the heart and soul of the Element lineup, and a big part of why I like these rigs. For the transmission you'll need bag 4  Gate 1: The gears for the (rounded up) 6% and 12% overdrive are provided. I chose to go with the 12% gear setup.  I made an error in the picture above. There are only 2 bearings for this step, and the 3rd third should be a washer/spacer    Gate 2:    Gate 3:    Gate 4:   Last edited by soze; 11-22-2020 at 12:16 AM. |
|
| |
|
11-21-2020, 11:44 PM
| #4 |
| I wanna be Dave Join Date: Aug 2016 Location: Orange County, CA
Posts: 3,643
|
Part 3: Axles You'll need bags 5 & 6 for the axles  We've got the hard plastic parts for the axles. I'm not sure how I feel about the hard plastic. I've never had an issue with the regular ones, and I can see parts like the C-hubs being an issue with being stressed more easily because they're hard plastic. I'm just going to say that I actually prefer the regular plastic for the axles. Front Axles: Bag 5  Gate 1:    Gate 2:   Gate 3:   Rear Axle: Gate 1:  Gate 2: 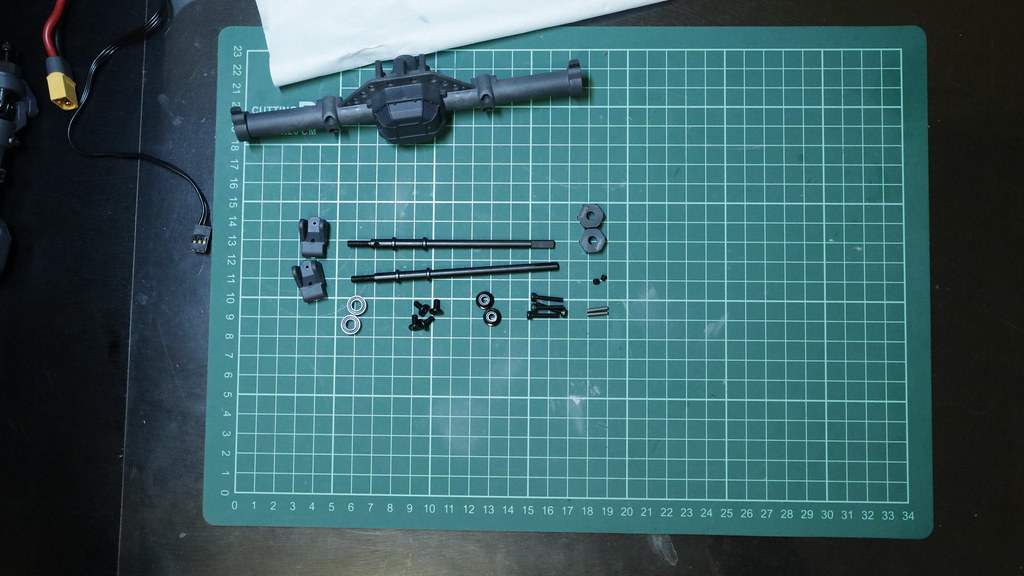 They finally wised up and updated the screws used to retain the bearings in the rear axle. Much better and less chance for these bearings to fall out now than with the older button head screws. 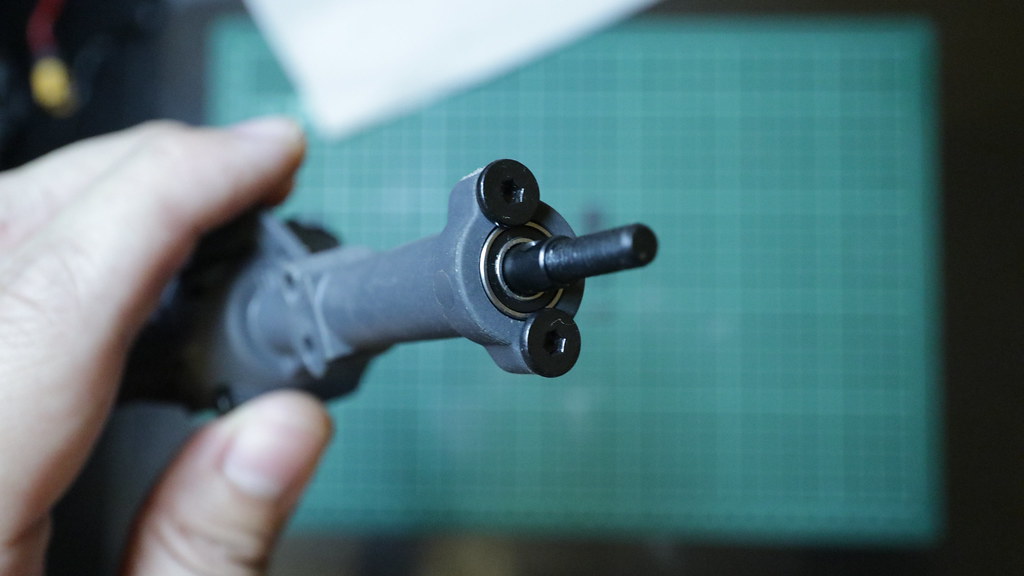  Axles finished!  Last edited by soze; 11-22-2020 at 11:27 PM. |
|
| |
|
11-21-2020, 11:44 PM
| #5 |
| I wanna be Dave Join Date: Aug 2016 Location: Orange County, CA
Posts: 3,643
|
Part 4: Links & Driveshafts Alright this step is going to probably drive you a little nuts. I mean people already hate building links. It's not an enjoyable part of the build at all. What can make this part worse? Well you can make the completed link illustration in the manual state the needed final length, BUT not be a 1:1 representation for you to compare your links with! You pretty much have to bust out your calipers after every link to measure. Would be nice if you could just quickly compare with the manual. For this part you'll need Bag 7 (links) and 8 (driveshafts)  Links: Gate 1:  You'll notice that I use my handy ProTek RC Shock pliers and the rod-end tool designed by our very own HumboldtEF of RCCrawler.com   Gate 2:    Gate 3:  Sorry this is the front upper link. I forgot to take a picture of it completed. Gate 4:   Gate 5: Nice thing about the Gatekeeper Builder's kit is that it comes with Factory Team parts like the high clearance links for the front lower links.    Gate 6:  Once again, forgot to take mounted picture. It'll be shown later anyway. Gate 7:   Gate 8:   Gate 9:  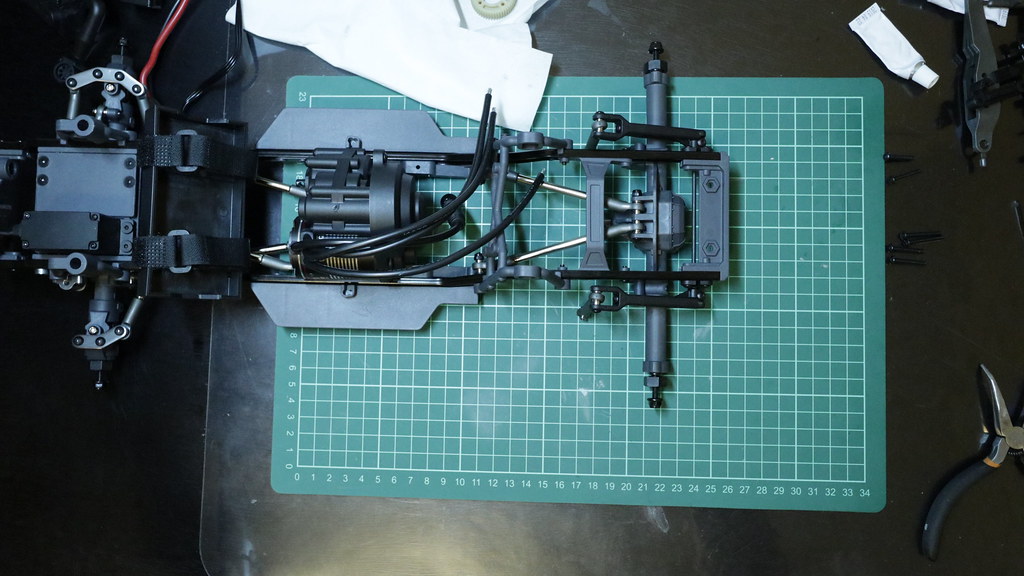 Gate 10:  One thing to note and pay attention to here. The rear of the trailing arm is attached to the OUTSIDE of the link mount on the rear axle and not inside the link mount like a normal link. You can use the 7mm spacer provided in the spacer sprue to fill in the gap in the link mount area. 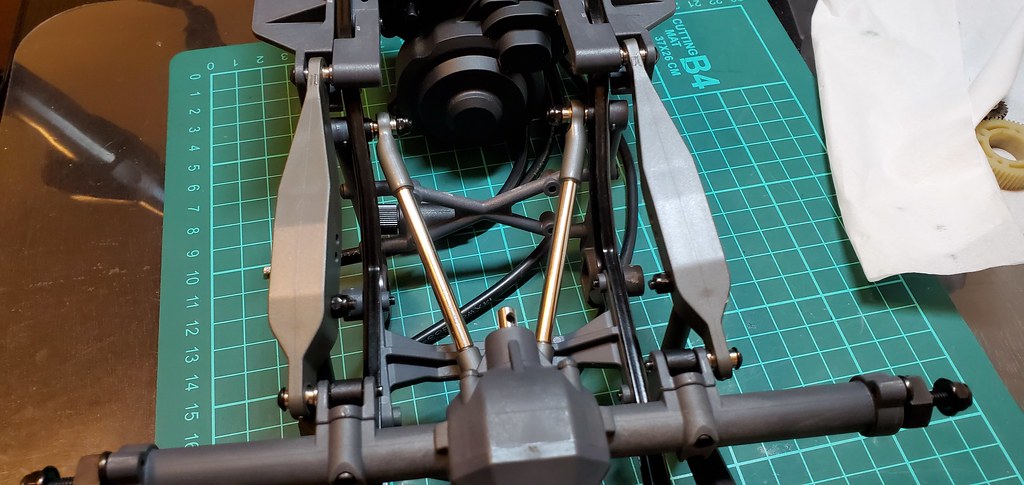  Driveshafts: bag 8 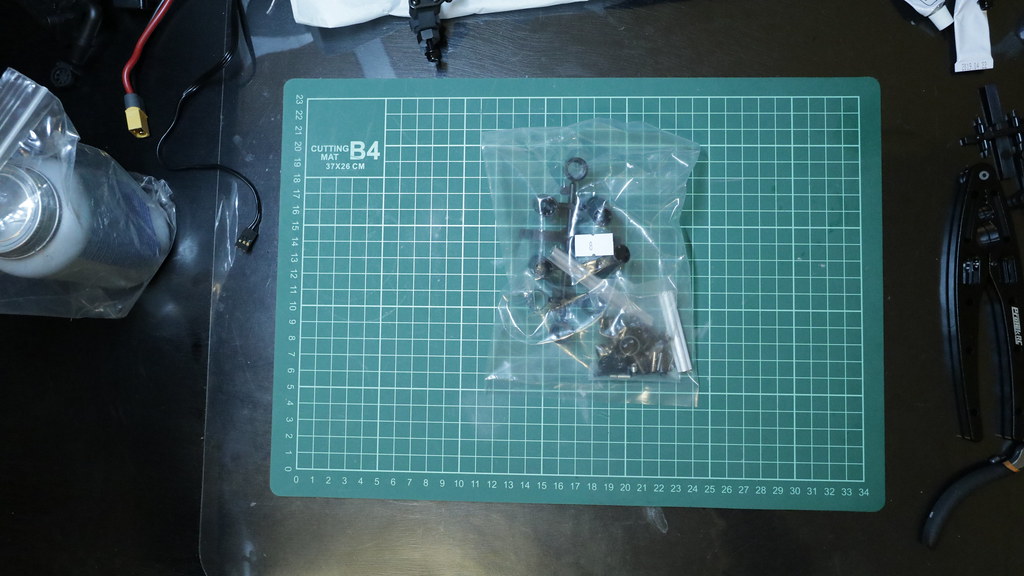 Gate 1:   Gate 2 & 3:   Last edited by soze; 11-22-2020 at 11:52 PM. |
|
| |
|
11-21-2020, 11:44 PM
| #6 |
| I wanna be Dave Join Date: Aug 2016 Location: Orange County, CA
Posts: 3,643
|
Part 5: Shocks For the shocks, you'll need bag 9  You can see that they include the nice bronze bodies for the shocks. I wish they would also include the aluminum parts to replace the plastic parts on the shock too. The builder's kit comes with the blue aluminum pieces, and I gotta say, they actually make a difference in the way the shock movement feels. Well, These just come with the bronze bodies, but still with the plastic shock caps and spring retainers. For this part of the build I use tools such as: ProTek RC Shock Pliers Noleen SF-3 Grease Duratrax Shock Stand Gate 1: Be very careful here! There are 2 black o-ring sizes. 2! The smaller black o-rings are for the shock cap. The larger black o-rings are for the shock collar.   Gate 2:  Gate 3:   Gate 4: Very cool adjustable shock mounts!    There is another ERROR IN THE MANUAL HERE!!! It states to use a m3x14 screw to mount the bottom of the shock into the trailing arm. The correct length of this screw should be m3x18mm just like the screw used to mount the sway bar into the trailing arm.   BTW, here's a tip. We know that the Larger battery tray does not fit inside the Gatekeeper cage. If you chop it up to a smaller width, you can mount it on the rear brace so that you can use it as a ESC or Receiver mount.   Last edited by soze; 11-23-2020 at 12:06 AM. |
|
| |
|
11-21-2020, 11:45 PM
| #7 |
| I wanna be Dave Join Date: Aug 2016 Location: Orange County, CA
Posts: 3,643
|
Part 6: Body Panels & Cage Alright... we're down to the finish which means you need all this stuff. Basically the body panels and bag 10.  In the following steps, I'll show what body panels are needed for the steps, but I won't actually go through with attaching any of the body panels until the very end due to painting of the panels being required. Gate 1: 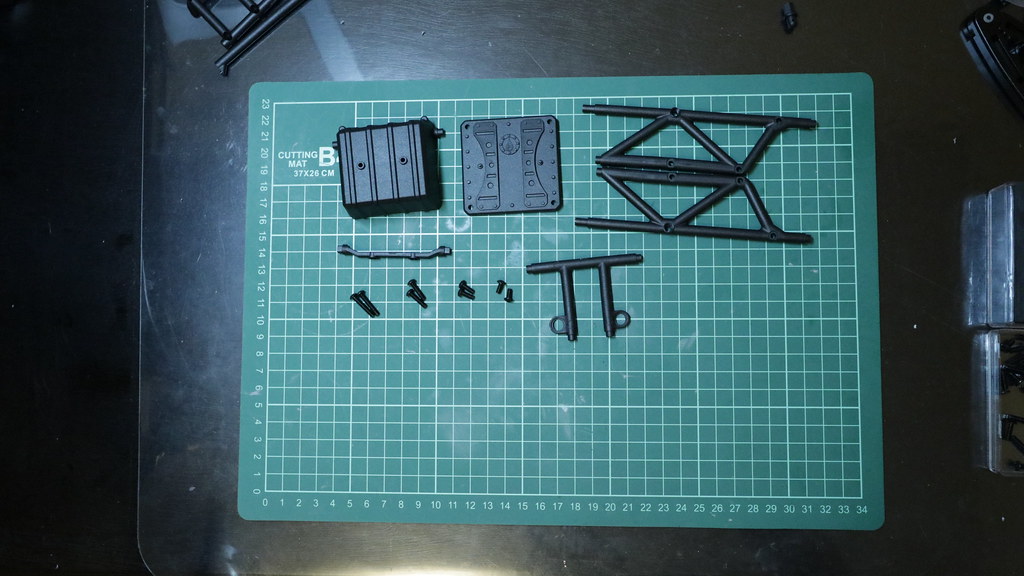 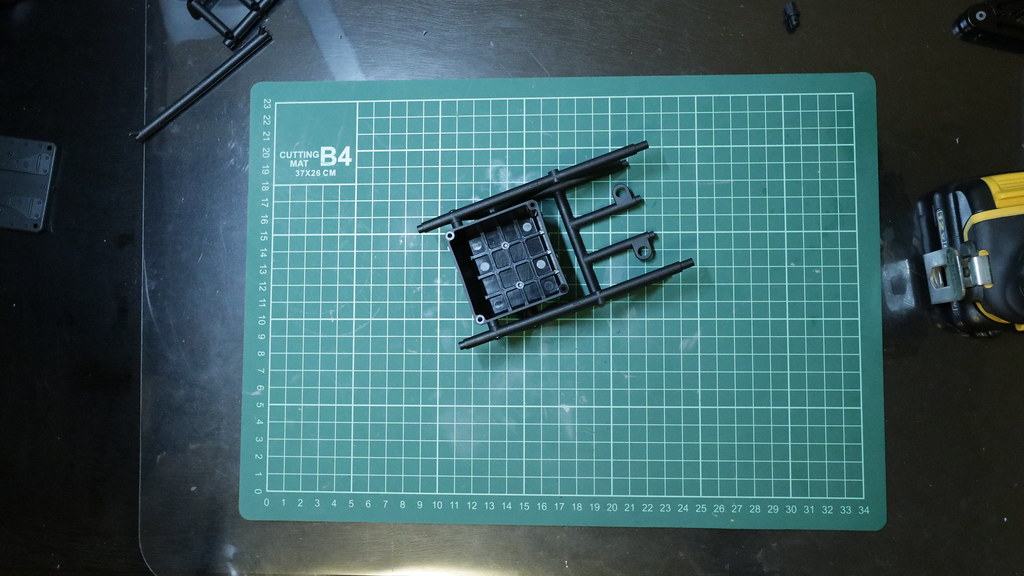 Gate 2:   Gate 3: 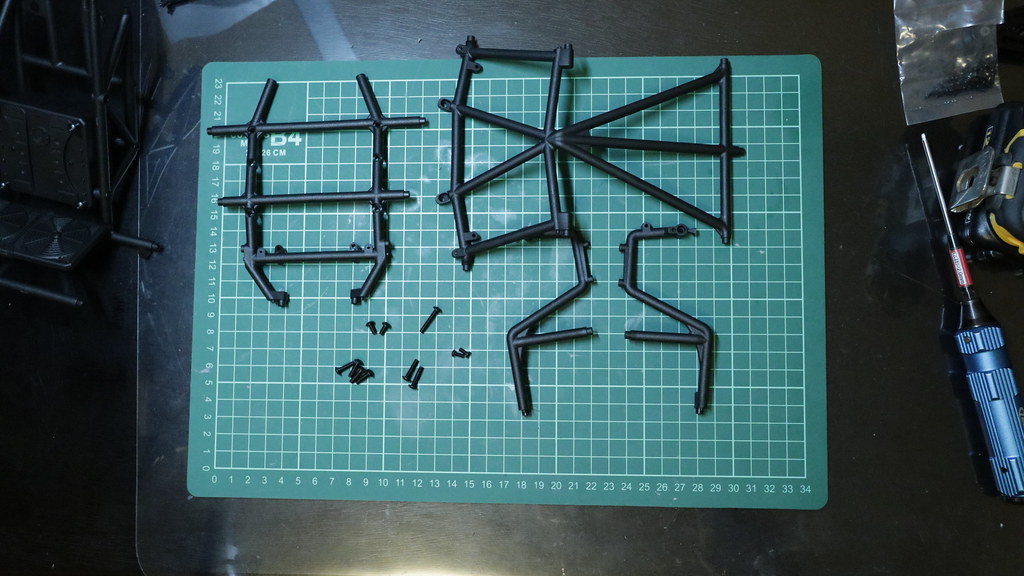 ATTENTION! Another ERROR IN THE MANUAL!!! The manual states that you need 4 m3x10mm screws to attach the hood panel to the cage. This is wrong! If you do that you will end up with the following pictures below if you fully tighten 2 of the m3x10mm screws down!   Luckily the screw didn't bust all the way through but here is what I found. I found 2 m3x8mm screws left in the remaining hardware. Nowhere in the rest of the manual were these m3x8mm screws mentioned. These must've been the correct screws to use, and the manual was not updated. So for that particular step, you'll need 2x m3x8mm screws and 2x m3x10mm screws to connect that hood area of the cage to the supports below.  Gate 4:  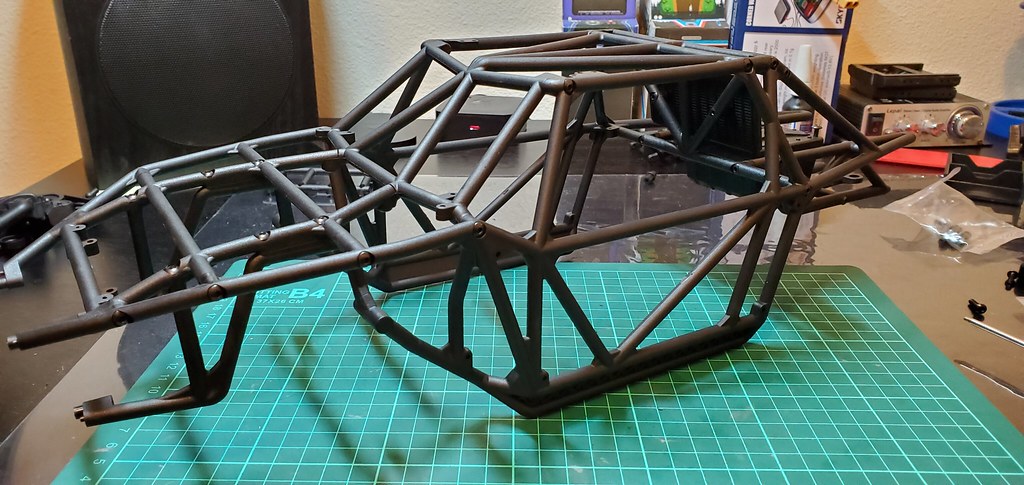   Gate 5:  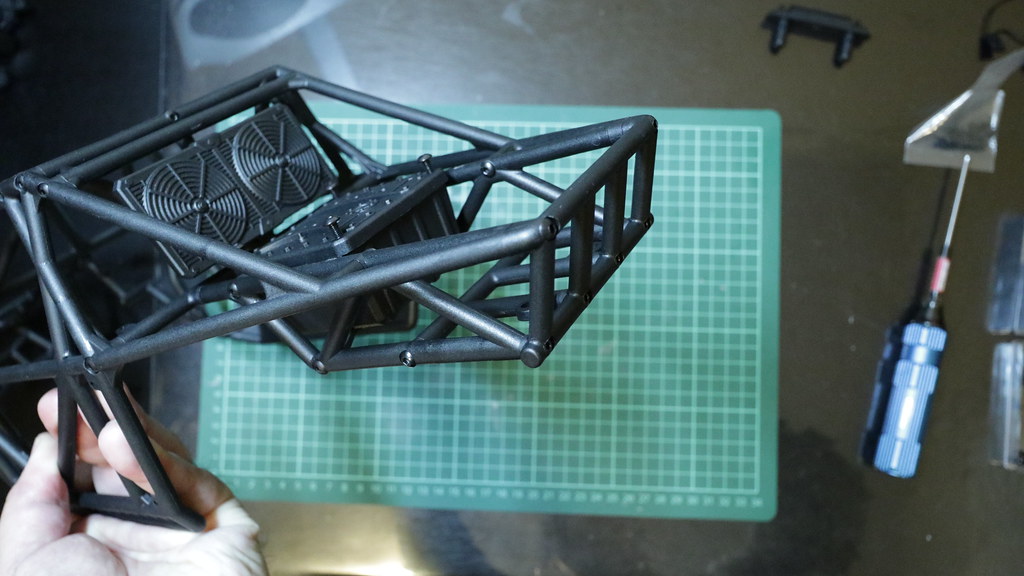  Gate 6:    Gate 7:  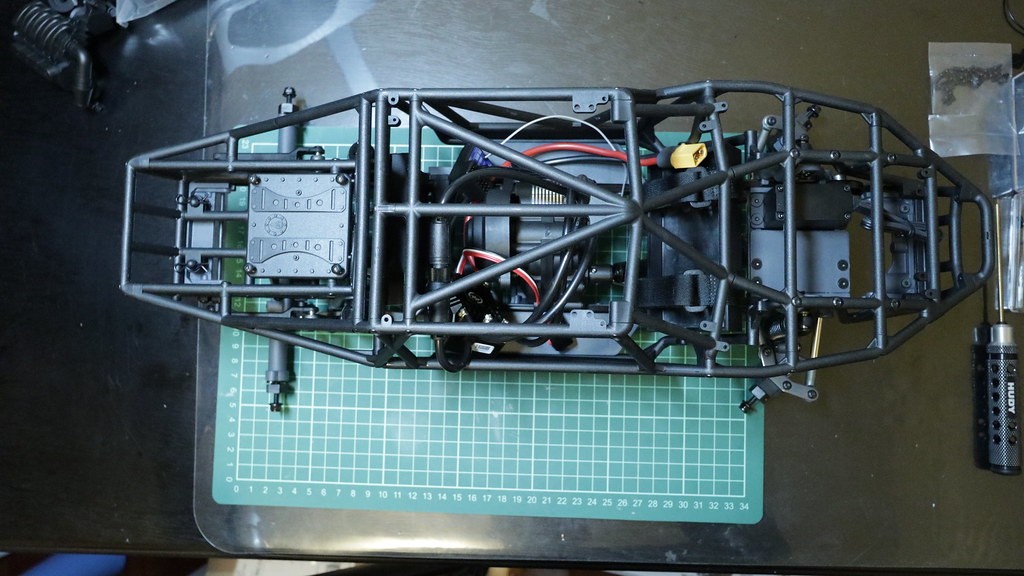   Now for the fun part the painted body panels!  Cut out a "Gozer Dog" mask for the side panels.  Going with the following Tamiya & Duratrax colors Pearl Clear Brilliant Blue Gunmetal Metallic Black (Duratrax)  I had some leftover SMT10 skull heads so I decided to use them for this build since it fit with my theme.  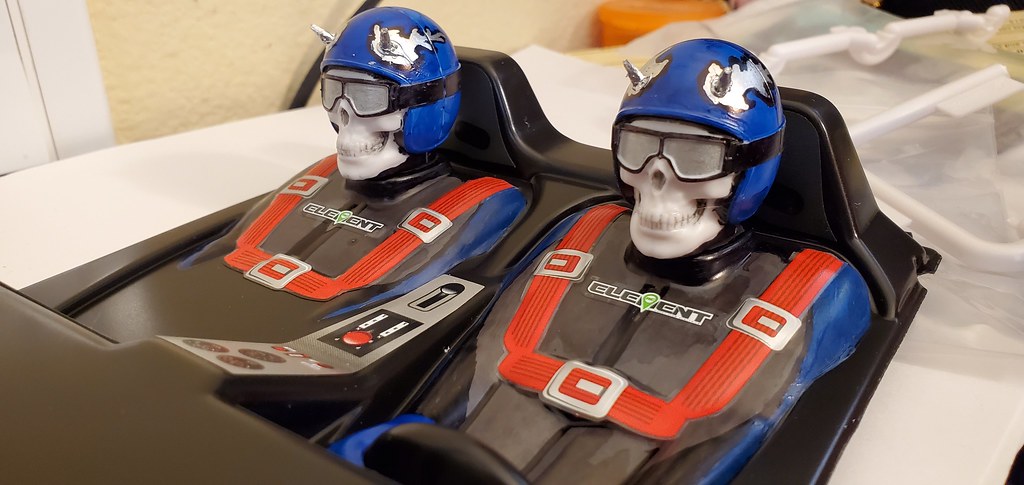   You'll also noticed I used some scrap lexan to create rear panels behind the cockpit. I think it looks much better with those panels there, and I wish it had been designed to have panels there.    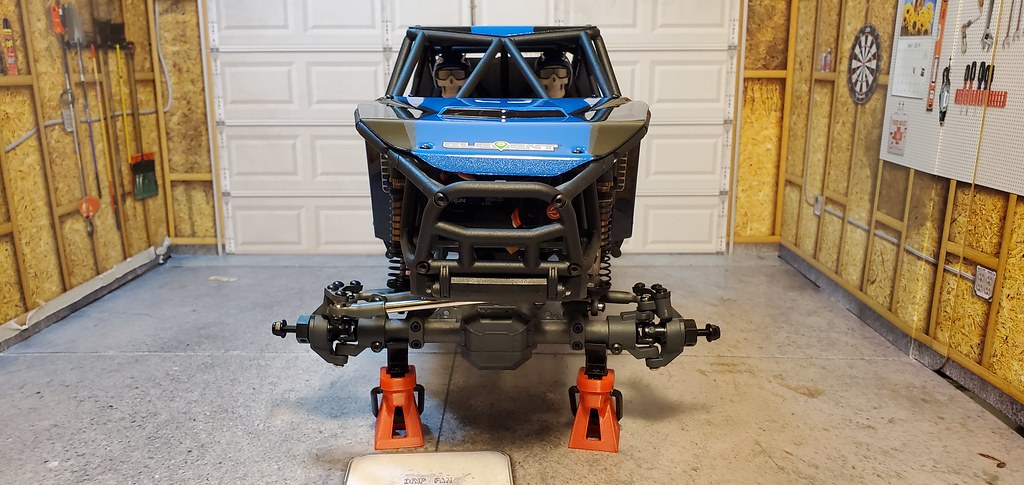 Last edited by soze; 11-23-2020 at 07:11 PM. |
|
| |
|
11-22-2020, 11:10 AM
| #8 |
| Newbie Join Date: Nov 2020 Location: Tokyo
Posts: 13
|
Nice build soze. I bought this kit aswell. Going to follow this thread... Those hard plastics looking good and rigid enough compared to the enduro kit. Have you tried using samix brass upgrades for enduro? Been considering using samix or ssd for this gatekeeper. |
|
| |
|
11-22-2020, 02:12 PM
| #9 |
| Quarry Creeper Join Date: Aug 2016 Location: Christiansburg
Posts: 279
|
Excellent!!! I just cracked open my kit on Friday and started painting it. I'll be following you for tips and tricks.
|
|
| |
|
11-23-2020, 04:03 AM
| #10 |
| Pebble Pounder Join Date: Jan 2017 Location: @scaleobsession on instagram
Posts: 155
|
My kit just arrived this week. Really looking forward to the build! Nice work!
|
|
| |
|
11-23-2020, 07:47 PM
| #11 |
| I wanna be Dave Join Date: Aug 2016 Location: Orange County, CA
Posts: 3,643
|
While I'm waiting for my tires and foams to ship, I temporarily took the Pitbull Rockbeast XL's off of my RedCat Gen8  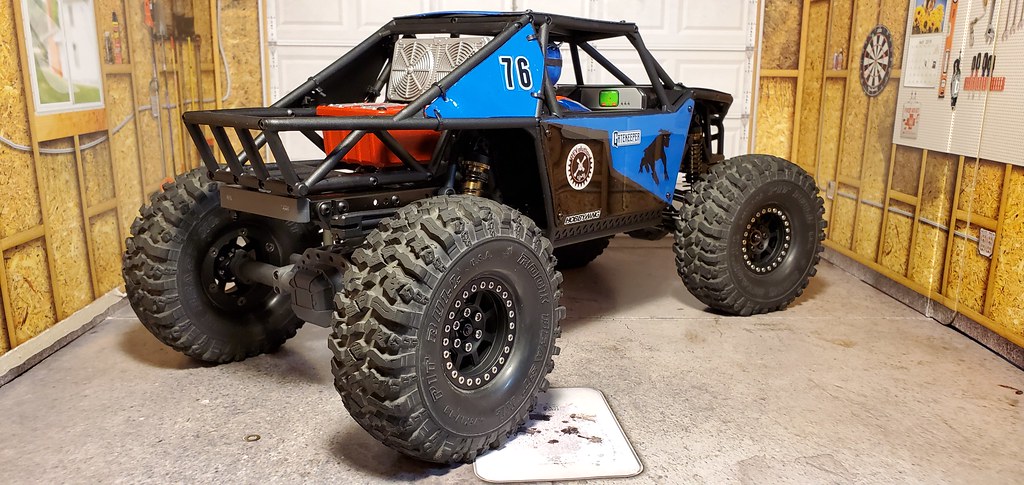  |
|
| |
|
11-23-2020, 09:48 PM
| #12 |
| Slow is the new Fast   Join Date: Nov 2013 Location: Winterpeg
Posts: 2,906
|
looks great soze! Really like the paint job, the beast on there looks menacing.
|
|
| |
|
11-24-2020, 06:26 AM
| #13 |
| Go Buckeyes!   Join Date: Jun 2017 Location: Mid-Ohio
Posts: 4,135
|
Sweet looking rig soze! Love the color combo!  Nice use of the skulls! They fit the look well! Also agree on the rear side panels. They are definitely needed and helps complete the look! As always, nice informative build thread! Looking forward to seeing the running vids out on the beautiful CDM rocks! |
|
| |
|
11-24-2020, 08:58 AM
| #14 |
| Quarry Creeper Join Date: Jul 2019 Location: Torrance, CA
Posts: 211
|
I could read your build threads all day Soze! Nice work on the Gatekeeper, looking forward to seeing it out at CDM one of these days! |
|
| |
|
11-24-2020, 09:35 AM
| #15 |
| Gold Star Baby! 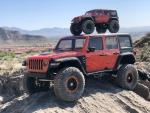 Join Date: Dec 2017 Location: Las Vegas
Posts: 2,554
|
Really like the scheme you landed on with this one. Looks great! I especially like the rear panels you came up with. Nice work, as always.
|
|
| |
|
11-24-2020, 10:23 AM
| #16 | ||||
| I wanna be Dave Join Date: Aug 2016 Location: Orange County, CA
Posts: 3,643
| Quote:
Quote:
Quote:
Quote:
| ||||
|
| |
|
11-24-2020, 11:45 AM
| #17 |
| RCC Addict Join Date: Jan 2019 Location: Corvallis, OR
Posts: 1,561
|
I’ve enjoyed all of your build threads, great detail. Also I really like the rear panels, it’s a great touch.
|
|
| |
|
11-25-2020, 07:21 AM
| #18 |
| Quarry Creeper Join Date: Aug 2009 Location: orange county
Posts: 313
|
Looks fantastic and even better in person. Great job as always 👍👍
|
|
| |
|
01-19-2021, 03:01 PM
| #19 |
| Pebble Pounder Join Date: Jan 2020 Location: Northern Utah
Posts: 118
|
what gearing did you go with?
|
|
| |
|
05-19-2021, 10:35 PM
| #20 |
| I wanna be Dave Join Date: Aug 2016 Location: Orange County, CA
Posts: 3,643
|
Some backlogged updates. Treating the Element Gatekeeper with my go-to standard upgrade for all my Element Enduro based rigs. I like the combination of the SSD Brass Knuckles and the SSD Aluminum C-Hubs.  C-Hubs first   Difference between stock C-Hub with limited angle and the SSD C-Hubs without the limiters.   Brass Knuckles next    Wanted to widen the trackwidth a little bit so I said why not and got these Samix 8mm wheel hexes.    Also decided to add Club 5 Racing 3mm brass hub weights to the front.   |
|
| |
|
 Soze's Element Enduro Gatekeeper build - Similar Threads
 | ||||
| Thread | Thread Starter | Forum | Replies | Last Post |
| Soze's Enduro Trailwalker RTR | soze | Element RC 1/10 Enduro Trail Truck Sendero | 46 | 11-03-2021 03:51 PM |
| shock position Enduro vs Gatekeeper | MOguy | Element RC 1/10 Enduro Trail Truck Sendero | 3 | 11-11-2020 08:49 AM |
| Soze's Enduro Trailwalker @ CDM Rocks 7/3/2020 | soze | Scale Videos! | 0 | 07-21-2020 12:02 AM |
| Soze's Element Enduro - New Year's Day CDM Run | soze | Scale Videos! | 0 | 01-14-2020 10:04 PM |
| Soze's MST CFX-W Build | soze | Max Speed Technology CFX | 90 | 01-31-2019 01:02 AM |
| |


 Linear Mode


