| |
 04-02-2010, 09:32 PM
| #1 |
| TEAM MODERATOR   Join Date: May 2004 Location: Tennessee
Posts: 10,855
|
I've been wanting to try something new with my Berg for a while. A good friend of mine has been working on this for a several months now. After I seen a few of the proto drawings,I knew I wanted one. I called up Ron at Big Ron Customs and ordered up a carbon chassis kit. Here's what I received a few days later. 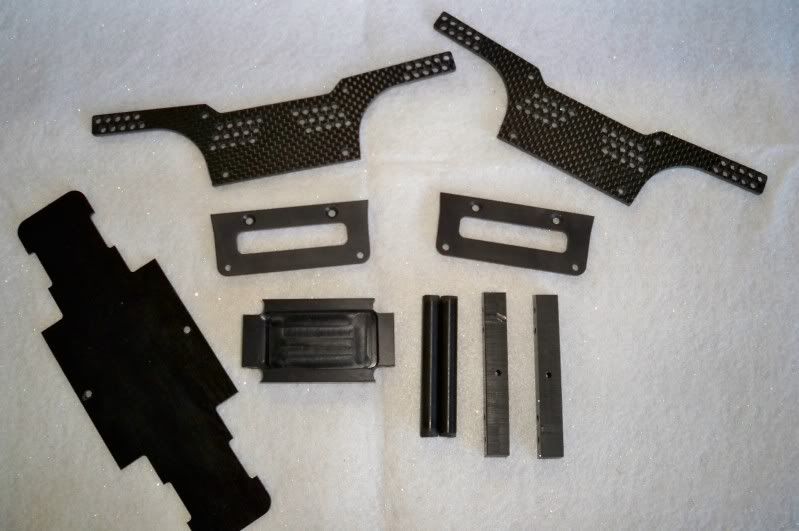 My lower links are 5/16" stainless. I like this allot because they won't deflect at all like delrin links are bad to do. They will also slide as well or better than delrin.....forever and ever. Aluminum links are good for not deflecting,but they get marred up and hang pretty bad at times. I was figuring they'd be a little heavy. Once I got all of them finished up,I was shocked. All 4 lower links, minus the Revo rod ends, totaled up to only 1.9 ounces. I'm working out a few details right now,but I'm going to start offering these links in a few different lengths very soon. 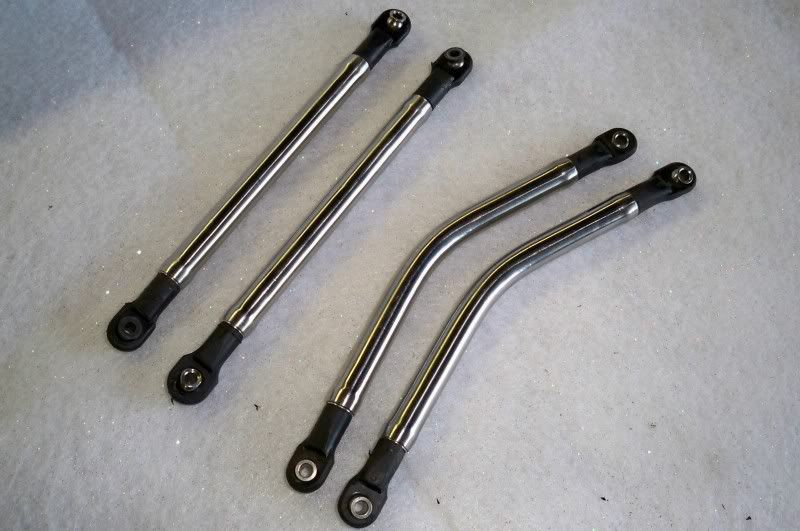 Another thing I like really well about this chassis,is the super skinny belly pan. A Holmes Hobbies 25C 1300mah lipo fits PERFECT in the belly pan. Having a super skinny chassis works great for squeezing through cracks and certain break over sections at times. Having a wider chassis gives you plenty of elbow room for mounting electronics. It also eliminates any need for spacers on your shocks to eliminate any binding. This chassis has both the benefits of a super skinny chassis and a wide chassis. Having a carbon fiber upper plate makes this chassis SUPER rigid. I'm starting to see this to be a HUGE advantage in a light weight truck. This seems to make the suspension VERY predictable and consistent. One thing that has ALWAYS appealed to me in any build,is having long upper links. In a 2.2 class truck,it would be hard to get links much longer than what this chassis allows. For mock up,I just used some 1/4" round delrin and some 1:8 scale buggy rod ends to set everything up and dial in the final length of my upper links. I'll have a few pictures of that as soon as they upload. I'm waiting on the material right now to make the finished upper links, should be early next week. The finished length,front uppers will be 5.750" long eye to eye. Rears will be 6.120" long eye to eye. I've been piecing this truck together the last couple days and can't believe how easy this thing is going together. Here's a few pictures I took yesterday during the first mock up. 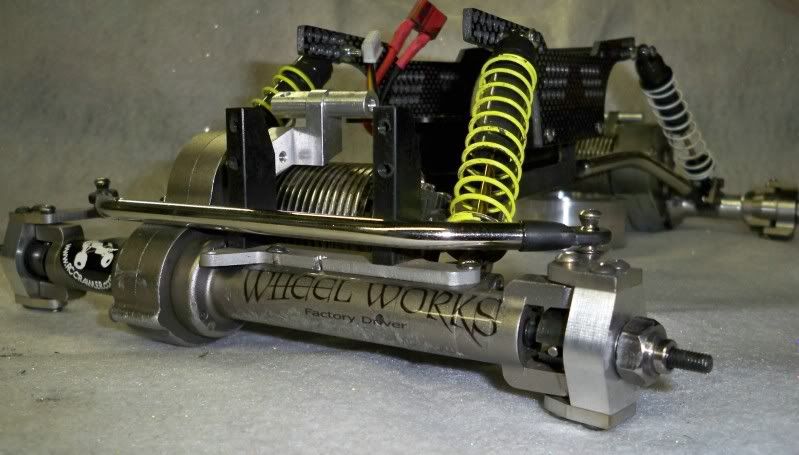 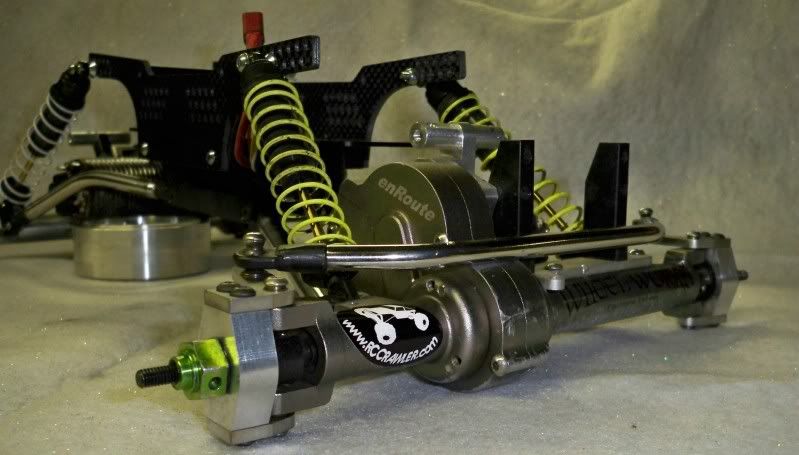 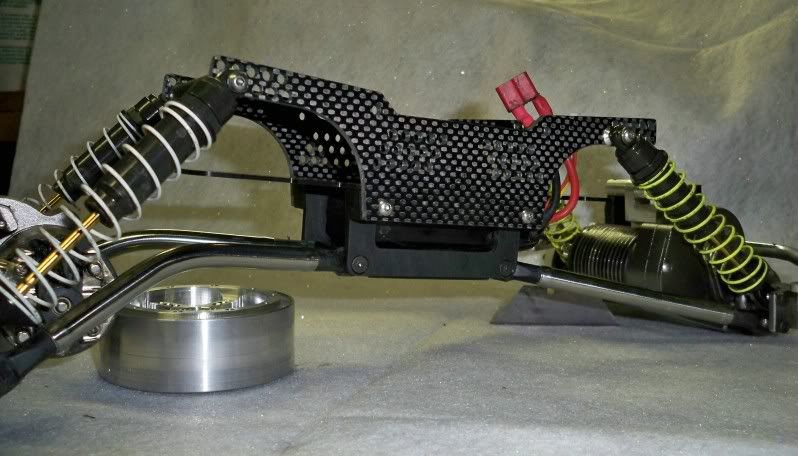 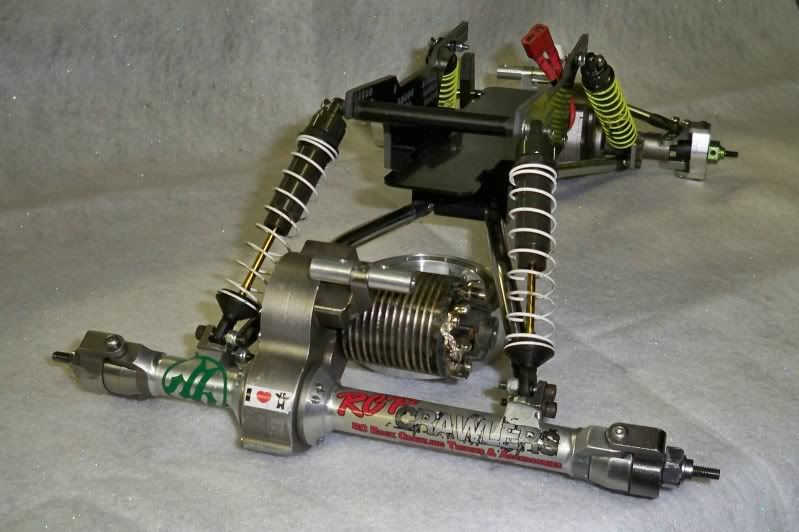 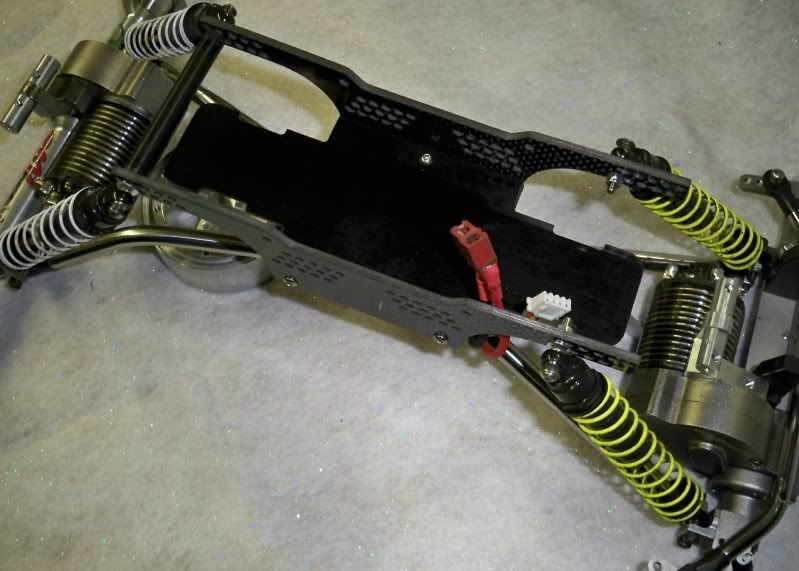 I've made a few small changes and some good progress today. I have a few more pictures uploading right now and will update this here in a little while. |

|  |
| Sponsored Links | |
| | |
|
04-02-2010, 09:47 PM
| #2 |
| Rock Stacker Join Date: May 2009 Location: chattanooga, TN
Posts: 97
|
That's looking really good! I think that chassis will work very well. I've seen it up close and it seems to be very user friendly.
|
|
| |
|
04-02-2010, 09:56 PM
| #3 |
| I wanna be Dave Join Date: Mar 2008 Location: In the Dark Edges of your Mind
Posts: 6,386
|
Looks really good Steve. I liked this chassis from the first time I saw it. If I wasn't running the moon buggy, I'd be running this. Do you think the 1/4" delrin uppers wouldn't hold up? I ask cause I just made some for the time being. Your chassis isn't the angled skid version is it? It looks like you put some rake on it though. I'm anxious to see the finished rig  BTW... what are you using for ball ends in the large hole of the big bores? |
|
| |
|
04-02-2010, 10:00 PM
| #4 |
| TEAM MODERATOR Join Date: May 2004 Location: Tennessee
Posts: 10,855
|
Definitely easy to build. I'm hoping to get a little test run in tomorrow to get a feel for it. Since my upper links are currently the delrin links I used for mock up,things will be a little sloppy and unpredictable.
|
|
| |
|
04-02-2010, 10:19 PM
| #5 | |||
| TEAM MODERATOR Join Date: May 2004 Location: Tennessee
Posts: 10,855
| Quote:
Quote:
In the rear,there's 3 1/8" under the skid. In the front,it's right at 2 15/16" under the skid. If you put to much rake in the skid,it effects your lowers allot and how they are related to your upper links. To much and it jacks your squat numbers all to crap. Quote:
| |||
|
| |
|
04-02-2010, 11:19 PM
| #6 | |
| Quarry Creeper  Join Date: May 2008 Location: Tennessee
Posts: 306
| Quote:
Last edited by bigron; 04-02-2010 at 11:53 PM. | |
|
| |
|
04-03-2010, 07:48 AM
| #7 |
| Rock Crawler Join Date: Jun 2009 Location: UK
Posts: 617
|
Looks Good ! Did you do the machining on the rear axle tubes?
|
|
| |
|
04-03-2010, 08:10 AM
| #8 |
| WOOPOOW!! Join Date: Nov 2008 Location: Atlanta, GA
Posts: 4,218
|
Looking good Steve. Cant wait to see how you do with it |
|
| |
|
04-03-2010, 08:36 AM
| #9 | ||
| TEAM MODERATOR Join Date: May 2004 Location: Tennessee
Posts: 10,855
| Quote:
I'll be doing a little work on the front axle and reworking my steering a little as well.Quote:
Pretty mad right now,all the pictures I uploaded last night,were junk. | ||
|
| |
|
04-03-2010, 02:12 PM
| #10 |
| Rock Crawler Join Date: Jan 2008 Location: Cotati
Posts: 704
|
I really like it so far. What kind of running weight are you shooting for?
|
|
| |
|
04-03-2010, 03:49 PM
| #11 | |
| TEAM MODERATOR Join Date: May 2004 Location: Tennessee
Posts: 10,855
| Quote:
My friend Randy came by and we took it for a test run in my back yard. Holly crap, this things a beast. I took it through some lines I knew pretty good and have ran several different trucks through. Needless to say, I'm VERY impressed. Out of the box,it's awesome.....YES Hurley....it's AWESOME! I need to get my upper links finished,there was a little axle walk going on from the flimsy delrin links. I also have a few ideas on a couple small tweeks I could do that may help more. I'm off to take a few new pictures.... | |
|
| |
|
04-03-2010, 04:06 PM
| #12 |
| Colt Python/SR9c  Join Date: Feb 2004 Location: out in the shop, reloading ammo!
Posts: 8,626
|
Looking good Steve.. Gotta love the Badger sticker  |
|
| |
|
04-03-2010, 04:12 PM
| #13 | |
| TEAM MODERATOR Join Date: May 2004 Location: Tennessee
Posts: 10,855
| Quote:
| |
|
| |
|
04-03-2010, 06:26 PM
| #14 |
| TEAM MODERATOR Join Date: May 2004 Location: Tennessee
Posts: 10,855
|
Electronics I used in this build. The best speed control period.....Holmes Hobbies TorqueMaster BR-XL Dig unit......Punk RC electronic dig Receiver.....Spektrum 3 channel micro Motors....wore out,beat to death 35t Integy's. Battery.....Holmes Hobbies 25C 1300mah lipo Steering servo.....JR9100 Finally got some decent pictures to share. made some aluminum plates for the lower section of my chassis. No real reason other than I wanted the speed holes 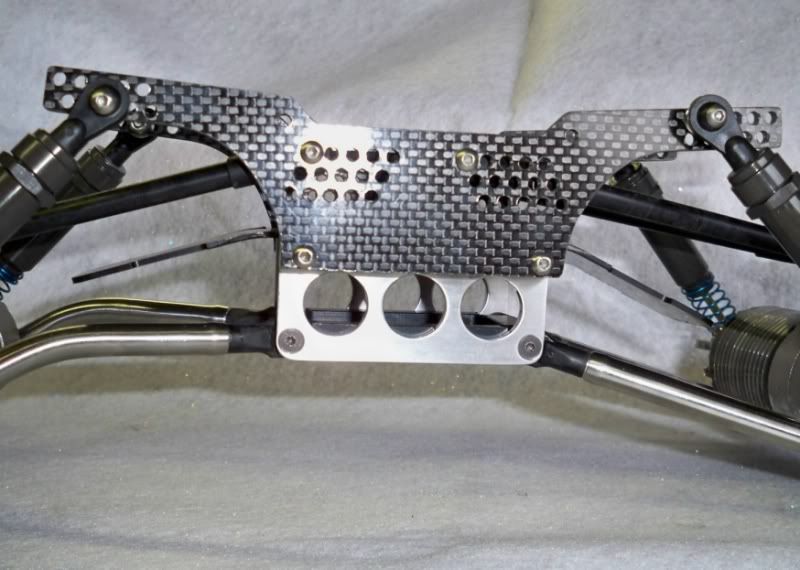 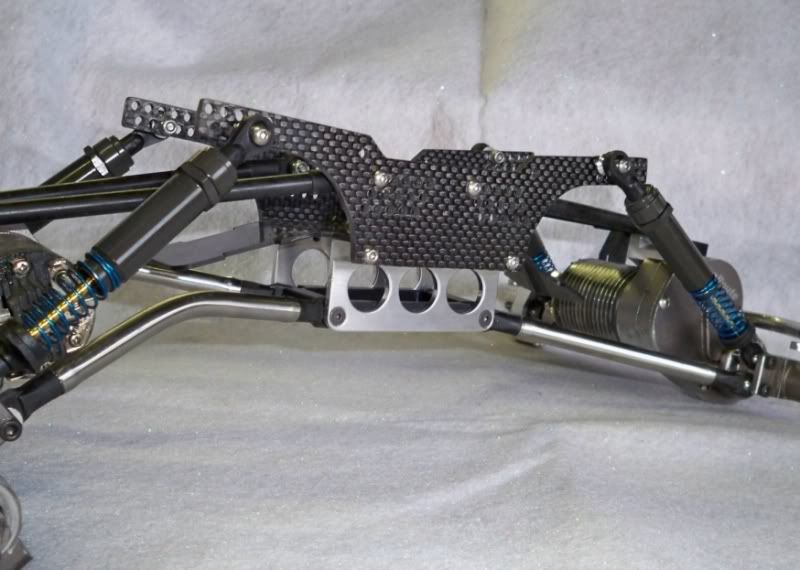 Here's a shot with the battery mounted in the belly and all the electronics mounted. Minus body mounts,she's ready to run. 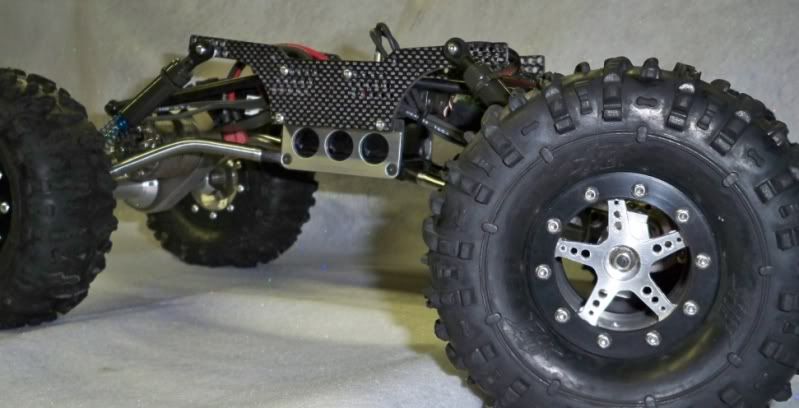 Here's a top view showing the electronics. With all the room in the upper section of this chassis,it's super easy to mount everything and not have a cluttered mess of spaghetti. 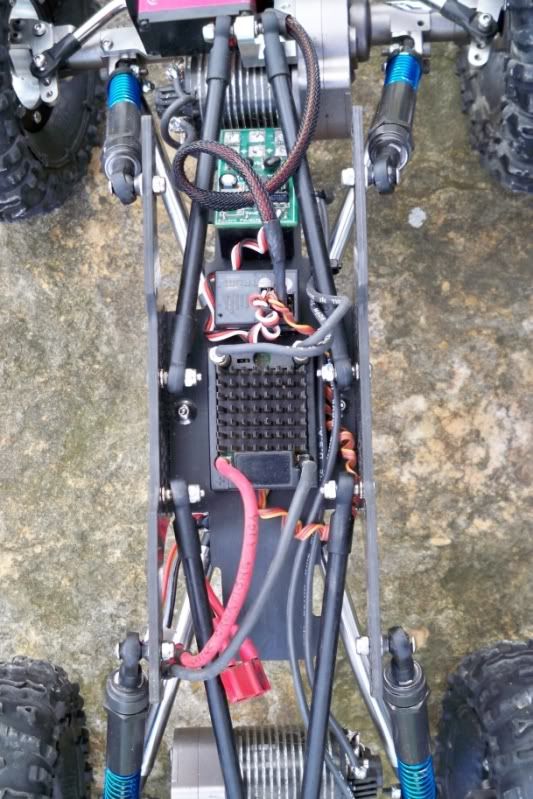 Last edited by Reflection; 04-03-2010 at 06:47 PM. |
|
| |
|
04-03-2010, 09:13 PM
| #15 |
| I wanna be Dave Join Date: Jul 2006 Location: Elberfeld
Posts: 2,085
|
Looks good man!!
|
|
| |
|
04-03-2010, 09:15 PM
| #16 |
| I wanna be Dave Join Date: Mar 2008 Location: In the Dark Edges of your Mind
Posts: 6,386
|
Are you going to get a new body or will you still be running the full size grappler?
|
|
| |
|
04-03-2010, 09:42 PM
| #17 | ||
| TEAM MODERATOR Join Date: May 2004 Location: Tennessee
Posts: 10,855
| Quote:
Quote:
| ||
|
| |
|
04-03-2010, 09:57 PM
| #18 |
| Rock Stacker Join Date: Mar 2010 Location: Tualatin, OR
Posts: 75
|
Looks great. What shock setup is that?
|
|
| |
|
04-03-2010, 10:05 PM
| #19 | |
| TEAM MODERATOR Join Date: May 2004 Location: Tennessee
Posts: 10,855
| Quote:
The shocks are regular ol' big bores I picked up at Brian's Hobbyland. I ground and drilled the caps,then installed some short 1:8 scale buggy rod ends on that I had lying around. I'm running 20 weight shock oil front and rear. The springs are off of an 1:18 scale racer I think....not exactly sure which one though. Works extremely well and is butter smooth. | |
|
| |
|
04-03-2010, 10:12 PM
| #20 | |
| Rock Stacker Join Date: Mar 2010 Location: Tualatin, OR
Posts: 75
| Quote:
| |
|
| |
 |
| |


 Linear Mode


