| |
| |||||||
 |
| | LinkBack | Thread Tools | Display Modes |
 03-10-2006, 11:13 PM
| #1 |
| Newbie Join Date: Feb 2006 Location: Memphis
Posts: 22
|
I've been a member of this forum for a while now and looking at all of your pictures and seeing your ideas has inspired me! I have never had a hobby grade car before. But I had the bug. I wanted to build a tube frame rockcrawler. and I figured the experience would be a good prototype for building my 1:1 If I ever get around to it. I would have rather built a chassis for a TLT with nice electronics Because I think it looks more realistic with drive shafts and differentials, but I dont have the money to fund a project like that at the moment. So I went a differen't route, a cheaper route.. i went to wally world and bought me a 1:18 nylint, then went to my local welding shop and got some brazing rod, then found me some 3/16 brake line and got to work. I had never brazed before either, and let me tell you something.. if you are thinking of making you one of these.. dont make the same mistake I did.. don't think that its better to have too much brazing rather than not enough. HAH! cleaning up messy joints is a chore I would of rather not have to deal with.. so take your time and practice some before you jump right into your project. Here's a Fast forward For all of you guys who dont like browsing through long threads.  My chassis is based losely on poison spyders bruiser 2  and I got a rubicon body for it.  I started this project about two weeks ago but, I didn't start taking pictures till someone bugged me enough and convinced me too. So this is where I started documenting my Progress. I new I wanted to have a triangulated 4 link setup front and rear. So I flipped the rear axle around and used the stock link mount for the upper links and the shock mounts for the lower links.  The front was a little more tricky.. I couldn't flip it like the rear because of the steering.. so I bent me a peice of 1/16 stainless and made an upper link bracket for it and bolted it on.  The skid plate and rocker panels are also 1/16 thick stainless making an over kill nuke proof belly.  I got it rolling using the stock tires but I was going for a scale look.. these tires just weren't going to cut it.  I didn't really want to spend anymore money on this project.. I had already bought the donor nylint and the body.. but once I saw the lil super swamper boggers at hobbytown.. i just couldn't help my self.. so I got the tires and the cheapest wheels I could find and rushed home to mount them.  The only problem was I couldn't get the stock tires off.. after about 5 minutes of pulling and prying.. I finnally got some plyers and twisted the hubs.. to my surprise.. They Came off! revealing a retaining screw. Unfortunatly.. the two tires mounted completely different.. so I drew up some plans and got to work on some adapters. Here's what I came up with for my front adaptors: I milled a 12mm hex for the 2.2 wheel, the hole is tapped 10-32 for the retaining screw. The big disc you see is simply cosmetic, I was making them out of 1 3/4 aluminum material, so i figured.. why not, right?!? they are suppose to resemble a disc brake.  The back is broached .25 to fit over the axle stub  the 10-32 tapped hole is also a counter bore for a retaining screw for holding the adapter to the axle, which is simply the stock screw that I machined the head down for, so it would fit through it.     and then the tires go on, like so  The back was a little more simple. Instead of broaching and counter boring I simply drilled a hole for the axle to go through, tapped the outside of the hole, then drilled and tapped holes for set scews.  Now I had my tires and frame more proportionate.. but it was still naked.. so I brazed on some 4-40 nuts for body mount tabs and started making some panels.        I still have some more tube work to do.. I dont like the shock hoops, so I'm going to redo those.. and I want to put in a floor board/dash with a steering wheel. I have to clean up some joints, and I need to braze me on some more body mount tabs to put on the back panel, then paint it.. but before that.. I need HELP!! Tragegdy has stuck.. and I need help. Like an idiot I was doing some brazing with the axles and electronics attached. and my electronic board isn't fastened down yet.. to make a long story short.. I torched my board. ruining most of the solder tape stuff and the other thin soldering lines. it wasn't working at all.. but I've managed to repair most of the damage getting the front/reverse to work and steering to the right. but I couldn't get left steering.. I need to see how to solder this thing together.. there are 5/3 possible things to solder the yellow/blue wire too.. I dont know which ones to solder it to and which to keep away from it. If someone could.. I need a picture of a board that is soldered right. so I can try to fix mine.. because I dont want to have to buy a whole new nylint to take out the board and I dont have the money to put real electronics in it.  But thats my build up so far.. any help or constructive criticism is welcome.. tell me what you think. Thx for Reading.. Last edited by SLY600rr; 04-01-2006 at 10:37 AM. |

|  |
| Sponsored Links | |
| | |
|
03-11-2006, 05:13 AM
| #2 |
| Quarry Creeper Join Date: Aug 2005 Location: classified
Posts: 320
|
Nice tube work and I like those 2.2 adapters. Here, I just took this pic for you: (lmk if you need any more pics)  |
|
| |
|
03-11-2006, 08:45 AM
| #3 |
| RCC Addict Join Date: Sep 2005 Location: Lehi
Posts: 1,284
| I did that samw thing to my board.... |
|
| |
|
03-11-2006, 08:59 AM
| #4 |
| Rock Crawler  Join Date: Nov 2005 Location: Rock-throwing country
Posts: 847
|
I have a couple extra boards PM me and I'll send you one. You'll probably upgrade soon after you notice how bad the steering will lug with those 2.2's though. Looks like a good start on a crawler looks strong! |
|
| |
|
03-11-2006, 09:37 AM
| #5 |
| Quarry Creeper Join Date: Jan 2006 Location: Ukiah, CA. (nor cal)
Posts: 275
|
yea I agree you'll prob going to want some real electronics soon, so if there is any way you can do it now you might as well do it now.... next time spend the extra $$ and get some safty-silv 56 it's well worth the money it dose a much cleaner job than the brazing rod, I've done it both ways and the safty-silv is hands down the winner, the only "clean up" I had on my tuber was where I tacked the chassis together as I was building it with my wire feed.... Last edited by dhoffroad; 03-11-2006 at 09:39 AM. |
|
| |
|
03-11-2006, 10:29 AM
| #6 |
| RCC Addict 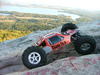 Join Date: Oct 2005 Location: Trussville, AL
Posts: 1,762
|
nice work. lookin good
|
|
| |
|
03-11-2006, 02:17 PM
| #7 |
| Newbie Join Date: Feb 2006 Location: Memphis
Posts: 22
|
Thanks for the compliments, and the picture.. but I think my board took a turn for the worse.. while doing some more soldering on it, im afraid I really screwed it up.. hooked the battery back up and there was some cracking and some smoking.. I'm afraid I blew a few of the resistors or transistors by wiring it wrong.. back to having nothing working again. I really would like to put some nice electronis in it.. but don't want to spend alot.. I'm going to check ebay and see if I can't find a cheap used TQ-3 and receiver.
|
|
| |
|
03-11-2006, 07:03 PM
| #8 |
| Rock Stacker Join Date: Feb 2006 Location: Las Vegas
Posts: 60
|
that looks super good! mmmm...toasty! |
|
| |
|
03-11-2006, 07:55 PM
| #9 |
| I wanna be Dave Join Date: Dec 2005 Location: Orlando
Posts: 7,420
|
Looks good Looks damun good!....BTW you watch some gay sh!t |
|
| |
|
03-12-2006, 01:14 AM
| #10 |
| Newbie Join Date: Feb 2006 Location: Memphis
Posts: 22
|
that is blasphemy sir. Pulp Fiction is one of the best movies ever. |
|
| |
|
03-12-2006, 01:22 AM
| #11 |
| Newbie Join Date: Feb 2006 Location: Memphis
Posts: 22
|
Okay guys. I'm probably going to hate myself in the morning.. but.. I bought some electronics.. Tell me what you think, did I get a good deal? Will these electronics work for me? http://cgi.ebay.com/ws/eBayISAPI.dll...MEWN%3AIT&rd=1  Last edited by SLY600rr; 03-12-2006 at 01:24 AM. |
|
| |
|
03-12-2006, 01:34 AM
| #12 |
| Rock Stacker Join Date: Oct 2005 Location: stockton
Posts: 58
|
I got extra circuit boards if you want one. just give me pm.
|
|
| |
|
03-12-2006, 03:12 PM
| #13 |
| Pebble Pounder Join Date: May 2005 Location: raleigh
Posts: 192
|
u got a damn good deal on those electronics right there man i wish i could find a tq3 or tq2 w/ reciever for cheap also
|
|
| |
|
03-12-2006, 03:25 PM
| #14 |
| RCC Addict Join Date: Apr 2004 Location: Cincinnati Ohio
Posts: 1,673
|
Pretty good deal you got there on the electronics! You could even sell the fail safe and optidrive for a few bucks since there is no use for it on your truck.
|
|
| |
|
03-12-2006, 04:24 PM
| #15 |
| Newbie Join Date: Feb 2006 Location: Memphis
Posts: 22
|
ah ha.. I was hoping that the optidrive thing was an ESC.. I don't really know much about the electronics side of things yet.. What ESC would be good for me?
|
|
| |
|
03-13-2006, 04:56 AM
| #16 |
| Pebble Pounder Join Date: May 2005 Location: raleigh
Posts: 192
|
The mini lst esc they are the best and can be bought for like 25 bucks even set up for dual motors!!.....or the spy or anything like that pretty much any esc w/ reverse is good cause the nylint motors really dont pull much....just watch the temp on w/e esc u get
|
|
| |
|
03-14-2006, 01:46 PM
| #17 |
| Pebble Pounder Join Date: Mar 2006 Location: Placerville
Posts: 145
|
How do you do this "PM" thing, I need a new board, as I fried mine when I put everything in a new chassis. I had everything attached, but I shorted out one of the transistors for the front motor. Now it only has 4wd in reverse/2wd forward. I'm currently trying to get funrise to send me a new one, but if that doesn't work...
|
|
| |
|
03-14-2006, 02:32 PM
| #18 |
| Pebble Pounder Join Date: Mar 2006 Location: Placerville
Posts: 145
|
Nice wheel adapters btw. You should make up a few more and sell them. I'm sure someone would buy them, hell it's way better than using the stock outer wheel halves as adapters. |
|
| |
|
03-14-2006, 05:23 PM
| #19 |
| Newbie Join Date: Mar 2006 Location: NORWICH
Posts: 3
| Sick looking build |
|
| |
|
03-14-2006, 06:17 PM
| #20 |
| Newbie Join Date: Mar 2006 Location: Dover
Posts: 11
|
I wil buy a set of those adapters if yo make them. let me know
|
|
| |
|
| |


 Linear Mode


