| |
| |||||||
 |
| | LinkBack | Thread Tools | Display Modes |
 08-15-2006, 01:05 PM
| #1 |
| RCC Addict Join Date: Dec 2005 Location: Beaver Falls
Posts: 1,166
|
I decided to rebuild my rear axle setup on my 4-linker because the rear of it keeps getting in the way and i wasn't happy with the upper links connecting to the blue arm bracket. What i did this time around is pretty much the same as any motor relocation but rotating the axle so the part that you cut off is facing the ground. The rear hump is facing straight up, which i am connecting my triangulated uppers to (it's a perfect mounting locations) and the lowers connect to the shock mounts, which are now facing forward. New shock mounts on bolted on top of the axle tubes. I feel this setup benifits more from the standard axle setup we see often. The ground clearance is increased by 1/4" (based on how much you cut off from the motor relocation cut), there's no hump in the rear to get stuck on, and the motor is facing forward, and tucked nicely under the body and between the tummy and axle. I'll have pictures in an hour. Sorry if this is a repeat, not sure if it was done before or not. |

|  |
| Sponsored Links | |
| | |
|
08-15-2006, 01:19 PM
| #2 |
| RCC Addict Join Date: Oct 2005 Location: $t. Helen$, OR
Posts: 1,082
|
Pictures? |
|
| |
|
08-15-2006, 02:15 PM
| #3 |
| RCC Addict Join Date: Dec 2005 Location: Beaver Falls
Posts: 1,166
|
Here's some pix. It flexes nicely, with no binding. The motor does seem kinda low, now that the tires are mounted. I may fab up a skid for the motor just in case it attracts sexy rocks. During the process of making new longer arms, i learned that brake line can fit inside the alum. tubing that i purchased online. With the brakeline inside the alum tubing and the threaded rod inside the brake line, it's nearly impossible to bend the links. STRONG!        I just wish the front axle was this simple to work with.... |
|
| |
|
08-15-2006, 02:24 PM
| #4 |
| RCC Addict Join Date: Oct 2005 Location: $t. Helen$, OR
Posts: 1,082
|
Nice work I think that is a 1st timer, but could be wrong |
|
| |
|
08-15-2006, 07:01 PM
| #5 |
| Newbie Join Date: Jul 2006 Location: SW Washington state
Posts: 18
|
I can't say for sure with out fielding the rig myself, but all the extra mods needed to rotate it, do not seem worth the gain of only 1/4 inch of clearance. As for the back side of the axle being up on top and out of the way, I just cut mine off in the same way I cut the front off where the motor was. Although I could be wrong. Take it out on some good rocky terrain and let all of us know if it really made a difference.
|
|
| |
|
08-15-2006, 10:06 PM
| #6 |
| Newbie Join Date: Aug 2006 Location: Duluth
Posts: 43
|
that 4-link setup is positively bad@$$!!!!!! nice work!! I'm thinking about going with something more like a 1/4 elliptical with mine....but we'll see, I may have to go 4-link |
|
| |
|
08-16-2006, 04:15 AM
| #7 | |
| RCC Addict Join Date: Dec 2005 Location: Beaver Falls
Posts: 1,166
| Quote:
I did some nasty flexing around the apt but haven't been outside yet. Planning on doign that today. | |
|
| |
|
08-16-2006, 06:24 AM
| #8 |
| Rock Crawler  Join Date: May 2006 Location: Burrillville, RI
Posts: 778
|
thats pretty cool....nice link placement too...
|
|
| |
|
08-16-2006, 06:41 AM
| #9 |
| I wanna be Dave Join Date: Sep 2005 Location: USA
Posts: 11,196
|
If you go by scale that is 1.5ins. Thats alot. Many 1:1's grind the hell out of there axles for less. So 1/4in could mean stuck for some spots, but couldn't hurt. Its also like going from a 33in tire to a 35in tire. Its more then you think. |
|
| |
|
08-16-2006, 10:37 PM
| #10 |
| Newbie Join Date: Aug 2006 Location: Duluth
Posts: 43
|
what did you use to attach the links to the frame/axle?? I'm very seriously considering doing this myself, but am not sure how to attach the links and have them move like they should. somethink like a mini-balljoint.... I can't tell from the pics what you used... |
|
| |
|
08-17-2006, 03:14 AM
| #11 | |
| RCC Addict Join Date: Dec 2005 Location: Beaver Falls
Posts: 1,166
| Quote:
http://www2.towerhobbies.com/cgi-bin...&I=LXHGB7&P=ML These are mostly used for traxxus and other RC's that use turnbuckles and stuff like that. I got the threaded rod from home depot and alumunium tubing to go over the rod from an online website. Home depot has it too. | |
|
| |
|
08-17-2006, 09:31 AM
| #12 | |
| Newbie Join Date: Aug 2006 Location: Duluth
Posts: 43
| Quote:
| |
|
| |
|
08-18-2006, 01:09 AM
| #13 |
| Rock Stacker Join Date: Jan 2006 Location: hampstead
Posts: 50
|
nice clean work
|
|
| |
|
08-21-2006, 08:47 AM
| #14 |
| RCC Addict Join Date: Dec 2005 Location: Beaver Falls
Posts: 1,166
|
WOW! is all i can say. The difference is HUGE. I took it out for the first time today and played in the rocks, mud, and on the hills. The sections that i could not do with my other nylint, i could get through with the 4-linker. The wheelbase is about 1.5" longer but the 4-link rear setup gets most of the credit. Having the lower links spread out on the axle like they are, and the uppers triagulated made the rear axle super-stable without any of that bouncing and rotating that the stock axle has after some use. The jeep would climb hills without slipping and hopping. The lower links double duty as rock sliders which helped tremendously on the spots i could not get through previously. I managed to roll about 3-4 times (on the steps), one major, and the links held up just fine. After playin some, i tried out the steps leading up to my apartment. The very first step is un-climbable due to it being higher than the rest of the steps so i just place the crawler angled on the 2nd step and it climbs up. There was no way my stocker could get up 1/2 of a step without rolling backwards. I also cut off the lower outside lugs (that most of you guys are doing) and this proved to be very helpful on mud-slicked hills. You can see the tires dig the moment they touch the ground. Sweeet. |
|
| |
|
11-02-2006, 11:15 AM
| #15 |
| [HOONIGAN] 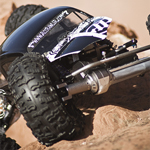 Join Date: Nov 2005 Location: Grand Junction
Posts: 4,269
|
Good idea flipping the axle around, turned out pretty nice.
|
|
| |
|
11-02-2006, 03:28 PM
| #16 |
| Rock Crawler Join Date: Mar 2006 Location: Dayton
Posts: 712
|
that is nice, a lot like my 1/18 -Dalton |
|
| |
|
11-03-2006, 06:35 AM
| #17 |
| Pebble Pounder Join Date: Sep 2006 Location: Hardin
Posts: 125
|
sweet... my plan for my spare axles is to use the stock shockmount/pivot as the link mounts.... i will be cutting off the front and rear of the axle and making a skid to wrap all the way around.... i will also be going to HG electrics that can handle 12 volts and using a F&F battery.... will probably go ahead and build my chassis, but the electrics will have to wait until i have my credit card almost paid off..... |
|
| |
|
11-03-2006, 06:37 AM
| #18 |
| Pebble Pounder Join Date: Sep 2006 Location: Hardin
Posts: 125
|
heres the ESC i am going to use....... http://www.horizonhobby.com/Products...ProdId=PRB2314 |
|
| |
|
| Thread Tools | |
| Display Modes | |
| |


 Linear Mode


